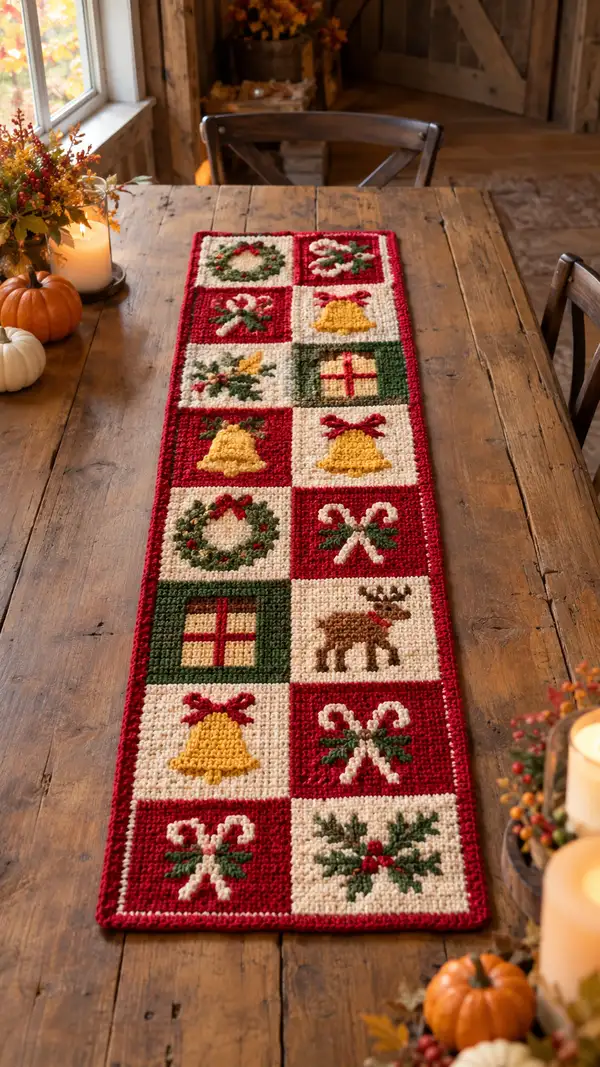
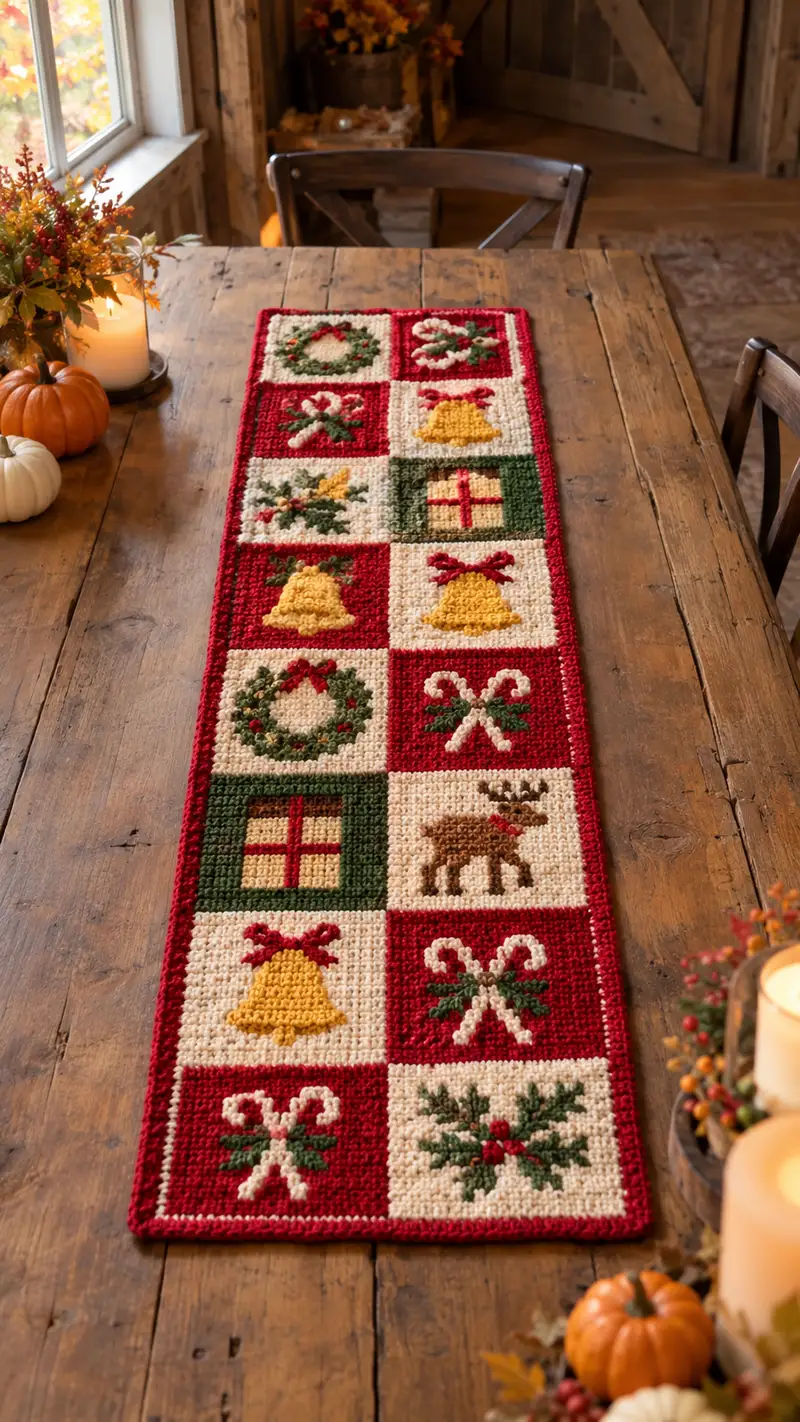
A warm, vintage-inspired crochet table runner featuring a patchwork of festive motifs—wreaths, candy canes, bells, holly, gift boxes and a reindeer—worked in rich red, deep green, soft cream and golden yellow. The textured motifs are made with tapestry single crochet and surface loop accents for a handmade, dimensional look. This runner fits a farmhouse table and adds an inviting holiday touch to your home decor. Detailed row-by-row instructions and color charts included for accurate reproduction.
Progress Tracker
0% Complete
— Preparation & Overview :
Info :
This table runner is worked flat in tapestry single crochet across the full width of 3 squares. Each square is 20 stitches wide and 20 rows tall; the full width is 60 stitches (3 x 20). You will work continuous rows from bottom to top, changing yarn colors as specified in each square's row chart. Carry unused colors along the inside, catching floats approximately every 4 stitches. Maintain a consistent tension throughout for neat colorwork.
Info :
Gauge: 20 sc x 20 rows = approximately 8" x 8" with a 4.0mm hook using worsted weight yarn. Individual gauge will vary; the finished sample runner measures approximately 14" wide x 48" long (including border). To alter length, add or remove full square rows (20-row blocks).
Info :
Color legend used in instructions: CR = cranberry red, CRm = medium red (for small bows), CREAM = soft cream background, GREEN = forest green, GOLD = golden yellow, BROWN = medium brown, RED = accent red for berries/bows.
— Foundation Row :
Round 1 :
Chain 61 (this creates 60 foundation chains for 60 sc across; +1 for turning). Ensure chain is not twisted, place marker in first chain for start of next row.
Info :
Turning chain: For tapestry single crochet, you will ch 1 and sc into the first chain across; do not substitute turning ch2. Work a sample of 6 stitches to check tension with carried yarn.
— Working the Runner: Layout & Approach :
Info :
Layout of the runner squares from bottom (beginning) to top (finishing): Row A (bottom): Candy Canes (left) | Holly (center) | Bell (right). Row B: Wreath | Gift | Reindeer. Row C: Bell | Candy Canes | Holly. Row D: Wreath | Gift | Reindeer. Row E: Bell | Candy Canes | Holly. Row F (top): Wreath | Gift | Reindeer. This repeats and alternates background colors so that adjacent squares contrast (red vs cream vs green as noted). You may rearrange motifs as desired.
Info :
Each row across the full runner will list three 20-stitch segments separated by vertical bars for the three columns. When changing color within a stitch, complete the final yarn-over with the new color to minimize visible joins (standard tapestry color change method).
— Square Dimensions & Stitch Counts :
Info :
Each row across entire runner = 60 sc. Each 20-stitch square row must sum to 20. Keep a tally pad of rows (1-120) as you progress; rounds below are numbered as global rows across the full width.
— Motif: Wreath (20 sts x 20 rows) :
Info :
Colors: background CREAM, wreath GREEN, bow RED (small accent). The wreath occupies central 12 stitches of the 20-stitch square and appears as a circular ring. Use tapestry sc for crisp edges and surface embroidery for small red berries after completing the square.
Round 1 :
20 sc CREAM (20)
Round 2 :
8 sc CREAM, 4 sc GREEN, 8 sc CREAM (20)
Round 3 :
7 sc CREAM, 6 sc GREEN, 7 sc CREAM (20)
Round 4 :
6 sc CREAM, 8 sc GREEN, 6 sc CREAM (20)
Round 5 :
5 sc CREAM, 10 sc GREEN, 5 sc CREAM (20)
Round 6 :
4 sc CREAM, 12 sc GREEN, 4 sc CREAM (20)
Round 7 :
4 sc CREAM, 12 sc GREEN, 4 sc CREAM (20)
Round 8 :
4 sc CREAM, 12 sc GREEN, 4 sc CREAM (20)
Info :
At rows 6-8 keep floats caught; the wreath ring is forming. If you prefer a more raised wreath, plan to add a surface loop stitch on rows 7-10 across the GREEN area later.
Round 9 :
5 sc CREAM, 10 sc GREEN, 5 sc CREAM (20)
Round 10 :
6 sc CREAM, 8 sc GREEN, 6 sc CREAM (20)
Round 11 :
7 sc CREAM, 6 sc GREEN, 7 sc CREAM (20)
Round 12 :
8 sc CREAM, 4 sc GREEN, 8 sc CREAM (20)
Round 13 :
9 sc CREAM, 2 sc GREEN, 9 sc CREAM (20)
Round 14 :
20 sc CREAM (20)
Round 15 :
20 sc CREAM (20)
Round 16 :
20 sc CREAM (20)
Info :
After finishing the square, use a small amount of RED yarn to embroider a bow at rows 6-8 center (6 stitches from left edge of the 20-st square). Use 3-4 short satin stitch bars to create the bow and 3 French knot-style berries spaced symmetrically around the lower-right of the wreath.
Round 17 :
20 sc CREAM (20)
Round 18 :
20 sc CREAM (20)
Round 19 :
20 sc CREAM (20)
Round 20 :
20 sc CREAM (20)
— Motif: Candy Canes (20 sts x 20 rows) :
Info :
Colors: background CR (cranberry), cane WHITE, holly GREEN and RED berries accent. Two crossed candy canes centered in the 20-st square. We will build the diagonal shape using offset color blocks in tapestry sc.
Round 2 :
18 sc CR, 2 sc WHITE (20)
Round 3 :
16 sc CR, 4 sc WHITE (20)
Round 4 :
14 sc CR, 6 sc WHITE (20)
Round 5 :
12 sc CR, 8 sc WHITE (20)
Round 6 :
10 sc CR, 10 sc WHITE (20)
Info :
Start the opposing cane on row 7 by offsetting white blocks towards the right side of the square; these two sequences will mirror and overlap in the center rows to form the crossed look. Add small GREEN holly leaves at rows 10-12 using surface embroidery post-completion.
Round 7 :
9 sc CR, 11 sc WHITE (20)
Round 8 :
8 sc CR, 12 sc WHITE (20)
Round 9 :
7 sc CR, 13 sc WHITE (20)
Round 10 :
6 sc CR, 14 sc WHITE (20)
Round 11 :
7 sc WHITE, 13 sc CR (20)
Round 12 :
8 sc WHITE, 12 sc CR (20)
Round 13 :
9 sc WHITE, 11 sc CR (20)
Round 14 :
10 sc WHITE, 10 sc CR (20)
Round 15 :
11 sc WHITE, 9 sc CR (20)
Round 16 :
12 sc WHITE, 8 sc CR (20)
Info :
Where the two candy canes cross you will have clusters of WHITE next to WHITE; if you want a thin darker stripe, add a single strand of CR over the white during these rows to mimic the cane stripes, but this is optional.
Round 17 :
13 sc WHITE, 7 sc CR (20)
Round 18 :
14 sc WHITE, 6 sc CR (20)
Round 19 :
15 sc WHITE, 5 sc CR (20)
Round 20 :
20 sc CR (finish row with background color to frame motif) (20)
— Motif: Bell (20 sts x 20 rows) :
Info :
Colors: background CREAM or CR depending on placement, bell GOLD, bow CRm (dark red). The bell uses loop stitch texture in the central rows to create a raised ruffle effect. If you prefer not to use loop stitch, use popcorn stitch clusters instead for raised texture.
Round 1 :
20 sc CREAM (20)
Round 2 :
9 sc CREAM, 2 sc GOLD, 9 sc CREAM (20)
Round 3 :
8 sc CREAM, 4 sc GOLD, 8 sc CREAM (20)
Round 4 :
7 sc CREAM, 6 sc GOLD, 7 sc CREAM (20)
Round 5 :
6 sc CREAM, 8 sc GOLD, 6 sc CREAM (20)
Round 6 :
5 sc CREAM, 10 sc GOLD, 5 sc CREAM (20)
Info :
Rows 7-10: work loop stitch across the GOLD area only to create a tufted bell body. Loop stitch technique: yarn over and pull a loop of approx. 1/2" to 3/4" before completing sc. Catch loops on subsequent rows if you want to maintain them. If using popcorn, work 1 popcorn every 3rd stitch in the central gold area.
Round 7 :
4 sc CREAM, 12 sc GOLD (loop or popcorn across these 12 sts), 4 sc CREAM (20)
Round 8 :
4 sc CREAM, 12 sc GOLD (loop), 4 sc CREAM (20)
Round 9 :
5 sc CREAM, 10 sc GOLD (loop finishing), 5 sc CREAM (20)
Round 10 :
6 sc CREAM, 8 sc GOLD, 6 sc CREAM (20)
Round 11 :
7 sc CREAM, 6 sc GOLD, 7 sc CREAM (20)
Round 12 :
8 sc CREAM, 4 sc GOLD, 8 sc CREAM (20)
Round 13 :
9 sc CREAM, 2 sc GOLD, 9 sc CREAM (20)
Round 14 :
20 sc CREAM (20)
Info :
After finishing, use CRm to add a bow above the bell: small surface crochet chain or a few stitch bars to form the bow tails. Trim loops selectively to shape the tufted bell if using loop stitch for a more rounded silhouette.
Round 15 :
20 sc CREAM (20)
Round 16 :
20 sc CREAM (20)
Round 17 :
20 sc CREAM (20)
Round 18 :
20 sc CREAM (20)
Round 19 :
20 sc CREAM (20)
Round 20 :
20 sc CREAM (20)
— Motif: Holly Sprig (20 sts x 20 rows) :
Info :
Colors: background CR or CREAM depending on placement, holly GREEN and berries RED. Holly motif is a cluster of three leaves with three berries aligned slightly off-center. We'll place the leaves across central columns 7-14 in the 20-st area.
Round 1 :
20 sc background (20)
Round 2 :
10 sc background, 4 sc GREEN, 6 sc background (20)
Round 3 :
9 sc background, 6 sc GREEN, 5 sc background (20)
Round 4 :
8 sc background, 8 sc GREEN, 4 sc background (20)
Round 5 :
8 sc background, 8 sc GREEN, 4 sc background (20)
Round 6 :
9 sc background, 6 sc GREEN, 5 sc background (20)
Info :
Rows 7-12 will shape leaf points and add berries. After completing this square, embroider 2-3 small French knot-style red berries using the RED yarn at row 7 and 9 centered over the leaf cluster.
Round 7 :
10 sc background, 4 sc GREEN, 6 sc background (20)
Round 8 :
12 sc background, 2 sc GREEN, 6 sc background (20)
Round 9 :
14 sc background, 6 sc background (20)
Round 10 :
20 sc background (20)
Round 11 :
20 sc background (20)
Round 12 :
20 sc background (20)
Round 13 :
20 sc background (20)
Round 14 :
20 sc background (20)
Round 15 :
20 sc background (20)
Round 16 :
20 sc background (20)
Round 17 :
20 sc background (20)
Round 18 :
20 sc background (20)
Round 19 :
20 sc background (20)
Round 20 :
20 sc background (20)
— Motif: Gift Box (20 sts x 20 rows) :
Info :
Colors: GREEN background, GOLD box body and top, RED ribbon. The gift uses a centered cross of RED over GOLD filling the central square. The box occupies the central 12 stitches of the square with the cross ribs in RED spanning rows 8-12 and columns 8-12 of the square area.
Round 1 :
20 sc GREEN (20)
Round 2 :
8 sc GREEN, 4 sc GOLD, 8 sc GREEN (20)
Round 3 :
7 sc GREEN, 6 sc GOLD, 7 sc GREEN (20)
Round 4 :
6 sc GREEN, 8 sc GOLD, 6 sc GREEN (20)
Round 5 :
6 sc GREEN, 8 sc GOLD, 6 sc GREEN (20)
Round 6 :
7 sc GREEN, 6 sc GOLD, 7 sc GREEN (20)
Round 7 :
8 sc GREEN, 4 sc GOLD, 8 sc GREEN (20)
Info :
On rows 8-12 introduce RED for the ribbon cross: on row 10 the vertical ribbon is centered; use surface embroidery later to thicken the ribbon, or work the color change as tapestry stitches for a slightly raised ribbon effect.
Round 8 :
8 sc GREEN, 2 sc GOLD, 4 sc RED, 6 sc GREEN (20)
Round 9 :
7 sc GREEN, 6 sc RED, 7 sc GREEN (20)
Round 10 :
7 sc GREEN, 6 sc RED, 7 sc GREEN (20)
Round 11 :
8 sc GREEN, 2 sc GOLD, 4 sc RED, 6 sc GREEN (20)
Round 12 :
8 sc GREEN, 4 sc GOLD, 8 sc GREEN (20)
Round 13 :
7 sc GREEN, 6 sc GOLD, 7 sc GREEN (20)
Round 14 :
6 sc GREEN, 8 sc GOLD, 6 sc GREEN (20)
Round 15 :
20 sc GREEN (20)
Round 16 :
20 sc GREEN (20)
Round 17 :
20 sc GREEN (20)
Round 18 :
20 sc GREEN (20)
Round 19 :
20 sc GREEN (20)
Round 20 :
20 sc GREEN (20)
— Motif: Reindeer (20 sts x 20 rows) :
Info :
Colors: CREAM background, BROWN for reindeer body, DARK BROWN or BLACK for eye and hoof contrast, RED for nose if Rudolph style. The reindeer faces right and stands across rows 8-15 of the square with legs on rows 16-19.
Round 1 :
20 sc CREAM (20)
Round 2 :
14 sc CREAM, 6 sc BROWN (20)
Round 3 :
12 sc CREAM, 8 sc BROWN (20)
Round 4 :
10 sc CREAM, 10 sc BROWN (20)
Round 5 :
8 sc CREAM, 12 sc BROWN (20)
Round 6 :
8 sc CREAM, 12 sc BROWN (20)
Info :
Use darker brown or black for a single eye stitch on row 7-8, column near center of animal head. For antlers, switch to CREAM or a slightly darker small contrast to outline antler tips in rows 4-7 near the leftmost area of the brown cluster. Small surface embroidery can add ear detail and eye highlight.
Round 7 :
7 sc CREAM, 13 sc BROWN (20)
Round 8 :
6 sc CREAM, 14 sc BROWN (20)
Round 9 :
5 sc CREAM, 15 sc BROWN (20)
Round 10 :
6 sc CREAM, 14 sc BROWN (20)
Round 11 :
8 sc CREAM, 12 sc BROWN (20)
Round 12 :
10 sc CREAM, 10 sc BROWN (20)
Round 13 :
12 sc CREAM, 8 sc BROWN (20)
Round 14 :
14 sc CREAM, 6 sc BROWN (20)
Round 15 :
16 sc CREAM, 4 sc BROWN (20)
Round 16 :
18 sc CREAM, 2 sc BROWN (20)
Round 17 :
20 sc CREAM (20)
Round 18 :
20 sc CREAM (20)
Round 19 :
20 sc CREAM (20)
Round 20 :
20 sc CREAM (20)
— Full Runner Row-by-Row Assembly (Global Rows 1-120) :
Info :
Below are the global rows that combine the three 20-st motif rows into full 60-st rows (Left Column | Center Column | Right Column). Work Row 1 of the runner by following the first row of each motif assigned to that square position. Continue sequentially to Row 120, following the motif maps above for each square. Keep stitch count 60 each row.
Round 1 :
Work motif ROW 1 across squares in bottom Row A: Candy Canes Row1 (20) | Holly Row1 (20) | Bell Row1 (20) — total 60 sc (60)
Round 2 :
Candy Canes Row2 (20) | Holly Row2 (20) | Bell Row2 (20) (60)
Round 3 :
Candy Canes Row3 | Holly Row3 | Bell Row3 (60)
Round 4 :
Candy Canes Row4 | Holly Row4 | Bell Row4 (60)
Round 5 :
Candy Canes Row5 | Holly Row5 | Bell Row5 (60)
Round 6 :
Candy Canes Row6 | Holly Row6 | Bell Row6 (60)
Info :
At the end of every full row, chain 1 and turn. Check your stitch count and ensure floats are caught. When two adjacent squares share the same carrying color, the float will be continuous across the seam — this is fine and helps a tidy inside finish.
Round 7 :
Candy Canes Row7 | Holly Row7 | Bell Row7 (60)
Round 8 :
Candy Canes Row8 | Holly Row8 | Bell Row8 (60)
Round 9 :
Candy Canes Row9 | Holly Row9 | Bell Row9 (60)
Round 10 :
Candy Canes Row10 | Holly Row10 | Bell Row10 (60)
Round 11 :
Candy Canes Row11 | Holly Row11 | Bell Row11 (60)
Round 12 :
Candy Canes Row12 | Holly Row12 | Bell Row12 (60)
Round 13 :
Candy Canes Row13 | Holly Row13 | Bell Row13 (60)
Round 14 :
Candy Canes Row14 | Holly Row14 | Bell Row14 (60)
Round 15 :
Candy Canes Row15 | Holly Row15 | Bell Row15 (60)
Round 16 :
Candy Canes Row16 | Holly Row16 | Bell Row16 (60)
Round 17 :
Candy Canes Row17 | Holly Row17 | Bell Row17 (60)
Round 18 :
Candy Canes Row18 | Holly Row18 | Bell Row18 (60)
Round 19 :
Candy Canes Row19 | Holly Row19 | Bell Row19 (60)
Round 20 :
Candy Canes Row20 | Holly Row20 | Bell Row20 (60)
Info :
Having completed bottom block of 20 rows for Row A (the bottom horizontal band), continue in the same fashion for Row B (next 20 rows), mapping the motifs Wreath | Gift | Reindeer across columns. Keep the same color-carrying discipline and check that background color changes are consistent between adjacent squares to maintain a clean checkerboard border look.
Round 21 :
Wreath Row1 | Gift Row1 | Reindeer Row1 (60)
Round 22 :
Wreath Row2 | Gift Row2 | Reindeer Row2 (60)
Round 23 :
Wreath Row3 | Gift Row3 | Reindeer Row3 (60)
Round 24 :
Wreath Row4 | Gift Row4 | Reindeer Row4 (60)
Round 25 :
Wreath Row5 | Gift Row5 | Reindeer Row5 (60)
Round 26 :
Wreath Row6 | Gift Row6 | Reindeer Row6 (60)
Round 27 :
Wreath Row7 | Gift Row7 | Reindeer Row7 (60)
Round 28 :
Wreath Row8 | Gift Row8 | Reindeer Row8 (60)
Round 29 :
Wreath Row9 | Gift Row9 | Reindeer Row9 (60)
Round 30 :
Wreath Row10 | Gift Row10 | Reindeer Row10 (60)
Info :
Every 20-row block is an individual band of squares. Continue this procedure for all six bands (Row A through Row F). The global rounds continue in the same fashion; below we collapse repetitive instructions but you should follow the per-motif row charts mapped earlier for each band until you reach global Round 120.
Round 31-120 :
Continue working through the motif charts in sequence: Row C band (Rounds 31-50), Row D band (Rounds 51-70), Row E band (Rounds 71-90), Row F band (Rounds 91-110), and finally finishing area rows (Rounds 111-120) which add a transition band and prepare for the border. For each global row, work the corresponding row of each of the three motifs that occupy that horizontal band; maintain 60 sc per row.
Info :
Check alignment: after completing each band of 20 rows, fold runner to ensure motifs line up vertically and color alternation looks balanced. If any motif placement needs shifting, it is easiest to correct within the first few rows of the next band rather than later.
— Border & Finishing Rounds (Global Rows 121-128) :
Round 121 :
After finishing the topmost motif band, fasten off extra color tails leaving 6" tails for weaving. Turn your work so RS faces you. Using CR, ch 1 and begin single crochet evenly along the long edges: 1 sc in each row end across the long side (approx. 120 sc per side if counting turning chains). Ensure border stitches are evenly spaced — adjust by working 2 sc in occasional row ends where needed to avoid puckering (approx counts will depend on your row tension).
Round 122 :
Work 1 sc in each sc around entire perimeter placing 3 sc in each corner to keep runner flat. Maintain color CR for a classic framed look. (Perimeter count variable - maintain even tension) (Info: If you prefer a cream inner line, switch to CREAM at the next round.)
Round 123 :
If adding decorative inner line: change to CREAM now and work 1 sc in each st around on top of previous round to create a 1-row inner border. (Optional) (Counts match previous round)
Round 124 :
Switch back to CR and work a final edging round: *sc in next 2 sts, picot (ch3, sl st in 3rd ch from hook)*; repeat across long sides; do single sc in corners with extra picot spacing to avoid bunching. Fasten off and weave in ends thoroughly on WS.
Info :
Blocking: Damp-block lightly to shape (pin to desired rectangle measuring approx. 14" x 48"), let dry overnight for a crisp edge. Do not overstretch; just align edges and flatten motifs.
— Surface Finishing & Embroidered Details :
Info :
Embroider small details after blocking: bow loops, berries, reindeer's eye and nose, holly veins, and the gift ribbon thickness. Use tapestry needle and contrasting colored yarn, making small satin stitches for bows and French-knot-style bar knots for berries.
Info :
For tufted bells: trim loops to give a neat rounded tuft and snip uniformly if desired. If you used popcorn stitch instead, leave them as-is for depth. Check the underside for carried yarn tensions and weave in all tails on the WS to secure floats.
— Tips for Success :
Info :
1) Use a lifeline or slip a removable stitch marker every 10 rows while practicing tapestry tension. 2) Keep your carried yarn behind the work (on RS) so your floats sit on WS. 3) If a float must cross more than 4 stitches, twist it around the working yarn every 4 stitches to tack it down so it won’t show on the RS. 4) Use small amounts of blocking steam (not direct heat) to relax stitches before final edging.
Info :
5) Keep color bobbins organized by winding small lengths on cardboard to avoid tangles. 6) If you are new to tapestry crochet, practice a small 20x20 swatch of one motif first to refine your tension and color changes before committing to the full runner project.
This heirloom-style table runner brings classic holiday motifs to your table with rich, textured crochet. Each square combines careful tapestry colorwork with small raised details for a warm, handcrafted look that will be treasured through seasons. The pattern is satisfying to work, and the finished runner makes a wonderful centerpiece for family gatherings and cozy dinners. 🎄🧶 Spread holiday cheer stitch by stitch and enjoy the beautiful warmth handmade decor brings to your home. ✨