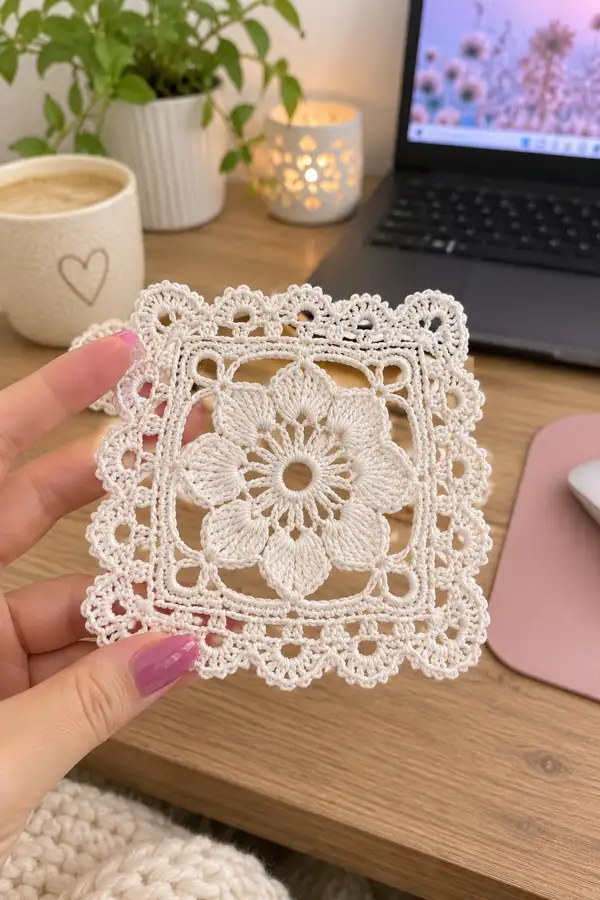
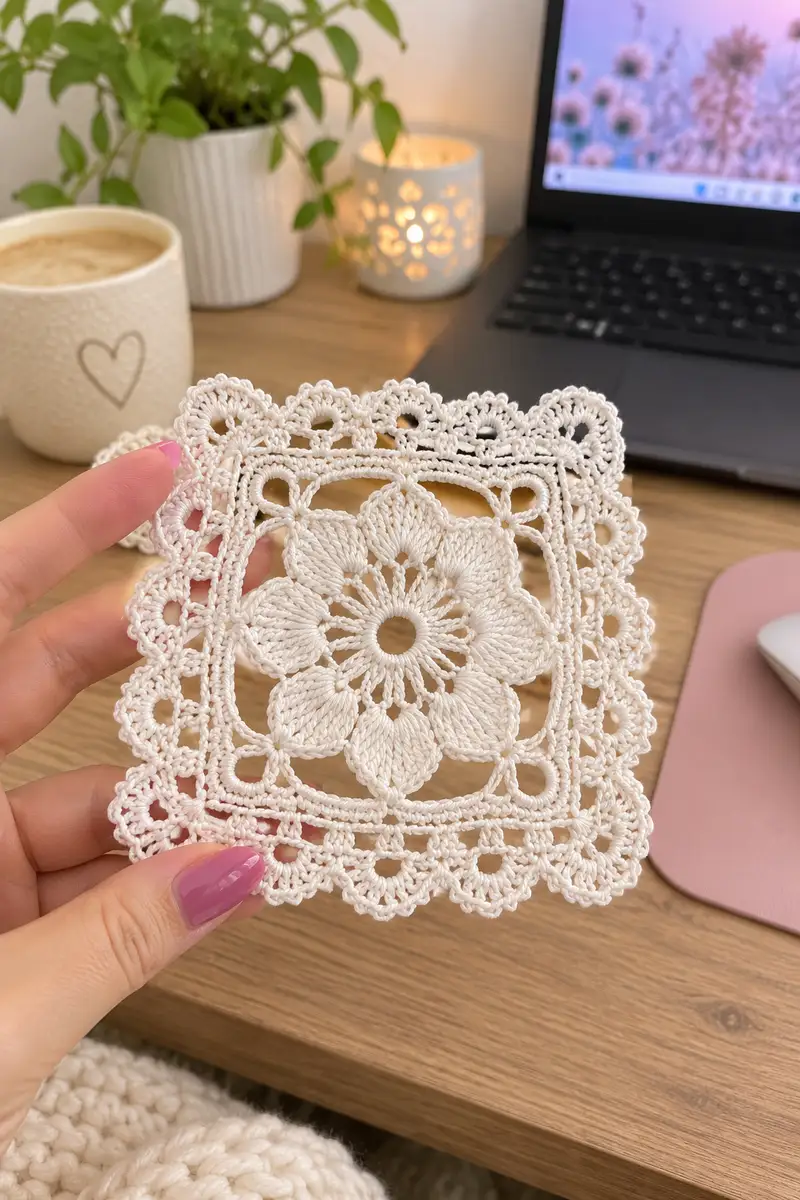
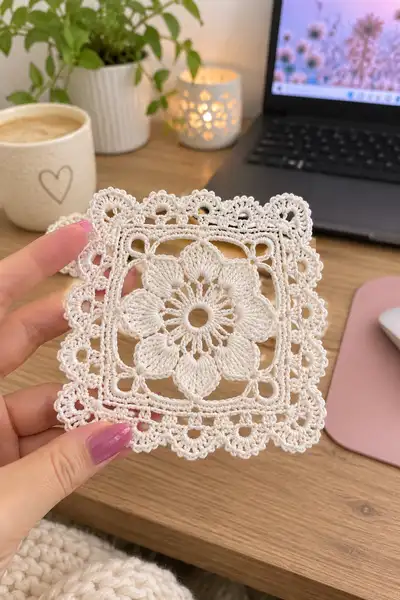
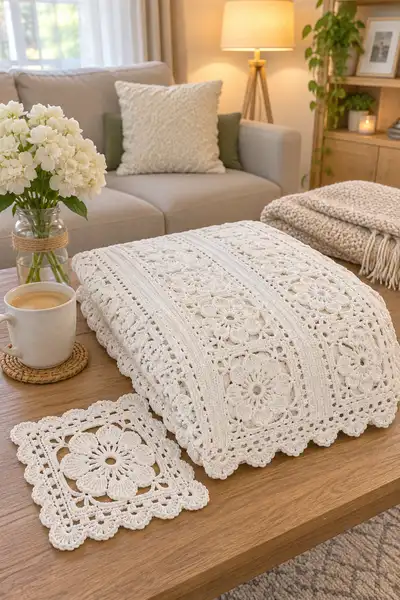
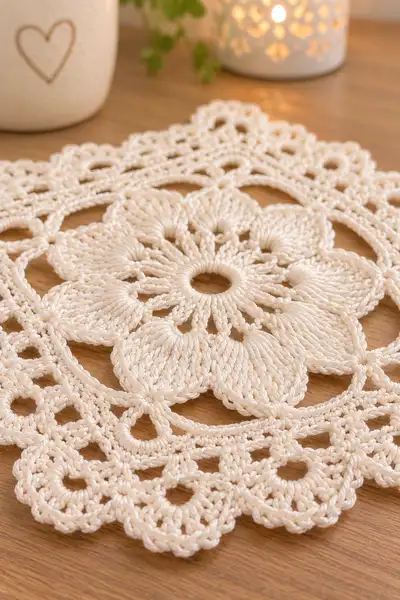
Create a timeless, elegant bedspread made from lacy white granny-square motifs with raised floral centers and a scalloped edge. This pattern guides you through making the decorative square motifs, joining them into panels and strips, and finishing with a wide scallop border for a beautiful, vintage-inspired bedroom centerpiece. The finished bedspread features textured puff petals, airy picot work, and a soft cotton feel that drapes beautifully over a bed.
Progress Tracker
0% Complete
— Overview :
Info :
This pattern builds one square motif (worked flat in rounds) with a raised floral center and multiple rounds of lace and ridged work to form a decorative square approximately 18-20cm (7-8") across blocked using worsted cotton. Motifs are joined as you go into strips, strips are joined into panels, and panels are joined together to create the full bedspread. Rounds are numbered and stitch counts are given at the end of each round. Use a 4.0mm hook to achieve a solid lace look; adjust if your gauge is different.
— Motif (Square with Floral Center) :
Round 1 :
mr, ch3 (counts as dc), 15 dc into ring, pull ring closed and join with sl st to top of ch3 (16)
Round 2 :
ch1, sc in same st, *ch3, skip next st, sc in next st; rep from * around to create 8 ch-3 loops, join with sl st to first sc (16 ch-3 loops/8 sc anchors; 16 anchor positions)
Round 3 :
*Into each ch-3 loop: ch1, (puff stitch made by YO, insert hook, pull up loop) 5 times, YO and draw through all loops on hook, ch1, sl st into next sc anchor; rep from * around to make 8 raised petals. (Note: puff stitches do not change round stitch count; maintain 16 anchor points)
Round 4 :
ch1, sc around each petal top and into the chain spaces between petals, placing 2 sc at the tip of each petal to round out the petal top. Work 1 sc into each sl st and 2 sc at each petal top to create a tidy round (32)
Info :
Use a consistent tension on puff stitches. Pull each puff to the same height so petals look even. If necessary, practice the 5-loop puff on scrap yarn to match height.
Round 5 :
(1 sc, 1 inc) x 8 across the round working evenly into sc's from previous round (48)
Round 6 :
(2 sc, 1 inc) x 8 (56)
Round 7 :
(3 sc, 1 inc) x 8 (64)
Info :
These increase rounds build a slightly domed medallion which later flattens as the next rounds shape into a square. Keep track of your repeats and place a stitch marker every 8th increase to mark repeat boundaries.
Round 8 :
(4 sc, 1 inc) x 8 (72)
Round 9 :
(5 sc, 1 inc) x 8 (80)
Round 10 :
ch3 (counts as dc), *skip 4 sc, 5 dc into next sc (shell made), skip 4 sc, dc into next sc; rep from * around to create shell-and-space pattern for later square shaping (80)
Info :
This round sets up arches between shells which will later be anchored to create corner points for making the round square-shaped. Keep shells evenly spaced.
Round 11 :
ch1, sc around each stitch and shell top placing 1 sc in each dc and 3 sc across each 5-dc shell, working evenly (80)
Round 12 :
(6 sc, 1 inc) x 8 (88)
Round 13 :
(7 sc, 1 inc) x 8 (96)
Round 14 :
Begin square shaping: *ch5, skip next 12 sc, sc in next 4 sc to mark side; rep from * 4 times to create 4 ch-5 corner loops equally spaced (96 with corner chain spaces accounted)
Info :
At this stage you will feel the piece begin to look more square. The ch-5 loops mark the corners. Place temporary markers in each corner loop so subsequent rounds can treat them as corners.
Round 15 :
Working into the body and corner loops: sc into next 4 sc, (sc, ch3, 3 dc, ch3, sc) into each ch-5 corner loop to form defined corners, continue sc along sides placing 1 sc per sc across; join (104)
Round 16 :
1 sc in each st around, placing 3 sc in each corner group (104)
Info :
From here, square rounds follow a standard pattern: create sides between corner groups and place a corner assembly (sc,ch3,3dc,ch3,sc) in each corner loop. Each full round will add 8 stitches total (two per corner repeat). Keep count and place a marker at the start of each corner repeat.
Round 17 :
(8 sc, 1 inc) x 8 (120)
Round 18 :
(9 sc, 1 inc) x 8 (136)
Round 19 :
(10 sc, 1 inc) x 8 (152)
Round 20 :
Work this round in BLO to create a raised ridge: 1 sc in each st BLO around, placing 3 sc in each corner set (152)
Info :
Working in BLO makes a subtle ridge that will visually separate the medallion from the outer lace border—this is a key design feature to mimic the sample.
Round 21 :
ch1, sc into each BLO sc around (152)
Round 22 :
*(sc, ch2, skip 2, sc) across side until corner; in corner sc group, (sc, ch5, sc) to create a larger corner loop; rep around (152)
Round 23 :
Into each side segment: 1 sc in each sc and 7 dc into each corner ch-5 loop to form a shell corner; continue sc along side spaces (160)
Info :
At this stage the round count may increase due to corner shells; keep careful count. This round places big shells in the corners to visually anchor the square.
Round 24 :
1 sc in each st around including shells, placing 4 sc across each corner shell (160)
Round 25 :
*ch3, 1 dc in next 4 sts, ch3, skip 4, sc in next sc to create chain arches between shells and side sc; rep around (160)
Round 26 :
Into each ch-3 arch: (ch1, puff x4 [yo insert pull-up x4], yo draw through all loops, ch1), sl st to anchor between arches; rep around to create a set of smaller puff clusters outlining the medallion (160)
Info :
Puff rounds add depth. Keep puff loops drawn to the same height. If your puffs look too tall for the motif scale, reduce to 3 loops per puff.
Round 27 :
sc around, placing 1 sc in between each puff cluster and 3 sc across puff tops to tidy the round (160)
Round 28 :
(11 sc, 1 inc) x 8 (200)
Round 29 :
(12 sc, 1 inc) x 8 (208)
Round 30 :
Work 1 sc in each st around, placing 5 sc in each corner shell to keep the square flat (208)
Round 31 :
ch1, sc in same, *ch5, skip 5 sc, sc in next sc; rep across each side and make (sc,ch7,sc) in each corner to create elongated corner arches (208)
Info :
These elongated corner arches create the scalloped structure visible in the outer area of the motif and give the outer border a gentle wave before the scallops are added.
Round 32 :
Into each ch-5 side arch: *7 dc cluster followed by picot, sl st into next sc; rep across side arches. In corner ch-7 loops make 9 dc cluster for a fuller corner shell (208)
Round 33 :
sc around, placing 1 sc between each dc cluster and 5 sc across corner shells to secure shape (208)
Round 34 :
*(1 sc, ch2, 1 sc) into top of each side arch; in corner shell (sc, ch4, sc, ch4, sc) to form small loops; rep around (208)
Round 35 :
Into each tiny loop: (sc, picot, sc) to create a delicate lace loop; continue around securing tails and smoothing the motif (208)
Info :
At this point your motif should measure roughly 16-20cm (6.5-8") blocked. If your motif is significantly smaller or larger, re-check hook size and tension. Blocking will influence final measurement.
Round 36 :
ch1, sc in each st around to tidy and even counts after picot work (208)
Round 37 :
Work 1 round in FLO of previous round: 1 sc in each st FLO to create a shallow raised ridge to separate motif from outer scallop (208)
Round 38 :
*(1 sc, ch3) x2 across side spaces, (sc, ch5, sc) in corner; rep around (208)
Round 39 :
Into each ch-3: 5 dc cluster, sl st to anchor; into each ch-5 corner: (sc, ch3, 5 dc, ch3, sc); rep around (208)
Round 40 :
sc around placing 2 sc over each dc cluster and 6 sc across corner shells (208)
Info :
From rounds 28-40 we build the outer lace and strengthen the edges so motifs will join cleanly without stretching. If you want a slightly smaller motif, omit one increase round earlier (e.g., skip round 29); adjust consistently across all motifs.
Round 41 :
Begin outer scallop shaping: *ch4, 7 sc into next 7 sts (form scallop), ch4, sl st into next sc; rep across sides and corner sections making slightly larger scallops in corners (208)
Round 42 :
Into each scallop: (sc, picot, sc) across to define scallop ridges; rep around (208)
Round 43 :
ch1, sc in each st around tightening scallops and smoothing edges (208)
Round 44 :
Work 1 round of (sc, ch1) filling any gaps and making small loops that will be used to join motifs later (208)
Round 45 :
Optional decorative round: *In each scallop top work (hdc, dc, hdc) to produce a tiny raised fan; rep around (208)
Round 46 :
sc around to tidy (208)
Round 47 :
Final outer picot round: *ch3, sl st into same st to make micro-picot, skip 1, sc in next; rep around (approx 156-208 depending on spacing)
Info :
Fasten off and weave in ends. Gently steam-block each motif to flatten and open the lace. Pin to square measurements while wet/steam to keep edges even. Allow to dry fully before joining.
— Making Multiple Motifs & Consistency :
Info :
Make as many motifs as required for your bed size. A typical twin/single bedspread in the sample uses motifs arranged into wide panels: 5 columns x 8 rows = 40 motifs (estimate). For a queen use approx 7 x 9 = 63 motifs; for a full/king adjust accordingly. Ensure all motifs are blocked to the same dimensions and that scallop points line up for a consistent join.
— Join-As-You-Go (JAYG) into Rows :
Round 48 :
When making the second motif onward, join to previous motif(s) on the last round: Work last round up to join point; instead of sl st, align motif edges and sl st through matching sc on the adjoining motif, ch1, continue; repeat sl st joins across entire side, ending last sl st into corner picot loop; finish round. This method joins edge scallops and micro-loops neatly.
Info :
To align motifs, place finished motif on top of the already-joined strip so scallops and picots align. Use pins if necessary. Match micro-picot loops to micro-picot loops. When joining, do not pull too tight—maintain a slight flexibility so fabric drapes.
Round 49 :
For corner joins (where four motifs meet): After joining two motifs along full side, join the third motif to adjacent edge and where corners meet, join through both corner picot loops using sl st through both pieces to create a tight corner intersection (no extra space) (no additional stitch count change)
Round 50 :
If you prefer seam joins, whipstitch the motifs together from the wrong side with matching yarn. For a seamless look, use the JAYG method which produces minimal visible joins and secures motifs firmly.
— Assembling Strips into Panels :
Round 51 :
After creating rows of motifs (joined along sides), join rows together using the same JAYG technique: work last round of upper row and slip stitch into corresponding loops of lower row placing sl st in each micro-picot to secure. Align seams so scallops nest neatly (no increase in stitch count across panels)
Info :
Create panels of several rows first (example: 5 motifs across x 3 rows high per panel). Joining panels last reduces bulk and makes handling simpler when finishing the full bedspread.
Round 52 :
Once panels are created, join panels to each other along side edges using slip stitch crochet from right side through both sets of loops to create a flush seam. Make sure to stagger seams slightly for even joining.
Round 53 :
When all panels are joined leaving a full top, press the whole assembly flat via steam-blocking pinned on a large blocking board or carpeted area. This helps set joins and smooths any minor irregularities.
— Wide Center Strips (Optional Decorative Bands) :
Round 54 :
These bands run vertically or horizontally between motif groups in the sample image. Using same yarn, pick up along seams and work 8-12 rows of (ch1, sc across) to fill gaps forming narrow ridged bands. Work in BLO for 2 rounds to form a ridge. Typical band width: 10-14 sc depending on motif size.
Info :
These strips visually separate large groups of motifs and give the design a structured look. You can adjust width to taste; blocking will affect band width slightly.
— Border & Scalloped Edge (Finishing) :
Round 55 :
With the whole bedspread assembled and blocked, work an even single crochet round all around the entire bedspread edge to even the perimeter: 1 sc in each st around; at each motif-corner work 3 sc, ch3, 3 sc to maintain corners (work evenly so perimeter stitch count is consistent)
Round 56 :
ch3 (counts as dc), *work 7 dc in next 7 sts to create scallop, ch3, sl st into base to anchor scallop; rep across entire perimeter creating large scallops that echo motif scallops. At corners work 9 dc for a fuller scallop (perimeter will have multiple scallops; count approx 120-160 scallops depending on bedspread size)
Round 57 :
Into each large scallop work (sc, picot, sc, hdc) to define scallop and add small decorative points (perimeter count remains equal to number of scallops)
Info :
Finish the scallops with one final tidy round of sc around to secure any loose loops and create a clean edge. Steam-block the entire bedspread once more after trimming and weaving in ends to set the scallops in place.
Round 58 :
For an extra decorative edge: Work a small shell between scallops: *sl st to middle of next scallop, ch3, 5 dc into ch-3 sp, ch3, sl st; rep around (scallop alternation, count as many shells as scallops)
Round 59 :
Final tidying round: sc around entire edge, weave in ends securely on wrong side, and clip close. If desired, add a few hand-sewn stitches to hold primary joins for extra stability.
Info :
Edge rounds do not typically alter center motif counts but should be worked evenly to prevent pulling the bedspread edge in or flaring outward. Adjust tension accordingly and block fully when done.
— Pillow Shams / Cushion Covers (Optional) :
Round 60 :
Create cushion-sized motifs by stopping at round 36-40 (before scallops) if you want smaller motifs for pillows. Make two identical square motifs for each sham (front and back) and join three sides with sc, insert pillow form and sc closed, or add zipper before final round for a removable cover.
Info :
Use the same join techniques for shams—JAYG for a seamless appearance or whipstitch for a neat back finish. Add an extra sc round on the back to create a flange to tuck under the pillow form if desired.
— Blocking & Finishing Notes :
Round 61 :
Lightly steam-block motifs pinned to a square template. Use rust-proof pins and a blocking board or padded surface. Do not over-wet cotton—use steam or a mist spray and gently shape. Allow to dry completely before joining to prevent warping.
Round 62 :
After joining, give the entire bedspread a gentle steam, focusing on edges and scallops. Use a damp cloth between iron and fabric if pressing is necessary to avoid shine on cotton yarn.
Info :
Weave in ends by threading tails through the reverse side of surface stitches and hiding them inside the motif structure. Trim close to fabric after securing. For very secure joins, use small whipstitches across the join on the wrong side as reinforcement.
This Classic White Granny Square Bedspread is a labor of love—each motif is a tiny work of art that comes together to create a luxurious, textured spread for your bed. The raised petals and delicate scalloped edge make every panel feel special, and the join-as-you-go assembly keeps the construction tidy and satisfying. Whether you make it as a gift or keep it for yourself, this bedspread will bring handmade charm and cozy style to your bedroom. 🧶 Pin, make, and share your finished creation — you'll treasure each stitch. ✨