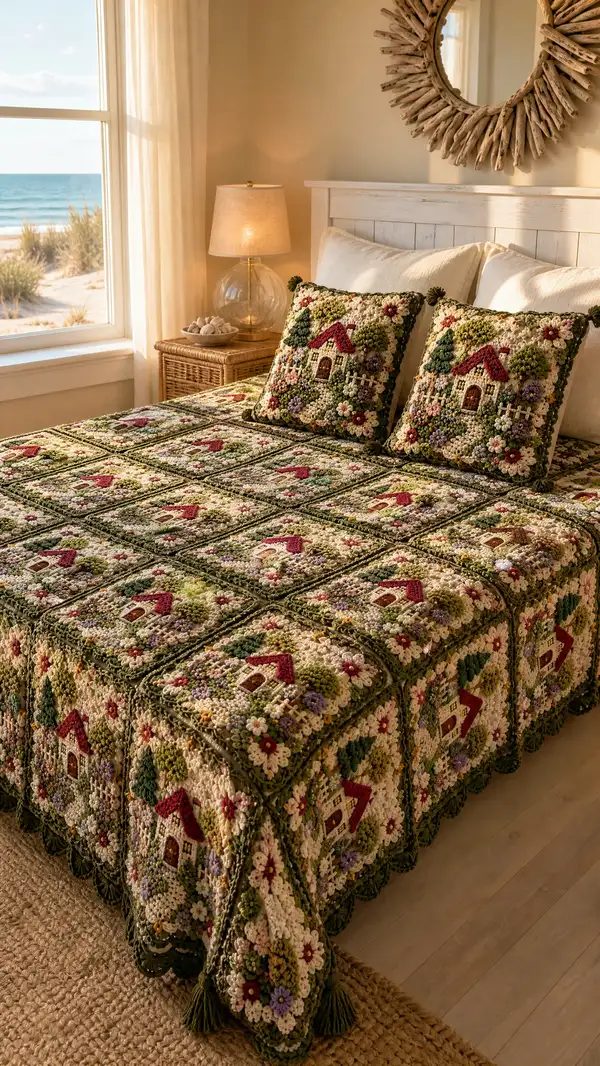
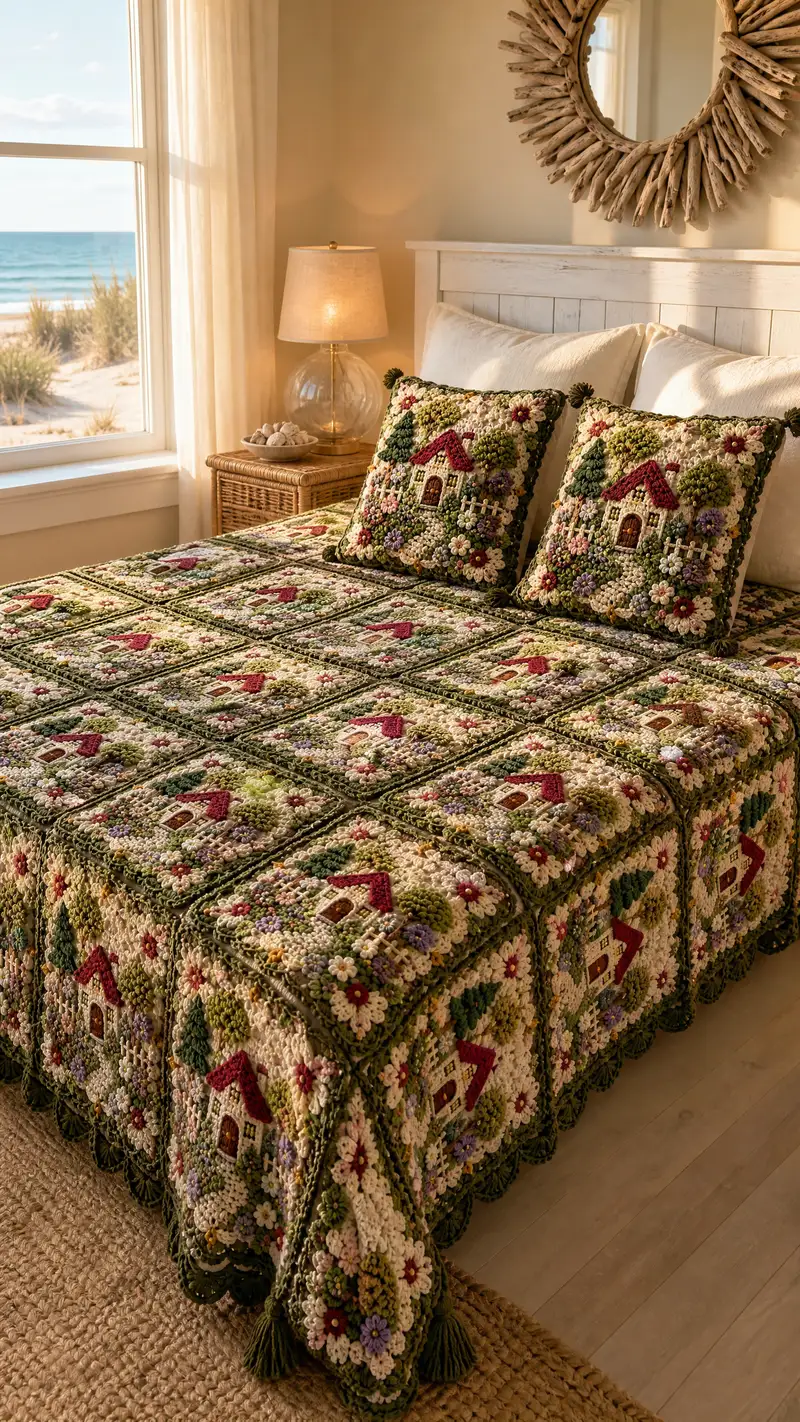
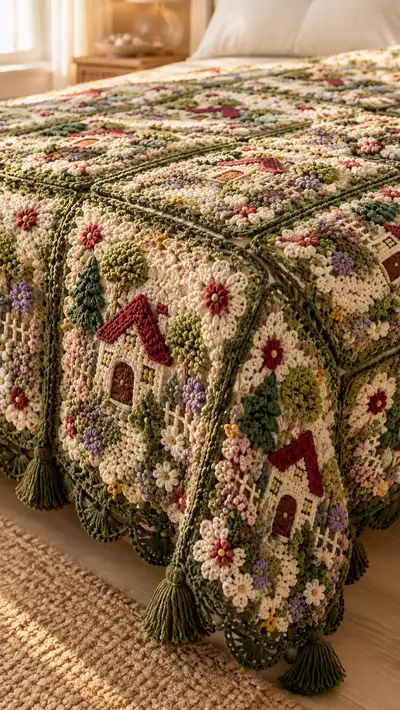
A vintage-inspired coastal cottage bedspread made from richly textured granny squares, each featuring a tiny embroidered house, trees, and clusters of raised flowers. Soft cream backgrounds, leafy greens, and berry red roofs combine with three-dimensional puff and popcorn stitches for a cozy, tactile finish. Each square is joined with a dark olive lattice and finished with a scalloped edge and tassels for a warm, finished look. Perfect for a cozy bedroom with a seaside palette.
Progress Tracker
0% Complete
— Materials & Gauge :
Info :
Gauge (after blocking): One finished house motif square measures approximately 11 x 11 inches when worked in worsted weight yarn with a 4.0 mm (G) hook and light blocking. Gauge may vary with tension and yarn. Make a test square before committing to bedspread size.
— Notes & Techniques :
Info :
This pattern constructs one embellished granny square motif per block. Each motif is worked from center outward in rounds, with textured puff/popcorn clusters, appliqued house parts and small sewn-on flowers and trees. You can make squares in any number to reach your desired bedspread size; the sample bedspread is 6 squares across by 7 squares down (42 squares) for a full/queen drape. Use join-as-you-go or whip-stitch to join squares; instructions for both are provided in the Join section.
— Block (House Motif) :
Round 1 :
6 sc in magic ring (6)
Round 3 :
(1 sc, 1 inc) x 6 (18)
Round 4 :
(2 sc, 1 inc) x 6 (24)
Round 5 :
(3 sc, 1 inc) x 6 (30)
Round 6 :
(4 sc, 1 inc) x 6 (36)
Round 7 :
(5 sc, 1 inc) x 6 (42)
Round 8 :
(6 sc, 1 inc) x 6 (48)
Info :
Use cream for these rounds to build the neutral background. Place a stitch marker in the first stitch of each round to keep track. Keep tension even; these rounds establish the center field for later texturing.
Round 9 :
1 sc in each st (48)
Round 10 :
1 sc in each st (48)
Round 11 :
(11 sc, inc) x 4 (52)
Round 12 :
(12 sc, inc) x 4 (56)
Info :
Rounds 11-12 form the transitions toward a square. Increase evenly at four points to create soft corners. Keep marker positions at round start and move marker up each round.
Round 13 :
1 sc in each st (56)
Round 14 :
1 sc in each st (56)
Round 15 :
(3 sc, puff in next st) x 14 (56)
Info :
Puff stitch: yarn over, insert hook, pull up loop, yarn over, insert hook into same st, pull up loop, repeat 3 times total (3 loops on hook), yarn over and pull through all loops, ch1 to close puff. Work puffs evenly spaced to create the first textured ring. Count carefully so stitch total remains 56.
Round 16 :
1 sc in each st between puffs (56)
Round 17 :
(2 sc, pop in next st, 1 sc) x 14 (56)
Info :
Popcorn (pop) stitch: work 5 dc in indicated st, drop loop, insert hook into first dc of group, grab dropped loop and pull through to close popcorn. Anchor with ch1 or sc as needed. Popcorns add dimensional shrubbery when later colored with green or accent yarns.
Round 18 :
1 sc in each st (56)
Round 19 :
(4 sc, 1 inc) x 8 (64)
Info :
We expand here to create space for the house applique to sit on a slightly larger field. This increase adds 8 stitches overall and gives a nicer square proportion for the cottage placement.
Round 20 :
1 sc in each st (64)
Round 21 :
Change to olive for a subtle grassy frame. Ch1, 1 sc in each st BLO (64)
Info :
Working in BLO here creates a small ridge that reads as a framed boundary for the cottage area. If you prefer a flat background, work full sc in both loops instead.
Round 22 :
1 sc in each st (64)
Round 23 :
(5 sc, 1 inc) x 8 (72)
Info :
This round adds another band for applique placement and provides a slightly raised platform. Use a removable stitch marker to note the exact center for house placement: measure across to find center stitch on each side and mark.
Round 24 :
1 sc in each st (72)
Round 25 :
Change to cream. 1 sc in each st (72)
Round 26 :
1 sc in each st (72)
Info :
At the end of Round 26 your background field is ready for appliques. Keep the right side (RS) facing you and use pins to place roof, door and tree pieces before sewing. If you prefer to crochet appliques directly on the background (surface crochet), you may follow the surface instructions below instead of making separate pieces.
— Roof Applique (Make 1 per Square) :
Round 1 :
Using berry red, ch6, sc in 2nd ch from hook, sc across (5 sc) turn to form small triangle base (5)
Round 2 :
Ch1, turn, (1 sc in first st, 2 sc in next) working as increase at sides to shape triangle: (sc across 7) (7)
Round 3 :
Ch1, turn, (sc across) 9 sc (9)
Round 4 :
Ch1, turn, (sc across) 11 sc (11)
Info :
Increase evenly at the edges of rows by adding extra sc at the first and last stitch to create a triangular roof with clean angled edges. Keep the roof small so it sits nicely above the house square center.
Round 5 :
Ch1, sc across to shape peak, sc2tog at center top to form peak (9)
Round 6 :
Fasten off leaving long tail for whip-stitch attachment. Block to flatten if desired.
— House Body Applique (Make 1 per Square) :
Round 1 :
Using warm brown, ch6, 1 sc in 2nd ch from hook and across (5)
Round 2 :
Ch1, turn, (1 sc in each st, inc at both ends) working short rectangle: 7 sc (7)
Round 3 :
Ch1, turn, sc across 9 sc (9)
Round 4 :
Ch1, turn, sc across 9 sc (9)
Round 5 :
Work 1 sc around to create a neat edge for sewing (9)
Info :
House body is a small rectangle. You can embroider window panes and door details using contrasting yarn: two vertical stitches for a window and a centered vertical stitch for the door seam, or sew on small squares of color for windows.
Round 6 :
Fasten off leaving long tail for sewing. Position directly under the roof with the top edge of the house body just beneath the lower roof edge, leaving a small overlap for a neat seam.
— Door & Window Details :
Info :
Use a darning needle and deep brown yarn to embroider a centered door shape: stitch an arch by creating a small curve of chains or use tiny satin stitch to fill. For windows use cream or pale yellow small cross stitches (x) to simulate window panes. Add a tiny yellow french knot (or bullion) as a dainty knob.
— Tree (Make 2 per Square - Left & Right) :
Round 1 :
Using olive green, mr, 6 sc (6)
Round 3 :
(1 sc, inc) x 6 (18)
Round 4 :
1 sc in each st (18)
Round 5 :
Change to a lighter green, (2 sc, puff) x 6 (18)
Info :
Make two tree tops per square for balance. The little puff clusters act as leafy clumps; shape them gently with fingers and flatten slightly with a craft needle if you prefer a triangular silhouette. Leave a long tail to sew tree base to background right beside house body.
Round 6 :
1 sc in each st (18)
Round 7 :
Fasten off leaving long tail.
— Flower (Make 6-9 per Square) :
Round 1 :
Using pastel color A, mr, ch2, 8 hdc in ring, sl st to first hdc (8)
Round 2 :
Change to pastel color B, ch2, (2 dc in next st, sl st in next) x 4 to create petals (8 petals)
Round 3 :
Switch to cream, small sc circle or a french knot center using contrasting tiny dot color; fasten off leaving tail for sewing.
Info :
Flowers are made small and sewn over the puff/background for a dense garden look. Vary colors across squares for a lively spread. Use small bead or seed bead for flower centers if you prefer; ensure beads are secured for laundering concerns.
— Small Fence Segment (Make 1 per Square) :
Round 1 :
Using cream or pale tan, ch7, turn, sc in 2nd ch from hook across (6)
Round 2 :
Ch1, turn, sc across 6, ch1, sc back along top to create small picket detail (6)
Info :
Work two small fence segments and sew them across the lower edge of the house using long tails. Alternately surface-crochet an X-lattice with cream yarn across the background for a fence effect using crossed sl st or small chains sewn down.
— Assembling Appliques onto Block :
Info :
Place the finished roof, house body, door and trees on the square background. The house should sit centered horizontally and slightly above the vertical center to leave room for garden flowers. Pin in place and whip-stitch through both appliques and background with matching yarn tails for an invisible join. Sew tree bases to each side of the house, ensuring symmetry. Sew flowers around the house, pressing each puff/pop outward for full texture.
— Edging Motif & Preparation for Joining :
Round 1 :
With olive, join in any corner stitch, ch2, hdc around the square working 3 hdc in each corner st to maintain the square shape; join with sl st to first hdc. (Work hdc evenly to maintain 72-76 stitch perimeter depending on counts)
Round 2 :
Ch1, 1 sc in each st around, working 3 sc in corner sts to keep corners square (perimeter remains approximately 72-76)
Info :
If you are join-as-you-go, at this point align your new block to the previously made block and begin the JAYG joining round described below. If sewing later, leave long tails and block the square to a perfect 11 x 11 in and stack for joining later.
— Join-As-You-Go Edge (When attaching blocks in rows) :
Round 1 :
With RS facing and while working the last edging round of a new block, hold new block next to previously made block. Work sc in new block to the point where blocks touch, then sl st into corresponding edge st of adjacent block, ch1 and continue sc on new block to secure. Repeat along side to join edge. (Edge stitch count unchanged)
Round 2 :
When joining corners between three blocks (corner of new block meets two existing blocks) work sc3tog across the corner to anchor tightly (work as directed to match spacing)
Info :
Use the olive color for joining for a defined lattice look. Keep tension firm but not tight so joined seams lie flat. Join-as-you-go works well for large projects because it reduces finishing time and helps keep edges square.
— Alternative: Whip-Stitch Joining (If assembling after blocks are complete) :
Round 1 :
Lay two squares RS together and whip-stitch along edge using olive yarn by inserting needle under both loops of each stitch, spacing stitches evenly; join all blocks row-by-row, then join rows together.
Info :
Whip-stitch will be slightly more visible than JAYG but is simpler for some crocheters. Make sure to block squares prior to joining to avoid wavy edges.
— Joining Rows & Full Spread Assembly :
Round 1 :
Join 6 squares together for each row (or adjust per bed size); repeat for 7 rows to match the pictured sample. Join rows using the join method selected, aligning motifs so cottages form a visually pleasing repeated grid.
Info :
Check layout by laying squares on the floor before joining to verify color and motif placement. Alternate orientation of some squares or rotate by 180 degrees to create visual movement if desired.
— Inner Border (Once full spread of squares is joined) :
Round 1 :
With olive yarn, join at any corner, ch2, work hdc evenly around entire joined blanket, placing 3 hdc in each corner (perimeter will depend on final number of squares; work hdc evenly to keep shape)
Round 2 :
1 sc in each st around (perimeter unchanged)
Info :
This narrow inner border stabilizes the joins and gives a base for the scalloped outer border. Keep stitch counts even and place corner increases carefully to maintain the rectangular shape.
— Outer Scalloped Border (Worked in Olive) :
Round 1 :
Join olive, ch1, 1 sc in each st around for one round to even base (perimeter unchanged)
Round 2 :
*Skip 2 sts, 7 dc in next st, sl st in next st; repeat from * around to create scallops. Work 3 sc between scallops as needed at joins and corners (perimeter unchanged but scallops create visual depth)
Info :
Scallops are sized to be substantial on the draping edge. If your bedspread needs larger scallops, increase to 9 dc in each scallop and adjust skip spacing accordingly. Work carefully at corners to make a symmetric scallop pattern; you may decrease the number of skipped stitches to bend scallop placement.
Round 3 :
Work 1 sc in each sc and 1 sl st in the center dc of each scallop to anchor and neaten scallop curve; fasten off and weave in ends
— Tassels & Corner Embellishments :
Round 1 :
Make tassels from olive yarn approximately 3.5-4 inches long (measured before trimming). Wrap yarn around a book or cardboard of desired width ~30-40 times for a full tassel, tie at top, fold and trim ends evenly. Make one tassel for each corner and additional tassels evenly spaced along the bedspread edge (sample shows one per corner and every second scallop).
Info :
Secure each tassel by threading the top loop through the stitch at the base of a scallop and tying several knots on the WS, then backstitching a few times to secure. Trim and fluff tassels. For extra stability, dot a tiny amount of fabric glue inside the knot (optional) and allow to dry before trimming outer strands.
— Finishing Touches & Blocking :
Info :
Once all squares are joined and border is complete, wet-block the entire bedspread (or steam-block) to even the scallops and flatten any seams. Pin to exact dimensions on a blocking mat and allow to dry fully. Use a gentle setting for steam to avoid flattening puffs too much; you want some three-dimensional texture preserved.
Round 1 :
Weave in all loose ends with a yarn needle, pulling tails through several stitches on the WS before trimming close to work to ensure ends stay hidden. Inspect seams and reinforce any loose points with additional whip-stitches as required.
— Care Instructions :
Info :
Hand wash or machine wash on gentle cycle with cold water and mild detergent. Lay flat to dry or use a low-heat dryer setting with dryer balls. Avoid harsh agitation to protect puff/pop stitches. Remove tassels for machine drying if concerned, reattach after drying.
Completing this Coastal Cottage Granny Square Bedspread is such a rewarding, cozy project! Each tiny cottage square tells its own story, and when joined together the collection becomes a beautiful, textured landscape that transforms a bedroom with handmade charm. The scalloped border and tassels add a nostalgic finish that feels lovingly crafted. 🧶🌿 Take your time, enjoy the process, and celebrate each block you finish — your bedspread will be a treasured heirloom. 🏡✨