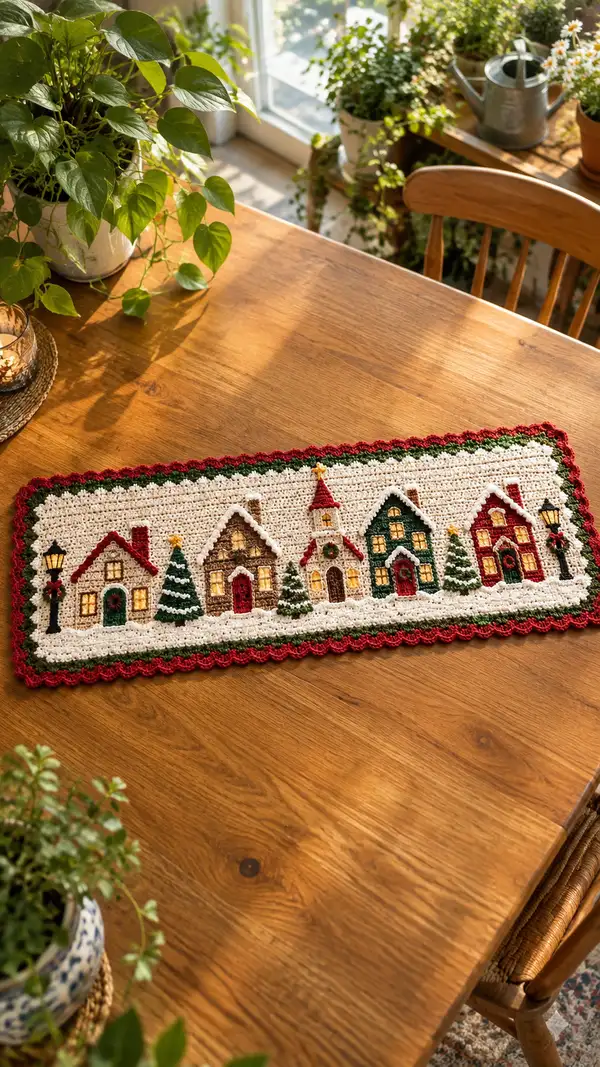
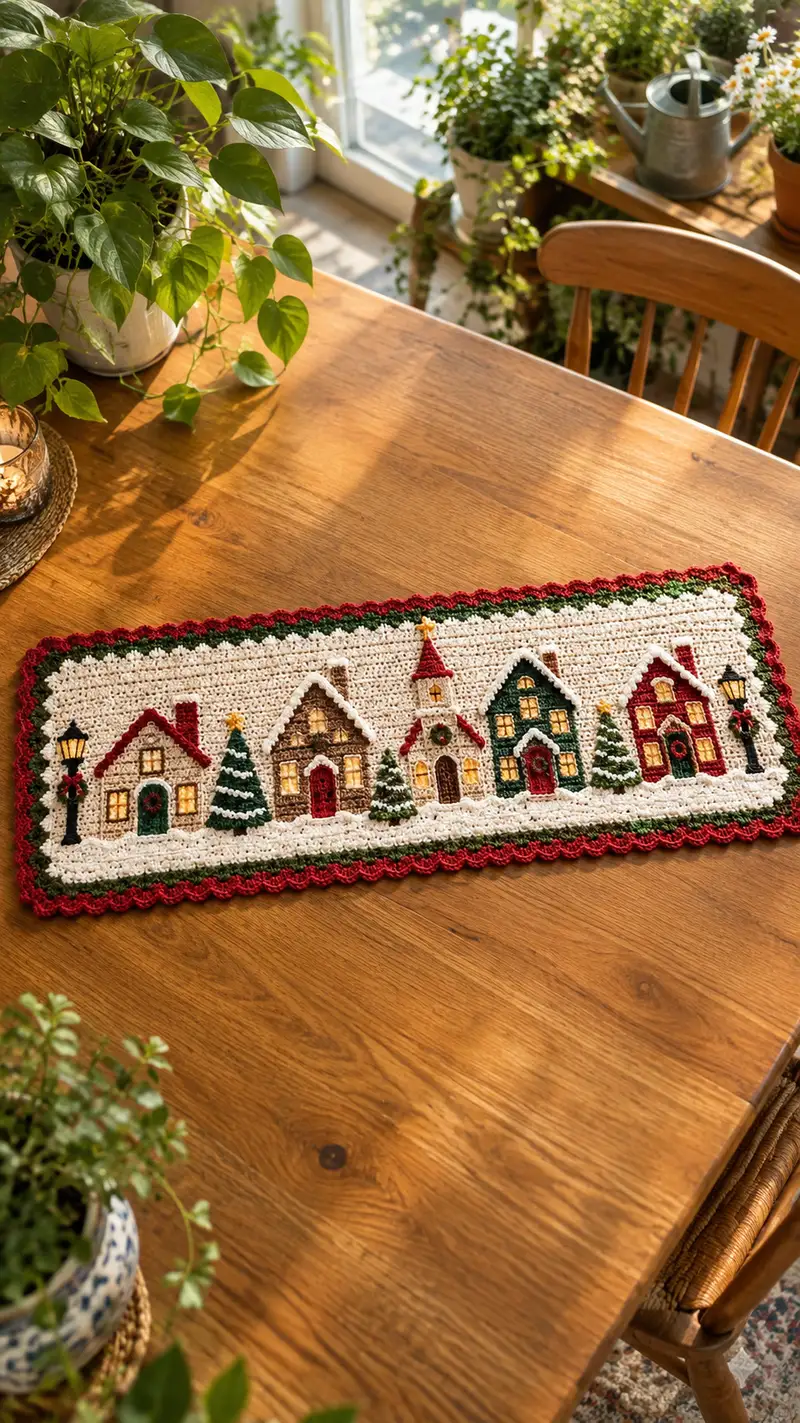
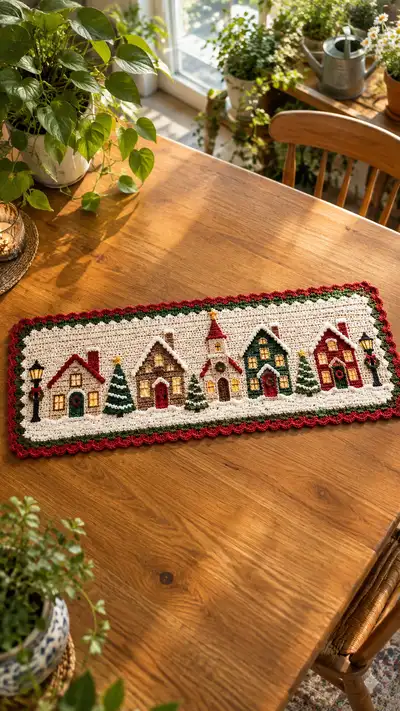
A warm, detailed pattern to crochet a festive Christmas village table runner featuring five charming houses, snow-dusted trees, glowing windows and lampposts framed by a green and red scalloped border. Worked on a creamy textured background with tapestry/applique details for depth and interest. Perfect for holiday décor or a handmade gift—complete with clear color-change guidance and assembly notes.
Progress Tracker
0% Complete
— Base Panel :
Info :
Work the base on a foundation chain of 121 stitches for a runner approximately 12 x 36 inches (30 x 92 cm) depending on tension and yarn. The base is dense to support appliques. Use main cream color. Place markers or make a sketch to map applique placements before beginning.
Foundation :
Ch 121 (this is your base width). Note: chain counts are kept exact to align applique placement.
Row 1 :
1 sc in 2nd ch from hook and in each ch across (120)
Row 2 :
Ch 1, turn, 1 sc in each st across (120)
Row 3 :
Ch 1, turn, 1 sc in each st across (120)
Row 4 :
Ch 1, turn, 1 sc in each st across (120)
Info :
If you prefer a lighter, more drapey runner, substitute hdc rows for every 4th row; for a firm base keep sc throughout. Keep a stitch marker at first stitch of each row to mark the row beginning.
Row 5 :
Ch 1, turn, 1 sc in each st across (120)
Row 6 :
Ch 1, turn, 1 sc in each st across (120)
Row 7 :
Ch 1, turn, 1 sc in each st across (120)
Row 8 :
Ch 1, turn, 1 sc in each st across (120)
Info :
We will work the snow ridge near the lower third of the panel using a textured cluster. Mark rows 18-20 as the lower snowline reference where appliques will sit so you can align houses properly.
Row 9-12 :
Repeat Row 2 (1 sc in each st) for 4 rows (120)
Row 13 :
Ch 1, turn, *1 sc in next 3 sts, 1 puff in next st (yo twice, insert hook, pull up loop 3 times, yo and pull through all loops), 1 sc in next 3 sts* rep across (120)
Row 14 :
Ch 1, turn, 1 sc in each st across working around puff post to anchor it (120)
Info :
Puff stitches create a raised snowy bank. Keep tension moderate to avoid puckering; puff cluster counts as 1 stitch and is worked as a textured accent only where called.
Row 15-18 :
Ch 1, turn, 1 sc in each st across (120)
Row 19 :
Ch 1, turn, 1 sc in each st across (120)
Info :
At the end of Row 19 you should be at the lower placement for your appliques: arrange pins for left edge lamppost ~6 sts in from left, then houses spaced roughly 18-22 sts each with 4-6 sts between them, church near center, then trees and lamp on right. Use the written applique placement map in the next section.
Row 20-40 :
Ch 1, turn, work 20 more rows of 1 sc in each st across (120) to create a tall background area above the houses (120)
Info :
Rows 20-40 form the sky and upper background where roof points and taller church spire will reach. Keep this area flat: avoid puff stitches here.
Row 41-46 :
Ch 1, turn, 1 sc in each st across (120) work 6 rows to reach final top edge before borders (120)
Info :
Fasten off cream yarn leaving a long tail for weaving at the top edge. Block the base panel lightly to even edges if desired before applying appliques. Pin appliques over the puff-snow bank and across rows 18-26 as per the placement map below.
— Applique Placement Map & Prep :
Info :
Use the base panel with 120 sts width. Horizontal stitch positions (counting left to right, 1-120): place left lamppost centered at st 6-7; House 1 center from st 12-30 (width ~19 sts); Small tree between House1-2 at st 33-36; House 2 at st 38-56 (19 sts); Church center at st 60-72 (13 sts but taller); House 3 (green) at st 74-92 (19 sts); House 4 at st 96-114 (19 sts); Right lamppost at st 118. These are guidelines—pin and adjust on your sample prior to sewing.
Info :
Make each applique separately flat so sewing is accurate. All appliques are worked in rows (small rectangles) and finished with roof triangles or scalloped trims. Each applique uses a small long tail for sewing; do not fasten off fully until sewn in place when possible.
— House A (Make 1 - Leftmost Cozy Cottage) :
Info :
House body width 19 sts x height 14 rows for walls; roof triangle worked separately. Use Tan/Beige for walls, Dark Brown for roof trim, Red for door and roof accent, Gold for window lights.
Row 1 :
With tan, ch 20, 1 sc in 2nd ch from hook and across (19)
Row 2 :
Ch 1, turn, 1 sc in each st across (19)
Row 3 :
Ch 1, turn, 1 sc in each st across (19)
Row 4 :
Ch 1, turn, *1 sc in next 5 sts, change to gold yarn, 3 sc for window (center), change to tan, 1 sc in remaining sts* (19)
Info :
Windows: we simulate glowing windows with a small 3-st wide gold rectangle centered on rows 4-6. Carry color floats or use duplicate stitch later if tapestry carrying is difficult in tiny appliques.
Row 5 :
Ch 1, turn, 1 sc in each st across (19)
Row 6 :
Ch 1, turn, 1 sc in each st across (19)
Row 7 :
Ch 1, turn, change to red for door: 1 sc in st1-6, 3 sc in sts7-9 (door block), 1 sc in st10-19 (19)
Row 8-11 :
Ch 1, turn, 1 sc in each st across (19) work 4 more rows to complete body height (19)
Row 12 :
Ch 1, turn, 1 sc in each st across (19)
Row 13 :
Ch 1, turn, 1 sc in each st across (19)
Row 14 :
Ch 1, turn, 1 sc in each st across, finish, leave long tail for sewing (19)
Roof (triangle) :
With deep red, ch 1, make 7 sc in a magic loop or ch 8 and sc 7, Row1 base = 7 sts. Row2: ch1, turn, (sc2tog) across to 3 sts (3), Row3: ch1, turn, sc3tog (1). Fasten off leaving long tail for sewing to top of house for a peaked roof with snow edging in white (see Snow Cap below).
Snow Cap :
With white, sew small puff knots along lower edge of roof (use small picot or 3-d popcorns). Leave tail for securing.
Info :
Sew the roof to the top edge of the house: center roof triangle over the 19-st wide top. Tack in 3-4 spots, then invisible stitch the perimeter for a smooth seam.
— House B (Make 1 - Stone Cottage with Chimney) :
Info :
Width 19 sts x 16 rows body. Use mottled brown (dark + tan carried fleck) for stone texture. Build a small chimney as a 4-st column and attach to roof side.
Row 1 :
Ch 20, sc across (19)
Row 2-4 :
Ch1, turn, sc across (19)
Row 5 :
Ch1, turn, *1 sc in next 4 sts, change to gold for window 3 sts, change to brown, 1 sc in rem sts* (19)
Row 6-8 :
Ch1, turn, sc across (19)
Row 9 :
Ch1, turn, 1 sc in each st (19)
Row 10 :
Ch1, turn, work a shallow arch for the red door: sc across to center 3 sts, 3 sc for door detail, sc remainder (19)
Row 11-14 :
Ch1, turn, sc across (19)
Row 15 :
Ch1, turn, sc across (19)
Row 16 :
Ch1, turn, sc across, leave tail for sewing (19)
Roof :
Make roof triangle wider than house: starting chain 21, sc 20. Decrease over 6 rows until 2 sts remain to form pitched roof. Attach brown roof to top. Add chimney: ch4, sc in 2nd ch from hook across to form 3-st tall chimney column, sew to roof left side and secure to house body with a few stitches to anchor.
Info :
For a stone effect, carry tan and dark brown alternately every few stitches (mosaic effect) or use a variegated yarn. Keep appliques flat before sewing.
— Church (Make 1 - Center Steepled Building) :
Info :
Church is taller and narrower: body width 13 sts x height 24 rows; steeple built separately as stacked triangles. Use cream/tan for body, red for roof spire, gold for windows, small wreath accent in green/red.
Row 1 :
Ch 14, sc across (13)
Row 2-4 :
Ch1, turn, sc across (13)
Row 5 :
Ch1, turn, change to gold for tall arched window: sc across to center st5, 3 sc in center for window, sc remaining sts (13)
Row 6-10 :
Ch1, turn, sc across (13)
Row 11 :
Ch1, turn, change to red for entrance bow: sc across center stitch for door, sc across rest (13)
Row 12-14 :
Ch1, turn, sc across (13)
Row 15-20 :
Ch1, turn, continue sc for body height (13)
Row 21-24 :
Ch1, turn, sc across (13) finish body, leave long tail
Steeple Base :
With red, ch 10, sc9. Next rows decrease to make narrow peaked tower: R2 sc9, R3 decrease pairs to 5, R4 to 3, R5 to 1. Stack steeple pieces if desired to create height and sew to center top of church body. Add a small gold star or cross at tip with embroidery thread.
Info :
Church will sit centered over the puff-snow bank; when sewing, align bottom row of church at Base Panel Row 19 so steeple reaches rows 30-35 on panel.
— Houses C & D (Make 2 - Green & Red Houses) :
Info :
Each similar to House A in structure but swap yarn colors (Forest Green for one house body with gold windows and dark green roof; deep red for the other house body and darker roof). Use same width 19 sts x 14 rows for each house body.
Row 1 :
Ch 20, sc across (19)
Row 2-6 :
Ch1, turn, sc across (19)
Row 7 :
Ch1, turn, change to gold for window center if desired (3 sts), sc across remaining sts (19)
Row 8-14 :
Ch1, turn, sc across (19). Fasten off leaving long tails for sewing and apply matching roof triangle like House A.
Info :
For the green house add a small wreath: embroider a 5-stitch round of green yarn on the second row of the house front then add a tiny red French knot for the bow, or crochet a 6-ch small ring, sew and secure.
— Trees (Make 3-4) :
Info :
Evergreen trees are small layered triangles stacked for a 3D look. Sizes vary: small tree width 6 sts (6 rows high), medium 8 sts (8 rows high), large 10 sts (10 rows high). Accent with white slipped stitches for snow and tiny gold knots for lights.
Small Tree :
Ch 7, sc6. Row2: dec to 4, Row3 dec to 2, Row4 sc2tog to 1. Make 2-3 tiers and sew them stacked with slight offset. Add trunk: ch3, sc2 in back center and attach under tree base.
Medium Tree :
Ch9, sc8. Decrease over 4 rows to 2, finish tier. Make 3 tiers for medium height. Embroider diagonal white bars to mimic snow.
Info :
Sew trees to the background so their bases align with the puff-snow bank (base Row 19). Slightly tuck tree bases behind puff stitches to create a snowy overlap.
— Lamp Posts (Make 2) :
Info :
Black posts are tall narrow columns with a 2-3 st base, about 14 rows tall. Add a small yellow/gold square for the lamp and a tiny red wreath accent.
Post Column :
Ch 4, sc3 for 12 rows to desired height. At top, attach small 3x3 gold window: ch4, sc3 for one row, fold and stitch closed to form lamp glass. Add a small sl st for lamp top and tiny red bow (red yarn) under lamp.
Info :
Sew lamp posts to the left and right edges as indicated by placement map. Anchor well with 6-8 passes of yarn when sewing into base for stability.
— Snow Accents & Roof Snow :
Info :
Use white yarn to add snow caps to roof edges: small 3-loop popcorns or clusters spaced evenly along roof lower edges. Use slip stitch picots for delicate icicles along roofs and lamp tops. Sew a few white puff stitches at house bases to overlap the puff-snow bank for continuity.
Technique :
To make a 3-loop popcorn: yo, insert into st, pull up loop three times, yo and pull through all loops, ch1 to secure. Anchor with a sc in next base stitch.
— Window Embroidery (Gold Glowing Windows) :
Info :
For glowing windows either crochet gold rectangles into the applique or embroider small satin-stitched rectangles with embroidery thread after sewing appliques down. Stitch windows on rows indicated in each house section so they align horizontally across the village.
Embroider :
Thread yarn needle with gold yarn, make vertical satin stitches three threads wide, three threads tall per window; secure on wrong side and knot neatly.
— Assembly Instructions (Applique Sewing) :
Info :
Pin each applique on the panel prior to sewing. Baste with a few long stitches to hold position, check spacing from adjacent buildings and snow bank, then sew perimeter with a neat invisible stitch or whipstitch using the long tail left on each applique.
Row 1 :
Sew House A starting at base row 19 aligning center door area to panel stitches 12-30. Use mattress/ladder stitch along vertical sides and a few stitches across bottom to hide tail and create a joined seam that is stable but flat.
Row 2 :
Attach House B, Church, Houses C & D and trees following placement map. Sew lamp posts last and secure with extra passes.
Info :
Stitch window embroidery and wreaths after final sewing. Add any extra snow puffs at joins to disguise seams and create a cohesive snowy bank that overlaps applique bottoms slightly.
— Finishing Base & Edging Prep :
Info :
With appliques sewn, lightly block the entire panel so edges are even. We will add a green inner border (2 rows) then red scalloped outer border (one or two rows of shells). Leave panel flat and damp-block or steam lightly if your yarn allows.
Border Row 1 (Green) :
Join forest green at any corner: ch1, work 1 sc evenly across raw edges along each side (count approx 120 sts top & bottom, 46 sts down sides depending on height) keeping corner increases to keep edges flat: 3 sc in each corner stitch. Work around entire rectangle to create a neat edge.
Border Row 2 (Green) :
Ch 1, turn, 1 sc in each st around to build height for scallops, sl st to join (approx same total sts)
Info :
Keep counts even on sides: if your stitch count differs due to blocking, adjust the number of sc along sides to make scallops line up evenly. Use pins to mark 10-st intervals if helpful.
Scalloped Edge (Deep Red) Row :
Join deep red at a corner, *skip 2 sts, 5 dc in next st, skip 2 sts, sl st in next st* rep around. At corners make 7 dc shells to help turn. Finish with sl st and fasten off. This creates the decorative red scalloped border.
Info :
Alternative scallop: (dc3, ch2, dc3) in one stitch for a chunkier shell. Use whichever visually matches your sample best. Add a second row of scallops if you want a wider decorative border.
— Final Finishing Touches :
Info :
Weave in all ends along the wrong side securely. Use a small amount of craft glue under lamp posts if the base stitches feel loose, then stitch over glue to hide. Trim any stray fibers and steam-press carefully (test on scrap first).
Detail Embellishments :
Add small French knots in red for wreath bows, tiny sequin or bead for a star on the steeple if desired (sew securely and seal thread ends on wrong side), and a few pearl or gold beads in tree lights if preferred.
Care :
Hand wash gently in cool water and lay flat to dry; do not tumble dry. Re-block if edges relax after washing.
Info :
Allow the panel to rest for 24 hours after assembly so seams settle. If any appliques lift, secure with a few additional hidden mattress stitches from wrong side to anchor them flat.
This Christmas village runner is a cozy, handmade centerpiece that turns any table into a festive scene. Each applique and tiny embroidered window adds personality and charm to the wintery layout. The step-by-step approach and modular pieces make the project enjoyable and manageable. Display it proudly or gift it to someone who loves heartfelt holiday decor—every stitch tells a story. 🧶🏘️🎄