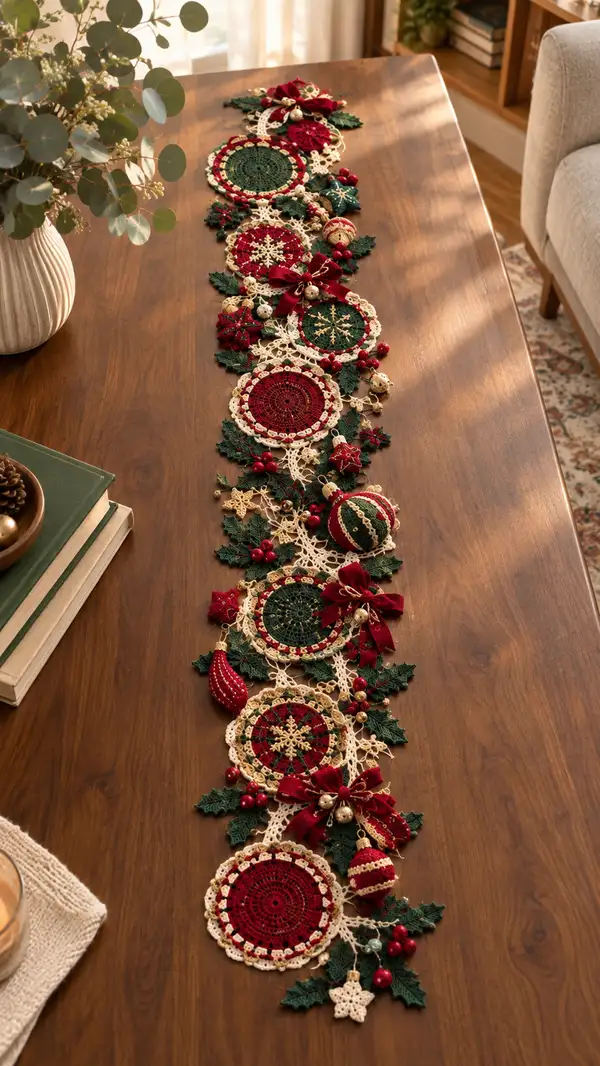
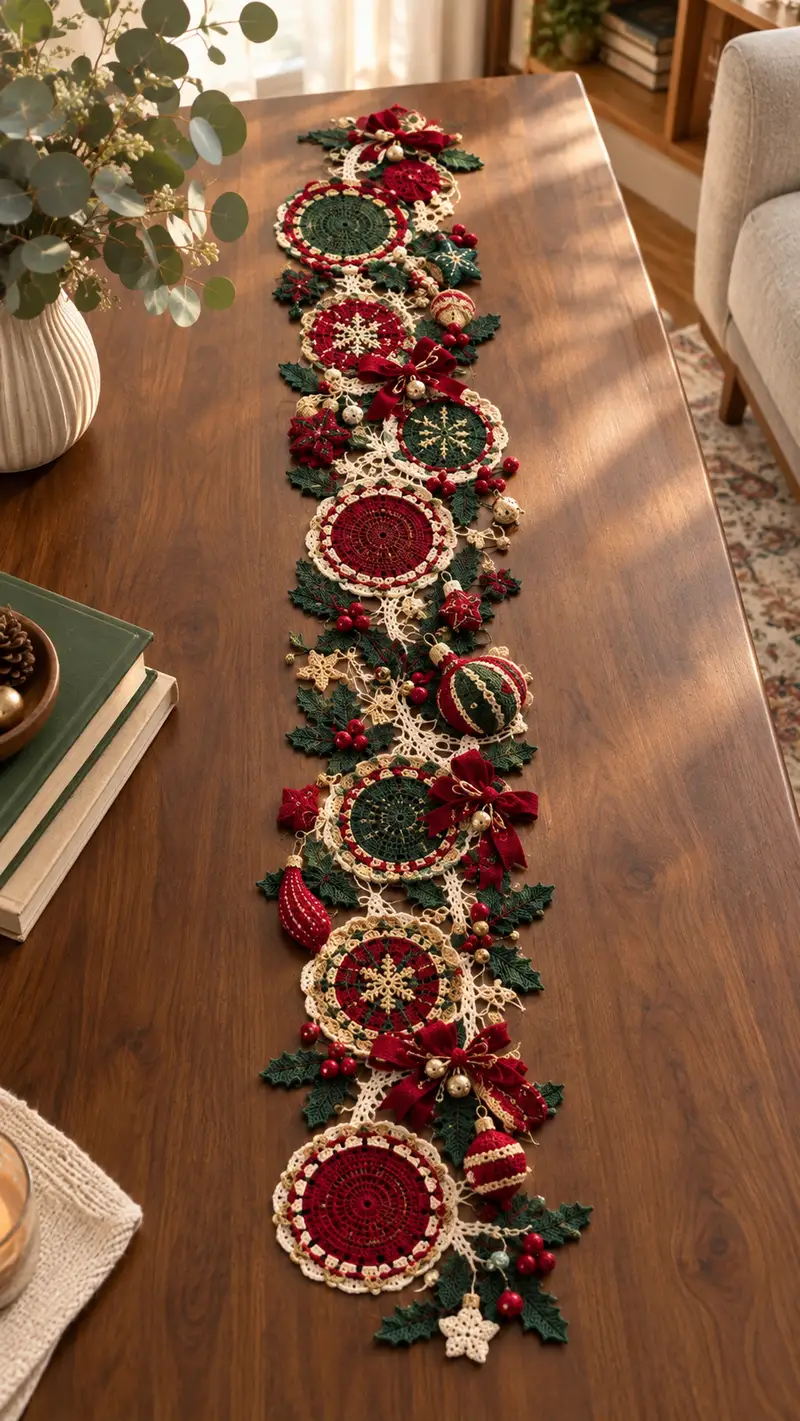
A vintage-inspired holiday table runner featuring layered crochet doily medallions, delicate cream lace connectors, evergreen holly leaves, and three-dimensional bauble ornaments. Rich ruby red and forest green motifs are accented with gold thread and tiny bells for an heirloom feel. This pattern teaches motif construction, small spherical ornaments, decorative leaves and lace joins to create a long, elegant runner perfect for holiday centerpieces.
Progress Tracker
0% Complete
— Materials and Gauge :
Info :
Use worsted weight yarn and a 3.5mm hook. Gauge is not critical for this decorative runner but for consistency 18 sc/10cm in single crochet is a good reference for small elements. Block motifs to exact shape before assembling for a neat finish.
— General Notes :
Info :
Work in continuous rounds unless instructed to join with sl st. When changing colors, fasten off and weave in tails or carry colors inside small elements. All stitch counts in parentheses are the total number of stitches at the end of that round. The runner in the photo is approximately 90-100cm long (35-39") made from six large medallions joined with lace panels and decorated with leaves, berries and three baubles.
— Circle Medallion Type A (Make 3, Red center with cream edging) :
Round 3 :
(1 sc, inc) x 6 (18)
Round 4 :
(2 sc, inc) x 6 (24)
Round 5 :
(3 sc, inc) x 6 (30)
Round 6 :
(4 sc, inc) x 6 (36)
Info :
Switch to red yarn here if you started in cream for a contrasting center, or continue red. Keep tension smooth so the disc lies flat. If the medallion cups, block flat; if it ruffles, work one fewer increase in the next round.
Round 7 :
(5 sc, inc) x 6 (42)
Round 8 :
(6 sc, inc) x 6 (48)
Round 9 :
1 sc in each st (48)
Round 10 :
1 sc in each st (48)
Info :
Switch to openwork rounds now to create a delicate center texture. You can embroider a small star later with metallic thread on the center if desired.
Round 11 :
(3 sc, ch 2, skip 1) x 12 (48 loops - stay at 48 base sc for spacing)
Round 12 :
In each ch-2 space: (sc, ch3, sc) to create small looped petals (48 petals total)
Round 13 :
Change to cream yarn. *sc in next 2 petals, (2 dc, ch1, 2 dc) in next petal* rep around (96 stitches including dcs counted as 2 each)
Info :
When changing to cream for the lace rim, carry the red yarn to the back or fasten off and weave tail. This round builds a scalloped border that will be visible on the table runner face.
Round 14 :
Working into the (2 dc, ch1, 2 dc) groups: sl st into ch-1, ch1, (5 sc) into same ch-1 to form small shell; *skip next 2 groups, shell in next group* rep around (24 shells)
Round 15 :
Into each shell: (sc, hdc, 2 dc, hdc, sc) to create raised scallop (24 scallops)
Round 16 :
Ch1, *picot then 3 sc across scallop top*, rep around; finish with sl st to first sc (approx 96 sc placements counting picots)
Round 17 :
Optional: Embroider a small gold star at center with metallic thread extending 6 radial spokes; stitch through the fabric and secure at the back
Info :
Block medallions flat to shape each one identical. Use a damp-block and pin each scallop for consistent edges. Make three of these for the red positions.
— Circle Medallion Type B (Make 3, Green center with gold star) :
Round 3 :
(1 sc, inc) x 6 (18)
Round 4 :
(2 sc, inc) x 6 (24)
Round 5 :
(3 sc, inc) x 6 (30)
Round 6 :
(4 sc, inc) x 6 (36)
Info :
Use forest green for the center rounds to create contrast. Keep rounds even and flat; if it cups, block more firmly; if it ruffles remove one increase step on the next round.
Round 7 :
(5 sc, inc) x 6 (42)
Round 8 :
(6 sc, inc) x 6 (48)
Round 9-11 :
1 sc in each st (48)
Round 12 :
Change to gold thread held with green: *sc 2, ch 2, skip 1* rep around for delicate lacy ring (48 units)
Round 13 :
In each ch-2 sp: (sc, ch4, sc) to open a slightly larger loop (48 loops)
Round 14 :
Into each loop: (2 dc, ch1, 2 dc) to form a decorative cluster; sl st to join (48 small clusters)
Round 15 :
Using cream yarn: *sc in next cluster, ch 3, skip cluster* rep around creating a lattice foundation for the outer scallop (24 ch-3 spaces)
Round 16 :
Shell round: into each ch-3 space work (sc, hdc, 3 dc, hdc, sc) creating larger scallops (24 scallops)
Round 17 :
Picot edging: into each scallop top work (sc, pic, sc) to create a refined rim (48 picots)
Info :
Finish with a small embroidered snowflake or star in gold across the green center by making 6 evenly spaced spokes using surface stitches from round 9 outwards.
— Decorative Snowflake Star (Make 6 small stars) :
Round 3 :
(2 sc, inc) x 4,(1 sc, inc) x 2 to shape into slight oval (18) adjust to symmetry
Round 4 :
Change to gold; *ch 3, sl st into next sc* rep around forming pointed arms (18 chains forming arms)
Round 5 :
On each chain: (sc, hdc, 2 dc, hdc, sc) to form star point; repeat on all 6 arms (6 points)
Round 6 :
Finish with picots on points for sparkle: sc across star and picot at tip of each arm, fasten off (approx 36 sc counting)
Info :
Sew stars at points between medallions and secure with a few tiny stitches through the lace connector so they appear suspended between circles.
— Holly Leaf (Make many - suggested 18) :
Round 1 :
Ch 8, 1 sc in 2nd ch from hook and next 5 ch (6 sc), 3 sc in last ch turning to work other side of foundation, sc 5 down the chain, sl st to first sc (20) — leaf base
Round 2 :
Ch1, 1 sc in each st around (20)
Round 3 :
Ch2, *2 dc in next st, dc in next 2, hdc in next, sc in next 2, hdc in next* rep to end to form ridge (approx 22 stitches in shape)
Round 4 :
Work picot points along edge to create holly serrations: *sc, ch3, sl st back into same st* repeat every 2-3 sts to form 6-8 points
Info :
Use forest green and work leaves slightly stiff by blocking with a light starch spray or by weaving a thin floral wire into the base before sewing into the runner if you want leaves to hold a specific shape.
Round 5 :
Finish with sl st to first sc, fasten off leaving a long tail for sewing (do not stuff). Block and shape with pins to create a defined holly leaf curl.
— Berry Cluster (Make as many clusters as needed) :
Mini Berry (Make 18) Round 1 :
6 sc in mr (6)
Round 3 :
(1 sc, inc) x 6 (18)
Round 4 :
1 sc in each st (18)
Round 5 :
(1 sc, dec) x 6 (12)
Round 6 :
6 dec (6) — finish stuffing very lightly; fasten off leaving a tail for sewing
Info :
Thread a small red bead onto a yarn tail before closing to achieve a glossy berry look; if using plain yarn, sew three berries in a triangular cluster and attach to a leaf base.
— Bauble Ornament (Make 3 — Large Spherical Bauble) :
Round 3 :
(1 sc, inc) x 6 (18)
Round 4 :
(2 sc, inc) x 6 (24)
Round 5 :
(3 sc, inc) x 6 (30)
Round 6 :
(4 sc, inc) x 6 (36)
Round 7 :
(5 sc, inc) x 6 (42)
Round 8 :
(6 sc, inc) x 6 (48)
Round 9 :
1 sc in each st (48)
Info :
At this point decide on color patterning — alternate rows of red, green and gold for stripes. Carry colors up the inside or break and reattach as preferred. This spherical shape will later be stuffed and closed.
Round 10 :
1 sc in each st (48)
Round 11 :
(6 sc, dec) x 6 (42)
Round 12 :
(5 sc, dec) x 6 (36)
Round 13 :
(4 sc, dec) x 6 (30)
Round 14 :
(3 sc, dec) x 6 (24)
Round 15 :
(2 sc, dec) x 6 (18)
Round 16 :
(1 sc, dec) x 6 (12)
Info :
Stuff firmly but not overfilled so the bauble keeps a round shape. Use small amounts of fiberfill and compact gradually through the opening. Join a scrap of gold thread or small metal cap to top for hanger loop, or stitch a loop directly into last rounds.
Round 18 :
Fasten off leaving long tail. Use yarn needle to close remaining opening tightly and weave tail through several stitches for security
— Detailed Bauble Stripe Variant (Optional decorative bands) :
Round 1 :
With gold thread and 2.5mm hook: join in a sc at equator of bauble, ch1, sc evenly spaced around to create a narrow decorative band (24 sc)
Round 2 :
Work small slip stitch loops: *ch3, sl st in next sc* rep around to form looped trim (24 loops)
Info :
Sew this band onto the bauble across one or two rounds for more ornamentation. Add tiny seed beads into loop spaces for extra sparkle if desired.
— Lace Connector Panels (Make 5 long panels to join medallions) :
Round 1 :
Ch 40, join with sl st to form a ring, ch3 (counts as dc)
Round 2 :
Dc in each ch around, sl st to join (40 dc)
Round 3 :
Ch1, sc in each st around (40)
Round 4 :
Ch3, *skip 1, dc in next, ch2* rep around to create mesh (approx 30 meshes depending on spacing)
Round 5 :
In each ch-2 sp: (sc, ch4, sc) making vertical loops to attach medallions and leaves (approx 30 loops)
Round 6 :
Edge: work picot-shells along both long sides: *sc, ch3, sl st in same st, sc in next 5 sts* rep for decorative edge
Info :
Make five panels sized to the distance between medallions in your layout. These panels create the lace scaffolding that will be used to sew medallions and decorations in place. Block panels before assembly for a crisp, even base.
Round 7 :
Work small connecting loops every 8th mesh to create an attachment point for leaves and beads (approx 6 attachment points per panel)
— Small Decorative Bow (Crocheted option - Make 6) :
Round 1 :
Ch 20, 1 sc in 2nd ch from hook and across (19 sc). Fasten off leaving long tail
Round 2 :
Fold strip in half, use long tail to wrap tightly around the center 5 times to form bow shape and secure with a few stitches (no counted stitches)
Info :
Alternatively use velvet ribbon bows as in the photo and sew small bells to center. Crocheted bows give a fully handmade look; fabric bows add luxurious texture and shine.
— Assembly & Decorative Addition Rounds :
Info :
Layout all motifs on a flat surface before sewing. The photo runner alternates Medallion A, Medallion B, Medallion A, Medallion B, Medallion A, Medallion B and joins them with lace connector panels between each medallion. Add leaves and berry clusters in groups of 2-4 around each medallion edge to mimic the layered look. Positions below reference the medallion round numbers for alignment: attach to outer scallop rounds (Round 14-17 area) so that leaf stems sit under scallops.
Info :
Sew each medallion to the lace connector by stitching through the outer picot row into the connector loops, placing 8-12 evenly spaced stitches to secure each large medallion flat to the panel. Use matching cream thread so stitches remain invisible from the front.
Info :
Sew berry clusters into small triangles of three on leaf junctions using the long tail left from each berry. For baubles, use two or three stitches around the top gold loop then secure to the runner's lace panel. Add small gold bells near velvet bows with a few sewing stitches or thin wire for extra holiday jingle.
Round 1 :
Final edging: with cream yarn, work sc evenly around the entire assembled runner, placing 2 sc in each joining point and 1 sc on openwork loops to create a unified edge. Trim to aesthetics (approx stitch count will vary with runner length).
Info :
Block the fully assembled runner again to let joins settle and to set the shape. Use plenty of pins and a steam iron on low if your fiber allows. Add ribbon bows and jingle bells with a final hand stitch; consider adding a few sewn bead clusters to enhance depth.
This festive table runner brings classic holiday charm to your tabletop with stunning layered motifs and three-dimensional ornaments. Each medallion and leaf is crocheted, blocked and sewn together to create a beautiful heirloom-style centerpiece you can customize forever. Add your favorite beads, ribbons and bells to make it uniquely yours — a warm holiday touch for years to come. 🎄🧶