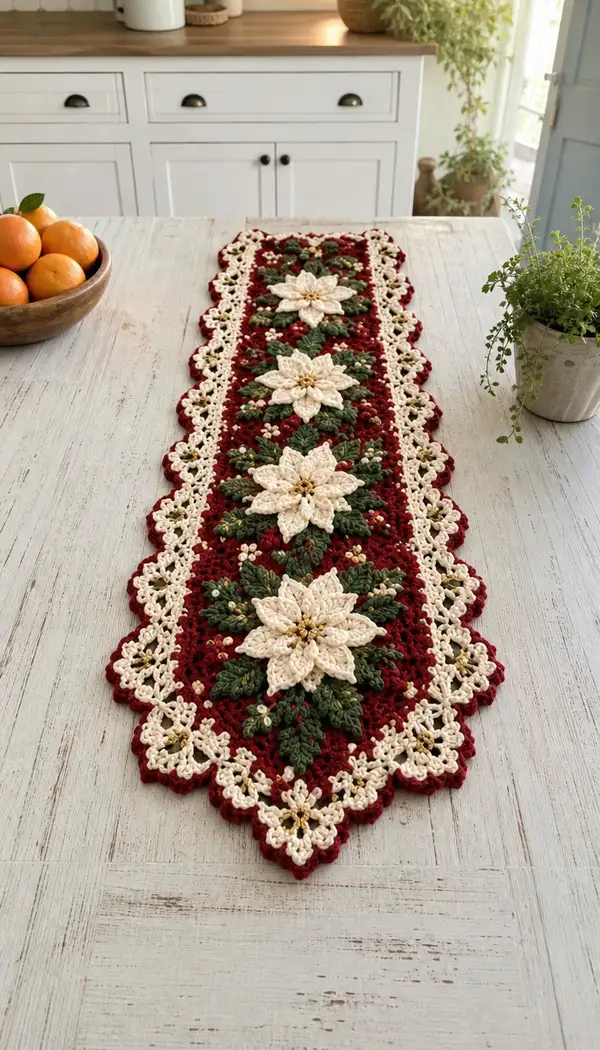
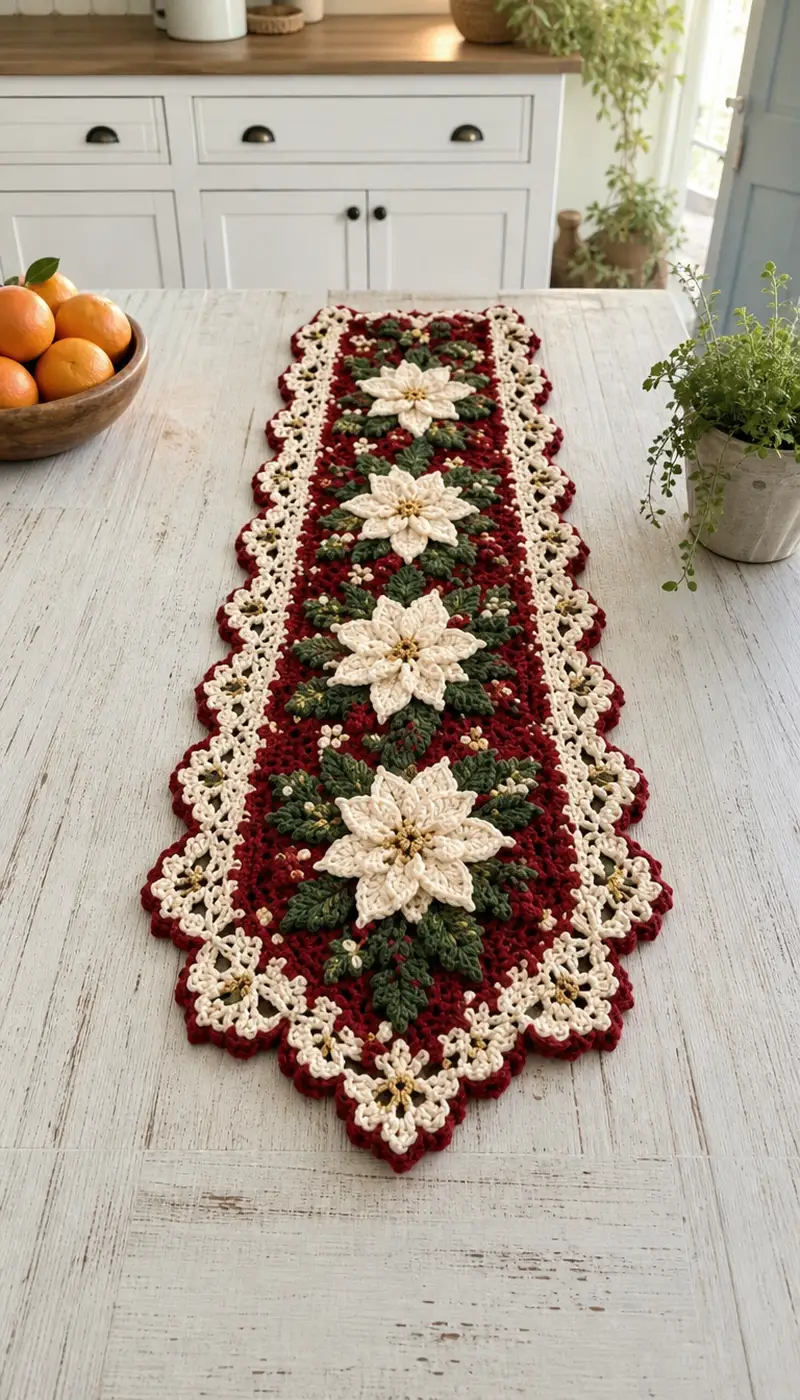
A festive, layered table runner featuring cream 3D poinsettias set against a deep burgundy lacy field with leafy green accents and a delicate cream scalloped border. This pattern recreates the heirloom look of layered petals, textured leaves, and tiny gold bead berries for a warm holiday centerpiece. The finished runner is decorative, richly textured, and uses standard worsted weight yarn to create crisp, defined stitches.
Progress Tracker
0% Complete
— Notes & Gauge :
Info :
Gauge is not critical for overall look but important for size. Using worsted weight and a 3.5mm hook the runner measures approximately 12" wide and 44" long in the sample with four poinsettia motifs. If you change yarn or hook size, adjust motif spacing and the number of center field repeats accordingly.
Info :
Work tightly for the poinsettia petals so they hold shape; you may switch to a 3.0mm hook for the petal rounds if you prefer crisper petals. Use stitch markers to mark motif centers and join points. Block all pieces lightly to shape before attaching.
— Center Lace Panel (Make 1 rectangular panel) :
Round 1 :
Chain 132 loosely (foundation chain). Turn, skip first ch from hook, 1 sc in 2nd ch from hook and in next 2 ch, *ch3, skip 3 ch, 1 sc in next 3 ch; rep from * across to last 4 ch, 1 sc in remaining 4 ch. (Approx foundation grid for first row)
Round 2 :
Ch3 (counts as first dc), turn. 2 dc in first sc, ch2, sk next 3-ch sp, [3 dc in next sc, ch3] across following grid, ending with 3 dc in last sc. This establishes shell clusters across the row; count will vary but aim for evenly spaced shells.
Round 3 :
Ch1, turn. 1 sc in first dc, ch3, sk next 2 dc, 1 sc in center dc of next 3-dc shell, *ch3, 1 sc in center dc of next shell; rep across; finish with sc in last dc. This creates an open lace chain grid. (Maintain same number of shell points across each row)
Info :
Keep track of shell points with a stitch marker at the first shell of the row; this helps align poinsettia placement later. The central panel is a repeating shell grid so stitch counts per row should stay consistent after initial setup.
Round 4 :
Ch3, turn. Work 3 dc in each sc that marks a shell base, ch3 between shell clusters, 3 dc in sc, repeat across. At row ends, work 3 dc into the edge sc to maintain a straight edge. (Even row; shell clusters remain consistent)
Round 5 :
Ch1, turn. Sc in first dc, [ch3, sk 2 dc, sc in middle dc of next shell] repeat across. Maintain grid spacing. Repeat this lace repeat for a total of 16 rows (Round 2-17) to create a rectangular length that will later accommodate four poinsettia motifs spaced evenly along the center line.
Rounds 6-17 :
Repeat Rounds 2-5 pattern sequence (shell row followed by sc grid row) building the rectangular burgundy field. Keep a running count of shell centers; you will place the poinsettia motifs centered over specific shell centers at row positions Rounds 6, 10, 14, 18 of the panel (visual alignment positions once blocked).
Info :
After completing 16 repeating rounds of the shell-grid sequence (panel body), measure and block the panel flat to your desired width. Blocking evens the shells and defines the grid spaces so the poinsettia motifs lay flat when attached.
Round 18 :
Ch1, turn. Work 1 sc in each st across to create a solid band along the panel edges (this band helps hide join seams later). Keep stitch count consistent with previous even rows.
Round 19 :
Repeat Round 18. At the end of Round 19 fasten off burgundy and weave ends. This completes the central lace panel. Block panel to final dimensions (approx 12" x 44").
Info :
Mark four evenly spaced shell centers down the panel center line where the poinsettias will be positioned. Use pins and a measuring tape to ensure even spacing. These positions will align with the flower motif centers made next.
— Poinsettia Motif (Make 4 identical motifs) :
Round 1 :
With cream yarn and 3.0-3.5mm hook, MR, ch2 (does NOT count as st), work 12 hdc into magic ring; tighten ring and join with sl st to first hdc. (12)
Round 2 :
Ch2, work (hdc, inc) x6 around alternating to create 18 sts. Pattern: (1 hdc, 1 inc) x6 (18)
Round 3 :
Ch2, (2 hdc, inc) x6 (24). This forms the small domed center for the petal base. Finish round with sl st and do not fasten off; keep yarn attached for first petal layer.
Info :
These first rounds create a sturdy circular base for layering petals. Ensure the base is flat by adjusting tension; if it cups, loosen your hook slightly or add an extra hdc in Round 3 evenly.
Round 4 :
Ch3 (counts as first dc), *ch1, skip 1 st, dc5 in next st (cluster for petal), ch1, sk 1 st, sl st in next st (pivot between petals); rep from * to form 8 petal anchor points around the center. You should have eight dc5 clusters separated by ch1 spaces and sl st anchors. (8 petal anchors)
Info :
Anchor points are where each petal will be worked. Keep petals oriented outward; place a marker at the start of Round 4 to find petal centers easily later.
Round 5 (Petal Row A) :
Working into the ch1 space between anchors: ch1, sc in ch1 space, (ch3, tr, ch3) all in same ch1 space to create a pointed petal base, sl st into the next sl st anchor to lock; rep around for 8 shallow petals. Fasten off and weave in tail for this small layer or continue directly to next layer if you prefer attached petals.
Round 6 :
Rejoin cream yarn at base of petal anchor for Layer Two. Ch3 (counts as first dc), into same anchor work (2 dc, tr, 2 dc) to make a fuller petal top, ch2, sl st into the sl st anchor between petals to create separation; rep around for 8 larger petals. (Each petal cluster: 5 sts + a tr for height)
Info :
Layer One gives delicate inner petals; Layer Two creates the outer fuller petal. If you want a fuller flower, add a third petal round in slightly larger stitches using dtr/treble combinations. Keep petal counts equal (8 petals) to preserve symmetry.
Round 7 (Petal Sculpting) :
Using cream, ch1, work 3 sc across each petal face to create a crisp edge, then work 1 sc in the sl st anchor between petals. Repeat around. This anchors the petal edges to the base and creates a slightly cupped petal face. (total stitch count = 8 petals x (3 sc) + 8 anchor sc = 32)
Round 8 :
Ch1, sc evenly around the entire motif working 1 sc in each sc and 2 sc in each petal center to ease the petal edge—aim for a total of 40 sc around. Place a marker at the start for reference. Fasten off if using beads later.
Info :
If you plan to add small gold bead 'berries' between petals later, leave a long tail for stitching and beading. You can also embroider a small center with gold yarn using French knot or sewn beads.
Round 9 (Optional Center Bead Cap) :
With gold or mustard yarn, MR, ch1, 8 sc in MR, tighten and sl st to join—fasten off leaving long tail. Sew this small gold disc to the motif center and sew on 6-8 seed beads in a cluster for realistic poinsettia centers. (8)
Info :
Make four identical poinsettia motifs. For a slightly larger bloom repeat Rounds 6-8 increasing the dtr or tr in the petal apex to add height and a larger footprint on the runner.
— Leaf Clusters (Make 6 leaves per poinsettia; total 24 leaves) :
Round 1 :
With forest green and a 3.5mm hook, ch12. Row 1: 1 sc in 2nd ch from hook, 1 hdc in next, 1 dc in next 3 ch, 1 tr in next 2 ch (apex), 1 dc in next 2 ch, 1 hdc in next ch, 1 sc in last ch. Turn—this forms a tapered length for leaf base. (11 sts)
Round 2 :
Ch1, work along the opposite side of foundation chain: 1 sc in first foundation ch (opposite), 1 hdc, 2 dc, 2 dc in apex ch (to create a slight central ridge), 2 dc, 1 hdc, 1 sc. Sl st to join at base. Fasten off and weave a long tail for sewing. This creates a slightly cupped leaf with a ridge in the center.
Info :
For texture, work the second row in BLO so the center ridge appears raised on the top surface. Alternatively, add a central surface slip stitch column to mimic veins.
Round 3 (Vein Detail) :
Rejoin green at the leaf base, ch1, sc into center top of leaf, surface sl st up center ridge approximately 5-7 times to create a vein; fasten off. Repeat to make 6 leaves per flower. Leaves can be varied in size by using ch10 for small and ch14 for larger accent leaves.
Info :
Place three leaves beneath each poinsettia facing outward (left, center, right) and an additional three staggered between them to create a layered foliage effect. Use pins to arrange before sewing.
— Tiny Berry Clusters (Make many, place between petals and leaves) :
Round 1 :
With gold yarn and 3.0mm hook, MR, ch1, 5 sc into MR, tighten and sl st to join (5). Fasten off leaving tail to stitch cluster in place. Optionally glue or sew a small seed bead to center of this cluster.
Info :
Make 6-8 small clusters for each flower grouping. These give the faux-berry look and elaborate the center of the runner. If you prefer no beads, use the gold yarn clusters alone for a subtle effect.
— Attaching Motifs to Panel :
Info :
Position the four poinsettia motifs on the blocked burgundy panel at the pre-marked shell centers. Pin each motif so it sits centered on a shell center and so that the petals overlap the mesh slightly, creating a cohesive layered look. Under each flower place its 6 leaves in a fan arrangement, pinning them so the largest leaf points toward the runner edge.
Round 1 :
With matching burgundy thread or crochet yarn and a yarn needle, whip stitch the flower base onto the panel by sewing through the round that was made in Round 8 of the poinsettia motif. Take shallow stitches through the burgundy panel to avoid distorting the mesh. Sew around the base at 8 evenly spaced points to anchor firmly. Knot and weave ends. Repeat for all four flowers.
Info :
Sew leaves under the wreath of the flowers using small blind stitches. Sew the leaves only at the base so their tips remain free and slightly raised for dimension. If you prefer a sturdier attach, tack the midpoints of leaves with one or two small stitches.
Round 2 :
Sew small gold bead clusters (berry clusters) into the grid spaces surrounding each flower by using the long tails from the gold clusters or sewing beads separately with embroidery thread. Secure beads tightly and knot ends on the wrong side of the panel. Trim thread close after weaving ends.
Info :
Place berries asymmetrically for a natural cluster appearance. Use 3-5 tiny beads near each flower center and a few along the leaf tips to echo the photo design.
— Joining Extra Decorative Appliques (Optional) :
Round 1 :
Some burgundy panels include additional small cream quatrefoil motifs along edges. To make these: MR, ch1, 8 sc into MR, sl st; ch5, sl st into alternate sc to create loops; fasten off and sew into place along runner edges between scallops as desired.
Info :
These extras are optional and help visually transition the central burgundy into the scalloped cream border for a continuous lace appearance.
— Main Scalloped Border (Worked onto entire runner edge in cream) :
Info :
Work the border after motifs are sewn down and panel blocked. The border is worked in rounds around the entire rectangular panel using cream yarn to create a lace scallop with pointed diamond corners. Begin at one short end and work evenly around.
Round 1 :
With cream yarn and 3.5mm hook, join with sl st to any edge st on the short end. Ch1, work 1 sc in each edge st evenly around short end for approx 12 sc (depending on panel width). At corner work 3 sc into corner space to maintain turn. Continue along long side placing sc evenly; aim for same number of sc on both long sides. Join with sl st. Count total sc around for future repeats.
Round 2 :
Ch3, *sk 2 sc, (5 dc, ch2, 5 dc) in next sc (big shell), sk 2 sc, sl st in next sc; rep around. At corners work (5 dc, ch2, 5 dc) into the corner sc to create diamond points. Join with sl st. This creates a dramatic scalloped shell with diamond corner points. Maintain consistent shell placement relative to the panel shell points for symmetry.
Info :
Ensure shells sit neatly by working them over a regular number of base sc; adjust by adding or skipping 1-2 sc in the base band as needed to maintain even shells around the curved/pointed corner areas. Blocking later evens shell shapes.
Round 3 :
Ch1, work 1 sc in each dc across shells and in ch2 spaces work (ch3, picot, ch3) then sl st into top dc of shell to create an open lacy connector; repeat around. This trims the shells with a delicate lacy row and creates small loops suitable for gold bead accents.
Round 4 :
Ch1, *1 sc in each of the next 3 dc, (picot, sl st) in ch3 loop to create raised scallop points; rep around making sure diamond corners remain pointed by placing an extra picot set in the ch2 corner space. Join with sl st and fasten off. Weave in ends.
Info :
If you want a deeper scallop like the sample photo, add an additional shell round (Round 2 repeat) before finishing with the lacy trim. Adjust bead placement accordingly, typically sewing one bead cluster at each diamond corner.
— Decorative Outer Picot Lace (Final Edge Accent) :
Round 1 :
Rejoin cream at top of each scallop. Ch4, (sl st into base sc, ch4) repeat around working 1 loop per scallop to create consistent loops along edge. Join and fasten off.
Round 2 :
Into each loop work (sc, picot, sc) to create delicate points. At diamond corners work (sc, ch3, picot, ch3, sc) to maintain a larger point. Fasten off and weave all ends neatly to wrong side. This replicates the cream scalloped edging in the picture.
Info :
Sew small gold clusters into the center of each diamond scallop using the tiny gold MR clusters you made earlier. This echoes the photo where each scallop diamond has a small gold center dot.
— Final Finishing Rounds & Blocking :
Round 1 :
Give the entire piece a final gentle blocking: pin to desired rectangular dimensions on blocking mat, gently block petals upward so flowers remain slightly domed. Wet block or steam lightly as appropriate for your yarn fiber. Allow to dry fully.
Info :
After blocking, check all seams and beads; reinforce any loose stitches. Weave in all tails at least 3-4 inches into the piece and trim flush. Add a light spray starch if desired to keep petals shaped longer.
Round 2 :
Final inspection: press petals lightly with fingers to shape. Use pins to raise leaf tips if necessary and add a small invisible tack stitch behind each leaf base for stability. Your runner is complete.
Info :
Store flat to preserve shape. For washing, hand wash gently and block again to reshape. Avoid machine washing as bead and petal structure may be damaged.
This runner combines elegant color contrast with 3D floral texture to create a standout holiday centerpiece. The layered poinsettias and lacy scalloped border are romantic and heirloom-ready, perfect for special dinners and seasonal décor. As you finish each flower and stitch the delicate edge, you'll enjoy seeing the runner transform into a beautiful statement piece. 🎁🧶 Display proudly this holiday season and treasure it for years to come!