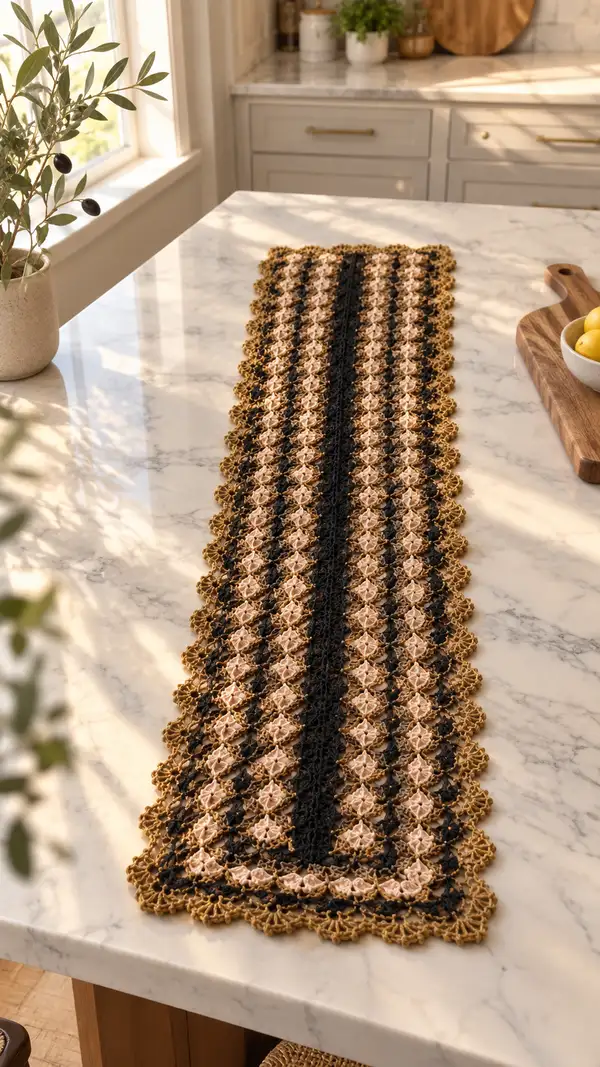
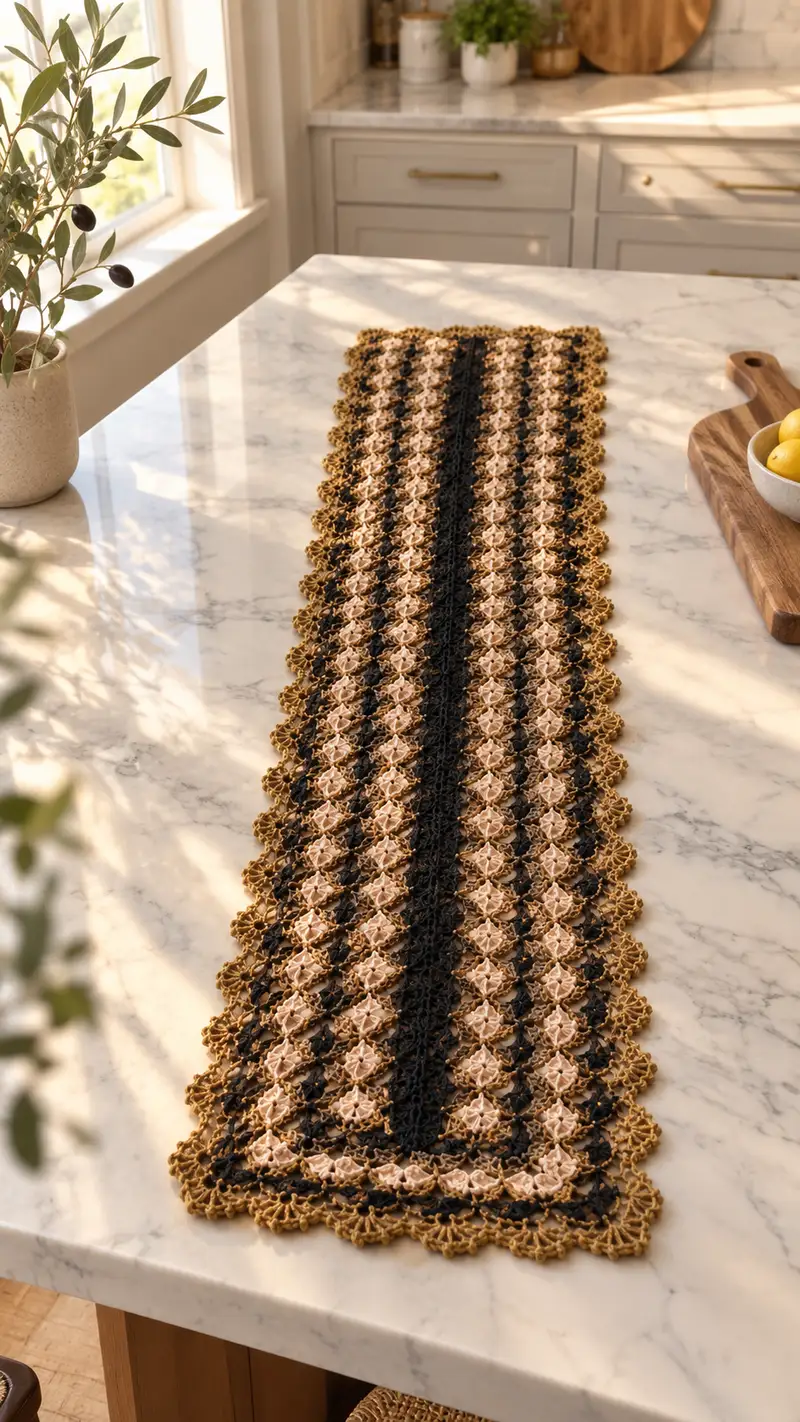
A narrow, elegant table runner made from repeating floral star motifs in warm gold, black and soft cream stripes. This pattern recreates the delicate openwork, scalloped edge and center stripe seen in the photo, perfect for a dining table or kitchen island. Clear step-by-step motif construction, joining rows, and a decorative scalloped border are included.
Progress Tracker
0% Complete
— Overview :
Info :
This pattern constructs a narrow runner made of identical floral motifs joined into vertical strips. Each motif is worked in rounds with three color zones: center (cream), middle petals (black when appropriate), and outer frame (golden brown). The runner in the photo uses 5 vertical strips: two striped outer columns, two floral columns, and a solid black center column. Gauge and length are adjustable by changing the number of motifs per strip. The instructions below give a single motif construction, a border frame round for each motif, a join-as-you-go method for linking motifs into vertical strips, instructions to assemble strips into the runner, and extensive scalloped edging rounds.
Info :
Because the motif is lacy, blocking each motif before final joining yields the most even finished fabric. Work with a consistent tension and check motif counts as you progress. Colors are changed at specified points; carry yarn inside motifs or fasten off as instructed.
— Motif (make multiples) :
Round 1 :
With cream: MR, ch 3 (counts as first dc), 11 dc into ring. Join with sl st to top of ch-3. (12 dc total)
Round 2 :
Ch 1, sc in same st, ch 3, sk next dc, sc in next dc, ch 3, *sk next dc, sc in next dc, ch 3; rep from * around. Join with sl st to first sc. You will have 6 ch-3 loops around the center. (6 ch-3 loops)
Round 3 :
Change to black (Info before round: if making a cream-first motif leave a longer tail to weave in). Join black in any ch-3 loop: ch 1, (sc, ch 2, 5 dc in same ch-3 loop, ch 2, sc) in each ch-3 loop around, joining with sl st to first sc. This creates petal clusters. (6 petals)
Info :
Ensure each 5-dc petal sits centered in its loop. Keep tension even so petals are uniform. Use a stitch marker to mark the start of a petal if helpful.
Round 4 :
Ch 1, sc in the top of any petal, ch 4, sk to base between petals, sc between next petal bases; repeat (sc, ch4) between each petal around to create small arches. Join with sl st. (6 ch-4 arches)
Round 5 :
Ch 2 (counts as hdc), work 6 hdc into each ch-4 arch evenly (space stitches so arches are filled), sl st to top of beginning ch-2. This rounds the petal area to a slightly fuller shape. (6 x 6 hdc groups = 36 hdc)
Info :
If you prefer a denser motif, use sc for Round 5 instead of hdc; counts will change slightly and may require tighter tension for an identical diameter.
Round 6 :
Change to golden brown. Ch 1, in each hdc across the first petal group work: (sc, ch 3, sc) across the curve to form connecting picot-style loops, then sc between petal groups; rep around. Join with sl st. These ch-3 loops form the scaffolding for the outer frame. (36 sc + 6 ch-3 loops)
Round 7 :
Ch 3 (counts as dc), in each ch-3 loop work (dc, ch 1, dc, ch 1, dc) to create three-dc spikes separated by chain spaces. Between spikes work sc in previous sc to anchor. Join with sl st. The motif begins to look star-like. (approx 18-24 dc groups depending on spacing)
Info :
Keep stitches in Round 7 centered on the ch-3 loops; spacing adjustments can be made by increasing or decreasing the number of sc anchors between loops. This helps tune the motif diameter.
Round 8 :
Ch 1, sc in each dc and in each anchor sc around to tidy the round. At the end of this round you should have a uniform ring of sc around the motif; count to confirm (expected ~48 sc depending on previous grouping). Join with sl st.
Round 9 :
Ch 4 (counts as tr), *sk next 2 sc, (tr, ch 2, tr) in next sc, ch 2, sk next 2 sc, sc in next sc; rep from * around to form tall arches outward for joining points. Join with sl st to top of ch-4. (6 tall arches)
Info :
Round 9 creates the points where motifs will join to neighbors. Keep ch-2 gaps even; these become stable join spaces for the join-as-you-go method.
Round 10 :
Ch 1, sc in same st, ch 3, (2 dc, ch 3, 2 dc) in each tall arch center, sc in space between arches; rep around. This creates fan shells that will link with adjacent motifs. Join with sl st. (6 fans)
Round 11 :
Ch 1, sc around the bases of fans and across the outer edge, making 2 sc in the spaces between fan groups to keep edges flat; join with sl st. Expected edge stitch count approx 72 sc. (approx 72 sc)
Info :
If a slightly larger motif is desired, add an extra round of (ch 3, dc) fans before tying off to increase diameter. For our runner, keep the motif diameter consistent so joining geometry remains precise.
Round 12 :
Fasten off leaving a 12-15 cm tail for weaving in. Weave in ends or leave for joining. If you will join-as-you-go, keep tail for final securing rather than weaving now. Block motif flat, pinning each point evenly to desired diameter.
— Motif Border (optional decorative frame for each motif) :
Round 1 :
With golden brown: Join in any outer sc, ch 1, sc in same st, ch 5, *skip 2 sc, sc in next sc, ch 5; rep around. Join with sl st. You will have a series of ch-5 loops around. (approx 12 ch-5 loops)
Round 2 :
Ch 1, in each ch-5 loop work (sc, hdc, 3 dc, hdc, sc) to form a scallop. Join with sl st. (approx 12 scallops)
Info :
This narrow scallop gives a delicate raised border when motifs are seen in repeat. If you plan to join motifs tightly, consider omitting this border on motifs that abut one another directly and only use it on edge motifs.
Round 3 :
Ch 1, sc around scallops, placing 2 sc in the center top of each scallop for a firm edge. Join with sl st and fasten off. Weave in ends. Block once more if necessary.
— Join-As-You-Go Vertical Strip Construction :
Info :
You will make vertical strips by joining individual motifs to the previous motif in the strip at three or four evenly spaced points along the outer join arches. The runner in the photo places motifs in offset columns so each motif shares join points with motifs to the left and right where appropriate; the center strip is a narrow solid stripe worked separately. The join method below uses slip stitch joins into the ch-2 spaces on Round 9 of each motif.
Round 1 :
Work the first motif fully and block it. This is Motif A; no joining is needed. Position Motif B directly below Motif A aligning their bottom and top join points so centers form a straight vertical column.
Round 2 :
To join B to A: when you reach Round 9 of motif B (the tall arch round), at the designated join arch, instead of working the usual (tr, ch 2, tr) all in the arch, do: tr in arch, ch 2, insert hook through corresponding ch-2 space on Motif A, sl st, complete tr in arch (pulling through both loops). Then continue the arch and repeat for the next join points (usually 3 joins per adjoining side). This makes an invisible slip-stitched link. Complete motif B as normal. Repeat to add Motif C below B, and so on.
Info :
When joining, ensure the motifs are oriented identically so petals and points align. If a motif edge has the Motif Border scallops and it will be joined, work joins through the inner sc round rather than the scallop to avoid bulky seams.
Round 3 :
Continue making motifs and joining in this manner until your strip reaches the desired length. For a typical island-runner length of ~36-40 inches, make 10-14 motifs per strip depending on motif diameter. Measure as you go. Each additional motif adds one more motif height to the strip length. (Make 10-14 motifs per strip as required)
Info :
Alternate which color you use for Round 3 petal color to create vertical striping. For the runner pictured: outer columns alternate gold and cream petals with black connectors; center column is worked in black for all motifs, producing a bold stripe.
Round 4 :
Tip for straight columns: before finalizing the sl st join, pin the new motif in place and confirm vertical alignment using a ruler or measuring tape down the center of the strip. Small adjustments in join spacing keep the column visually straight.
Round 5 :
Once the strip is complete, weave in all tails and lightly steam or wet block the entire strip to stabilize the joins and flatten any distortions. Repeat to create the number of strips required: for the pictured layout you will need two outer flower strips (alternating cream/gold), two inner floral strips, and one solid black strip.
— Solid Center Stripe (worked as a narrow strip) :
Round 1 :
Using black: ch 13, sc in 2nd ch from hook and across (12 sc). Turn. (12 sc)
Round 2-6 :
Ch 1, 1 sc in each st across (12 sc). Repeat these even rounds until the length matches the joined floral strips (i.e., same motif count tall). Maintain consistent stitch count. (12 sc)
Info :
The narrow solid strip provides the pronounced center stripe you see in the image. If desired, make a wider stripe by increasing the foundation chain for more sc per row to the desired width.
Round 7 :
Optionally, work a decorative row: ch 3, *sk 1, dc in next st, ch 1; rep across to create a lacy vertical texture. Fasten off and block the strip to size.
— Assembling Strips Into Runner :
Round 1 :
Layout your strips on a flat surface in the final order: outer floral strip, next floral strip, black center strip, next floral strip, outer floral strip. Use pins to maintain alignment at multiple points along the length. Check edges and centerline with a ruler for straightness. Adjust joins if necessary before final sewing.
Round 2 :
Sew adjoining strips together using mattress stitch or whipstitch along the touches where motifs meet. For the join between a motif and the center black strip, align points so that the fan shells of the motif sit neatly against the solid sc edge. Sew through both layers catching the inner tail loops and secure with a knot and weave-in. Repeat along the entire length on both sides of the center strip.
Info :
A join using a crochet slip-stitch seam gives a slightly raised ridge; a mattress stitch or whip stitch is flatter. Choose based on your preferred look. Always sew slowly and evenly, checking for twist as you go.
Round 3 :
When seams are complete, press the runner lightly or re-block it to flatten seams and unify stitch tension. If any gaps exist, use a small crochet hook to pull a few stitches across or add a tiny horizontal stitch in matching yarn to close them invisibly.
— Decorative Scalloped Edge (full runner border) :
Info :
You will work the scalloped border around the entire runner after assembly. Work in golden brown to match the outer frame. Because the runner is long and narrow, work evenly spaced scallops across the straight sides and proportionally fewer scallops at the short ends so corners look balanced.
Round 1 :
With golden brown, join in any outer edge stitch at a corner: ch 1, sc in same st, *ch 4, skip 3 edge sts, sc in next edge st; rep around the long side placing sc evenly across motif edges. At the short end, place sc in every 2 edge stitches to produce a rounded corner. Continue around running evenly. Join with sl st. Count the ch-4 loops around the runner—aim for an even number across both long sides. (approx 40-48 ch-4 loops per long side depending on width)
Round 2 :
Ch 1, in each ch-4 loop work (sc, hdc, 5 dc, hdc, sc) to create a large scallop. At corners work an extra dc cluster to form a neat curve. Join with sl st. (approx number of scallops from previous round)
Info :
For a pronounced border similar to the photograph, make each scallop slightly deeper by adding one additional dc in the center of each scallop (i.e., 7 dc center instead of 5). This creates larger scalloped edge points and mirrors the motif outer points.
Round 3 :
Ch 1, sc around scallops placing 2 sc in the top center of each scallop to firm the edge, and place 1 sc in each hdc on the sides. Join with sl st. Fasten off and weave in ends. Repeat on the opposite long side if you worked only one side at a time.
Round 4 :
Optional picot finish: join a contrasting cream in any top center sc, ch 1, sc, *ch 3, sl st in top of next scallop center (picot), sc in next scallop center; rep around for subtle decorative points. Fasten off and weave ends.
Info :
Keep scallops consistent by counting base stitches under each scallop and adjusting the number of dc in each scallop center. Blocking after this step will soften and unify scallops to a professional finish.
— Extensive Edging Variations (adds rounds and decorative detail) :
Round 1 :
If you desire a heavier border, work an additional 3 rounds: Round A: sc around edge, Round B: ch 3 loops with dc fan clusters, Round C: final sc tidy. These three rounds add weight and definition. (sc counts depend on runner perimeter)
Round 2 :
Round A: Join in any edge st, ch 1, sc in each st around, placing 2 sc in corners to maintain shape. Join with sl st. This evens the edge and creates a uniform base for fans. (perimeter sc count)
Round 3 :
Round B: Ch 3, *sk 2 sc, (2 dc, ch 2, 2 dc) in next sc, ch 3; rep around to create large ornate fans. Join with sl st. Fans should align with motif outer points if spaced correctly. (fan count equal to ch-3 loop count)
Round 4 :
Round C: Ch 1, sc around fan edges placing 2 sc at fan peaks. For extra lacy detail, add a ch 3 picot at each peak: (sc, ch 3, sl st in sc) at the center top of each fan. Join and fasten off. Weave ends securely. (perimeter tidy)
Info :
These extra rounds are optional but recommended for a runner that will be used as a centerpiece — they keep the runner looking intentional and stable under decorative items.
— Finishing, Blocking and Care :
Round 1 :
Carefully inspect the runner for loose ends and holes. Weave in all tails using a yarn needle, following the path of stitches for an invisible finish. Trim excess tails close to the work but avoid cutting too close to the knot.
Round 2 :
Block: wet block or lightly steam the runner, pinning it to the exact final dimensions on a blocking mat. Ensure scallops are evenly spaced and points are symmetric. Allow to dry fully. Blocking will settle the joins and produce the flat, even look seen in the photo.
Round 3 :
Optional stiffening for a stable centrepiece: for a non-laundered runner, apply a fabric starch solution lightly to the wrong side and dry flat. Test on a scrap first to be sure it does not change sheen or color.
Info :
For tables where food will be placed, use coasters/plates — cotton yarn can absorb and may stain. If you expect frequent laundering, consider using mercerized cotton for color-fastness and less shrinkage.
— Alternative Construction Notes (custom sizing and colorwork) :
Round 1 :
To change runner length: add or remove motifs from each strip before joining. Maintain an odd number of columns if you want a single center stripe; use even columns if you prefer symmetry with a center motif column instead of a stripe.
Round 2 :
To widen the runner: add additional motif columns on each side. For each column added, you will add one motif width (~2.5-3.5 inches depending on yarn and hook). Recalculate yarn amounts accordingly.
Round 3 :
For a reversible look, use the same join method on both sides and work symmetric scallops; avoid heavy seam stitches that create a ridge. Join strips with a single crochet seam from the right side for a subtle, almost invisible join.
Info :
If you want a more textured fabric, substitute some rounds of sc for BLO ribbing across the solid center strip to create subtle lines and tactile interest.
— Troubleshooting Common Issues :
Round 1 :
If edges ripple: check that motif diameters are consistent, re-block motifs, and ensure you are not inadvertently increasing or decreasing counts while joining.
Round 2 :
If seam gaps appear: sew a small running stitch across the gap using matching yarn and tighten slightly; or add an extra join slip stitch where needed.
Info :
Consistent motif tension and precise blocking are the two most important factors for a professional-looking runner.
This elegant table runner captures vintage charm with modern color blocking, combining airy floral motifs and a bold center stripe for a beautiful handcrafted centerpiece. Each motif is lovingly worked, joined, and finished with a scalloped border for a balanced, finished look. I hope this project brings warmth to your home and joy to your crafting time. 🧶✨