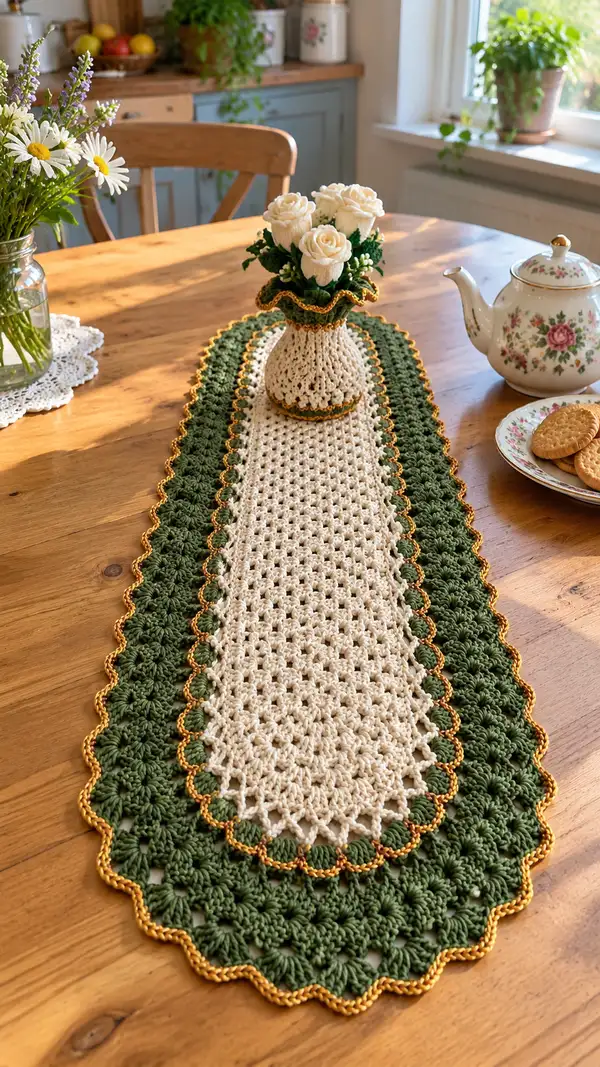
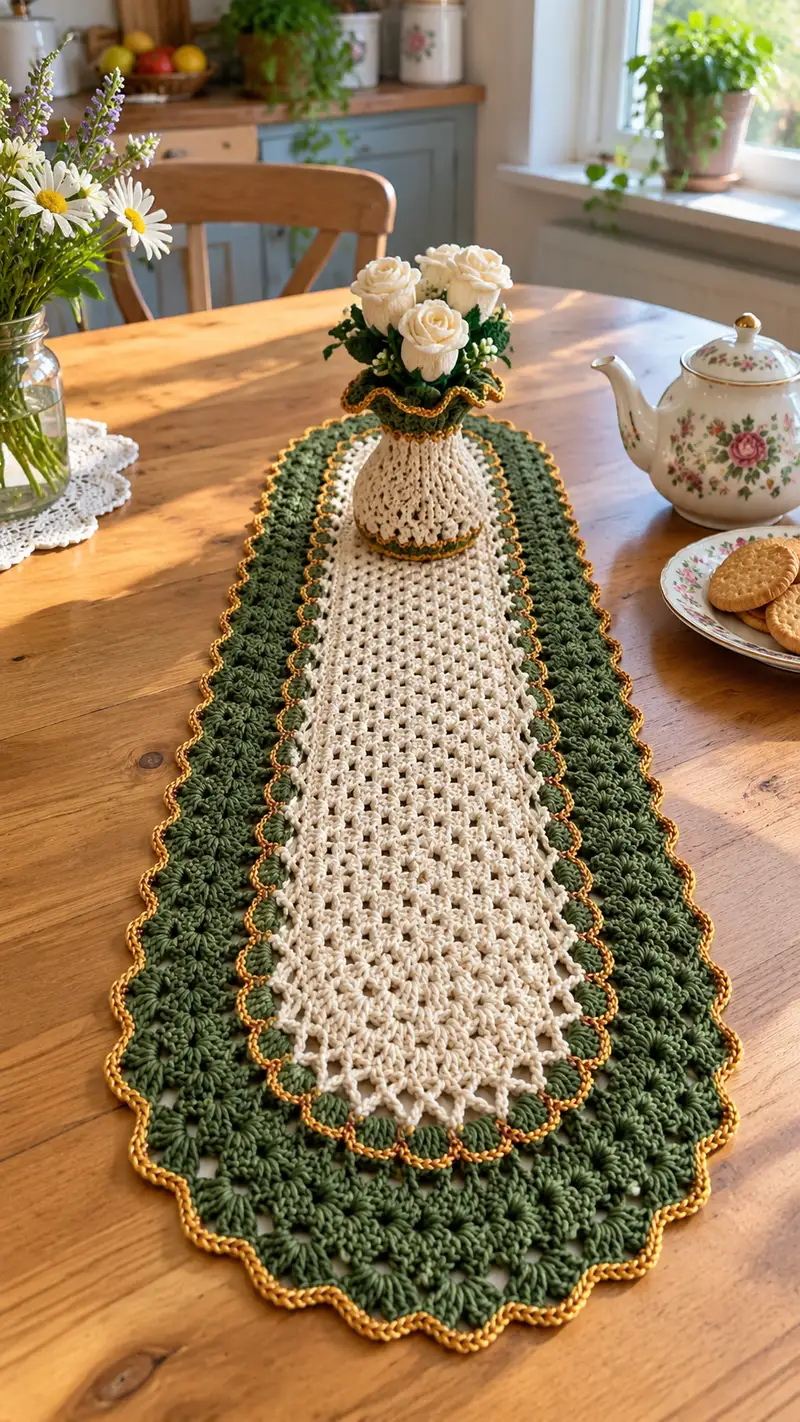
A timeless oval table runner worked in a warm cream center with a deep forest green scalloped border and a gleaming gold picot edge. This elegant runner uses simple lace mesh and cluster motifs to create a hand-crafted heirloom look. The pattern also includes a matching ruffled vase cozy shown placed on top of the runner. Detailed instructions, stitch counts and finishing tips make this a satisfying intermediate crochet project.
Progress Tracker
0% Complete
— Notes :
Info :
This runner is worked in continuous rounds (spiral) to create an oval shape. Begin with a foundation chain and work around both sides of the chain. Increase evenly at both short ends each round until the desired oval width is achieved, then work even rounds to produce length. Switch colors as instructed. Tension is important: aim for a firm but drapey fabric. Block when finished to shape scallops.
— Center Mesh Panel (Cream) :
Round 1 :
Chain 61 (foundation). Working into the 2nd chain from hook and across: 1 sc in each ch to the last ch, in the last ch work 5 sc to form the turning curve; now working along the opposite side of the foundation chain, 1 sc in each ch back toward the beginning, in the final chain work 5 sc in same stitch as first sc to complete the oval join. Join with sl st to first sc (total after joining: 132 sc)
Info :
Place a stitch marker in the first stitch of the round; move marker up as you progress to mark your round start. The 5-sc clusters at both ends form the rounded ends of the oval.
Round 2 :
Ch1, sc in same st, *sc in next 9 sts, 2 sc in next st*; rep from * to * across first side (total increases distributed across the side curve and straights), in the 5-sc end cluster work (2 sc, 1 sc in next 3 sts, 2 sc) to expand the curve; continue around opposite side mirroring the first side; sl st to join (total 156 sc)
Info :
Distribute increases evenly along straight sections and concentrate a few increases in the end cluster to keep the oval end smooth. Count after joining to confirm stitch count.
Round 3 :
Ch1, sc in same st, *(sc in next 11 sts, inc) repeat across each straight section; in each 5-sc end cluster: (sc, inc, sc, inc, sc) to continue shaping; sl st to join (total approx 180 sc - increases distributed)
Round 4 :
Ch2 (counts as dc), *ch1, sk 1 st, dc in next st (creates the base for the open mesh), rep across the first side until you reach the end clusters; in each end cluster: (dc in each of 5 cluster sts with ch1 between as placed to maintain oval), repeat for opposite side; sl st to join. This round establishes the mesh foundation.
Info :
Switch to V-stitch mesh now by working dc-ch1-dc (V-st) into the spaces along the straights and one V into the center of each end cluster. The look in the photo is an airy V-st mesh, so keep stitches relaxed.
Round 5 :
Ch2, dc into first st, *ch1, sk 1, (dc, ch1, dc) into next sp (V-st), rep across until curve. In the end clusters work V-sts into the center of each curve section to maintain smooth shaping; continue around and sl st to join. (Round stitch count is same as previous round in terms of V spots)
Round 6 :
Repeat Round 5 across entire oval working V-sts into each ch1 space along the straights and placing single V-sts in the end curves (mesh count remains consistent). Keep an even gauge (no additional increases this round).
Info :
Work these mesh rounds until your center panel reaches the desired length leaving room for the decorative transition and border. In the pictured runner the cream center is about 22 rounds of mesh after the foundation shaping; adjust to taste. Start stuffing nothing — this is flat.
Rounds 7-20 :
Continue in the established mesh pattern (dc, ch1, dc in each ch1 space) for 14 rounds (Rounds 7-20). Maintain the V-stitch in the end clusters to preserve oval shape. After Round 20 the oval center should be long and even. (Stitch count remains stable each round once mesh is established.)
Info :
If you want a narrower or wider cream center, add or subtract mesh rounds in this section. Always end on a full round so border placement aligns evenly.
Round 21 :
Ch1, sc in each stitch across (work into top of each dc and ch1 spaces as guests for sc), placing 3 sc evenly across each 5-st end curve to keep shape (sc around entire oval) (stitch count remains stable)
Round 22 :
Ch1, sc in each st BLO (this creates a slightly defined ridge to which the decorative gold transition will be attached). Work evenly around and sl st to join.
Info :
Working the round in BLO creates a subtle ridge that visually separates the lace center from the border and gives a neat point to pick up stitches for the next color.
— Narrow Gold Transition :
Info :
Attach gold yarn in any stitch along the BLO ridge made in Round 22. This narrow round of gold adds a highlighted line between center and green border.
Round 23 :
With gold yarn, ch1, sc into same st, *ch2, sk 2 sc, sc into next st; rep around to create small decorative picot-like loops linking center to border; join with sl st. (Spacing: one ch2 loop between each sc along BLO round)
Info :
If your gold yarn is a lighter weight, use a 3.5mm hook for this round to keep it snug and defined. Fasten off gold but leave a tail to weave in later if you prefer; otherwise leave ready to work the border from the green yarn attached right after.
— Outer Border Base (Green) :
Info :
Join forest green yarn into an sc on the round directly after the gold loops (or into the same stitch as a gold sc for a closely nested look). The border is made of repeating shell/cluster units that make scallops. We'll work shells of 7 dc separated by ch1 spaces down the straight edges and shells placed into the end clusters to preserve oval shape.
Round 24 :
Ch2 (counts as first dc), *sk next ch2 loop (from gold), work (7 dc) into next original BLO sc (or top of V-st stitch) to form a shell, ch1, sk 1-2 sts as needed, sc into next spot to anchor; rep across straight sections placing shells evenly; in the end clusters place 5-dc shells with ch1 between shells to soften the curve; sl st to join. (Count: approximate shell repeats vary by oval length — maintain even spacing so shell count is equal on both sides.)
Info :
Shell counts will determine final scallop rhythm. On a 61-chain foundation you will typically fit 12-16 shells per long side depending on spacing; keep counts the same on both sides for symmetry.
Round 25 :
Ch1, sc in top of first shell to anchor, *ch3, sk next 3 dc of shell, sc in center dc of next shell; rep across, placing ch3 spaces between shells to open the border slightly; in end curves carry the same ch3 spacing and sc into the center top of each shell in the curve; sl st to join.
Info :
This round helps define the scalloped edge and creates evenly spaced spaces used to build the more dramatic 3D clusters in the next rounds. Keep your stitches even and avoid pulling too tight.
Round 26 :
Ch2 (counts as dc), *into each ch3 space work (dc, ch1, dc) as a small V to lift the shells slightly and provide additional height between shell rows; sc into shell centers where necessary; repeat around. Sl st to join.
Rounds 27-34 :
Repeat the shell-building sequence over 8 rounds to develop a layered scallop effect: alternate rounds of full shells (7 dc) and rounds of anchored chain spaces with V-sts to create depth. At each end curve ensure the same number of shells are placed symmetrically. After Round 34 the border should be visibly thick and scalloped with shells raised from the center panel.
Info :
Every 3-4 rounds count your shells across one straight side and compare to opposite side; counts must match. If they differ, add or remove a sc anchor in a non-visible spot to balance.
Round 35 :
Work one round of sc evenly around in green to tidy up the shell bases and create a uniform foundation for the final shell clusters. Sc into top of shells and into ch1 spaces. Sl st to join.
Info :
This sc round in green evens the edge and prepares for the bold cluster stitches that define the scallops' outline.
— Raised Cluster Scallops (Green) :
Round 36 :
Ch3 (counts as dc), *into the next shell top work the following cluster: (yo, insert, pull up, yo, draw through 2) repeat to form 5-dc cluster worked as a shell cluster (cluster of 5 dc worked together at top), ch2, sl st into base between shells to anchor; rep across entire border placing clusters at center top of each shell; sl st to join. (Each cluster occupies a single shell top; total clusters equals number of shells).
Info :
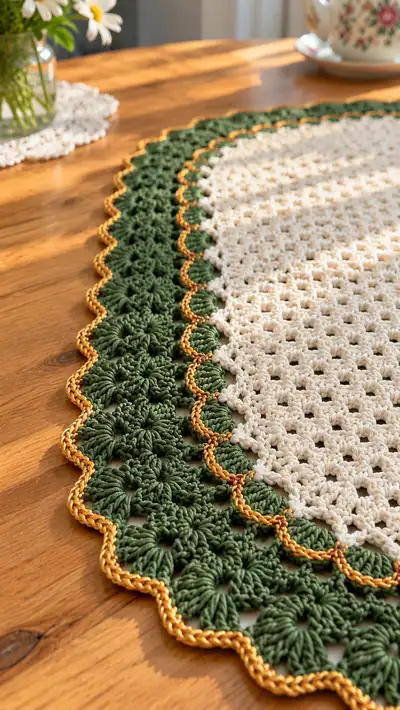
These 5-dc clusters are what produce the puffed scallop look in the photo. Work clusters with consistent tension so all scallops sit evenly.
Round 37 :
Ch1, sc into base between clusters, *ch3, work 1 sc into the top of the next cluster; rep to create looped arches that will be finished by the gold picot round; sl st to join.
Info :
If your green yarn is soft cotton, the clusters will relax over time — block immediately after finishing to set the shapes. Keep counts identical on both long sides and both short ends.
Rounds 38-44 :
Repeat a stabilization sequence: 2 rounds of sc into cluster tops and anchor points (Rounds 38-39), followed by 2 rounds of small V-sts (dc,ch1,dc) into arches to give gentle lift (Rounds 40-41), ending with a sc tidy round (Round 42). Use Rounds 43-44 to even any spacing differences: sc where gaps appear, sc decreases if needed at ends to maintain oval shape.
Info :
At this point the green border should have a firm, even scalloped edge of raised cluster motifs that match the photos. Check symmetry and measure across width: the total runner width (cream center + green border) should be approximately 9-11 inches depending on yarn and tension.
— Gold Picot Edge :
Info :
Join gold yarn to the tip of any outermost green scallop cluster. The gold round is worked as a small picot chain border to highlight each scallop tip and produce the decorative gold rope-like finish visible in the images.
Round 45 :
With gold, ch1, sc into same st, *ch4, sl st into the tip stitch of the next scallop (top of cluster), ch1, sc into the base between scallops; rep around so that each scallop tip has a small decorative loop anchored by a sc between shells; sl st to join. (This produces a stitching of gold loops floating over the green tips)
Round 46 :
Ch1, *in each gold loop work (sc, picot, sc) into the 4-ch loop: sc, (ch3, sl st into the last sc made to form a picot), sc; sl st to join. Fasten off and weave in ends securely. This creates the rope-like picot detail visible around the entire runner.
Info :
Use a smaller hook (3.5mm) for the gold rounds if the yarn is thinner to ensure the picots sit crisp and firm. Block after attaching the gold to set the scallops and create that crisp golden outline.
— Matching Vase Cozy (Cream with Green & Gold Ruffle) :
Info :
The small vase cozy visible in the photo is worked in the same cream center technique, joined to a green ruffled collar finished with gold picots. It is worked in the round top-down and shaped to snugly slip over a small tapering glass or ceramic bud vase (approx 3-4" tall). Adjust rounds for your vase size.
Round 1 :
Using cream yarn, make adjustable ring, ch1, work 10 sc into ring (10). Pull ring closed and place marker for beginning of round.
Round 2 :
Inc in each st around (20)
Round 3 :
(1 sc, inc) x10 (30)
Round 4 :
(2 sc, inc) x10 (40)
Info :
These increases form the base of the vase cozy and create a flat bottom. Measure across to ensure this diameter fits the bottom of your small vase. If you need a larger base, add another increase round using (3 sc, inc) repeats.
Round 5 :
Sc in each stitch around for 2 rounds (Rounds 5-6) to create rise and begin the sides of the cozy (40)
Round 7 :
(4 sc, dec) x8 (32) - begin gentle tapering to shape the vase body
Round 8 :
(3 sc, dec) x8 (24)
Info :
Try the cozy on your vase at this stage to check height and fit. Continue decreasing gently until the cozy grips the body of the vase comfortably without being too tight.
Round 9 :
Sc in each st around for 4 rounds (Rounds 9-12) to create a straight side (24)
Round 13 :
Change to green yarn. Ch2 (counts as dc), *work (dc, ch1, dc) into each stitch around to begin the ruffled collar; at the top 6-8 rounds for a pronounced ruffle increase stitches by working more dc into each st (for example 3-5 dc in each st) over the next 4 rounds (Rounds 13-16) to create a ruffle. Join each round with sl st.
Info :
To create the gathered ruffle you can work 3 dc in each stitch on Round 14, 4 dc on Round 15 and 5 dc on Round 16; this progressive increase yields a fuller ruffle as pictured. Adjust round counts to achieve the desired frill height.
Round 14 :
3 dc in each st around (72) - full ruffle beginning
Round 15 :
4 dc in each st around (288) if you want a very full ruffle OR for a milder ruffle work 2 dc in each st (144)
Round 16 :
Work an even sc round in green to tidy the ruffle base: sc in each st around (choose the same round stitch count as previous round if you used 2 dc per st, or adapt if you used 3-4 dc per st). Join with sl st.
Round 17 :
Attach gold yarn. Work picot edging around the top ruffle: *sc into next st, (ch3, sl st into last sc to form picot), skip next 1-2 sts depending on fullness; rep around. Fasten off and weave in ends.
Info :
For the vase cozy shown, the ruffle sits outward like a flower collar. You can stiffen the ruffle with fabric starch if you want a more sculpted shape. The cozy tucks over the neck of the vase and holds small decorative stems in place.
— Finishing & Blocking :
Info :
Weave in all ends neatly on the wrong side. For the runner and cozy, wet-block or steam-block into shape: pin the oval to a blocking mat with scallops evenly spaced and allow to dry. Starch lightly if you want a crisp table runner. For the cozy, set the ruffle shape by pinning and drying or using a light starch spray.
Info :
Check all stitch counts before cutting yarn: symmetry is key. Blocking brings the scallops into sharp definition and allows the gold edge to sit as shown in the photos.
— Pattern Variations & Tips :
Info :
If you prefer a longer runner, add additional mesh rounds in the cream panel before attaching the border. For a shorter runner, subtract mesh rounds. To change the scale, switch to DK yarn and smaller hook for a smaller runner, or bulky cotton with a larger hook for a chunky, rustic look. Always adjust the number of shell repeats on the border to keep symmetry.
This classic lace oval runner combines delicate meshwork with a bold scalloped border for a timeless table accent. The little matching vase cozy and gold trim make it feel special and gift-ready. Blocking and the final gold picots are what really bring it to life — a satisfying finishing flourish! 🧶🌿✨