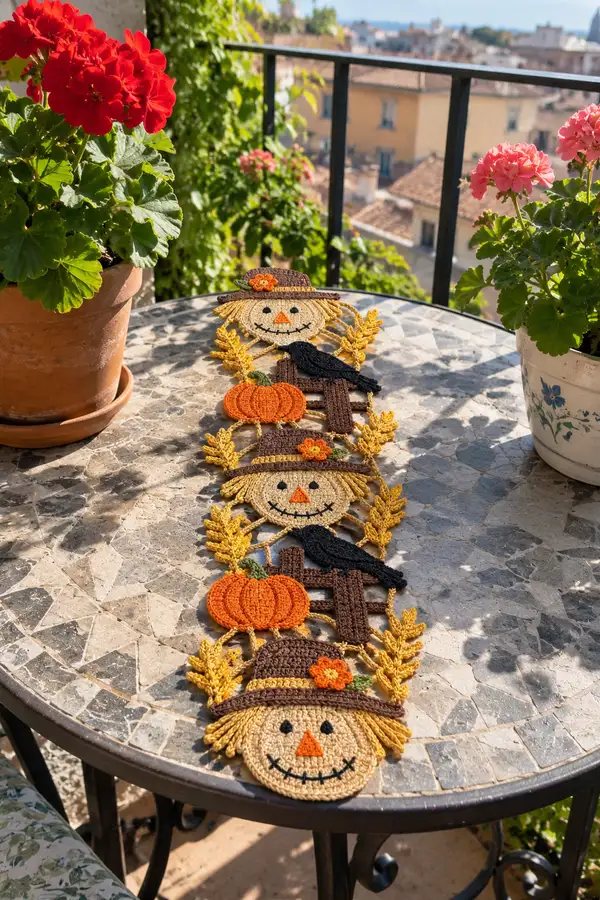
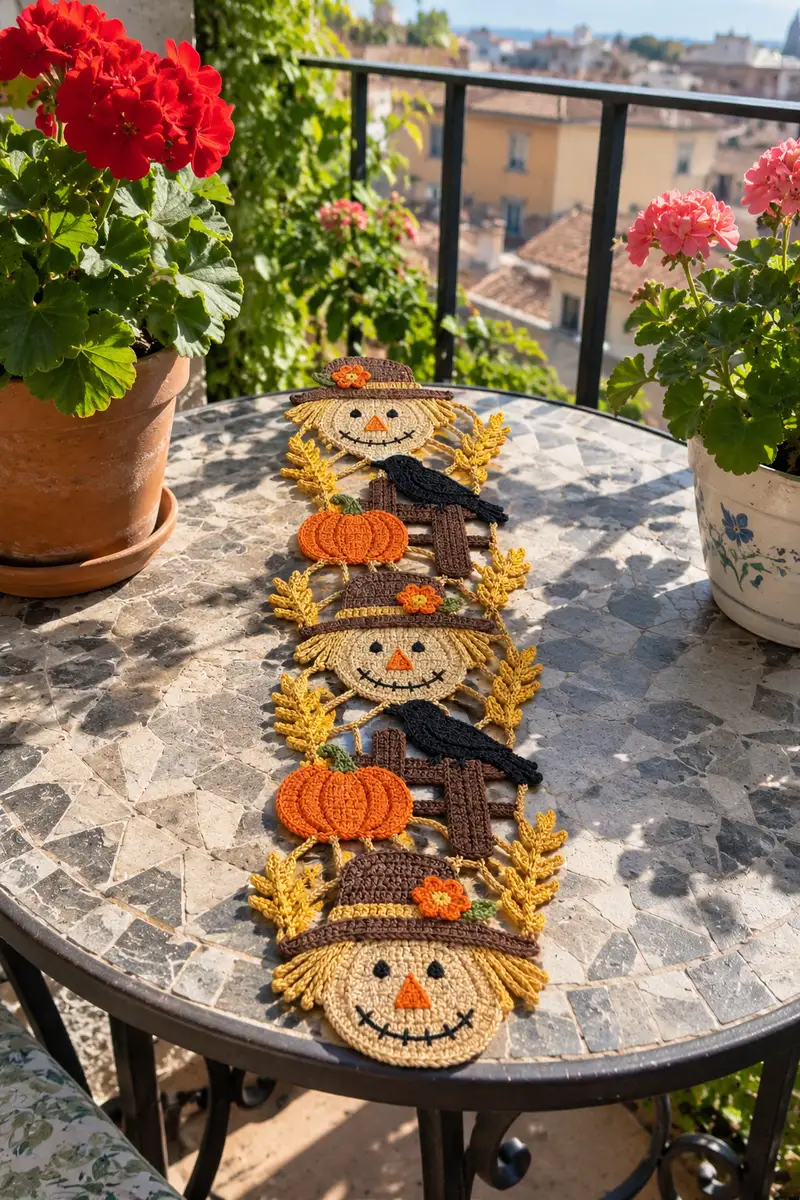
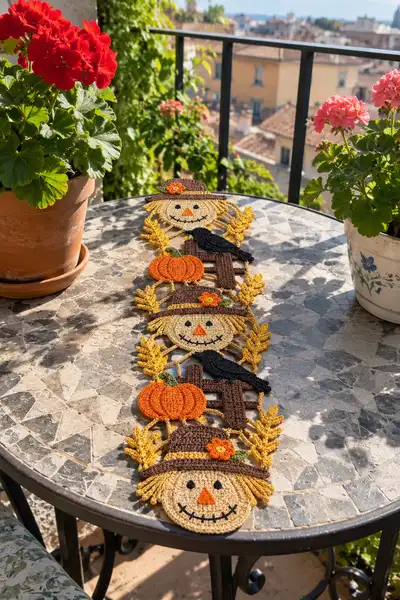
Bring autumn charm to your table with this Crow and Scarecrow Halloween Table Runner Pattern. The design features three cheerful scarecrow faces, pumpkins, rustic fence posts with perched crows, and golden wheat sprigs — all crocheted and joined into a long, decorative runner. Worked in warm harvest tones of tan, brown, orange, mustard and black, this pattern uses small motifs joined with a chain-lace base for flexible styling. Perfect for a seasonal centerpiece or mantel accent.
Progress Tracker
0% Complete
— Notes & Gauge :
Info :
Gauge is not critical for this decorative runner, but motifs should be consistent. With worsted cotton yarn and a 3.5 mm hook, a scarecrow face disc (completed) will measure approximately 9-10 cm / 3.5-4 in across. Block motifs lightly to flatten and even edges. Make a complete sample motif to establish tension and color balance before proceeding with the full runner.
Info :
Work in continuous rounds unless specified; place a stitch marker in the first stitch of the round and move it up each round. Surface embroidery is worked with a yarn needle and black or orange yarn as noted. Use blocking pins to shape flat pieces before joining.
— Scarecrow Face (Make 3) :
Round 1 :
6 sc in magic ring (6)
Round 3 :
(1 sc, inc) x 6 (18)
Round 4 :
(2 sc, inc) x 6 (24)
Round 5 :
(3 sc, inc) x 6 (30)
Round 6 :
(4 sc, inc) x 6 (36)
Round 7 :
(5 sc, inc) x 6 (42)
Round 8 :
(6 sc, inc) x 6 (48)
Round 9 :
(7 sc, inc) x 6 (54)
Round 10 :
(8 sc, inc) x 6 (60)
Round 11-16 :
1 sc in each st around (60) — work 6 rounds even to build face height (Rounds 11,12,13,14,15,16)
Info :
At this size the circle forms the base of the flat face. Place stitch markers at quarter points to help position eyes later. Block this piece flat after finishing for best results.
Round 17 :
(8 sc, dec) x 6 (54)
Round 18 :
(7 sc, dec) x 6 (48)
Round 19 :
(6 sc, dec) x 6 (42)
Info :
Before finishing the face, embroider features while the disc is flat. Use black yarn to stitch two small oval eyes with satin stitch or small French knots; place them around round 13-14, approximately 8-10 stitches apart depending on desired expression. Use orange to embroider a stitched triangular nose centered between the eyes (approximately on round 12-13).
Round 20 :
(5 sc, dec) x 6 (36)
Round 21 :
(4 sc, dec) x 6 (30)
Round 22 :
(3 sc, dec) x 6 (24)
Info :
If you prefer a perfectly flat face (no cupping), do NOT stuff — just finish flat and leave for sewing. If you want a slightly padded look, add a few small scraps of fiberfill now, distributing sparsely in the center.
Round 23 :
(2 sc, dec) x 6 (18)
Round 24 :
(1 sc, dec) x 6 (12)
Round 26 :
Fasten off leaving long tail for sewing (6). Weave tail through remaining sts and pull to secure into a slightly dimpled center. Weave end to the back.
Info :
Use black yarn to embroider the mouth now with backstitch: a curved smile across rounds 11-13, adding small vertical stitches to mimic stitched mouth detail. Work slowly to keep the smile centered and even.
— Hat Crown & Brim (Make 3) :
Round 1 :
6 sc in magic ring with brown yarn (6)
Round 3 :
(1 sc, inc) x 6 (18)
Round 4 :
(2 sc, inc) x 6 (24)
Round 5 :
(3 sc, inc) x 6 (30)
Round 6-7 :
1 sc in each st (30) — work 2 rounds even to form a short crown (Rounds 6 and 7)
Info :
Switch to a slightly darker brown for the band if you want contrast. You can also use BLO on the next round to create a distinct ridge for the hat edge.
Round 8 :
1 sc in each st BLO (30) — creates a defined band line
Round 9 :
(4 sc, inc) x 6 (36) — begin to flare for brim
Round 10 :
1 sc in each st (36)
Round 11 :
(5 sc, inc) x 6 (42)
Round 12 :
(6 sc, inc) x 6 (48) — wider brim base
Round 13 :
1 sc in each st (48)
Round 14 :
(7 sc, inc) x 6 (54)
Round 15 :
(8 sc, inc) x 6 (60) — brim flares outward
Round 16 :
1 sc in each st (60)
Round 17 :
Ch 1, sl st evenly around to create a neat edge; fasten off leaving long tail for sewing to face (60)
Info :
Sew the hat band flower decoration now: make a small 6-ch flower (see Flower section) and attach at the band front. Leave a tail for sewing and position carefully once hat is attached to the face.
— Hair & Straw Fringe (Fringe for Each Hat, Make 3 Bundles) :
Round 1 :
Join mustard yarn at back edge of hat band; ch 20, sl st back into the same anchor point to make one straw loop (counts as single loop)
Round 2-8 :
Repeat ch 20, sl st into successive stitches around the lower hat band to create 18-24 loops of fringe. Space loops evenly beneath the brim (work until you have 18-24 total loops per hat).
Info :
Once loops are in place, trim each loop to desired length to create straw-like strands or leave as loops for a tidy stylized look. For extra texture, fold each trimmed strand and knot near the base to form a straw knot.
— Pumpkin Motif (Make 3) :
Round 1 :
6 sc in magic ring with orange yarn (6)
Round 3 :
(1 sc, inc) x 6 (18)
Round 4 :
(2 sc, inc) x 6 (24)
Round 5 :
(3 sc, inc) x 6 (30)
Round 6 :
(4 sc, inc) x 6 (36)
Round 7 :
1 sc in each st (36)
Round 8 :
Change to front post double crochet (fpdc) around to form vertical ribs. Working into Round 7 posts, work 36 fpdc (36)
Round 9 :
1 sc in each st (36)
Round 10 :
Work rounds 8-9 two more times to build raised ribs (repeat fpdc then sc for 2 more rows)
Round 11 :
Change to smaller needle if you need tighter ridges. Work (3 sc, dec) x 9 to start slightly cup the pumpkin if you want a plump look (27)
Round 12 :
(2 sc, dec) x 9 (18)
Round 13 :
(1 sc, dec) x 6 (12)
Round 14 :
6 dec (6) — fasten off leaving tail for closing; weave tail to tighten center. Add small pinch of fiberfill if desired to puff pumpkin slightly before final closing.
Info :
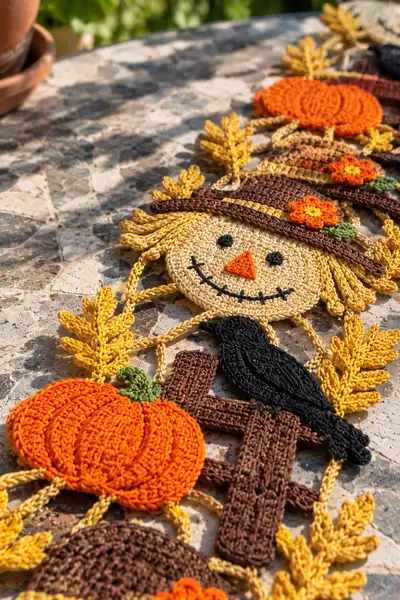
To create the pumpkin ribs seen in the photo, after finishing, use the yarn needle and a length of the same orange yarn to create surface ridge lines: push the needle from back to front at the top center, then down along the groove you want, and back to the center to create a sewn-rib effect. Repeat 5-7 ribs evenly spaced. Stuff lightly before final stitching if you want a slightly raised shape.
Round 15 :
Make a small green stem: Ch 6, sc in 2nd ch from hook and across (5). Fasten off leaving tail to sew to top center of pumpkin. Optionally work a tiny brown stem base with 6 sc in MR and attach beneath green leaf.
— Fence Slat Motif (Make 3) :
Info :
Fence pieces are worked as upright rectangular slats using foundation chains and rows. Each fence slat is made from two vertical posts joined by two cross slats.
Row 1 :
Foundation ch 18 with brown yarn, sc in second ch from hook and across (17) — turn (17)
Row 2-12 :
Ch 1, sc across (17) — repeat 11 more rows to reach 12 rows total; (17) — block to square rectangle
Info :
Make two identical rectangles for the vertical slats. For cross rails, make a shorter rectangle: foundation ch 10, sc across for 6 rows to create two small cross pieces that will be stitched across the vertical slats to create the ladder effect.
Row 13 :
Join cross rails: position them evenly and whip stitch in place forming a small fence section. Fasten off and weave tails.
— Crow Silhouette (Make 3) :
Round 1 :
6 sc in magic ring with black yarn (6)
Round 3 :
(1 sc, inc) x 6 (18)
Round 4 :
Work sc around in back loops for a slightly flat oval shape (18)
Round 5 :
Shift to shaping: (2 sc, dec) x 4, 2 sc (14) — this begins to create a tapered tail/beak area
Round 6 :
1 sc across (14)
Round 7 :
Shape wing: ch 8, turn, sl st in second ch from hook, sc next 6 ch, join back into body with sl st. Repeat for a second small wing on the other side if desired.
Round 8 :
Work a small beak: Ch 5, sl st in 3rd ch from hook then sl st to body; fasten off and secure.
Info :
Flatten and shape the crow silhouette, then press lightly with steam or block under a cloth to hold the shape. Sew the crow to the fence crossbar with invisible stitches, positioning it perched on one of the rails.
— Wheat Sprig (Make 12 or more pairs) :
Round 1 :
Ch 20 in mustard yarn. Working down the chain: Starting in 2nd ch from hook, *sc, ch 3, sl st in same stitch (creates a leaf)*, move 2 ch forward and repeat across until the end. You should have 6-8 leaf picots per sprig depending on spacing.
Round 2 :
Work a second row of picot leaves on the other side of the chain: join at end, ch 1, turn, and mirror the picots back along the opposite side to form a two-sided wheat sprig.
Round 3 :
Ch 2 and sl st into base to form a short stem; fasten off leaving long tail for attaching to motif.
Info :
For fuller wheat, make double chains and stagger picots to create a layered feathery effect. Block wheat sprigs gently to flatten and hold shape.
— Flower Accent (Make 6 small flowers) :
Round 1 :
6 sc in magic ring with bright orange yarn (6)
Round 2 :
Ch 1, in each st: (sc, ch 2, sl st) x 6 — forms 6 small petals (6 petals)
Round 3 :
Fasten off leaving long tail to sew to hat band or pumpkin leaf area.
Info :
Make some flowers with a yellow center by adding a tiny yellow disc (6 sc in MR, fasten off) sewn beneath orange petals for the look in the photos.
— Joining Chain-Lace Base & Runner Assembly :
Info :
This runner is made by creating a long decorative chain base, then joining each motif pair (scarecrow face + hat + wheat + pumpkin + fence + crow) to the chain with slip stitches and whip stitch. The base offers flexibility so the runner can be slightly curved to fit tables of various widths.
Round 1 :
With mustard yarn, ch 6 for starting loop, join ends with a sl st to form a small ring to anchor first motif. Continue ch 25-30 to the next anchor point and sl st into edge of first scarecrow face (see placement Info below). Repeat creating 6-8 chains between motif anchors to create airy lace spacing; the exact chain count can be adjusted to taste.
Round 2 :
After chaining anchors across the runner length, work a decorative edging: sc in each ch across, then return working back along the chain with a reverse row of picots (ch 4, sl st into same st) every 6 stitches to create a scalloped lace effect.
Info :
Layout the motifs first on a blocking board or table in the order: scarecrow + wheat pair either side + pumpkin + fence with crow perched + repeat. Pin pieces to the chain base to check spacing. When satisfied, use long tails from each motif to whip stitch to the chain base, then add small invisible stitches through motif backs for extra security.
Round 3 :
Join motifs as-you-go: where each motif meets the chain base, slip st through the chain and into the motif edge (for example along the face edge at rounds 11-13), making 6-10 join stitches depending on motif size to secure. Continue along runner joining each motif pair to the chain base.
Round 4 :
Work an outer border around the entire runner once all motifs are joined: sc evenly around, adding 3 sc in each corner curve to maintain flatness. Add a last round in BLO to create a subtle raised rim on the outside edge if desired.
Info :
Weave in all ends on the back; if you want the joins to lie flat and invisible, use a matching color thread and mattress stitch across seams. Press with steam under a cloth to set motif shapes and help the runner relax flat.
— Assembly & Final Embellishment :
Info :
Before final stitching, ensure each hat is sewn to its corresponding face at the back of round 7 of the hat to round 11 of the face. Sew the hair fringe under the brim and secure tightly. Attach pumpkins to the chain base beneath the face where pictured, then stitch fence to sit between pumpkins and faces. Position crow silhouettes perched on top of fence cross rails and sew securely. Add wheat sprigs symmetrically along the chain between motifs for that golden harvest look.
Round 1 :
Use long tails to stitch hat to face: align hat band to the forehead line (approx between rounds 10-12 of face) and whip stitch through hat band and face back for 10-12 stitches, adjusting for symmetry.
Round 2 :
Sew hair bundles under brim: using fringe tails or small strands prepared earlier, attach evenly around the lower edge of the hat band so straw falls down both sides of the face. Knot or stitch at base to secure each bundle.
Round 3 :
Attach pumpkins: center stitch pumpkin to chain base below the face using the long tail from the pumpkin stem. Add the green stem and a small flower accent to each pumpkin with a few neat stitches.
Round 4 :
Attach fence: sew fence slat piece to chain base between pumpkins; secure cross rails with small whip stitches through crossbars and vertical slats. Attach crow silhouette to one crossbar using several small stitches to hold firmly.
Round 5 :
Sew wheat sprigs: tuck the sprigs behind or between motifs and stitch at two points along the stem to prevent catching. Add small decorative flowers between hatband and wheat using long tails from flowers made earlier.
Info :
Finish with a light steam press over a damp towel if using cotton yarn. This settles stitches and helps motifs lie flat. Trim any loose threads and ensure all small elements are secured, especially if used in a household with children or pets.
— Finishing Touches & Blocking :
Info :
Blocking: pin the runner flat on blocking board to final dimensions and steam lightly, or wet-block following yarn manufacturer instructions. Shape each motif so that pumpkins are rounded and faces are circular and symmetrical. Allow to dry completely before removing pins and using on the table.
Info :
Tip: If you plan to launder this runner occasionally, use colorfast cotton yarn and hand wash gently in cool water, reshape and lay flat to dry.
This Crow and Scarecrow table runner brings the cozy spirit of autumn to your home with cheerful scarecrow faces, pumpkins, and golden wheat strands. Each carefully crafted motif layers texture and color for delightful seasonal charm. As you stitch and join each piece, the runner gradually takes shape into a warm and whimsical centerpiece you’ll be proud to display. 🧶🍂🎃