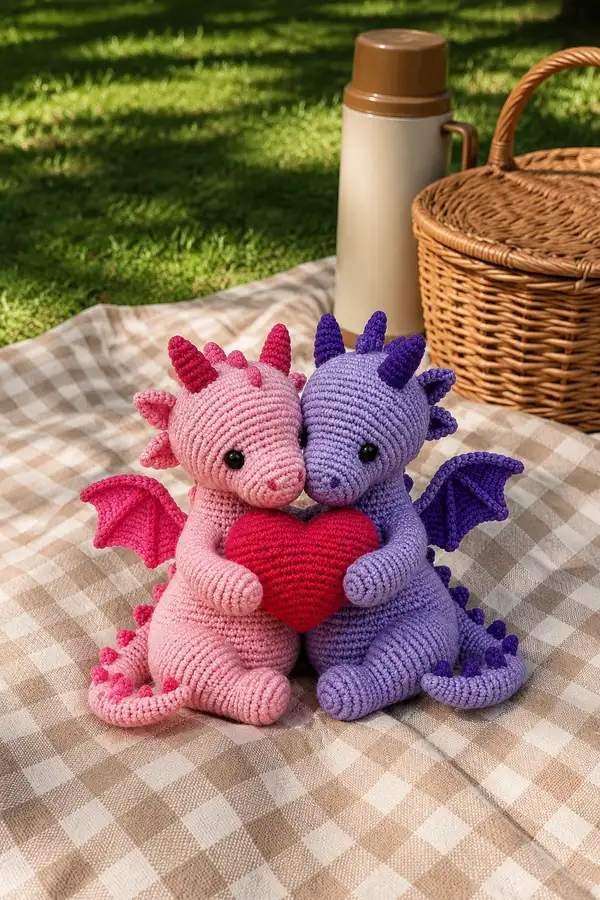
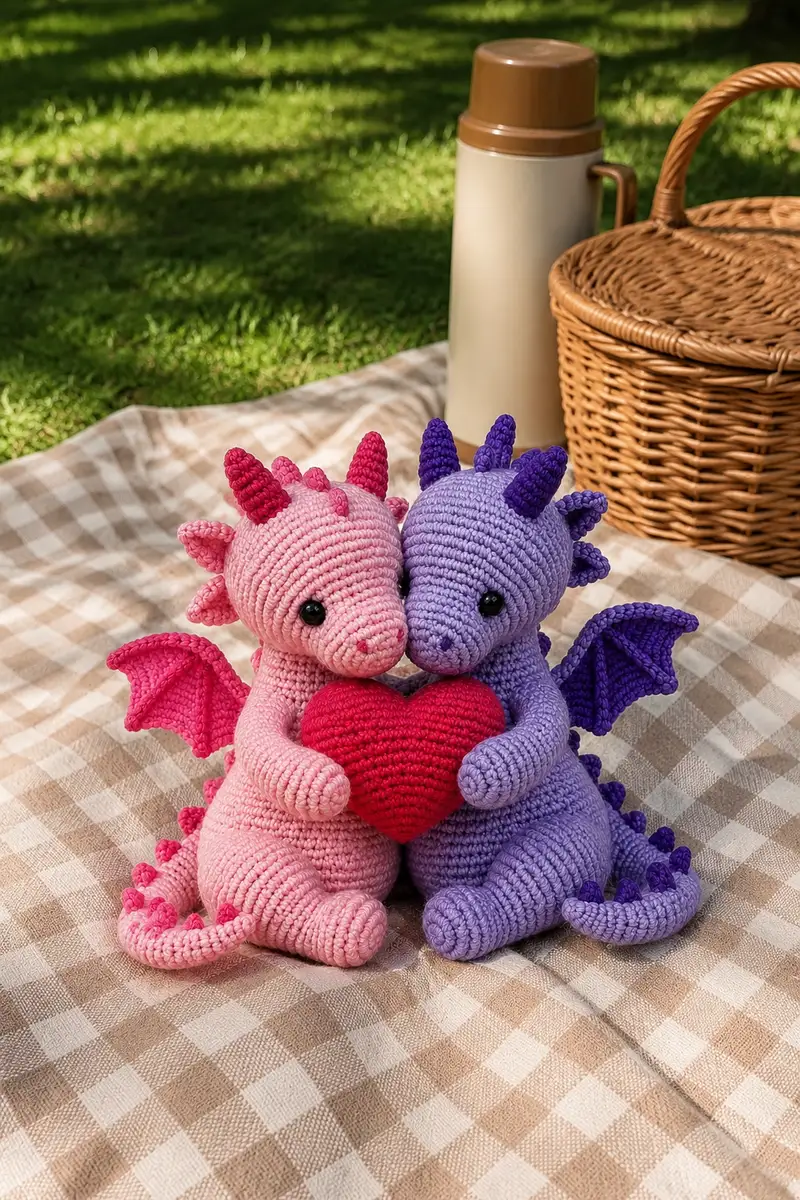
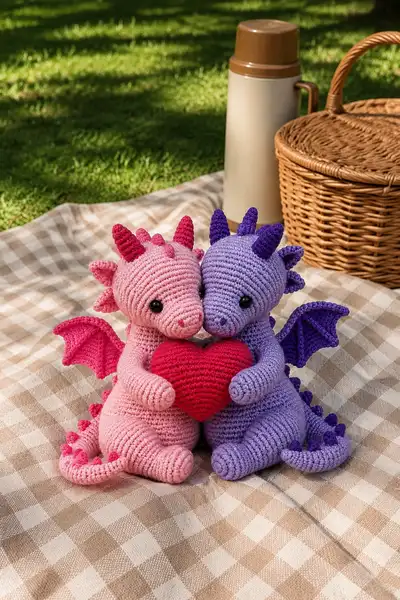
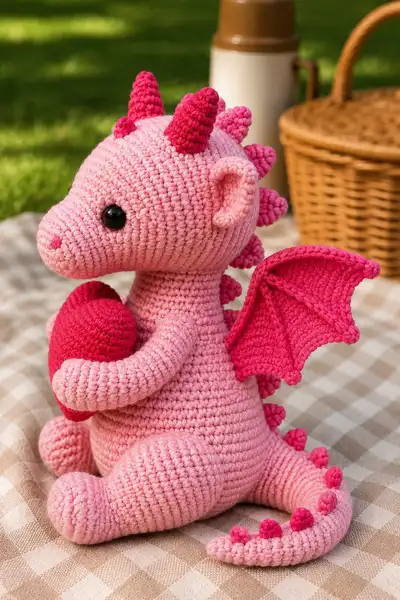
Create two adorable hugging dragon plushies holding a heart with this detailed amigurumi pattern. This design features rounded snouts, soft chubby bodies, curved tails with heart-tipped spikes, tiny horns, wing membranes, and a cuddly red heart for them to share. Clear round-by-round instructions, stuffing tips, and assembly guidance are included so you can recreate the pair exactly or customize colors and size.
Progress Tracker
0% Complete
— Notes & Overview :
Info :
This pattern is written in US crochet terms and is worked in continuous rounds unless specified. Each main section gives full round-by-round instructions for one dragon; make two sets for the pair. Work tightly for amigurumi to avoid stuffing showing through - use a hook 1 size smaller than the yarn label if needed. Use safety eyes before final stuffing and weave in long tails after sewing pieces together. Stretch and block pieces lightly if desired to shape the wings and ears.
Info :
All rounds are continuous; use a stitch marker to mark the first stitch of each round and move it up as you go. When the pattern says to make 'Make 2' this means make two identical parts for each dragon unless instructed otherwise. Where indicated, work in BLO or FLO to create texture ridges.
— Head :
Round 1 :
6 sc in magic ring (6)
Round 3 :
(1 sc, inc) x 6 (18)
Round 4 :
(2 sc, inc) x 6 (24)
Round 5 :
(3 sc, inc) x 6 (30)
Round 6 :
(4 sc, inc) x 6 (36)
Round 7 :
(5 sc, inc) x 6 (42)
Round 8 :
(6 sc, inc) x 6 (48)
Info :
These increases create a broad, rounded head base. If you prefer a slightly larger head, add one more increase round (7 sc, inc) x 6 = 54 before continuing.
Round 9-12 :
1 sc in each st (48) — 4 rounds to build height for the forehead and top of head
Info :
Eye placement: Position safety eyes between rounds 13 and 15, approximately 10-12 stitches apart depending on look. For a cuddly expression place them closer (8-10 sts apart); for a neutral look place 11-12 sts apart. Use pins to check both sides before securing.
Round 13 :
(6 sc, inc) x 6 (54) — gentle forward bulge to shape brow and snout base
Round 14-16 :
1 sc in each st (54) — work 3 rounds even to lengthen the snout base
Round 17 :
(6 sc, dec) x 6 (48) — begin tapering toward the snout
Round 18 :
(5 sc, dec) x 6 (42)
Info :
Start stuffing now: use small amounts of fiberfill, firm at the forehead and slightly softer toward the snout for a rounded look. Keep stuffing distributed and use a stuffing tool to push filling to the nose tip.
Round 19 :
(4 sc, dec) x 6 (36)
Round 20 :
(3 sc, dec) x 6 (30)
Round 21 :
(2 sc, dec) x 6 (24)
Info :
Define snout tip shaping by adjusting stuffing. If you want a slightly longer snout, add 1-2 rounds of even sc at 30 sts before continuing decreases.
Round 22 :
(1 sc, dec) x 6 (18)
Round 24 :
Do not close fully — FO leaving a long tail for sewing into the neck later. The head opening is used to attach to the neck and body. Fasten off if necessary and hide tail inside for a clean finish.
Info :
If adding nostril embroidery: use small running stitches with matching yarn in the snout tip using your yarn needle. Do this before attaching the head to the neck for best control.
— Ear (Make 2 per head) :
Round 1 :
6 sc in magic ring (6)
Round 3 :
(1 sc, inc) x 6 (18)
Round 4 :
1 sc in each st (18)
Round 5 :
(2 sc, dec) x 6 (12)
Round 6 :
1 sc in each st (12)
Round 7 :
(1 sc, dec) x 4 then 4 sc (8) — create inner curve shaping
Round 8 :
FO, leaving a long tail for sewing. Slightly flatten the ear and sew the base to the side of the head between rounds 10-12, pulling the ear forward for a natural cupped look.
Info :
Pin ears on the head symmetrically — measure distance from center to ensure matching placement on both sides. Slightly curve the ear before sewing to get that cupped appearance seen in the photos.
— Horn / Head Cone (Make 3 per head: two side, one center) :
Round 1 :
6 sc in magic ring (6)
Round 3 :
(1 sc, inc) x 6 (18)
Round 4 :
1 sc in each st (18)
Round 5 :
(2 sc, dec) x 4 + 2 sc (14) — tapering
Round 6 :
(1 sc, dec) x 4 + 2 sc (10)
Round 7 :
5 dec? No. Work 1 sc in each st (10) — small finish round for a neat tip
Round 8 :
FO leaving tail. Stuff lightly and sew cones to top of head: one cone centered at the forehead and two slightly behind it on either side. See Info for spacing.
Info :
Spacing: place the center horn on the top front of the head, then measure back 6-8 stitches and place the side horns equidistant to create the clustered look seen. For the pink dragon use bright magenta horns; for purple use deep violet.
— Neck :
Round 1 :
6 sc in magic ring (6)
Round 3 :
(1 sc, inc) x 6 (18)
Round 4 :
(2 sc, inc) x 6 (24)
Round 5-12 :
1 sc in each st (24) — work 8 rounds to create the distinct long neck seen in the photos
Info :
Neck length: This section creates the long, graceful neck. Stuff lightly — keep it flexible so the head attachment sits naturally into the body. Leave the last round open for sewing to the body.
— Body :
Round 1 :
6 sc in magic ring (6)
Round 3 :
(1 sc, inc) x 6 (18)
Round 4 :
(2 sc, inc) x 6 (24)
Round 5 :
(3 sc, inc) x 6 (30)
Round 6 :
(4 sc, inc) x 6 (36)
Round 7 :
(5 sc, inc) x 6 (42)
Round 8 :
(6 sc, inc) x 6 (48)
Round 9-12 :
1 sc in each st (48) — bulk of the round belly area
Info :
If you want the dragons to lean into each other more, build an extra even round here so the torso is slightly taller and the center of gravity sits forward.
Round 13 :
(6 sc, dec) x 6 (42) — starting to shape into the hip area
Round 14 :
(5 sc, dec) x 6 (36)
Round 15 :
(4 sc, dec) x 6 (30)
Round 16 :
(3 sc, dec) x 6 (24)
Info :
Begin stuffing body fairly firmly from the bottom up to create a stable base. The bottom needs to be firmer so the dragons can sit upright without tipping forward.
Round 17 :
(2 sc, dec) x 6 (18)
Round 18 :
(1 sc, dec) x 6 (12)
Round 19 :
6 dec (6) — do not close fully. Leave opening to attach neck and for final stuffing
Info :
Attach neck to body: Align neck opening to the top center of the torso (rounds 10-12 area from top of body). Pin in place, check position with head attached, then sew using a ladder stitch or whip stitch. Fasten off and weave tails into the body.
— Arm (Make 2 per dragon) :
Round 1 :
6 sc in magic ring (6)
Round 3 :
(1 sc, inc) x 6 (18)
Round 4-8 :
1 sc in each st (18) — build arm length for hugging pose (5 rounds)
Round 9 :
(1 sc, dec) x 6 (12) — begin taper for wrist
Round 10-12 :
1 sc in each st (12) — short even rounds for wrist
Info :
Stuff hand portion firmly so the arm holds its curve and can be sewn into a hugging position. Leave the arm slightly curved when stuffing — a small stuffing tool helps push fiberfill into the rounded hand.
Round 13 :
(1 sc, inc) x 4 + 8 sc? No. To shape the forearm: (2 sc, inc) x 4 (16) — widen slightly toward the shoulder
Round 14-16 :
1 sc in each st (16) — 3 rounds to lengthen upper arm
Round 17 :
(2 sc, dec) x 4 (12) — shape toward shoulder base
Round 18 :
1 sc in each st (12) then FO leaving a long tail for sewing. Position arms on the sides of the body slightly forward (around rounds 10-14 on body) so they meet in the center holding the heart.
Info :
Sew arms to the body by matching the seam and placing them so that the tips touch the heart when assembled. Use ladder stitch through the arm opening and body to make a secure but neat attachment.
— Leg & Foot (Make 2 per dragon) :
Round 1 :
6 sc in magic ring (6)
Round 3 :
(1 sc, inc) x 6 (18)
Round 4 :
(2 sc, inc) x 6 (24)
Round 5-7 :
1 sc in each st (24) — form round foot base
Round 8 :
(2 sc, dec) x 6 (18) — begin forming ankle
Round 9-12 :
1 sc in each st (18) — build lower leg
Round 13 :
(1 sc, inc) x 6 (24) — widen for thigh bulge
Round 14-18 :
1 sc in each st (24) — lengthen the upper part of the leg
Round 19 :
(2 sc, dec) x 6 (18)
Round 20 :
1 sc in each st (18) then FO leaving a long tail to sew to the bottom sides of the body. Stuff the foot firmly so the dragon sits; stuff leg a bit less firm to allow slight shaping when sewn.
Info :
Place legs at the bottom front of the body such that the feet rest slightly outward — this creates the stable sitting pose. Space legs approximately 10-12 stitches apart at the base depending on body circumference.
— Tail :
Round 1 :
6 sc in magic ring (6)
Round 3 :
(1 sc, inc) x 6 (18)
Round 4-6 :
1 sc in each st (18) — tail base
Round 7 :
(2 sc, dec) x 4 + 2 sc? Keep math simple: (2 sc, dec) x 4 + 2 sc = 14
Round 8-12 :
1 sc in each st (14) — tapering tail length
Round 13 :
(2 sc, dec) x 3 + 2 sc = 11? Let's make it exact: (1 sc, dec) x 4 + remaining sc to maintain shape (10) — but to keep accurate counts: Round 13: (2 sc, dec) x 3 + 2 sc = 11
Round 14-15 :
1 sc in each st (11) then FO leaving tail for sewing. Attach previous rounded spikes along the top of the tail (see Spike section) spaced evenly from base to tip.
Info :
Make sure the tail has curvature. When attaching to the back of the body, position it slightly to one side so the pair can sit without tails colliding. Stuff lightly so the tail curves but remains soft.
— Dorsal Spike / Small Cone (Make 8-12 per dragon) :
Round 1 :
5 sc in magic ring (5)
Round 3 :
(1 sc, inc) x 5 (15)
Round 4 :
1 sc in each st (15)
Round 5 :
(2 sc, dec) x 4 + 3 sc? To keep consistent: (2 sc, dec) x 5 = 10
Round 6 :
1 sc in each st (10)
Round 7 :
FO leaving long tail. Stuff very lightly and sew spikes along center top of head, down the neck and back to the tail, spacing 6-8 stitches between each spike depending on look desired.
Info :
Create smaller spikes for the head (slightly shorter, 5 rounds) and larger spikes for the center of the back (6-7 rounds). Use accent color for contrast: hot pink on the pink dragon, deep purple on the purple dragon.
— Wing (Make 2 per dragon) :
Info :
Wings are crocheted flat in rows with a slightly raised ridge for the wing 'bones'. Work two mirrored wings per dragon. The wing uses the accent color for the membrane and main body color for the edge if desired.
Row 1 (Round 1) :
Ch 16, sc in 2nd ch from hook and across (15)
Row 2 :
Ch 1, turn, sc across (15)
Row 3 :
Ch 1, turn, (sc 5, inc) x 3 = math check: sc 5 then inc repeatedly to shape - recommended exact: sc in first 4, (2 sc in next st) x3, sc remaining to total 18 — but to keep clarity: Increase evenly to reach 18 sts (18)
Row 4 :
Ch 1, turn, sc across (18)
Row 5 :
Ch 1, turn, decrease 1 near the tip to create curve: (sc 3, dec) x 4 + sc 2 — result 14 sts
Row 6 :
Ch 1, turn, sc across (14)
Row 7 :
Ch 1, turn, (sc 1, inc) x 7 = 21 — widen slightly for inner wing shape (21)
Row 8 :
Ch 1, turn, sc across (21)
Row 9 :
Ch 1, turn, create scalloped ridge: BLO sc across (21) — this makes a ridge line for wing bones
Row 10 :
Ch 1, turn, sc across decreasing to taper: (4 sc, dec) x 4 + sc 1 = 17
Row 11 :
Ch 1, turn, sc across (17)
Row 12 :
FO, finish edge with sc around entire wing edge, placing 3 sc in each corner for a neat rounded finish. Make opposite wing mirrored by working same rows and flipping before finishing edge.
Info :
Sew wings to the back of the body between rounds 12-16. Pin first and baste stitch to check symmetry. Slightly fold the wing forward when sewing to give a natural wing curve. For stiffer wings, insert a thin strip of cardboard or plastic between membrane layers before closing.
— Heart (Make 1 shared heart) :
Round 1 :
Make 2 separate halves: For each half, 6 sc in magic ring (6)
Round 3 :
(1 sc, inc) x 6 (18)
Round 4 :
1 sc in each st (18)
Round 5 :
(2 sc, inc) x 6 (24)
Round 6 :
1 sc in each st (24)
Round 7 :
Change to shaping round: dec evenly to create heart curve: (3 sc, dec) x 6 (18)
Round 8 :
1 sc each (18) — finish half and make two identical halves
Round 9 :
Sew halves together along the straight edge, stuffing firmly as you go to create a plump heart. After sewing most of the seam, add stuffing and close remaining gap with invisible stitches.
Info :
For the heart to sit correctly between the two arms, sew a small fabric loop at the back of the heart or embroider two small anchor stitches on each side so the arms can be attached and overlap the heart slightly without it slipping.
— Small Details and Embroidery :
Info :
Use contrasting accent yarn to embroider tiny nostrils and a blush line if desired. Sew tiny chain-stitched eyebrows above eyes to add expression. Use yarn tails to secure spikes and horns firmly by passing the needle through the base several times.
Round 1 :
Eye detail: If embroidering eyelids, use slip stitch along row above the eye and secure with a few backstitches to create a sleepy or expressive look.
Info :
Weave in all tails by threading the yarn needle along the inside of the piece for several cm before trimming close to avoid tails pulling out. For safety eyes, ensure the washer is firmly attached and press until locked.
— Assembly & Final Stuffing :
Info :
Pin all pieces in position before sewing. Use the body rounds indicated earlier as a reference: arms attach between body rounds 10-14, wings at rounds 12-16, tail at back center around round 14, legs at base spaced 10-12 sts apart. Check symmetry frequently.
Round 1 :
Sew the head to the neck opening: use mattress stitch or ladder stitch to create a seamless join. Make sure the head tilts slightly toward the heart for a hugging expression.
Round 2 :
Sew arms in place so the hands meet in the center. Use small invisible stitches to anchor the heart between them. Sew one arm slightly over the heart edge and the other slightly under the heart edge to create a natural embracing look.
Round 3 :
Sew legs to the base of body and check sit position: adjust stuffing in the bottom to ensure the dragon sits upright. Add extra stuffing behind lower back if necessary to maintain balance while seated.
Info :
If you want the dragons to lean together like the photo, sew the two bodies with a few mattress stitch anchors at the sides where they touch (about 3-4 small stitches), then hide the tails of yarn inside before trimming. This secures the duo in their hugging pose.
Round 4 :
Attach wings at the back and sew spikes along the center of the back and tail. Add the horns to the head. Check for even spacing and stitch each piece securely with strong yarn and multiple passes through the base.
Info :
Finish by trimming all tails and giving the pair a final shaping. Use your fingers to roll the limbs into a natural curve, and use tiny tacking stitches between arms and torso if you want the hug to remain closed permanently.
This double-hugging dragon set brings warmth and charm to any shelf or gift box. Each tiny detail — from rounded horns to scalloped spikes and the bright red heart — is designed to create a whimsical and affectionate pair. Enjoy stitching each section and watching the two dragons come to life as they find each other in your hands. 🧶💘 These make perfect keepsakes or gifts for loved ones — stitch with love and share the hugs! 🌸