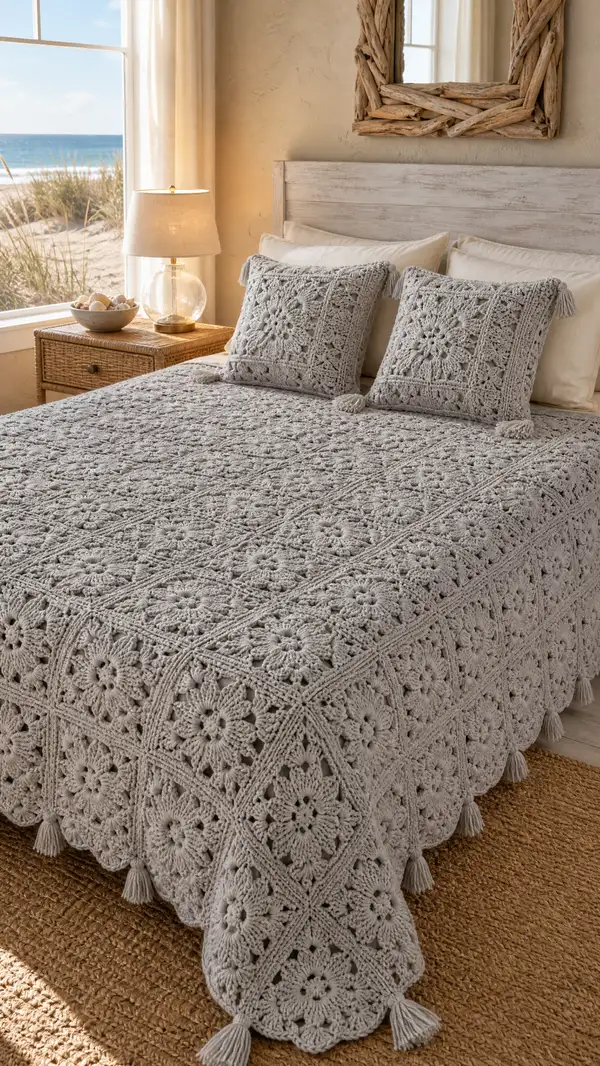
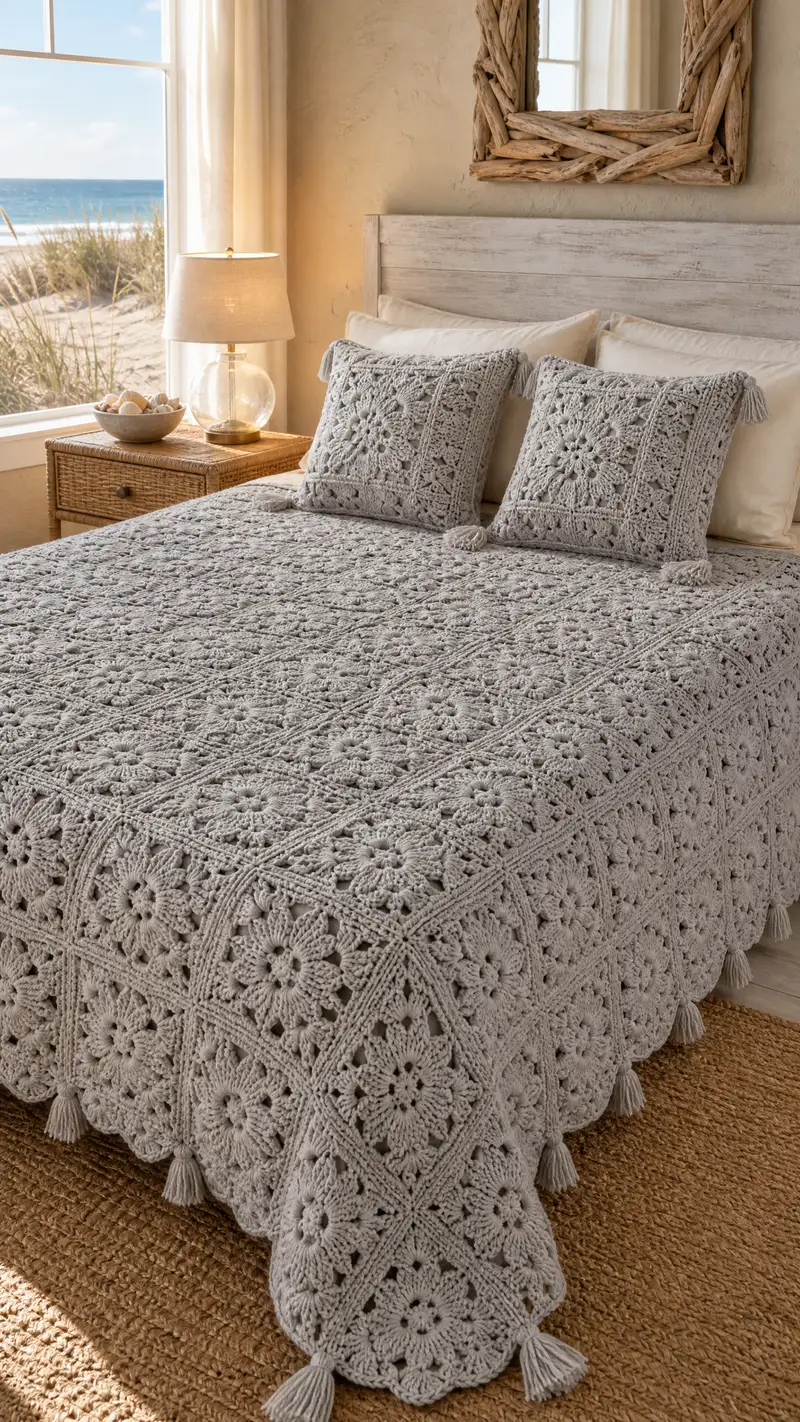
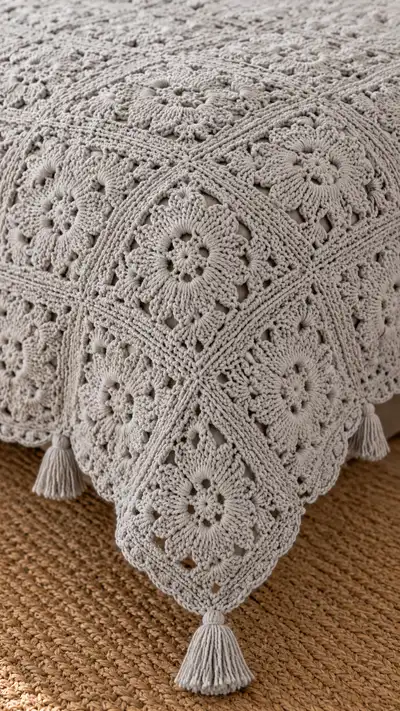
A serene, cottage-style bedspread made from floral granny squares in a soft dove gray. The bedspread features raised ridge joins, a deep decorative border and tassel accents at each corner and side seam. Perfect for coastal or farmhouse bedrooms, this pattern uses textured puff clusters and joined-as-you-go assembly for a drapey, vintage-inspired finish.
Progress Tracker
0% Complete
— Finished Size and Planning :
Info :
Finished size for the sample bedspread shown measures approximately 92" x 96" (queen/large double) constructed from 10 motifs across by 12 motifs down. Each completed motif measures roughly 9"-10" square after blocking when worked in worsted weight cotton on a 5.5 mm hook. Adjust number of motifs to fit different bed sizes: Twin 7 x 9, Full 8 x 10, King 11 x 12, etc.
Info :
Gauge: One finished motif = 9.5" square after blocking using 5.5 mm hook and worsted cotton; puff clusters should be firm but not tight. Blocking will open the petals and square the motif.
— Motif (Make 120 motifs or adjust as needed) :
Round 1 :
mr, ch 3 (counts as dc), 15 dc into ring, sl st to top of ch 3 to join (16)
Round 2 :
ch 1, *sc in next dc, ch 3, sk 1 dc* around, sl st to first sc to join (16 sc + 8 ch-3 sps)
Round 3 :
Working in each ch-3 space: *(ch 2, puff5, ch 2, sl st in same ch-3 space), sl st into next sc* around to create 8 puff petals. Puff5 = [(yarn over, insert hook, pull up loop) x 5] pull through all loops and ch 1 to close puff. After completing around, sl st to join at base of first petal. (8 petals; center finished)
Info :
Puff stitch technique: keep each loop pulled to a similar height. When you finish a puff, pull gently to even it with previous puffs, then ch 1 to secure. Practice a few puffs on scrap yarn to get even texture.
Round 4 :
ch 1, sc in base of same petal, *ch 3, sc in next petal base* around to form 8 ch-3 loops between petals, sl st to first sc (8 sc + 8 ch-3 sps)
Round 5 :
Change to a 5.5 mm hook if you used a smaller hook. Info : This round begins expanding the motif into a square form. ch 3 (counts as dc), in each ch-3 space work: (2 dc, ch 2, 2 dc) – this creates corner arches at each petal separation. Between corners, work 1 dc in each sc base from previous round. You will make 8 corner groups and 8 singles. Join with sl st to top of ch 3. (Total stitches approx 48-56 depending on exact placement)
Round 6 :
ch 1, sc in same st, *(sk next dc, [3 dc, ch 2, 3 dc] in ch-2 corner sp), sk next dc, sc in next dc across petal area* repeat around forming defined corners and side arcs. Sl st to first sc. (8 corner shells, side dc groups total will depend on stitch spacing; motif begins to take a rounded square shape)
Round 7 :
Info : Start regularizing stitch counts for easier joining. From this round forward, we will work established repeat sides between corners so each side has the same number of stitches. ch 3 (counts as dc), *work 1 dc in each of the next 6 sts, [3 dc, ch 2, 3 dc] in next corner ch-2 sp* repeat around until you have 4 identical sides between corners. Join. (Approx 4 sides of 14 dc each + 4 corner shells = ~64 sts)
Round 8 :
ch 1, sc in next st, *ch 3, sc in 7th st along side, repeat across side, sc in first corner shell to anchor* finish round to create a grid of ch-3 sps along sides. This prepares for surface texture rounds. (Even side spacing; count 6-8 ch-3 sps per side depending on your tension)
Round 9 :
ch 2 (counts as hdc), hdc in same st, *hdc in next 7 sts down side, [hdc, ch 2, hdc] in corner, hdc in next 7 sts* repeat around, sl st to top of ch 2. (This round evens out sides; approximate total 72-80 hdc)
Info :
Check that each side has the same number of hdc between corner ch-2 spaces. If not, add or reduce hdc evenly across sides to reach equal counts — symmetry matters for join-as-you-go alignment.
Round 10 :
ch 1, sc in each hdc around working evenly; work 3 sc in each corner ch-2 space to keep corners square. Sl st to join. (Approx 80 sc; motif is now a definitively squared shape)
Round 11 :
Info : Add a raised ridge frame around the floral square. ch 2, dc in same st, *dc in next 9 sts across side, 3 dc in corner sp, dc across next side* repeat. Work last dc, sl st to join. (Count carefully; sides should match so that each side has equal numbers of dc)
Round 12 :
ch 1, 1 sc in each dc around working in BLO (back loops only) to form a crisp ridge. Work (sc, ch 1, sc) in corner to keep square. Sl st to join. (Same stitch count as Round 11)
Round 13 :
Info : Decorative surface cables — in this round we create raised rib lines that will visually form the diagonal joins when squares are assembled. ch 3 (counts as dc), *skip next st, fpdc around next st (front post double crochet), dc in next st* repeat around with symmetrical placement so each side shows 3-4 fpdc ribs depending on side length. Join with sl st. (Total depends on fpdc count; maintain pattern symmetry)
Round 14 :
ch 1, sc in each st around working evenly and keeping corner (sc, ch 1, sc) to maintain shape. This round tidies the surface cables. (Stitch count consistent with previous rounds)
Round 15 :
Info : Optional texture round. If you want deeper petal definition, this round adds alternating puff clusters along the side spaces. Work *puff3 in every other side ch-3 sp, sc between puffs* around. This is optional — skip for a cleaner look. (If worked, adjust stitch count to include puffs and sc anchors)
Round 16 :
ch 1, sc in each st around, working 3 sc in each corner (established pattern), sl st to join. (Final motif sizing round; maintain stitch counts so every motif matches in size)
Round 17 :
Info : Final edging for motif to prepare for join-as-you-go. ch 2, dc in same st, dc in next 2 sts, ch 1, skip 1, dc in next sts evenly until corner; for each corner work (2 dc, ch 2, 2 dc). Join to starting dc. This creates evenly spaced side stitches for joining.
Round 18 :
ch 1, sc in each st around working in BLO on this round to create a defined picture-frame ridge that will be used to seam motifs together. Finish and fasten off leaving 20" tail for seaming if not using join-as-you-go. (Final motif: square with defined ridge; measure to achieve 9-10" across after blocking)
Info :
Block every motif to measurement before joining. Wet block or steam-block to open puff petals and square the sides. Pin to a square template and allow to dry completely for best, consistent results.
— Join-As-You-Go Joining Method (Use while making final round of motifs) :
Info :
This method joins motifs on-the-fly on the last round (Round 17/18). Work three sides of the motif as usual; on the side where you will join to a neighbor, work join steps: when you reach a joining space, insert hook into corresponding stitch on already-joined motif and sl st to join, then continue working ch spaces as instructed. This forms a flat seam and preserves the raised ridges.
Round J1 :
Start last round of motif as Round 17. On side A when you reach the point where this motif meets an existing motif, *sl st into corresponding BLO sc on neighbor, ch 1, sl st back into current motif to anchor* and continue. Repeat for each stitch aligning neighbor motifs exactly. (Each sl st join replaces sl st in the motif; maintain symmetry across whole side.)
Info :
Pin adjoining motifs lightly before joining to maintain perfect alignment of corner and side points. Work joins so that the ridge of the motif lies above the seam for a raised grid look as seen in the photographs.
Round J2 :
After joining a full row, work corner joins by placing (sl st into corner neighbor, ch 1, sl st back) in the corner ch-2 and continue to finish round. When joining into multiple motifs at a corner (four-way join), work a triple sl st sequence to create a firm, square corner. (Corner join uses 3 small sl st anchors)
Info :
When joining with join-as-you-go, avoid pulling joins too tightly — keep joins flat so the decorative ridge frames sit proud of the seam. If you prefer an invisible seam, join motifs later using whip stitch along the BLO ridge.
— Joining Strips and Structural Rows :
Round S1 :
After motifs are joined into panels, add a reinforcement strip across every 4th row to stabilize the bedspread. Attach yarn at one edge and ch 1, sc in each BLO along the seam line across the panel. Work (sc, ch 1) across the seam area to keep breathability. Turn and repeat for 2 rows to form a subtle ridge (length depends on panel width). (Number of sc equals number of seam stitches along the row)
Info :
These strip rows are optional but they reduce stretch in the finished bedspread and help keep the grid regular when the spread is laundered. Place them at strategic intervals such as every 4 motifs vertically.
Round S2 :
ch 2, dc in each sc across to create a raised line. Work 2 rows of dc for a substantial rib, then sc across to tidy. Repeat on the opposite side as needed. This process improves structural integrity for large spreads. (Be consistent for symmetry.)
Info :
If you plan to add a heavy border, these reinforcement rows can also act as an attachment band to which the border is sewn for extra strength.
— Wide Decorative Border (Work after all motifs are joined) :
Round B1 :
With RS facing, join yarn in any corner, ch 1, work 1 sc evenly around entire outside edge of joined motifs, working 3 sc in each outer corner to maintain shape. Join with sl st. (Count will be the total of all edge stitches; for example, a 10 x 12 motif layout 10 motifs across x 12 down with each motif 9.5" will have approximately 10 x motif-side stitch count.)
Round B2 :
ch 2, dc in same st, *dc in next 3 sts, (dc, ch 2, dc) in corner, repeat around* to create a substantial first border round. Join. (This sets corner scaffolding; stitch count depends on layout width.)
Round B3 :
ch 1, sc in each dc around working in BLO to form a framed ridge. Join. (Stitch count consistent with B2)
Info :
From this point we will build a textured border reminiscent of the motif ridges so that the bedspread reads as one continuous piece. Keep stitch counts even and measure often to maintain flatness.
Round B4 :
ch 3 (counts as dc), work reverse shell pattern: *skip 2 sts, 5 dc in next st (shell), skip 2 sts, dc in next 4 sts* repeat around so shell peaks align with motif centers. Join. (Number of shells will align with motif counts along perimeter)
Round B5 :
ch 1, sc in each st around working (sc, ch 1, sc) in each shell top to create scalloped points. Join. (This tidy round helps when adding tall tassels and final scallop shaping)
Round B6 :
Info : Add raised braided ridges similar to interior motif ridges. ch 3, place fpdc around designated posts to create vertical ribs. For a dramatic textured border work two rounds of fpdc with even spacing, then sc around to tidy. (Spacing: 6-8 fpdc per side depending on stitch count)
Round B7 :
ch 1, sc in each st around including working 3 sc in corner to keep border square. Join and fasten off. (This final sc round evens the edge and prepares for tassel placement.)
Info :
For a deep border like the photographed example, repeat a series of shell+sc rounds to reach desired border depth (the pictured spread has approximately 4-6" border beyond the motif grid). Keep repeats consistent for a neat look.
— Decorative Scallop and Final Picot Edge (Optional) :
Round E1 :
ch 1, sc around working *(ch 3, sl st in 2nd ch from hook, sl st in next ch) to create picot, sc in next 4 sts* repeat around. For narrow picot scallops, work picot every 3-4 stitches to keep proportions similar to motif scale. Join and fasten off. (Picot count depends on outer stitch count)
Info :
Picot edging is delicate; if you want a more substantial finish, replace picots with small shell clusters (5 dc cluster, sc anchor) every 4-6 sts for a more dramatic edge that matches the scallops on the motifs.
— Tassels (Make 24-36 depending on motif layout) :
Step 1 :
Cut strands of yarn quadruple the desired tassel length. For the pictured tassels measure 6" finished length so you need 24" strands before folding. Use 30-40 strands for a full tassel with worsted weight yarn.
Step 2 :
Fold the strands in half and attach with a larks head knot to a 4-6 stitch picot or the outermost ridge at each corner and side midpoint; secure with 3-4 tight wrap-turns using a strong scrap of yarn to form the tassel head. Trim ends evenly and comb for a polished look.
Info :
Attach tassels after final blocking. For an authentic look, place tassels at each outer corner and at the midpoint of each border square so they hang in a regular rhythm around the bedspread edge. The pictured bedspread uses one tassel per motif corner on the outside edge, creating a dense fringe.
Step 3 :
To secure tassels for longevity, weave the top wraps into the ridge under the tassel and add a small dab of fabric glue if desired before trimming. Fasten off yarn tail and weave ends in. (Repeat for each tassel location.)
— Finishing and Blocking :
Info :
After all motifs are joined and border/tassels attached, soak the bedspread gently in lukewarm water with a mild wool wash. Gently squeeze out excess water without wringing and pin to blocking mats to final measurements. Use pins at all corner points and along ridges to open the petals and square the motifs. Allow to dry completely before trimming tassels and final trimming of loose ends.
Step :
Weave in any remaining tails along the raised ridges so they are hidden in the seam lines. Trim tassels evenly and comb them for a soft finish. If you used cotton yarn, a light steam press (cover with a cloth and press from above) will flatten any unintended ripples; do not press directly.
Info :
For machine washing, use a delicate bag and a gentle cycle if yarn fiber allows. Otherwise, spot clean or hand wash to preserve puff texture and tassel shape.
— Optional: Alternative Seam - Invisible Whip Stitch :
Round W1 :
Fasten off motifs leaving 20" tail. With RS together, use a yarn needle and mattress stitch or whip stitch through the back loops only of the ridge rounds to form an invisible seam. Work snugly but not tight to keep seam flat. (Stitches equal to the number of ridge sc along side.)
Info :
This finishing method hides the seam beneath the raised frame and is an excellent choice if you want a nearly seamless look with the motif ridges intact.
— Final Care and Storage :
Info :
Store folded in a breathable cotton bag to prevent yellowing of natural fibers. Avoid hanging long-term as tassels and lower border may stretch. Refresh tassels periodically with a comb and snip to maintain neat edges.
Info :
For long-term care, replace any tassels showing heavy wear. Because tassels are removable if attached with a tightly-wrapped head and sewn loop, you can refresh them without disturbing the bedspread structure.
This floral granny bedspread brings texture, warmth, and handcrafted charm to any bedroom. Each puff petal and raised ridge is an invitation to slow down and enjoy the making process. With thoughtful blocking and careful joining you’ll end with a stunning heirloom-quality piece that’s both cozy and beautiful. 🧶✨ Whether you choose the exact dove gray or a color of your own, this pattern offers a therapeutic, rewarding crochet journey. Happy stitching and enjoy your beautiful handmade bedspread! 🛏️🌿