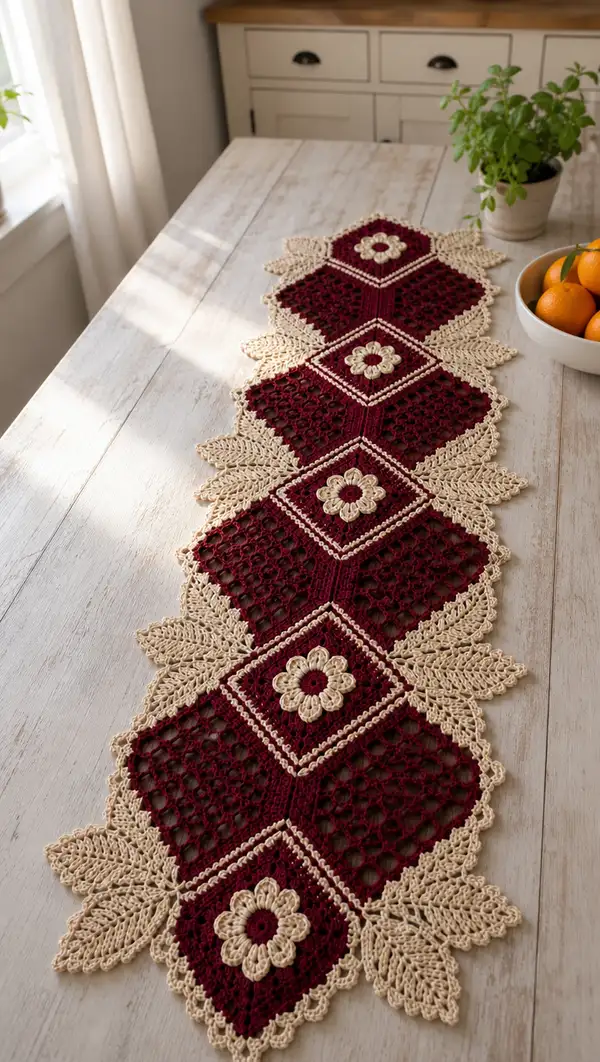
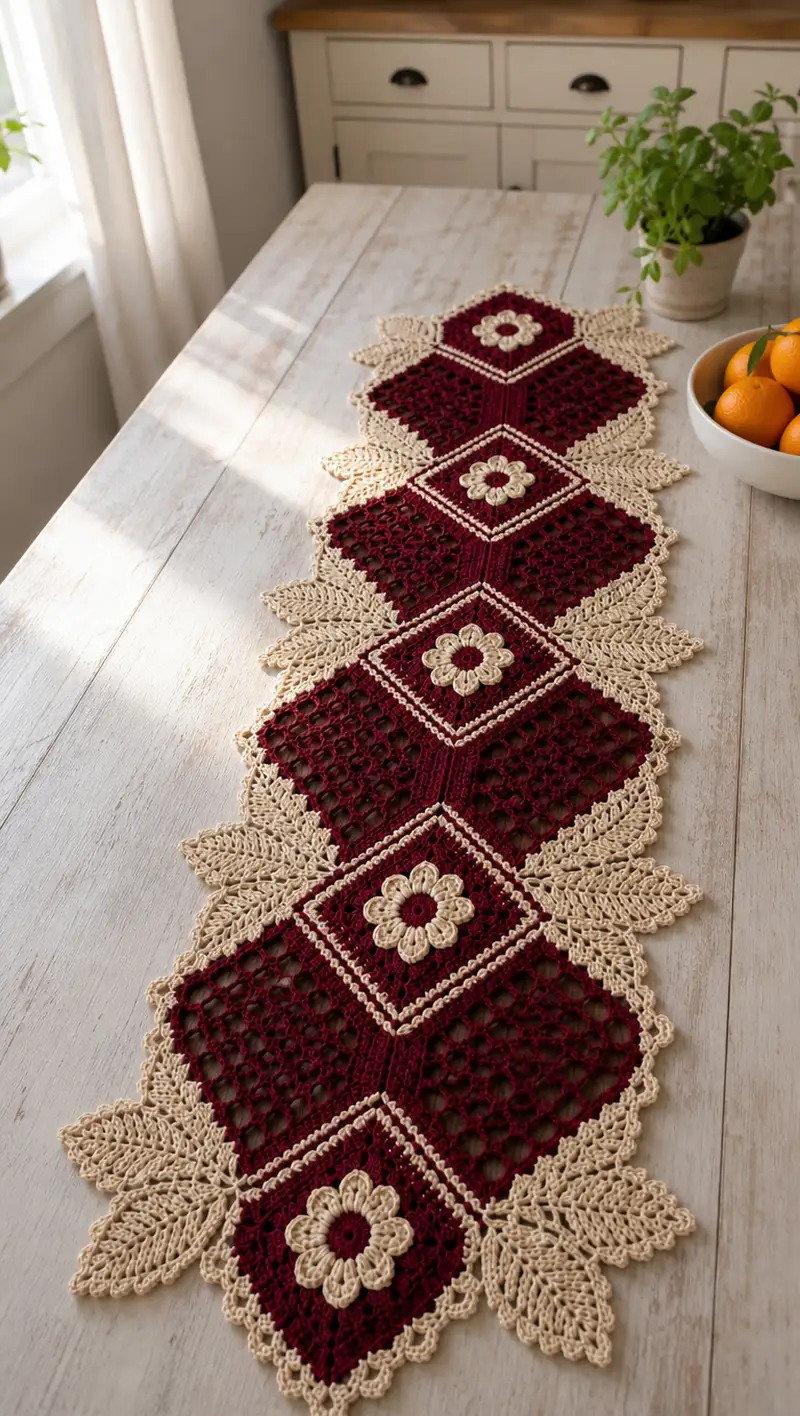
This elegant table runner features a row of diamond-shaped motifs with a deep burgundy openwork center, cream floral medallions and a scalloped leaf border. Each diamond is built from a floral center square, lacy mesh filling and a delicate leaf-edged trim to create a classic, vintage-inspired runner. The contrasting colors highlight the lacework and make this runner a beautiful centerpiece for seasonal and everyday tables.
Progress Tracker
0% Complete
— Gauge & Finished Size :
Info :
Gauge is not critical for lace table runners but for reference: one completed diamond module (square framed motif + mesh fill) measures approximately 10.5" diagonally across when worked in worsted cotton with a 3.5mm hook. The sample runner composed of 5 diamonds end-to-end measures roughly 48-52" long and 11.5-13" wide after blocking.
Info :
Work with a slightly smaller hook than yarn label recommends to keep openwork firm and prevent excessive stretching. Block motifs lightly for shape before joining.
— Center Flower Motif (Make 5) :
Round 1 :
6 sc in magic ring (6)
Round 3 :
(1 sc, inc) x 6 (18)
Round 4 :
(2 sc, inc) x 6 (24)
Round 5 :
(3 sc, inc) x 6 (30) — This round completes a flat disk which will be the base for the petal round
Info :
Change to cream yarn for flower petals now. Carry the burgundy tail along the back if you prefer a cleaner reverse, or fasten off and rejoin later.
Round 6 :
*ch 4, sl st into next st* repeat around to create 6 ch-4 loops for petals (6 loops, work count remains 30 reference points)
Round 7 :
Into each ch-4 loop: (sc, hdc, 3 dc, hdc, sc) — make 6 petals. Fasten off cream if changing back to burgundy for square framing (petals formed, visual count: 6 petals)
Info :
Make petals firm but not tight — keep stitches loose enough that petals lie flat. Weave in ends or leave long tails for joining to the square frame if preferred.
Round 8 :
Rejoin burgundy at back of any petal base. 1 sc in each visible base stitch around; at each ch-loop junction, work 2 sc to stabilize petals (approximate total 36; counts will vary visually by petal placement)
Round 9 :
(4 sc, inc) x 6 (42) — Begin expanding the medallion evenly for square shaping
Round 10 :
(5 sc, inc) x 6 (48) — The medallion should now be a circular disk large enough to build corners on
Info :
Check for symmetry: petals should sit relatively equally spaced. If one petal is floated, adjust by adding an extra sl st to re-distribute tension before proceeding.
Round 11 :
1 sc in each st (48)
Round 12 :
1 sc in each st (48) — Fasten off leaving a long tail for joining square frame or continue directly into square rounds if preferred
— Square Frame & Corner Points (Work into Flower Motif) :
Info :
The square frame is built around the circular medallion by defining four corner points. Each round increases by four stitches (one corner extra) as corners are built. The counts below show total stitches after each round.
Round 1 :
Join cream yarn to any point, *1 sc in next 11 sts, (ch 3, skip 3 sts) to form corner spc; repeat from * 4 times across the circumference, finishing with 1 sc to join (approx 52 for practical reference, corners formed)
Round 2 :
Working into sc and ch sp around: 1 sc in each sc and 3 sc into each ch-3 corner (adds 8, approx total 60) — this begins to square the medallion
Round 3 :
(7 sc, inc) x 4 around corners (total 64) — expand each side evenly
Info :
Use stitch markers at the start of each side (between corners) to help you count as you form the square. This keeps the rounds even and the diamond orientation clean for later joining.
Round 4 :
(8 sc, inc) x 4 (68)
Round 5 :
1 sc in each st (68) — work this round tightly to define the frame edge that will later join to the mesh panels
Round 6 :
Work 1 sc in each st BLO for ridge definition (68)
Round 7 :
Join-to-join edging: *ch3, sk2, sc in next 2 sts*, repeat around to create a small lacy line inside the frame (approx visual repeat 17-18 times)
Info :
Fasten off leaving long tail if you prefer to join motifs later; otherwise continue into mesh fill directly. The square frame should be straight and the corners pronounced — block if necessary.
— Mesh Diamond Fill (Work one mesh per side of square to make diamond shape) :
Info :
The mesh section forms the lacy openwork inside the diamond — it's worked in rows/rounds creating chain spaces. Each mesh panel spans from one corner to the adjacent corner in a diagonal diamond layout; counts below are given per diamond opening and should echo the square frame side counts for seamless joins.
Round 1 :
Join burgundy to the middle of a side, ch5 (counts as dc+ch2), *dc in next sc, ch2* rep across side until corner, end with dc into corner sc (creates foundational row of dc and ch2 spaces, approx 34 dc placements per side including corners)
Round 2 :
Turn work: ch3 (counts as dc), *dc in next dc, ch2; dc in ch2-sp from previous row* repeat across, ending with dc in corner (mesh opens into uniform ch2-sp pattern)
Round 3 :
Repeat Round 2 across the panel (mesh forms, counts remain consistent across rows; each repeat maintains the same number of dc placements per row)
Round 4-7 :
Repeat Round 2 for four more rows (total mesh rows 6-7 depending on desired openness) — at the last mesh row, work dc in corner sc to securely join to the frame
Info :
Adjust the number of mesh rows to change the diamond height; fewer rows will make a shallower diamond and more rows will increase length. Ensure the mesh edges meet the frame and corner points neatly.
Round 8 :
Border stabilization: with cream yarn, sc evenly around the mesh panel where it meets the frame, placing 3 sc in corner dc to secure (this will help attach leaf motifs later) — approximate running count per mesh-panel edge 36 sc
Info :
Repeat the mesh fill on all four sides of the square frame if you prefer the diamond to be fully open; the pictured design uses openwork across the large central area of each diamond so repeat until the four triangular mesh sections meet in the center if necessary.
— Central Diamond Join (Middle column between motifs) :
Round 1 :
After completing one framed diamond, join the next diamond by working a row of cream sc along the left and right small joining edges of the square frame: *sc into frame st, ch1* across the connecting side of the diamond, leaving the connecting loop loose so the next diamond can be attached later (approx 20 sc per join side)
Round 2 :
When adjoining diamonds, align corners so two diamonds meet at a point; using the cream yarn, sl st through one corner of the existing diamond and into the corner of the new motif and work 1 sc in each connecting sc along the side to join-as-you-go (counts will match previous join counts)
Info :
Work the runner in a straight chain of diamonds: after making the first motif, join the second to the first along one side then continue adding motifs sequentially. Pin motifs to keep alignment during join-as-you-go and block motifs lightly for precision.
Round 3 :
Reinforce the join by working a reverse single crochet (crab stitch) along the joining seam in cream for a defined ridge (approx stitch count equals previous join count)
— Decorative Ribbing Column (Center line between diamonds) :
Round 1 :
To create the raised ribbed column that runs between diamonds, join burgundy at the joining seam and work 6 rows of 1 sc BLO across the seam to make a defined band. Each row: 1 sc BLO in each st across (count equals seam length, approx 10-12 sts per band)
Info :
Work these rows tightly but not over-tight — the ribbing gives a neat visual break between motifs and can also be used as an anchoring point for the leaf motifs to attach later.
Round 2-6 :
Repeat Round 1 to build 6 total ridges. Fasten off and weave in ends.
— Leaf Motif (Make 12 leaves for runner edges, see placement diagram) :
Round 1 :
Ch 12, sc in 2nd ch from hook, hdc in next, dc in next 3, tr in next 2, dc in next 2, hdc in next, sc in last (creates the spine chain and initial shaping)
Round 2 :
Working on one side of chain: sl st, sc, hdc, dc, (tr, ch2, tr) in tip st for a small lacy point, then continue mirror back with dc, hdc, sc; fasten off to define one side. Work the other side the same way to get symmetrical leaf (visual stitch count varies by shaping)
Info :
Leaves are worked in cream yarn. For plump leaves, pull the tr stitches slightly taller and block with pins to set the curve. Each leaf will be roughly 3.5-4.5" long in worsted cotton depending on tension.
Round 3 :
Rejoin cream at leaf base and work 1 sc around entire leaf edge placing 3 sc into the tip if needed to make a rounded point (edge stabilization round)
Round 4 :
Decorative vein round: with burgundy, embroider a central vein using yarn needle or surface sl st: insert at base, run to tip, then return dividing the leaf into two mirrored lobes; secure and fasten off.
Round 5 :
Block the leaf gently and press into shape using damp cloth and pins. Make 12-14 leaves total, spacing them at diamond corners as pictured (two leaves per diamond corner cluster in staggered orientation)
Info :
Leaves are sewn to the outer cream stabilization round of each framed diamond. Pin and adjust spacing — the leaves will overlap slightly and create the scalloped botanical edge.
— Outer Scalloped Edge & Shell Trim :
Round 1 :
Working in cream yarn around the outer edge of the joined diamonds, sc evenly around the outside, placing 3 sc into every corner join to shape the outline (approx total running count depends on runner length; plan ~16-20 sc per diamond side)
Round 2 :
(ch 3, sk 2 sc, sc in next) repeat around to create small scallops; work 3 sc in corner points to keep shape (approx scallop repeat equals number of sc minus corners)
Round 3 :
Shell round: *5 dc in next sc, sk 2 sc, sc in next sc* repeat around to form larger shells. At leaf clusters place shells between leaves to accentuate botanical feel (shells give the runner a finished vintage edge)
Info :
Place shells precisely so shells come out between each leaf tip; if a shell would overlap a leaf, decrease shell dc to 4 dc to maintain spacing so leaves remain dominant design features.
Round 4 :
Picot edging: *sc in next sc, ch 3, sl st in top of ch-3 to make picot, sc in next 4 sc* repeat around to create delicate pointed trim along shell tips (adjust counts visually, this round is decorative)
Round 5 :
One-row finishing: work 1 sc in each st around to neaten any raw-edge from shells and picots; weave in ends and lightly block the entire runner on a flat surface, pinning leaf points and shell edges for crisp shape
Info :
Blocking is essential to let the diamond points and leaf motifs flatten neatly and the shells to show. Spray lightly with water or steam — do not stretch the cotton aggressively, just coax into shape.
— Reinforcement & Optional Decorative Stitches :
Round 1 :
To stabilize long runner seams, work a reversible ridge: join burgundy and sc along the middle seam (between diamond centers) in BLO for one round, then sc in each st the next round to lock it in (this adds two tidy ridges)
Round 2 :
Optional surface embroidery: use simple straight stitches or chain stitch in burgundy over cream shells to add contrast stitching motifs. Stitch placement should be trialed on a spare motif first.
Info :
If you want extra weight to keep the runner stable, sew a lightweight interfacing strip to the underside center using small whip stitches, avoiding visibility from the top side.
— Small Finishing Details :
Round 1 :
Check all joins and weave in ends at both sides of each seam. Tidy the back by trimming tails close and using a yarn needle to bury ends several inches along stitch path.
Round 2 :
Inspect leaf attachments: if any leaf lifts or gaps are visible, use tiny slip stitches to tack the leaf base to the shell round on the underside to secure. Hide knots under leaf base.
Info :
Final pressing: place a cotton towel over your pinned runner and press lightly with a low-heat iron. Do not iron directly on the yarn; steam gently to set shape.
— Variations & Size Adjustments :
Info :
To lengthen the runner, add additional diamond motifs in the same pattern and continue the leaf scalloped border around the new ends. To make narrower runners, use fewer leaves per side or omit every second leaf cluster.
Info :
To change scale, use a light DK yarn with a smaller hook for a more delicate look, or use a heavy worsted and a larger hook for a chunky vintage runner. Adjust blocking accordingly since fiber content affects final measurements.
Info :
If you prefer all-over cream motifs and burgundy leaves for inverted contrast, swap yarn colors at the start of the core medallion and follow same structural rounds for identical shaping.
Completing this table runner is a wonderfully satisfying project — every diamond, petal, and leaf joins to create a warm, heirloom look you can be proud of. The contrasting burgundy and creamy border makes a rich centerpiece that’s perfect for seasonally styled tables or as an all-year accent. I hope you enjoy the slow, meditative process of assembling the motifs, and that it brings a handmade touch to your home. 🧶🌿✨