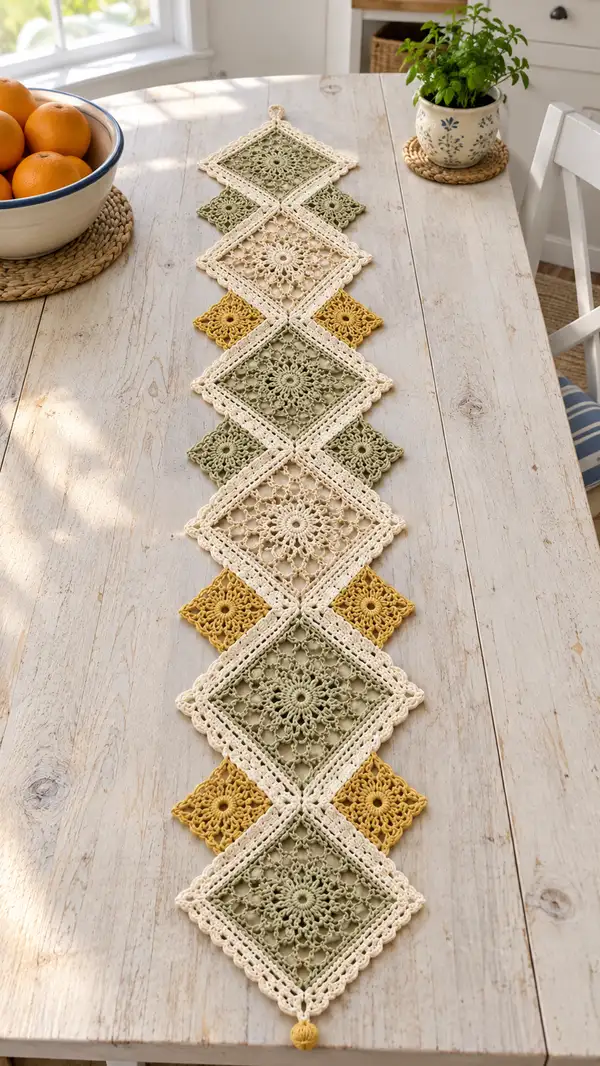
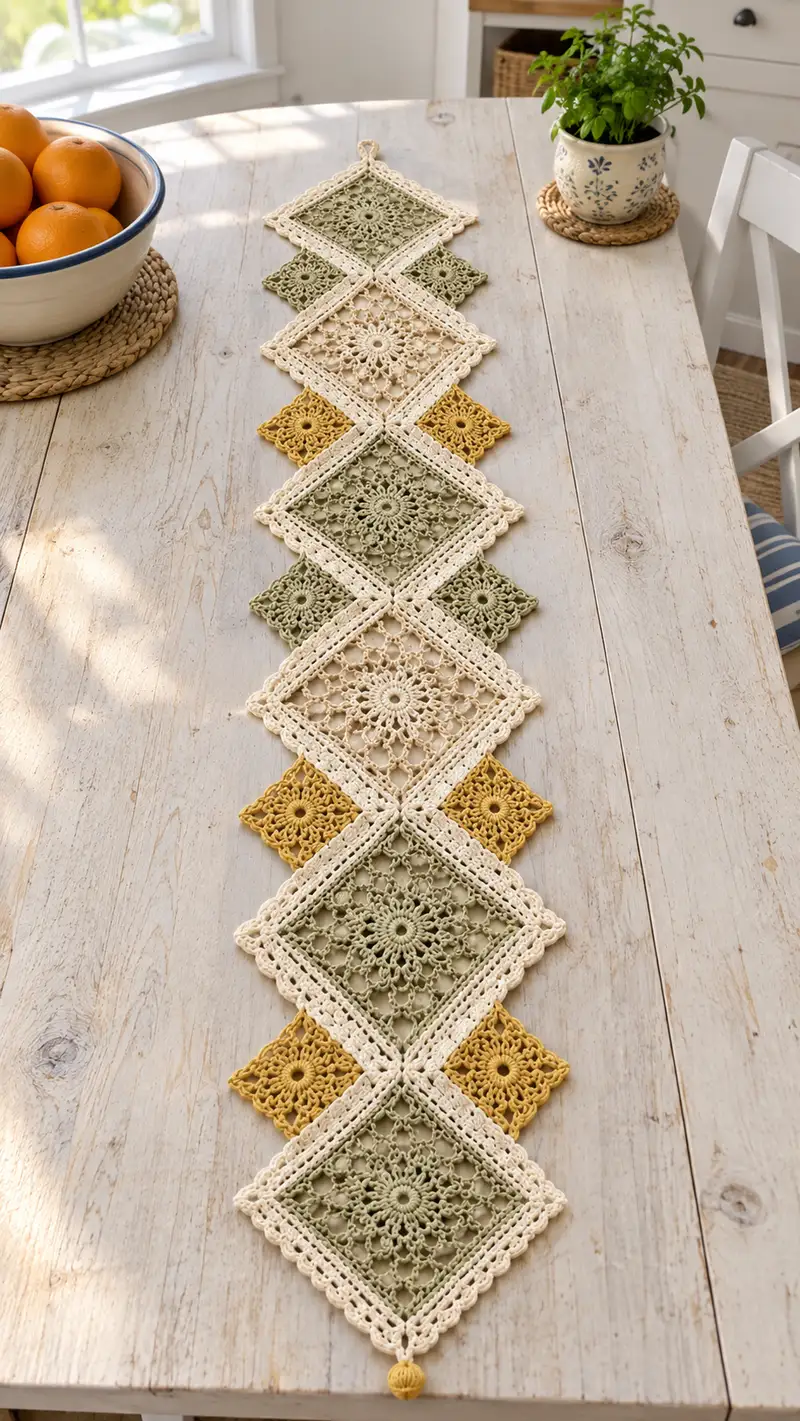
This delicate table runner features lacy diamond motifs worked in soft cream, sage green and warm mustard cotton. The design alternates large ornate squares with smaller accent squares, joined on the diagonal and finished with a scalloped border and tiny tassels. Perfect for a bright kitchen table or as a subtle centerpiece, the runner blends vintage lace motifs with modern color pops for a fresh farmhouse look.
Progress Tracker
0% Complete
— Notes Before You Begin :
Info :
Gauge is not critical for table runners but we recommend 18 rounds of the large motif should measure approximately 12.5" square when blocked with DK cotton and a 3.5mm hook. Adjust hook size if your motifs are larger or smaller than desired. Block each motif flat to identical dimensions before joining for a neat finish.
Info :
The pattern is written in US terms. Work motifs flat in joined-rounds so each round builds outward; counts refer to groups or main stitches where relevant. Keep a stitch marker for the first stitch of each round where counts are given.
— Large Lace Diamond Motif (works to square when blocked) :
Round 1 :
Start with a magic ring, ch3 (counts as dc), 15 dc into ring, join with sl st to top of ch3 (16 dc)
Round 2 :
Ch3 (counts as dc), *ch2, sk next dc, dc in next dc; rep from * around ending with ch2, join with sl st to top of ch3 (16 dc clusters, 16 ch2 spaces)
Round 3 :
Sl st into first ch2 space, ch3 (counts as dc), (2 dc, ch2, 3 dc) into same ch2 sp to form corner, *sk next cluster, in next ch2 sp work (3 dc, ch2, 3 dc) for next corner; rep from * around to create 8 corner clusters, join with sl st to top of beginning ch3 (8 corner shells)
Info :
This round begins shaping the square by forming 8 shell-corner groups. Keep shells even and use blocking later to form crisp corners.
Round 4 :
Sl st to center of first corner shell, ch3, (dc, ch2, dc) in same space, *ch3, sk to center of next corner shell, (dc, ch2, dc) in that corner center; rep from * around so you have ch3 side-spaces between corner groups, join with sl st (8 corner groups, 8 ch3 side-spaces)
Round 5 :
Sl st into first ch3 sp, ch1, (sc, ch3, sc) into ch3 sp, *in the side ch3 spaces work (sc, ch3, sc) across to strengthen the side, in corner ch2 work (sc, ch4, sc); rep around, join with sl st (8 corner ch4 spaces, 8 side ch3 spaces)
Info :
Use this round to get an even side count. If your sides feel tight, use slightly looser tension; this round will build chain-loop side-spaces that later accept taller stitches.
Round 6 :
Ch4 (counts as tr), *in each side ch3 space work (tr, ch2, tr), in corner ch4 space work (tr, ch4, tr), rep from * around, join with sl st to top of ch4 (8 corner groups, side tr groups)
Round 7 :
Sl st to center of a corner ch4 space, ch5 (counts as tr+ch2), (tr, ch2, tr) into same corner ch4 space, *ch1, in each side ch2 space work (tr) into top of previous tr, ch1 between side tr groups; rep across each side, and in each corner work (tr, ch3, tr) into corner center; join with sl st to top of beginning ch5
Round 8 :
Change to BLO for texture: sl st to a side tr post, ch1, 1 sc BLO in each tr across the sides to compress the fabric (counts vary by side but maintain continuity), at corners work (sc, ch3, sc) in corner ch3; join with sl st (BLO working creates a slightly raised ridge)
Info :
Changing to BLO for a round creates a subtle ridge that helps define the square. Use this technique if you want stronger lines; otherwise continue in regular stitches.
Round 9 :
Return to regular stitches. Sl st to a side ch-space, ch3, (2 dc, ch1, 2 dc) into each side ch-space to create little shell clusters across each side; in each corner work (2 dc, ch3, 2 dc). Join with sl st (sides filled with shell clusters, corners expanded)
Round 10 :
In this round work decorative puff clusters: sl st to center of a side shell, ch3, *(ps in next side shell - yarn over insert, pull loop through 3 times total, yo and draw through all loops), ch1, rep across side shells; in corners work (ps, ch3, ps) to accent corner; join with sl st (decorative puff clusters across sides and corners)
Info :
Puff stitch instructions: yo, insert hook, yo, pull through (do this 3 times to pull up loops), yo and draw through all loops on hook. Keep puff stitches consistent by using the same number of yarn-overs and loops each time.
Round 11 :
Ch4, *(1 dc in top of next puff cluster, ch2) x across side until corner, in corner ch3 space work (dc, ch3, dc); rep around, join with sl st (lace grid forms across sides)
Round 12 :
Sl st into ch2 space, ch3, work (2 dc, ch2, 2 dc) into each ch2 space to create larger shells, corners get (2 dc, ch4, 2 dc). Join with sl st (shells on sides enlarged; motif gains more square form)
Round 13 :
Ch1, in each shell work (sc, ch3, sc) around sides; in corners work (sc, ch5, sc) to maintain corner definition, join with sl st
Info :
At this stage your motif should begin to look square with defined corners. Measure and adjust tension if your corners are not 90 degrees after blocking.
Round 14 :
Ch4 (counts as tr), *in each side ch3 sp work (2 tr, ch1, 2 tr), in corners work (3 tr, ch3, 3 tr); rep around, join with sl st (sides are now tall lace arches)
Round 15 :
Ch1, sc into each tr across the side to compress the lace (sc across posts, use front loop only on last sc of each group for texture if desired), in corners work (sc, ch5, sc); join with sl st
Round 16 :
Decorative round: into each side-work ch1 space work (dc, ch2, dc) to create little diamond holes; corners (dc, ch4, dc) to preserve corner airiness; join with sl st
Round 17 :
Edge shaping: ch1, sc in each st around working carefully into groups; at the corners work (sc, ch7, sc) to form an ample corner loop that will square up when blocked; join with sl st (count approx equal number of sc around, corners create larger ch-loops)
Info :
Begin to think of the motif as a square with four decorative big loops at the corners. Blocking these loops outward will finalize the diamond shape when the motifs are joined on the diagonal.
Round 18 :
Ch3, *dc into next 2 stitches, ch2, sk 2; repeat across sides; in corner loops work (dc, ch6, dc); rep around; join with sl st (lacy openwork rows set)
Round 19 :
Ch1, sc in each dc and ch-space across to firm the edges, in corner ch6 work (sc, ch8, sc) to retain corner loop; join with sl st
Round 20 :
Final motif scallop foundation: ch3, (dc, ch2, dc) into each corner loop once, across sides work (dc, ch3, dc) in each side ch-space; join with sl st
Round 21 :
BLO decorative ridge: sl st to side dc post, ch1, 1 sc BLO in each stitch across sides and into corner spaces (creates a raised square ridge for joining). Join with sl st
Round 22 :
Final scallop: ch1, (sc, ch3, sc) in each side ch3 space to form small scallops and (sc, ch5, sc) in each corner to accent corners. Fasten off and weave in ends. (Motif complete - block to square.)
Info :
When blocking, pin to a square template or ruler to ensure each motif measures identical. Allow to dry completely before joining. Make as many large motifs as needed (photo shows 5 large diamonds in the center chain for the sample runner).
— Medium Textured Square Motif (alternate large square color option) :
Round 1 :
Magic ring, ch3 (counts as dc), 11 dc into ring, join with sl st (12 dc)
Round 2 :
Ch3, dc in same st, *ch2, sk next dc, (2 dc) in next dc; rep around creating 6 shell groups separated by ch2, join with sl st (6 shell groups)
Round 3 :
Sl st to ch2 sp, ch3, (2 dc, ch2, 2 dc) into each ch2 sp to build 6 corner shells, join (6 corner shells)
Round 4 :
Ch3, in side ch-spaces work (dc, ch1, dc) across each side, corners work (dc, ch3, dc), join (square shaping begins)
Round 5 :
Ch1, sc into each dc and ch-space across sides, in corners work (sc, ch5, sc), join
Info :
This motif creates a more compact textured square that reads as a background color in the runner. Make the same number of these squares as needed to alternate with large motifs.
Round 6 :
Ch3, dc into each sc across to enlarge square, in corners work (dc, ch4, dc), join
Round 7 :
Ch1, sc across to firm up edges, corners (sc, ch6, sc), join
Round 8 :
Ch4, (tr, ch2, tr) into each side space to create small arches; corners (tr, ch5, tr), join
Round 9 :
Ch1, sc across posts to compress texture, corners (sc, ch7, sc), join
Round 10 :
Final edge: ch1, sc in each st around for a neat edge; fasten off and weave ends. Block to square dimensions.
Info :
Make these textured squares in the sage green color in the sample. They work as the visual filler between large lace diamonds.
— Small Sunburst Accent Square (make multiple) :
Round 1 :
Magic ring, ch3 (counts as dc), 11 dc into ring, join with sl st (12 dc)
Round 2 :
Ch1, sc into same st, *ch5, sc into next dc; rep around creating 12 ch5 loops, join with sl st (12 loops)
Round 3 :
Sl st into first ch5 loop, ch3, (dc x7) into same loop (7 dc cluster), sl st to next loop, rep around making 12 little sunburst petals, join (12 petals)
Round 4 :
Ch1, sc between petals, *ch3, sc between next petal; rep around to create small lacy edge, join
Round 5 :
Ch3, (2 dc, ch2, 2 dc) into alternating spaces to give tiny corner-like definition; join, fasten off and weave in ends (small square complete)
Info :
These sunburst squares are worked quickly and act as bright mustard-colored accents in the runner. Make enough to tuck between diamond points as shown in the photo (runner sample uses 6 small accent squares interspersed).
— Join-As-You-Go Diagonal Assembly (joining motifs on the bias to create diamonds) :
Info :
Arrange motifs on a flat surface in the desired pattern (in the photo: alternating large cream, sage and textured squares, with small mustard squares inserted between corners). Join on the diagonal so that each square sits as a diamond. Join using slip-stitch or single-crochet join-as-you-go to the BLO ridge created in the large motif rounds for a neat seam.
Round 1 (Join step for one edge) :
With RS of both motifs facing up, align corner loops. Insert hook through BLO ridge of motif A and corresponding space of motif B, sl st through both loops, ch1, sl st in next st of both motifs; continue along the seam working sl st in matching stitches to join entire edge (seam length depends on motif dimensions)
Info :
For each edge join, maintain a consistent tension. If seams pull, use sl st more loosely or use sc join which creates a firmer seam. Encourage flat joins by pinning both motifs prior to joining.
Round 2 (Corner crossing join) :
Where four motifs meet at one point (two large + two small in diamond intersection), work a small 3-4 sl st cluster through all four motif loops to lock the intersection. For extra stability, run a small invisible whip stitch through the center behind the motifs with a matching color yarn tail.
Info :
In the runner photo, intersections are subtle and flat. Use small whip stitches if you want added security for table use; otherwise slip-stitch joins hold well for decorative use.
Round 3 (Continue joining) :
Repeat Join Round 1 for each adjacent edge until the entire runner chain is assembled. Work from center outward so you can adjust motif spacing and ensure symmetry. Block lightly after partial joins if seams feel wavy.
Info :
It helps to work joins with the lighter cream yarn to create a unified seam line between different colored motifs as seen in the sample runner. Carry the cream yarn along edges when joining different colored squares to make a cohesive look.
— Runner Edge and Scalloped Border :
Info :
Once all motifs are joined into the desired length, work a continuous border around the entire perimeter for a finished look. The border is worked right onto the outermost motif edges and into corner loops to create consistent scallops.
Round 1 :
With cream yarn and RS facing up, join with sl st to a side stitch on the outermost motif. Ch1, 1 sc in same st, *ch3, sk 2 sts, 1 sc into next st; rep along side edges to the corner, in corner loop work (sc, ch7, sc) to make large corner, continue along next side; join with sl st
Round 2 :
Sl st into next ch3 space, ch3, (2 dc, ch2, 2 dc) into each ch3 sp across to create small scalloped arches; in corner ch7 space work (3 dc, ch5, 3 dc) to accent corners; join with sl st
Round 3 :
Ch1, sc into top of first dc, *ch4, sc into top of next shell to form picot chain between shells; rep across sides and corners, join with sl st
Info :
If you prefer a flatter look, replace ch4 loops with ch2. The picot-like loops add a lacy fringe that reads nicely on a rustic table background.
Round 4 :
Final scallop round: sl st to center of a shell, ch1, (sc, ch3, sc) into each ch4 loop across; at corners work (sc, ch5, sc) to accent. Fasten off and weave in ends. Repeat the border on the opposite end of the runner if not continuous (this will create a neat framed edge).
Round 5 :
Optional reinforcement round: With cream yarn, work 1 sc evenly around border into the backs of previous rounds to secure and neaten the edge. This reduces flaring and keeps the runner flat under dishes.
Info :
Blocking the entire runner flat with pins after the border will set the scallops and ensure the runner lays flat on the table.
— Decorative End Tassel or Bobble :
Round 1 :
To make a small tassel: wind mustard yarn around a 1.5" cardboard 30 times, tie a short piece of cream yarn tightly at the top, slip off, fold in half and wrap tightly 1/4" from the top to create the head, secure and trim ends uniformly. Attach to end point of runner by sewing through the head with matching thread.
Round 2 :
For a bobble drop: make a small 12-st magic ring circle in mustard, work 12 sc in ring, 2 rnds of sc to form a dense ball, stuff lightly with a tiny amount of fiberfill, close and secure; sew into the very tip of the runner diamond as a hanging bobble.
Info :
In the photo the end has a small mustard bobble; choose tassel or bobble depending on desired look. Both should be firmly sewn for durability.
— Final Finishing and Pressing :
Info :
Carefully weave in all tails with a yarn needle, hiding ends in the back of lacy rows so they are not visible through the lace holes. Use blocking pins to square the entire runner and let it dry fully before using.
Round 1 :
Check all seams: small whip stitches behind the joins can reinforce areas that will carry heavier items. Also check that corner loops are secured to prevent catching on tableware.
Round 2 :
Optional: A light spray starch on the runner (if using cotton) will help keep scallops crisp. Test a small scrap first to ensure desired stiffness.
Info :
Hand-wash or gentle machine cycle recommended for cotton runners. Lay flat to dry to retain blocking shape.
Completing this runner is such a satisfying project — each lace motif feels like a miniature medallion that joins to form a gorgeous whole! The mix of soft cream, sage and mustard gives a gentle, curated look that suits farmhouse, coastal, and modern rustic tables alike. I hope you enjoy the rhythmic rounds and the rewarding blocking step that brings the motifs to life. 🧶🌿 Add a cup of tea, play some music, and enjoy making this charming centerpiece. ✨