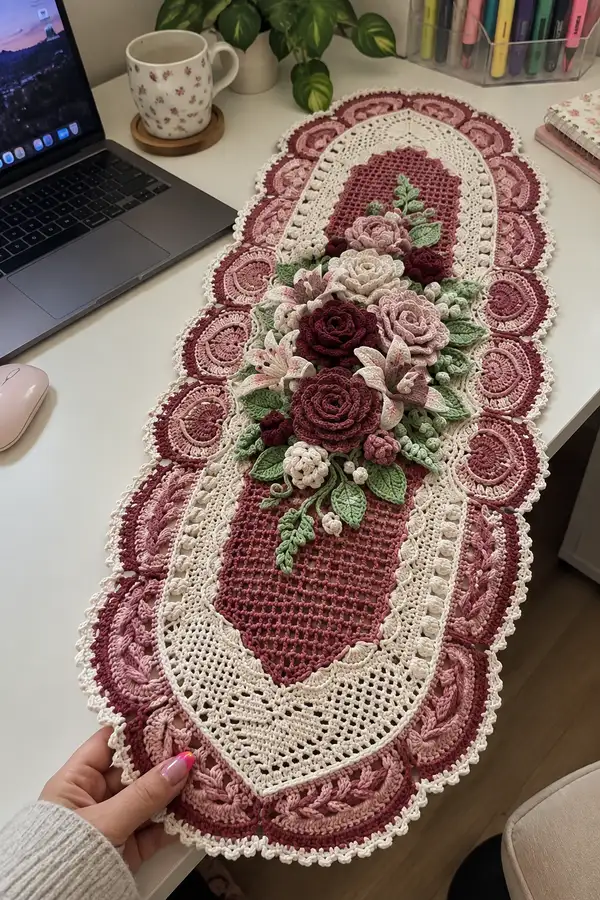
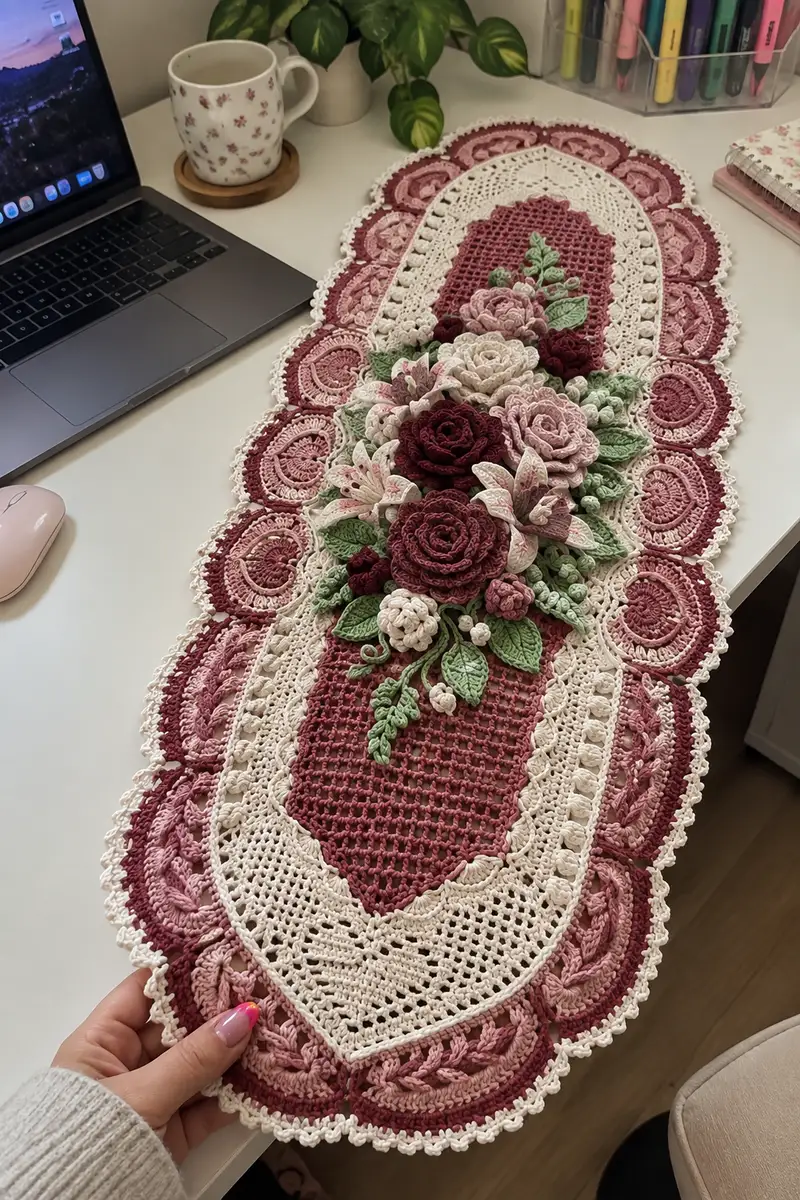
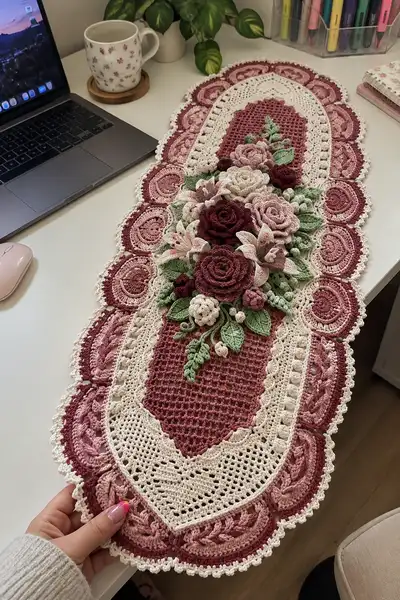
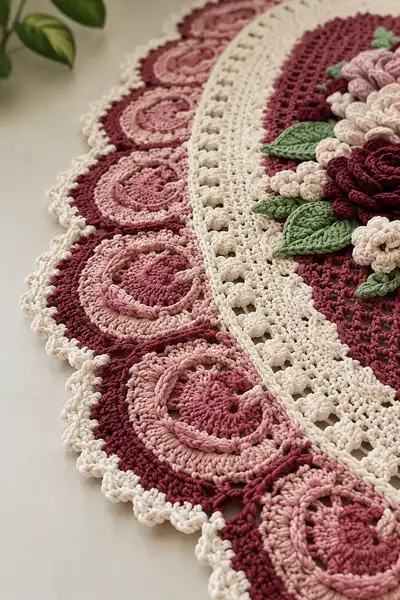
A long, oval crochet table runner featuring a dense central mesh, layered lace borders and an abundant bouquet of three-dimensional roses and leaves. The design uses soft cream, dusty rose and deep berry tones with sage green accents for a vintage-inspired centerpiece. Finished with scalloped outer edging and circular medallions, this runner adds a handcrafted, romantic touch to any table or dresser.
Progress Tracker
0% Complete
— Center Oval Base :
Round 1 :
Ch 56. Work 1 sc in 2nd ch from hook and in next 26 ch (27 sts) to form the straight section. 3 sc in last ch (to turn corner), work on opposite side of foundation ch 1 sc in next 27 ch, 2 sc in last ch (first ch) join with sl st to first sc. (59)
Round 2 :
Ch 1, 1 sc in same st, 1 sc in next 27 sts, 2 sc in each of 3 corner sts (9 sts added across both ends), continue 1 sc in next 27 sts, 2 sc in join stitch. (68)
Round 3 :
Ch 1, 1 sc in each st around but add 2 sc in the three corner sts at each short end to maintain the oval curve. (77)
Round 4 :
Ch 1, (3 sc, inc) around the short end curve areas: on each corner section work (2 sc, inc) twice to create smooth curve; 1 sc along the long sides. (86)
Round 5 :
Repeat Round 4, evenly distributing increases at the end arcs so the oval lengthens while sides remain straight. (95)
Info :
Keep a marker at the midpoint of each straight edge to maintain symmetry. Work a consistent tension; the center will be slightly denser than outer lace so use the same hook throughout the center base.
Round 6 :
Ch 3 (counts as dc), dc in next 12 sts along the long side, 2 dc in each of 5 arc sts at end (increase), continue dc along next long side, finishing arc increases. Move marker to next midpoint as you pass. (approx 100 dc)
Round 7 :
Ch 2, 1 hdc in each dc around, placing 3 hdc evenly across each arc to keep oval shape. (100)
Round 8 :
Ch 1, 1 sc in each hdc around for a neat edge; this round establishes a firm base to begin mesh filet. (100)
Round 9 :
Info :
Change to Dusty Rose for center inset mesh if desired. Carry cream if you plan border in cream; otherwise fasten off and rejoin. For the pictured runner the center lattice is worked in Deep Berry, then coated with a cream lace overlay. For contrast, change color now and weave in the tail securely.
Round 9 :
Ch 4 (counts as tr + ch1), *skip 1 st, tr in next st, ch1; rep from * across the long side, at arc sections work (tr, ch1) into each arc base to preserve shape. Join with sl st to 3rd ch of starting ch4. This creates a tall mesh foundation. (approx 50 tr)
Round 10-14 :
Repeat Round 9 for 5 rounds total to build a mesh rectangle within the oval shell. Keep ends even by working last tr into curve anchors. (mesh height remains consistent)
Info :
On Round 12 place two small stitch markers at positions where the floral bouquet will attach (center third of the runner). These markers will guide assembly later.
Round 15 :
Ch 3, dc in each tr across for a solid block on top of mesh, at arcs work 2 dc into each arc anchor to smooth curve. (approx 100 dc)
Round 16 :
Ch 1, sc in each dc around to firm up the oval panel. (100)
Round 17 :
Ch 2, *sk 1 st, dc in next st, ch1; rep to create open filet look. This alternates open squares for a softer mesh center. (approx 50 dc)
Round 18 :
Ch 1, sc in each st around closing any tall loops; maintain 3 sc over each arc anchor. (100)
Round 19-22 :
Work 4 rounds of alternating dc rows and sc rounds (dc row, sc round) to build height and give the center a slightly raised platform for the bouquet. Keep arc increases identical in each repeat. (100)
Info :
Begin blocking this central panel lightly now if you have time—pin gently on a mat to maintain the oval curve. Blocking helps when joining with the inner lace band later.
Round 23 :
Switch back to Cream yarn. Ch 1, sc evenly around the outer edge, placing 3 sc in each arc to keep curve gentle. (100)
Round 24 :
Ch 3, *sk 1 sc, 5 dc cluster shell into next sc, sk 1 sc, sl st into next sc; rep shell pattern along each long side, working smaller shells (3 dc) into arc sections to maintain smoothness. Join. (Shells spaced by 2-3 sc)
Round 25 :
Ch 1, sc in each st and into the top of each shell and sl st to anchor. This creates a firm base for the inner lace panel to attach. (approx 100)
Round 26 :
Info :
Measure your runner base now: with the number of foundation chains and rounds above you should have a central oval about 46-52cm long depending on tension. Adjust number of initial chains if you want a longer/shorter runner before continuing to borders.
Round 26 :
Ch 4, *1 tr in each of next 3 sc, ch 1, sk 1 sc; rep creating a lacy ladder around the central panel. At arcs work tr clusters of 3 separated by ch1 to sustain the rounded curve. (approx 80 tr)
Round 27 :
Ch 1, sc evenly around working 2 sc in arc top stitches. This will be the inner edge for the lace band to join. (approx 100)
Round 28 :
Fasten off and weave in ends neatly. Block the central panel flat before continuing to lace band rounds.
— Inner Lace Band :
Round 1 :
Rejoin Cream at a side midpoint. Ch 1, sc in next 10 sts along long side, ch 3, sk 2 sc, sc in next 10 sts; rep across opposite side symmetrically to create the chain spaces that form the vertical lace. At arc sections work (sc, ch3, sc) to form small arches. (approx 18 chain ch-3 spaces around length)
Round 2 :
Ch 3, in each ch-3 space work (2 dc, ch1, 2 dc) to make small picot-arch motifs, sl st into sc anchors. For ends work a denser fan of (3 dc, ch2, 3 dc) to hold curvature. (arches count approx 18)
Round 3 :
Ch 1, sc around the outer edge of these arches to stabilize shape and prepare for joining medallions. Place a marker at each 4th arch to mark medallion placement. (approx 110 sc)
Info :
This band is intentionally slightly open to let the floral arrangement sit on top. If you prefer more coverage, add an extra dc round before stabilizing with sc. Blocking now will help arches sit uniformly.
Round 4-8 :
Work 5 rounds repeating: Round of dc arches, sc stabilization, and one round of tiny popcorn clusters (work 5 dc cluster, ch1, anchor) spaced evenly. These rounds create texture and a transition between center and medallions. (counts maintained approx 110)
Round 9 :
Ch 1, sc evenly around, placing 3 sc at each arc seam to prepare for attachment of circular medallions. Fasten off and weave ends. Block the band so the arches are even and the medallion anchors lie flat.
— Circular Medallion Motif (make 12) :
Round 1 :
With Deep Berry, 6 sc in magic ring. (6)
Round 2 :
Inc around (12). (12)
Round 3 :
(1 sc, inc) x6 (18). (18)
Round 4 :
(2 sc, inc) x6 (24). (24)
Round 5 :
(3 sc, inc) x6 (30). (30)
Round 6 :
Ch 3, dc in each st around (30 dc). (30)
Round 7 :
Change to Dusty Rose. Ch 1, sc in each dc around. (30)
Round 8 :
Ch 3, (2 dc, ch2, 2 dc) in every 5th st to create scalloped petals; adjust spacing so scallops are even around. (approx 6 scallops)
Round 9 :
Info :
Optional: Crochet a raised rope over the medallion surface (used in image as twisted rings). For that use a long chain rope later and sew it in concentric rings. Otherwise continue with flat rounds for a layered medallion look.
Round 9 :
Fasten off leaving long tail for sewing. Block each medallion flat into an oval that mirrors the runner curve. Make 12 total and arrange evenly around the runner perimeter aligning with the markers placed on the lace band earlier.
— Raised Rope Accent (for each medallion) :
Round 1 :
Using Dusty Rose, ch 60 (or length to fit inside medallion circumference). Join chain ends with sl st to make a ring; work 1 sc in each chain around to make a thick rope tube. Fasten off leaving tail for sewing. (60 sc)
Round 2 :
Wind this rope in concentric loops onto medallion, tacking every 6-8 stitches with yarn tail to maintain spiral shape that mimics the raised loops seen in the photo.
Info :
The raised rope gives the medallions a three-dimensional braided look. Make ropes matching the exact diameter of medallion center — trim chain length if necessary.
— Outer Scalloped Edge (worked around medallions and runner) :
Round 1 :
Rejoin Cream at the outermost edge where medallions meet band. Ch 1, sc across medallion join seam and along lace band, placing 3 sc in each seam between medallions to create even spacing. (approx 160 sc total around entire runner)
Round 2 :
Ch 3, 4 dc in same st, sk 2 st, sl st into next st; rep around forming shell clusters over the outer side of each medallion. In arc join areas work 3 dc shells to keep shape. (shells approx 40)
Round 3 :
Ch 1, sc into each st and into the tops of shells, 1 sc in top of each 4-dc shell cluster. This creates a firm scalloped border. (approx 160 sc)
Round 4 :
Ch 1, *sc in next 2 sts, picot (ch3, sl st in 3rd ch) in next st; rep across scalloped edge to create delicate picot fringe. Fasten off and weave in ends. This completes the runner base and border. (picot count approx 40)
Info :
Block the entire runner now to shape medallions and scallops evenly. Pin into a flat oval and spray or steam-block according to yarn instructions. Allow to dry before adding floral arrangement.
— Large Rose (Make 2) :
Round 1 :
With Deep Berry and 3.0mm hook, ch 50 (or length to create a generous rose). Row 1: sc in 2nd ch from hook across. (49)
Round 2 :
Row 2: turn, ch1, sc across in back bumps only to create a curled edge (49). This creates a base strip for petals.
Round 3 :
Row 3: ch1, *in next st work (sc, hdc, dc, hdc, sc) to make a petal; skip next st, rep across creating 24 petals. Fasten off leaving long tail for sewing.
Info :
To assemble rose, coil the petal strip from one end, sewing through the base every 3-4 stitches to hold the spiral. Pin as you wrap to find the perfect tightness; the pictured roses are medium-firm with petals slightly fanned.
Round 4 :
Once coiled, secure the inner tip with a few whip stitches, then tack the outer petals with small stitches so the rose keeps its shape. Repeat for second large rose.
— Medium Rose (Make 3) :
Round 1 :
With Soft Pink, ch 36. Row 1: sc in 2nd ch and across (35). (35)
Round 2 :
Row 2: ch1, sc in blo across to add a decorative ridge (35).
Round 3 :
Row 3: ch1, *sc in next st, hdc in next, dc in next, hdc in next, sc in next; sk 1 st; rep across to form 16 petals. Fasten off and coil as with large roses. (petal count 16)
Info :
Use a slightly smaller hook or tighter tension on medium roses so they sit a little lower than large roses. You can also add a tiny circle of stuffing in the center for extra volume if desired.
— Small Rosette (Make 4) :
Round 1 :
With Pale Blush, 6 sc in magic ring (6). (6)
Round 2 :
Inc around (12). (12)
Round 3 :
(1 sc, inc) x6 (18). (18)
Round 4 :
Working in flo, sc around to produce a ridged spiral effect; fasten off leaving long tail to sew and twist into a tight rosette. (18)
Info :
Small rosettes provide texture and fill gaps in the bouquet. Sew them flush to the runner so they don't cast large shadows but add visual interest.
— Tiny Buds (Make 6) :
Round 1 :
With Dark Maroon, 6 sc in magic ring (6). (6)
Round 2 :
(inc, sc) x3 (9). (9)
Round 3 :
Sc around for one round, leaving long tail; stuff very lightly with a small bit of fiberfill and close. (9)
Info :
Buds are sewn in clusters around large roses to give a natural look. Fasten ends inside bud to hide tails. Use the sage green tail to make tiny sepals if desired (3 sc triangle).
— Leaves (Make 12) :
Round 1 :
With Sage Green and 3.0mm hook, ch 12. Row 1: sc in 2nd ch from hook, hdc, dc, tr, dc, hdc, sc across to end (11 sts). This forms a single leaf center rib. (11)
Round 2 :
Work around the leaf: from tip sc down one side of foundation ch: sc, hdc, dc, tr, dc, hdc, sc; at base work 3 sc, then mirror on other side reversing stitches to create symmetrical leaf. Fasten off leaving tail for sewing. (approx 22 sts around)
Round 3 :
Info :
For sculpted leaves, work a second round in blo with 1 sc in each st to create a raised ridge on the leaf surface. Steam-block leaves lightly to flatten and set curve.
Round 3 :
Optionally embroider central vein: using contrasting sage or darker green, stitch a running line from base to tip. Make 12 total leaves of varying sizes by adjusting initial chain length between 8-16.
— Curled Tendrils and Berry Sprigs :
Round 1 :
For tendrils, ch 40 with sage green, sc in 2nd ch and each ch across to make a rope; coil and tack to runner. For tiny berry sprigs, work 3-5 tiny buds on a 3-ch stem (sc in each ch) and sew in small clusters. Fasten off tails and weave in. (rope length variable)
Info :
Tendrils add realism — twist a few and sew under leaf clusters; tack every 8-10 sts to keep them in place without flattening the runner surface.
— Flower Assembly & Bouquet Layout :
Info :
Before sewing, layout all flowers on the blocked runner to determine placement. The pictured runner has a central cluster of 3 large roses, surrounded by 3 medium roses, 4 small rosettes and 6 buds with leaves interspersed. Place the central large rose slightly off center toward one long end so the arrangement reads naturally when viewed along a table.
Round 1 :
Attach the largest rose first at the marked center position using long tails and a yarn needle; sew through the base spiral every 4-6 stitches to anchor. Use hidden whip stitch along the spiral inner curve to prevent rotation. (attachment detail)
Round 2 :
Sew medium roses next forming a triangular cluster around the main rose. Position small rosettes and buds in gaps to create depth. Sew leaves under petals with the leaf base hidden beneath rose stitching for a natural overlap. Add tendrils and berry sprigs last. Use extra stitches in the main lace band to secure heavier flowers to the runner base.
Info :
Stitch through both the flower base and the underlying runner rounds (preferably the sc stabilization rounds) to anchor motifs securely. Use double-threaded yarn for extra strength when sewing large roses.
— Final Finishing Touches :
Round 1 :
Weave all remaining tails through 6-8 sts of the underside then trim close. Use small satin stitches to lock any visible seams if necessary. Lightly steam-block the entire runner again, reshaping medallions and bouquet so petals lie as desired.
Round 2 :
Optionally add a narrow row of cream sc around the underside junction of flowers to make the join area neater from the back. Fasten off and check for loose stitches. Your runner is complete.
Info :
For a more vintage look, gently age the runner with tea dye on a test scrap to ensure colors remain harmonious. Always test colorfastness before washing or placing liquids nearby.
This heirloom runner brings together delicate lace, sculptural roses and thoughtful colorwork to create a truly special centerpiece. The modular construction lets you personalize the arrangement and colors, turning a practical table accent into a piece of art. I hope you enjoy making each petal and watching the whole design come together — it’s immensely satisfying to create something so detailed and beautiful. 🧶🌸✨