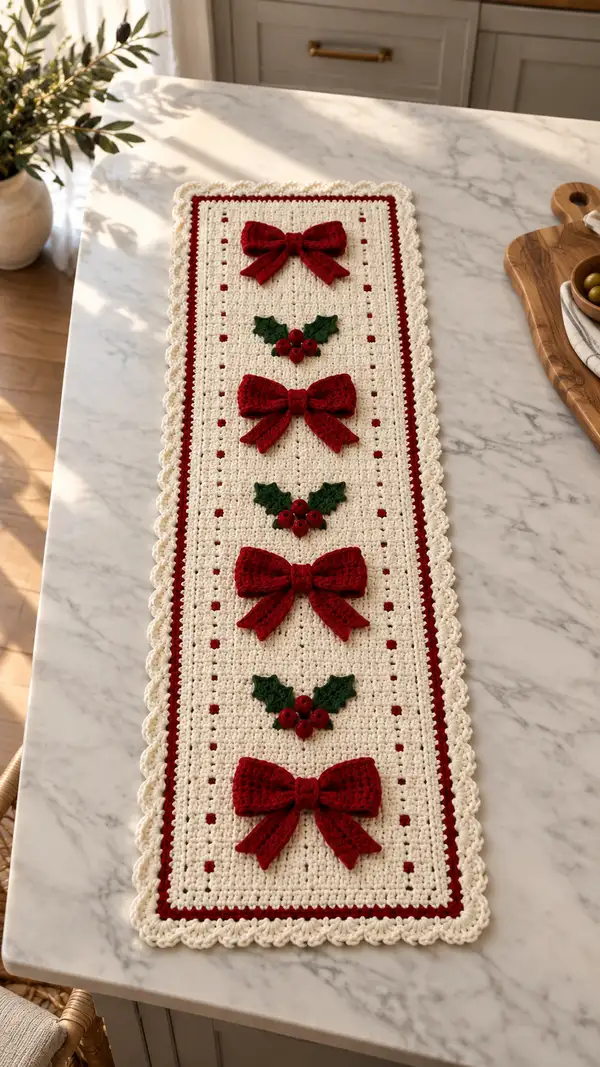
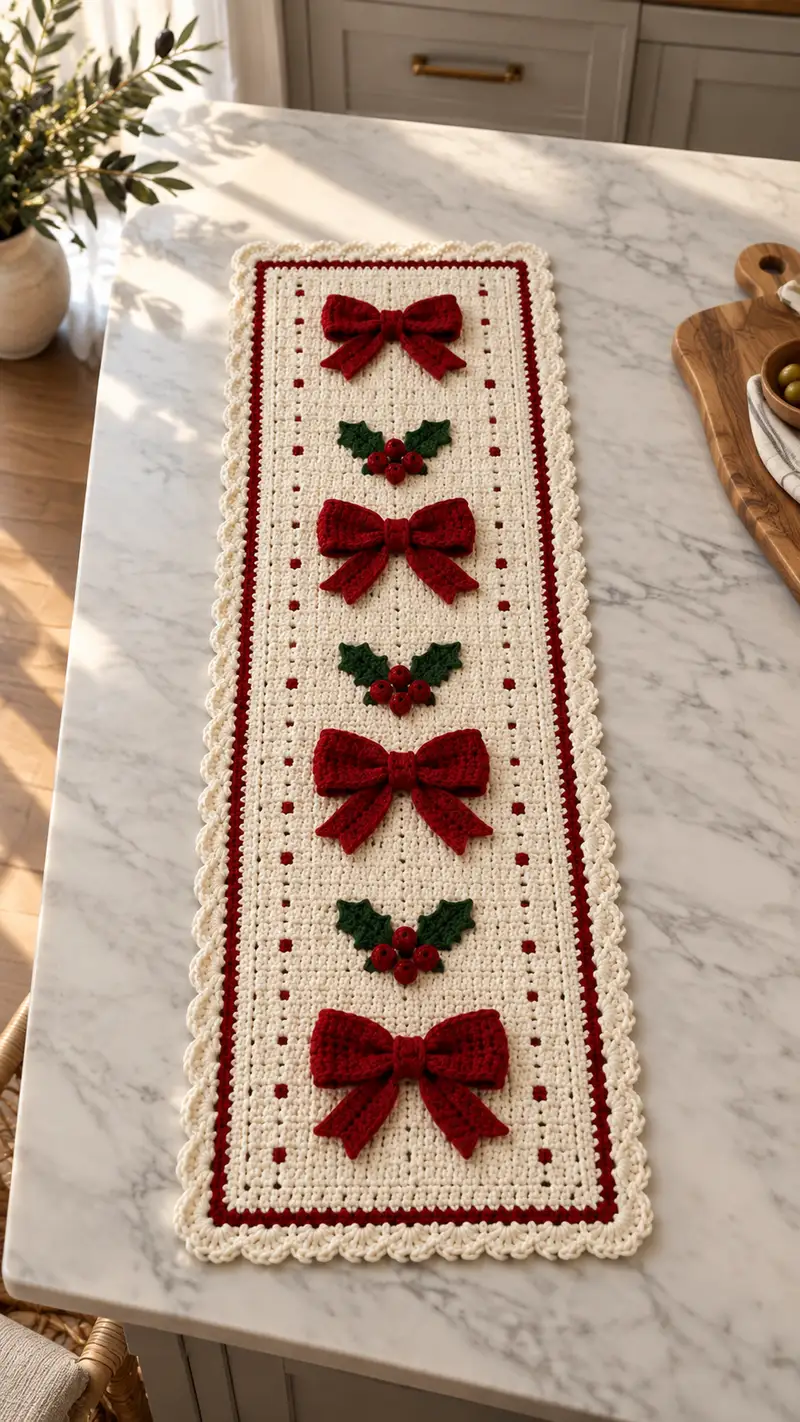
Create a charming holiday table runner featuring creamy textured panels, a deep red inset border, scalloped edging, and three-dimensional red bows with holly leaf clusters. This pattern includes detailed step-by-step instructions for the main panel, border, scalloped edge, four bows, holly leaves, and small crocheted berries. Perfect for seasonal decorating or gifting, the finished runner adds cozy handcrafted charm to your tabletop.
Progress Tracker
0% Complete
— Notes & Gauge :
Info :
Gauge is not strict for decorative table runner but for consistent size: 12 hdc x 8 rows = 4" in PM yarn with 4.0 mm hook. Adjust hook if necessary. Work on flat surface; yarn amounts assume standard 4-ply worsted.
Info :
This runner is worked flat in rows from one short edge to the other. Use a long stitch marker or removable clip to mark ends when needed. Maintain a straight edge by counting stitches at end of each row.
— Foundation & Main Panel (Cream) :
Round 1 :
Foundation chain: ch 86. This counts as ch-1 turning space for hdc rows. (86)
Round 2 :
Row 1 (RS): hdc in 3rd ch from hook (sk first 2 chs), hdc in each ch across. Turn. (84 hdc)
Info :
Chain 2 at row start counts as turning height for hdc; place stitch marker in first hdc of each row if you prefer marking the first stitch rather than the chain.
Round 3 :
Row 2 (WS): ch 2, hdc in each st across. Turn. (84)
Round 4 :
Row 3 (RS): ch 2, hdc in each st across. Turn. (84)
Round 5 :
Row 4 (WS): ch 2, hdc in each st across. Turn. (84)
Info :
Work the first 6 rows of hdc to form a solid base. Keep hook under both loops for a tidy edge unless you want a slight ridge; then use BLO for first RS row to form a subtle ridge.
Round 6-9 :
Rows 5-8: ch 2, hdc in each st across. Turn. (84)
Round 10 :
Row 9 (RS): ch 2, hdc in next 6 sts, *ch 1, sk 1 st (creates small eyelet space for dotted pattern), hdc in next 6 sts; rep from * across until last 6 sts, hdc in last 6 sts. Turn. (84, 7 small eyelets evenly spaced)
Info :
Eyelet (ch1, sk1) provides the little dotted red squares when later anchored by red surface stitches. Keep the eyelets evenly spaced by working the established repeat. Make a note of how many eyelets you create per row for placement consistency (in this pattern you will create 7 per eyelet row).
Round 11-16 :
Rows 10-15: ch 2, hdc in each st across. Turn. (84)
Round 17 :
Row 16 (RS): ch 2, hdc in next 6 sts, *ch 1, sk 1 st, hdc in next 6 sts; rep from * across, hdc in last 6 sts. Turn. (84)
Round 18-23 :
Rows 17-22: ch 2, hdc in each st across. Turn. (84)
Info :
The main panel is worked in vertical repeats; to get the runner length seen in the photo work 40 rows for the central cream panel before the inset red stripe. If you prefer longer or shorter runner, repeat additional sets of 8-12 rows to adjust length.
Round 24 :
Row 23 (RS): Change to red yarn on last yarn-over of previous stitch; ch 2 with red, hdc in each st across. Turn. (84)
Info :
We change to red for an inset stripe. To avoid a jog, change color on the final yarn-over of the previous stitch. Carry unused cream yarn loosely along WS inside or break and weave tail later.
Round 25 :
Row 24 (WS, red): ch 2, hdc in each st across in red. Turn. (84)
Round 26 :
Row 25 (RS): Change back to cream on last yarn-over; ch 2, hdc in each st across in cream. Turn. (84)
Info :
This creates the narrow red inset stripe seen near each short edge. Repeat this red stripe sequence at both short ends of the runner for symmetry (you will work one near beginning and one near the end).
Round 27-36 :
Rows 26-35: ch 2, hdc in each st across. Turn. (84)
Round 37 :
Row 36 (RS): ch 2, hdc in next 6 sts, *ch 1, sk 1 st, hdc in next 6 sts; rep from * across, hdc in last 6 sts. Turn. (84)
Round 38-42 :
Rows 37-41: ch 2, hdc across. Turn. (84)
Info :
At this point your main cream panel has three regularly spaced eyelet rows for the dotted motif. Mark the RS centerline and the positions where bows/holly clusters will be attached; this pattern places four bows at equal intervals along the length with a holly cluster between each bow.
Round 43-46 :
Rows 42-45: ch 2, hdc across. Turn. (84)
Round 47 :
Row 46 (RS): Change to red on last yarn-over. ch 2, hdc in each st across in red. Turn. (84)
Round 48 :
Row 47 (WS, red): ch 2, hdc in each st across. Turn. (84)
Round 49 :
Row 48 (RS): Change to cream on last yarn-over. ch 2, hdc in each st across. Turn. (84)
Info :
These two red rows form the inset stripe close to the far end of the runner mirroring the earlier one. Fasten off cream if you will work the border separately; otherwise continue with cream for the edge rounds.
— Inner Red Accent Border (worked along both long sides) :
Round 50 :
With RS facing, join red yarn at first st along long edge at one short end corner; ch 1, sc evenly along side edge working 1 sc into each row end for 40 ends, place 3 sc in corner, sc evenly along opposite side for 40 ends, 2 sc in corner, join with sl st to start. Count will be approx 84 sc around the perimeter in red. (Approx 84)
Info :
When joining red along the side, insert hook into the horizontal row ends; work evenly so the red inset appears as a narrow stripe around the inner perimeter. Adjust counts if your row count varies.
Round 51 :
sc in each sc around (single stitch perimeter in red). Join with sl st. (Approx 84)
Round 52 :
Change to cream on last yarn-over of last sc; ch 1, sc in each st around in cream for one round to begin scalloped base. Join with sl st. (Approx 84)
Info :
This thin red inset is decorative and should sit flush in from the scalloped edge. Adjust placement by working your first cream scallop round just outside the red perimeter.
— Scalloped Shell Edge (Cream) :
Round 53 :
Round 1 scallop (RS): ch 3 (counts as first dc), *sk 1 st, 5 dc in next st, sk 1 st, sl st in next st; rep from * around until corner; at corners work 7 dc into corner stitch to create smooth corner shell; continue rep; join with sl st to top of ch-3. (Shells around perimeter, stitch total varies by gauge)
Info :
Shell pattern creates the raised scalloped edge seen in the photo. If shells pull in too strongly, reduce to 4 dc per shell. Work shells evenly and count shells along one long edge to ensure symmetry on opposite side.
Round 54 :
Round 2 scallop (WS): sl st into center of first shell, ch 1, sc in same place, *ch 3, sc in center of next shell; rep from * around including corners, join with sl st. (Shell centers joined with ch-3 loops)
Round 55 :
Round 3 scallop (RS): *in each ch-3 loop work (sc, hdc, 3 dc, hdc, sc) to make a more pronounced scallop; rep from * around. Fasten off and weave ends. (Pronounced scallops all around)
Info :
Block the runner carefully to open scallops and square the corners: damp block and pin to shape on blocking mat. Allow to dry overnight for best results.
— Decorative Red Squares (Surface Embellishment) :
Round 56 :
Using red yarn and tapestry needle, embroider tiny surface dabs into each eyelet ch-1 space created earlier: insert needle from WS to RS through the ch-1 hole, make a small satin stitch across the hole, and secure on WS. Do this for each of the eyelet locations in the three eyelet rows. (Eyelet decorations complete)
Info :
These tiny embroidered dots create the small red squares visible on the runner. Keep stitches small and consistent; place exactly in the ch-1 spaces to look like inset squares rather than raised knots.
— Bow (Make 4 identical) :
Info :
Each bow is worked flat with red yarn as a small rectangle folded and cinched in center. Finished bow width approx 4.5" and height approx 3.25" depending on gauge. For a tighter texture, use hdc; for slightly lacy look use dc.
Round 57 :
Bow R1: With red, ch 24. (24)
Round 58 :
Bow R2: Row 1: ch 2 (counts as hdc), hdc in 3rd ch from hook and in each ch across. Turn. (22 hdc)
Round 59 :
Bow R3-12: Rows 2-11: ch 2, hdc in each st across. Turn. (22)
Info :
Work 11 total rows of hdc to create a dense rectangle. You can adjust width by changing the ch foundation (odd or even as preferred). Keep edges straight by counting sts each row.
Round 60 :
Bow R13: Fasten off leaving a 10" tail for sewing. Fold rectangle widthwise so short ends meet slightly overlapping; pinch center to form bow shape. Wrap a 3-4" length of red yarn around center two or three times and secure tightly at back with a few stitches. Weave in ends. (Bow formed)
Info :
For the tails of the bow, create two triangular tail pieces optionally: ch 8, work sc decreases to shape tails (see Bow Tail section). Alternately cut two lengths of rectangle folded and tapered by sc decreases to create tails and sew to the back of the bow.
Round 61 :
Bow Tail (make 2 per bow): With red, ch 8. Row1: sc in 2nd ch from hook and across (7 sc). Turn. Row2: ch1, sc2tog, sc in next 3 sts, sc2tog (5 sc). Turn. Row3: ch1, sc2tog, sc in next st, sc2tog (3 sc). Turn. Row4: ch1, sc3tog (1 sc). Fasten off leaving tail to sew. Make two and attach behind bow with center wrap to create ribbon streamers. (2 tapered tails per bow)
Info :
Arrange tails so they hang downward when the bow is sewn to the runner. Pin in place and tack stitch through back center to hide stitches under the bow wrap.
— Holly Leaf (Make 8 leaves to make 4 clusters of 3 leaves each) :
Info :
Leaves are small pointed motifs worked flat in green yarn. Each holly cluster in the photo has two leaves per cluster (slightly stylized). We'll make 2 leaves per cluster and place three small berries between them.
Round 62 :
Leaf R1: With green, ch 9. (9)
Round 63 :
Leaf R2: Row 1: sc in 2nd ch from hook and in next 6 chs, 3 sc in last ch; working on opposite side of foundation chain sc in next 6 chs, 2 sc in last ch (creates rounded base). Total approx 20 sc. Turn. (20)
Round 64 :
Leaf R3: ch1, (sc in next 2, hdc in next 2, dc in next 3, tr in next 3, dc in next 2, hdc in next 2, sc in last 4) - shaping pointed leaf. Fasten off leaving long tail to sew. (Approx 20 shaping stitches)
Info :
To create the classic holly serrated edge, you can add small picot points along the edge by replacing some sc with (sc, ch2, sl st) picots. Keep leaf sizes consistent by counting shaping stitches and following same pattern for each leaf.
Round 65 :
Leaf Edging Option: Rejoin green at base of leaf, ch1, sc around edge placing 1 sc in each st and (sc, ch2, sl st) picot every 4 sts on the wider side to emulate serration. Fasten off. (Leaf completed)
Info :
Slightly block and press leaves flat to smooth shaping—pin to a small foam block to dry if desired. Make 2 leaves per cluster and 4 clusters total (8 leaves).
— Holly Berries (Make 12 small berries) :
Round 66 :
Berry R1: Using red, make a magic ring, ch1. 6 sc in MR. (6)
Round 67 :
Berry R2: (inc) x6 (12)
Round 68 :
Berry R3: sc in each st around (12)
Info :
Stuff berries very lightly with small bit of fiberfill or cotton. Small amount only to keep spherical shape without bulging stitches. Use a darning needle to push stuffing in if necessary.
Round 69 :
Berry R4: (sc2tog) x6 (6)
Round 70 :
Berry R5: sc6 dec to close or sc6 and finish by pulling tail through remaining sts tightly to close. Fasten off and weave tail through center to secure. Make 3 berries per cluster; total 12 berries for 4 clusters. (Finished little berries)
Info :
If berries are too loose, use a smaller hook for berry rounds (3.5 mm) to tighten fabric before stuffing. You may add a tiny French knot with embroidery thread to each berry for glossy accent if desired.
— Placement Planning & Marker Rows :
Info :
Mark the RS centerline of the runner with a removable stitch marker in the center lengthwise. Measure the runner length and divide into 5 equal vertical zones to position 4 bows and 3 holly clusters between them symmetrically. Example: If central cream panel is 46 rows long, place bows centered at rows 6, 16, 26, 36 (counting from short edge after first red stripe).
Round 71 :
Placement Example: Pin first bow centered horizontally and vertically at RS row 6 from the short edge. Pin the next holly cluster between rows 10-12, then next bow at row 16, holly at 20-22, bow row 26, holly at 30-32 and final bow at row 36. This spacing makes the motif repeat evenly. Adjust to your chosen length.
Info :
Use pins to place bows, leaves, and berries before sewing. This ensures symmetrical placement and allows you to step back and adjust visually before committing with stitches.
— Assembly & Sewing Appliques :
Round 72 :
Attach Bow 1: Center bow at chosen marked row; use yarn needle and long tail to sew bow to runner by stitching through center wrap and into runner fabric across 6-8 secure running stitches. Tie off and weave tail inside runner. The back of bow should be secured with 4-6 small stitches through center band and under bow tails.
Round 73 :
Attach Holly Leaves: Position two leaves below each bow, slightly angled outward; sew leaf bases to runner with small whip stitches using green yarn tail. Secure each leaf with 5-6 stitches at the base only so tips remain slightly raised for dimension.
Round 74 :
Attach Berries: Group three small berries in cluster and sew them between the two leaves using red yarn. Pass needle through berry center and through runner fabric under the leaf base several times to secure. Knot and weave tail to WS. Repeat for all clusters.
Info :
Sew through both runner fabric and applique to anchor securely; add an extra backstitch at high-stress points. Keep stitches small and hidden beneath applique shapes for a neat finish.
Round 75 :
Secure Tails: If bow tails were made separately, sew tails to the underside/back of bow body then tack to runner with a couple of stitches through tail top to stop flaring. Trim any long tails and weave ends securely.
Round 76 :
Finishing Touches: With cream yarn, tidy any seam joins around inset border and weave in all ends on WS. Use small invisible whip stitches if needed to flatten seam allowances. Block gently as final step to set shape and scallops.
Info :
To achieve the slightly raised bow look, do not glue bows down; sew only through the center. A few stitches at tail bases are enough. If you want an even more raised look, add a small felt circle backing to each bow and stitch felt to the runner under the bow center for a padded base.
— Optional: Alternative Bow with Ribbed Texture (Make 4) :
Round 77 :
Rib Bow Row 1: ch 24 with red. Row1: hdc BLO across (22). Turn.
Round 78-86 :
Rows 2-10: ch2, hdc BLO across each row. Fasten off leaving long tail. Fold and cinch center same as standard bow; ribbed texture gives extra shadowing. (Finished ribbed bow)
Info :
Depending on desired visual effect, mix two bows (one ribbed, one plain) for subtle variety, but using identical bows maintains consistency with the pictured runner.
— Final Inspection & Care :
Round 87 :
Care: Spot clean with mild detergent and cold water. For deeper cleaning, hand wash flat and reblock scallops. Avoid machine washing to protect sewn appliques. Store flat or rolled to preserve scallop shape.
Info :
For gifting, press lightly and package flat. Include a small care note to the recipient about gentle hand washing and blocking to maintain shape.
This festive table runner brings holiday warmth to your home with handmade charm and layered texture. The dimensional bows and holly clusters add depth and personality while the scalloped edge gives a classic finish. Whether on a family table or entry console, it elevates festive decor and makes a heartfelt handmade gift. Enjoy the rhythmic, meditative stitching and the satisfying moment you pin the last bow in place! 🎁🧶