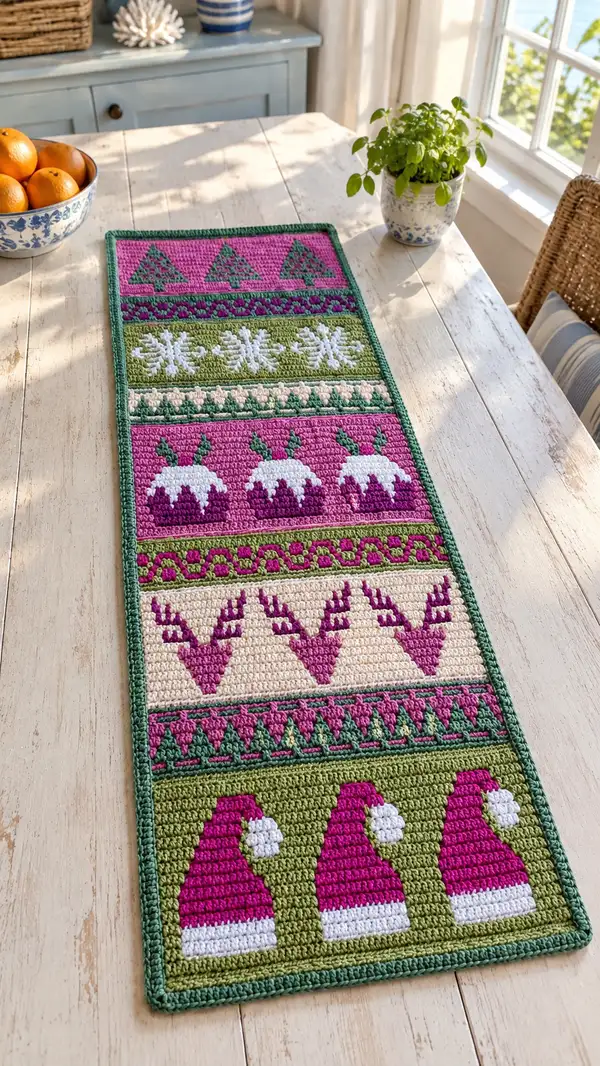
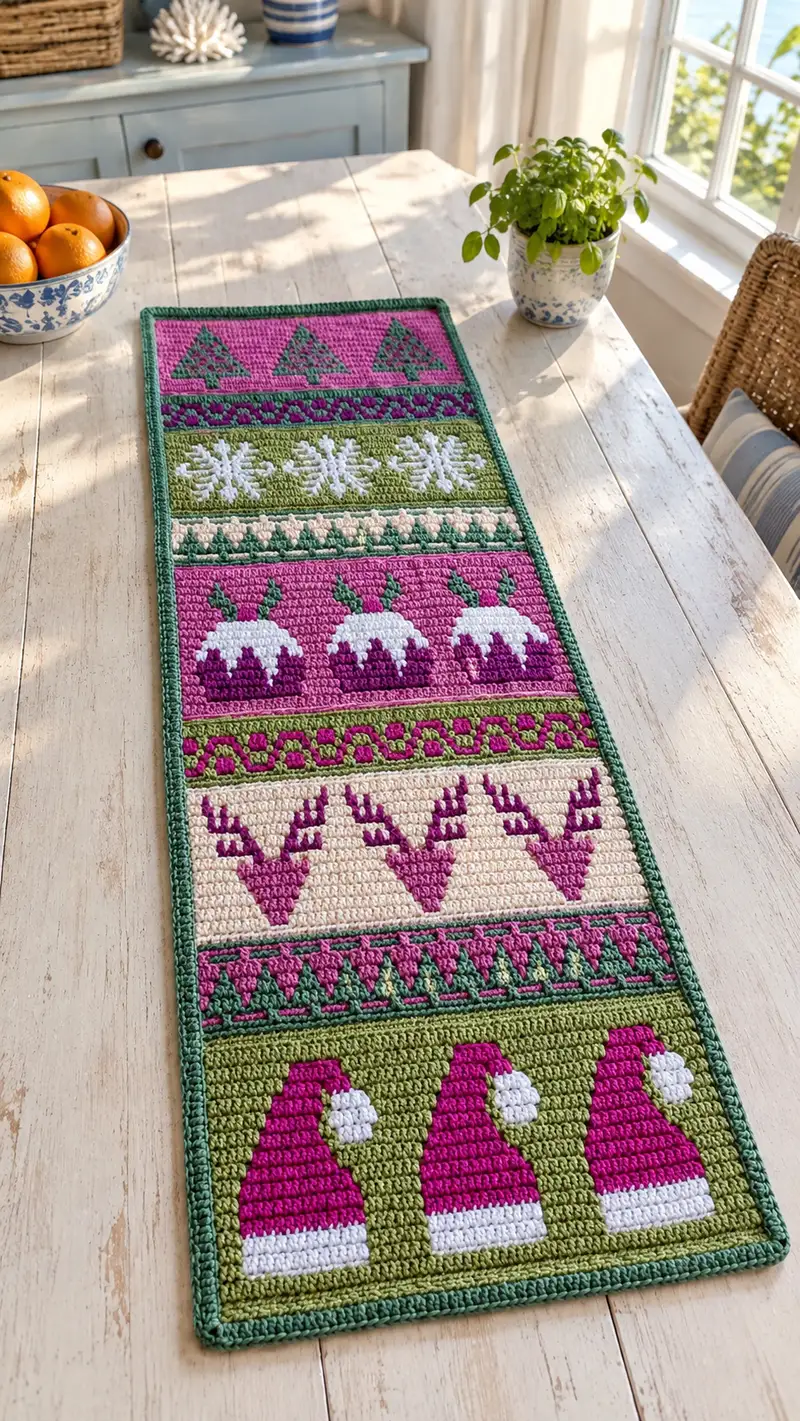
A long, colorful table runner worked in tapestry single crochet with bold festive motifs: Santa hats, reindeer silhouettes, Christmas puddings, snowflakes and stylized trees. Worked in bright magenta, leafy greens and warm cream, this rectangular runner features neat colorwork bands and a neat framed edge — perfect for holiday tables or a cheerful everyday accent.
Progress Tracker
0% Complete
— Notes :
Info :
Pattern is worked flat in tapestry single crochet (sc). Each 'Round' below refers to one worked row across the width (turning rows). Work in continuous rows with turning chain 1 (ch1 does not count as stitch) for neat edges, or turn with ch1 and sc into turning chain to maintain height. All rows below have 60 sc unless otherwise noted. Use the tapestry method: carry unused color across the top of the previous row, catching floats every 4-6 sts if required. Gauge: 18 sc x 22 rows = 10cm x 10cm (approx) in tapestry single crochet with recommended yarn and 3.5mm hook. Adjust hook size to achieve similar density.
— Foundation :
Round 1 :
Chain 61 loosely. (This chain counts as foundation; you will work 60 sc across.)
Round 2 :
Row 1: Sc in 2nd ch from hook and in each ch across. Turn. (60)
Round 3-6 :
Rows 2-5: Work 1 sc in each st across in Leaf Green (60). These 4 rows form the top green frame. Turn after each row. (60)
Info :
Keep tension even and carry the main Leaf Green yarn across the back when working into other colors so that the background is always contiguous; this helps motifs sit neatly on top of a continuous background color where intended.
— Band 1 : Stylized Trees on Magenta Background (Rows 7-24) :
Round 7 :
Change to Magenta. Row 6: 1 sc in each st across in Magenta (60). Turn. (60)
Infos :
We will create three tree motifs across the width. Each tree motif block is 18 sts wide, with 3 sts of spacing left and right at edges and 3 sts between motifs. Use small bobbins for Magenta and Forest Green to keep floats short.
Round 8 :
Row 7: Sc 3 Forest Green, *sc 18 Magenta, sc 3 Forest Green* x3? (see layout) — to maintain exact counts, work: sc 3 Forest Green, sc 18 Magenta, sc 3 Forest Green, sc 18 Magenta, sc 3 Forest Green, sc 15 Magenta. This achieves 60 sts. (60)
Info :
Because the trees are triangular shapes, we will build them upward over multiple rows using Forest Green for tree pixels on a Magenta background. For clarity, the left and right forest green margins of 3 sts are decorative; keep a consistent 3-st green trim at both edges on these rows.
Round 9 :
Row 8: Sc 3 Forest Green, sc 2 Magenta, sc 4 Forest Green, sc 10 Magenta, sc 4 Forest Green, sc 10 Magenta, sc 4 Forest Green, sc 13 Magenta. (60)
Round 10 :
Row 9: Sc 3 Forest Green, sc 4 Magenta, sc 8 Forest Green, sc 8 Magenta, sc 8 Forest Green, sc 8 Magenta, sc 4 Forest Green, sc 17 Magenta. (60)
Round 11 :
Row 10: Sc 3 Forest Green, sc 6 Magenta, sc 12 Forest Green (forming central triangle peaks across motifs), sc 30 Magenta. (60)
Info :
These rows use small pixel blocks to draw stylized trees. If you prefer chart-reading, draw three equilateral triangles each 7–8 rows tall across the magenta field. Maintain 3-st green border at both edges for a framed look.
Round 12 :
Row 11: Sc 3 Forest Green, sc 8 Magenta, sc 8 Forest Green, sc 12 Magenta, sc 8 Forest Green, sc 21 Magenta. (60)
Round 13 :
Row 12: Row in Magenta across, 1 sc in each st (60). This evens out the band and sets a solid background row. (60)
Round 14 :
Row 13: Repeat Row 11 pattern to refine tree shape: sc 3 Forest Green, sc 6 Magenta, sc 12 Forest Green, sc 30 Magenta. (60)
Info :
Place small tree trunks one or two rows below the triangle bases by inserting 2–3 Forest Green stitches centered under each tree; this yields a classic stylized tree look. If working from a chart, mark the center of each 18-st motif to align trunks symmetrically.
Round 15-20 :
Rows 14-19: Work 6 rows in Magenta, 1 sc in each st across (60). These rows create a solid field that visually rounds the tree motifs and gives breathing room before the next stripe. (60)
Round 21 :
Row 20: Change to Forest Green for a 2-row narrow divider: sc 1 sc in each st across in Forest Green. Turn. (60)
Round 22 :
Row 21: Work second row in Forest Green, sc across (60). Turn. (60)
Info :
These Forest Green rows act as a narrow framed divider. Carry Magenta across the back but do not let floats exceed 6 sts. Twist colors at each change when they meet to secure floats.
— Narrow Ornamental Stripe (Rows 23-26) :
Round 23 :
Row 22: Change to Magenta and work 1 sc in each st across (60). Turn. (60)
Round 24 :
Row 23: In Magenta, work ornamental motif: sc 4 Magenta, sc 6 Forest Green, sc 6 Magenta, sc 6 Forest Green, sc 4 Magenta, sc 34 Magenta to finish row. (60)
Round 25-26 :
Rows 24-25: Work 2 rows in Forest Green, 1 sc in each st across (60). These rows provide a band that sets up the snowflake section. (60)
Info :
At every band transition switch to bobbins or small balls and catch floats every 4–6 sts. If floats become long, secure them by crocheting over them once or twisting colors at the back.
— Snowflake Panel on Leaf Green (Rows 27-40) :
Round 27 :
Row 26: Change to Leaf Green. Work 1 row in Leaf Green across. (60)
Round 28 :
Row 27: Leaf Green across (60). Turn. (60)
Info :
Snowflakes will be composed in White and Cream on the Leaf Green background. Each snowflake block is approximately 16-18 sts wide. There will be three snowflakes across, with small spacing between each snowflake. Keep track of the center stitch for each snowflake area — at stitches 10, 30 and 50 approximately.
Round 29 :
Row 28: Create snowflake base row: sc 9 Leaf Green, sc 6 White (start left snowflake), sc 9 Leaf Green, sc 6 White (center snowflake), sc 9 Leaf Green, sc 6 White (right snowflake), sc 15 Leaf Green. (60)
Round 30 :
Row 29: Sc 9 Leaf Green, sc 2 White, sc 2 Cream, sc 2 White, sc 9 Leaf Green, sc 2 White, sc 2 Cream, sc 2 White, sc 9 Leaf Green, sc 2 White, sc 2 Cream, sc 2 White, sc 15 Leaf Green. (60)
Round 31 :
Row 30: Sc 9 Leaf Green, sc 6 White in a symmetric star formation (use alternating White/Cream for small arms), sc 9 Leaf Green, sc 6 White, sc 9 Leaf Green, sc 6 White, sc 15 Leaf Green. (60)
Info :
To make crisp snowflake arms, switch yarn color in the middle of a sc by pulling through the new color on the last yarn over (this creates neater vertical color breaks). Work slowly on these detailed rows and use a chart if helpful — mark the center of each snowflake as you go.
Round 32 :
Row 31: Work a narrow accent row in Cream: 1 sc in each st across in Cream. (60)
Round 33-36 :
Rows 32-35: Work 4 rows in Leaf Green, sc in each st across to stabilize the band and give negative space between snowflakes and the next band. (60)
Info :
Stuffing is not required — keep fabric flat. If you notice any puckering, block the piece before adding next bands; blocking will smooth tapestry work and square corners.
— Small Cream & Green Motif Band (Rows 41-48) :
Round 37 :
Row 36: Change to Cream. Row 36: 1 sc in each st across in Cream (60). Turn. (60)
Round 38 :
Row 37: Work ornamental triangular motif: sc 6 Cream, sc 6 Forest Green, sc 6 Cream, sc 6 Forest Green, sc 6 Cream, sc 6 Forest Green, sc 24 Cream. (60)
Round 39-44 :
Rows 38-43: Work 6 rows in Cream with small Forest Green accents every other row to create a stepped triangle edge. Maintain 60 sts each row. (60)
Info :
These small alternating color rows form a dentil-like trim between the snowflakes and the pudding band. Use the FLO (front loop only) once on the topmost cream row if you want a slightly raised ridge before the next color change.
— Christmas Pudding Panel on Magenta (Rows 49-62) :
Round 40 :
Row 44: Change to Magenta. Row 44: sc across in Magenta (60). Turn. (60)
Info :
Pudding motifs are worked with Magenta base, White frosting and deep Plum/Magenta for the pudding body. Each pudding motif block is ~16-18 sts wide and three are arranged across the row, similar to hats and reindeer bands. Plan centers at 10, 30 and 50 stitches roughly.
Round 41 :
Row 45: Sc 6 Forest Green (border stitch), sc 16 Magenta (left pudding area), sc 4 White (frosting top left), sc 14 Magenta (center pudding area), sc 4 White (frosting top center), sc 16 Magenta (right pudding area). Total (60). (60)
Round 42 :
Row 46: Sc 6 Forest Green, sc 14 Magenta, sc 6 White (extend frosting shape), sc 12 Magenta, sc 6 White, sc 16 Magenta. (60)
Round 43 :
Row 47: Sc 6 Forest Green, sc 12 Magenta, sc 8 White (curved frosting highlight), sc 12 Magenta, sc 8 White, sc 14 Magenta. (60)
Info :
To create the dripping frosting effect, alternate White and Magenta pixels in staggered rows to simulate a natural drip edge; this creates the impression of rounded frosting on a pudding shape.
Round 44-48 :
Rows 48-52: Work 5 rows in Magenta with small White decorative pixels centered on each pudding for final highlight rows. Each row: 1 sc in each st across (60). (60)
Round 49 :
Row 53: Change to Forest Green and work 2 rows to separate pudding band from the center reindeer band: 2 rows Forest Green sc across (60). (60)
Info :
When you change to the deep green separators, twist yarns where they meet at the back so the floats are locked; this helps the runner lay flat and reduces snagging.
— Narrow Interlace Decorative Stripe (Rows 63-68) :
Round 50 :
Row 54: Change to Magenta and work an ornamental interlacing motif for 2 rows: Row 54 and 55: sc across in Magenta with Forest Green small interlaced blocks: work sc 6 Magenta, sc 6 Forest Green, repeat as needed to total 60 sts. (60)
Round 51-52 :
Rows 56-57: Work 2 rows in Leaf Green to frame the center reindeer band. (60)
Info :
Small decorative stripes give separation between large motif panels and help the eye rest. They are also useful places to secure or weave ends neatly.
— Reindeer Heads on Cream Background (Rows 69-82) :
Round 53 :
Row 58: Change to Cream. Row 58: 6 sts Forest Green margin, *reindeer motif area 16 sts*, repeat to make 3 across, remaining sts in Cream to total 60. For simplicity: sc 6 Forest Green, sc 16 Cream (left reindeer block start), sc 16 Cream (center block), sc 16 Cream (right block). (60)
Info :
Reindeer silhouettes are composed in Magenta (antlers) and Forest Green (face contour) on Cream; we will build antlers upward across several rows to capture the branched silhouette effect. Center of three reindeers roughly at stitches 10, 30 and 50.
Round 54 :
Row 59: Create base shape: sc 6 Forest Green, sc 4 Cream, sc 4 Magenta (left antler base), sc 4 Cream, sc 4 Magenta, sc 6 Cream, sc 4 Magenta, sc 4 Cream, sc 4 Magenta, sc 6 Forest Green. (60)
Round 55 :
Row 60: Sc 6 Forest Green, sc 10 Cream, sc 6 Magenta (extend antlers/ears), sc 10 Cream, sc 6 Magenta, sc 6 Cream, sc 16 Forest Green leftover to finish row. (60)
Round 56-60 :
Rows 61-65: Work 5 rows in Cream with carefully placed Magenta pixels to shape antlers and faces. Typical single row example: sc 6 Forest Green, sc 12 Cream, sc 4 Magenta, sc 12 Cream, sc 4 Magenta, sc 12 Cream. (60)
Info :
Arms of the antlers will be achieved by 2–3 pixel wide Magenta branches protruding from a central Magenta trunk; keep antler pixels 3–4 sts long to read visually at this gauge. Use photos as guide and adjust row counts if you prefer larger antlers.
Round 61-62 :
Rows 66-67: Work 2 rows in Forest Green to separate the reindeer band from the lower motifs. (60)
— Narrow Dentil Band (Rows 83-88) :
Round 63 :
Row 68: Change to Magenta and work a dentil zigzag across: Work rows 68-71 as small alternating triangle pattern in Magenta and Forest Green — 4 rows total with 60 sts each. Example row: sc 4 Magenta, sc 4 Forest Green, rep across. (60)
Info :
Use BLO on the last Magenta row to create a subtle ridge that frames the next cream panel if you like. This is optional but gives nice visual separation.
— Repeated Reindeer/Ornament Motif & Cream Background (Rows 89-104) :
Round 64 :
Row 72: Change to Cream. Work 2 rows in Cream to center the motif. (60)
Round 65-68 :
Rows 73-76: Repeat a simplified triangular deer motif: sc 6 Forest Green border, sc 48 cream patterned region with Magenta triangular insets, sc 6 Forest Green. Realized as 4 rows forming the repeating triangle shapes depicted in the cream band of the sample. (60)
Info :
This central cream band shows V-shaped deer antler or chevron motifs; if you want to recreate the exact pictured look, mark each motif center and work the magenta chevrons over 6–8 rows to form the triangular teeth shapes.
Round 69-72 :
Rows 77-80: Work 4 rows in Magenta with small Forest Green accents to echo the design repetition. (60)
Round 73-76 :
Rows 81-84: Work 4 rows in Leaf Green to prepare for Santa hat band. (60)
Info :
At this stage your runner should be nearly two-thirds complete. Keep checking edge straightness; if you notice a drift, count across to find where color shifts may have been missed causing miscounts.
— Santa Hat Panel on Leaf Green (Rows 105-120) :
Round 77 :
Row 85: Change to Leaf Green and work 2 rows in Leaf Green across. (60)
Info :
The Santa hat band is one of the more graphic panels: three hats across, each approx 16-18 sts wide, with white pompom and brim. Hints: plan hat centers at stitches 10, 30, 50 — these are approximate and will be refined below in row-by-row instructions.
Round 78 :
Row 86: Sc 6 Forest Green margin, sc 16 Leaf Green (left hat block start), sc 16 Leaf Green (center hat), sc 16 Leaf Green (right hat). (60)
Round 79 :
Row 87: Begin forming hat shape in Magenta: sc 6 Forest Green, sc 4 Magenta, sc 8 Leaf Green, sc 4 Magenta, sc 8 Leaf Green, sc 4 Magenta, sc 18 Leaf Green. (60)
Round 80 :
Row 88: Sc 6 Forest Green, sc 6 Magenta (lower hat body), sc 6 Leaf Green, sc 6 Magenta, sc 6 Leaf Green, sc 6 Magenta, sc 24 Leaf Green. (60)
Round 81 :
Row 89: Sc 6 Forest Green, sc 8 Magenta, sc 4 White (start brim), sc 8 Magenta, sc 4 White, sc 8 Magenta, sc 22 Leaf Green. (60)
Info :
Work the white brim and pompom by switching to White yarn for those pixels. The pompom sits one or two rows above the brim and is typically 3–4 sts in diameter. For a puffier pompom effect, you can embroider a small round tuft after finishing.
Round 82 :
Row 90: Sc 6 Forest Green, sc 10 Magenta (hat taper), sc 6 White (brim across all hats), sc 10 Magenta (hat taper), sc 18 Leaf Green. (60)
Round 83 :
Row 91: Sc 6 Forest Green, sc 8 Magenta, sc 6 White (pom-pom row placement centered on each hat: 3 white sts per pompom), sc 8 Magenta, sc 24 Leaf Green. (60)
Round 84-88 :
Rows 92-96: Work 5 rows in Leaf Green to provide background under the bottom border and give separation before the edge finish. (60)
Info :
Check motifs for symmetry. If any hat, reindeer or pudding appears shifted, you can remove a row or re-distribute pixel counts in earlier motif rows to center them more accurately before adding the final border.
— Lower Framing & Border Rounds (Rows 121-130) :
Round 89 :
Row 97: Change to Forest Green. Work 2 rows sc across in Forest Green to complete the inner bottom border. (60)
Round 90 :
Row 98: Work a final 4 rows in Leaf Green to frame the edge before the finishing edging: 4 rows leaf green, sc across. (60)
Round 91 :
Row 99-101: Work 3 rows in Forest Green using sc across to form the outer framed edge. (60)
Round 92 :
Row 102: Switch to 3.0mm hook (optional) for neater finishing. Work a neat single crochet edge: work 1 sc evenly spaced around the entire rectangular piece, placing 3 sc in each corner to maintain square corners. Work across the end rows without turning in continuous round. (Approx 240 sc around including corners)
Round 93 :
Round: Work a decorative finishing round: *sl st into next st, ch 3, sl st into same st (creates small loop)* repeat across the long edges, and in the corners work sl st, ch 3, sl st twice to form a small picot-like trim. Fasten off and weave in ends. (Finishing)
Info :
Wet-block the runner by pinning it to desired rectangular shape on a blocking mat, stretching gently to even the sides. Let dry fully. Weave in all ends neatly on the WS using a yarn needle. If floats show at the edges, use the single crochet border to trap them for a clean look.
Round 94 :
Final: Give the whole runner a careful steam or wet block and press flat. Trim stray fibers. Your runner is complete. Approx finished dimensions (sample): 14" wide x 48" long (35cm x 122cm). Adjust by adding or subtracting bands in the center to alter length.
This cheerful table runner combines classic tapestry colorwork with a contemporary color palette to bring festive charm to any table. Each band is a small accomplishment — trees, snowflakes, puddings, reindeer and hats come together to tell a holiday story down the center of your table. Block and finish carefully to make the motifs pop, then display proudly or gift to someone special. 🎁🧶