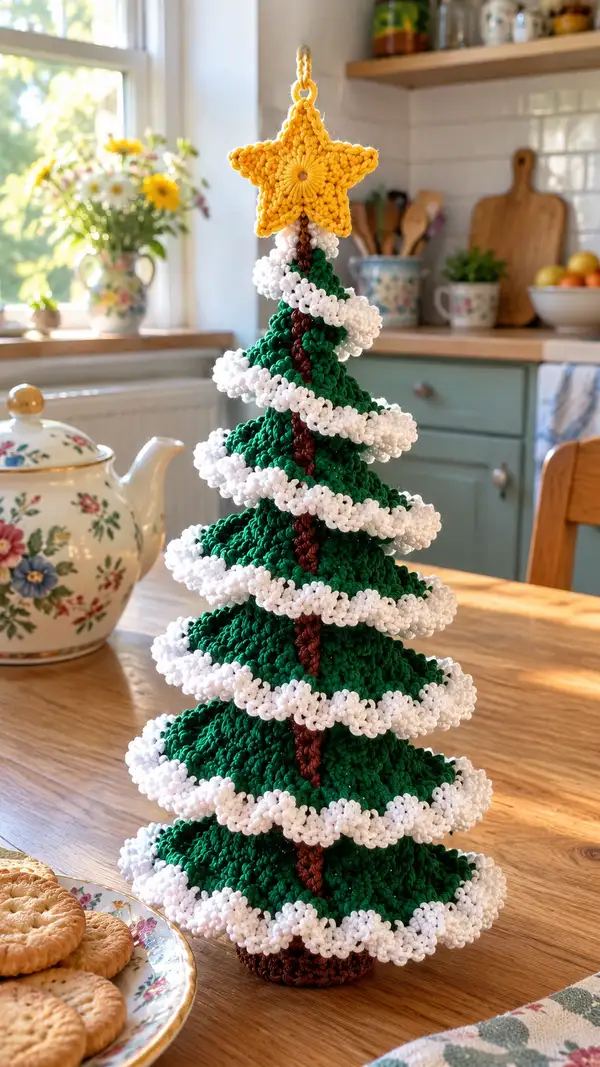
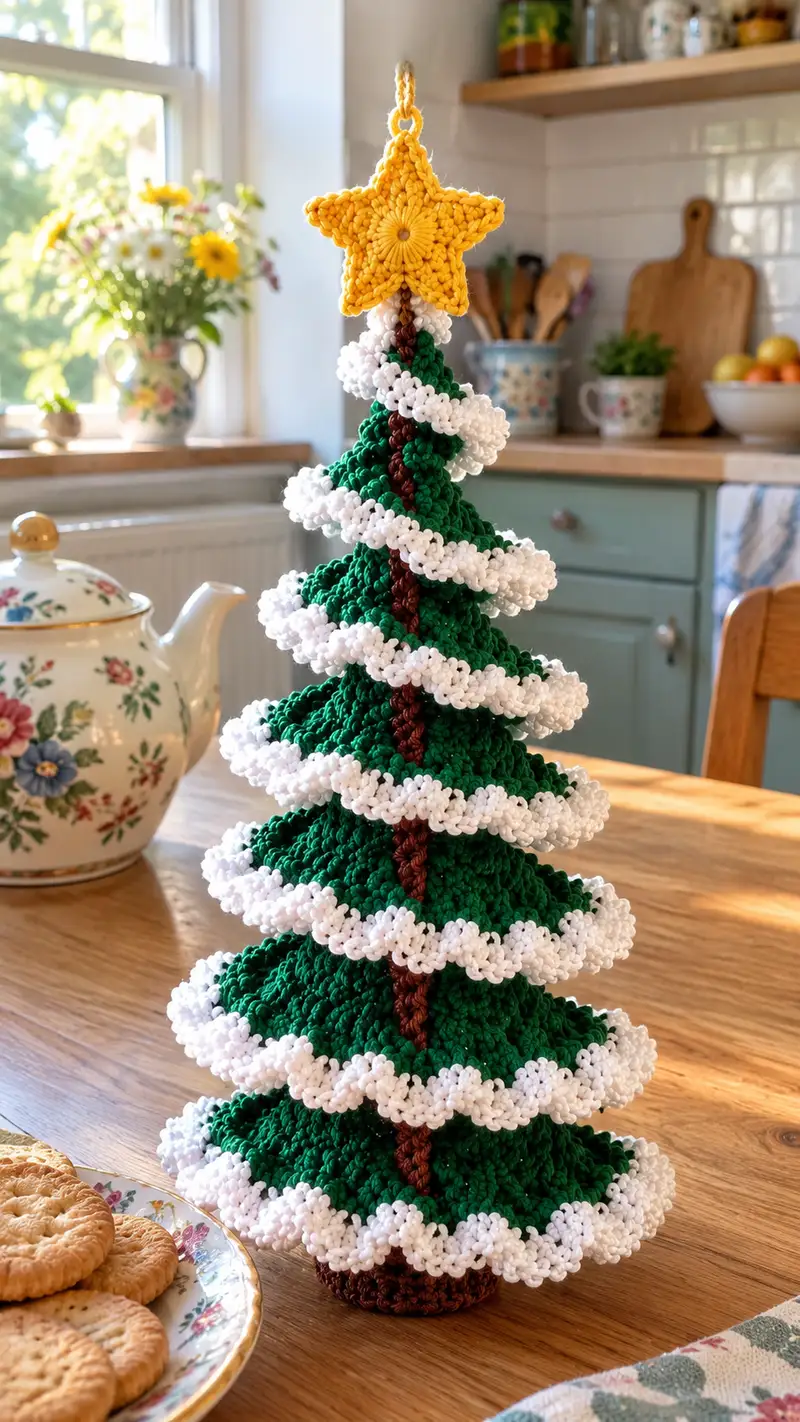
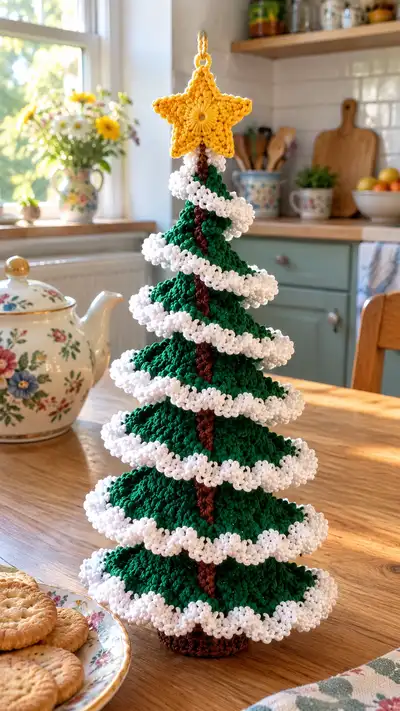
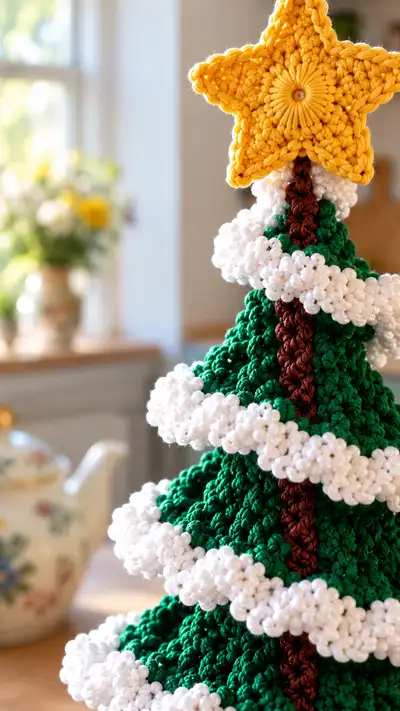
Create a charming spiral ruffle Christmas tree with a plump star topper, textured green tiers, a woven brown trunk and fluffy white garlands. This decorative tree is worked mostly in the round using textured stitches to create sculpted branches and a whimsical spiral snow ruffle. The pattern uses clear round-by-round instructions and helpful Info notes to guide you through stuffing, assembly and finishing touches.
Progress Tracker
0% Complete
— Star Topper :
Info :
This star is worked flat in rounds to form a plump five-point star then stuffed lightly. Use a smaller hook for crisp points. The star will be attached to the top of the tree with a small loop and sewn securely around the central dowel.
Round 1 :
6 sc in magic ring (6)
Round 3 :
(1 sc, 1 inc) x 6 (18)
Round 4 :
(2 sc, 1 inc) x 6 (24)
Info :
Keep tension slightly firm to create a defined round center. This central disk will become the backside of the star; place a stitch marker at the last stitch to track rounds.
Round 5 :
1 sc in each st (24)
Round 6 :
1 sc in each st (24)
Round 7 :
(3 sc, 1 inc) x 6 (30)
Round 8 :
1 sc in each st (30)
Info :
We will form five points. Each point is created over 6–8 stitches; divide 30 stitches into 5 sections of 6 sts each. Mark boundaries with safety pins or markers.
Round 9 :
(Work over section 1: ch2, (hdc, dc, tr, dc, hdc) in next 6 sts, sl st to next section marker) Repeat around to create first round of points (30)
Round 10 :
(Along each point: ch1, sc in each shaped stitch around point to form ridge, sl st to base) Work evenly around all 5 points
Info :
If you prefer a thicker star, work an additional round of sc around each point (FLO) to give more texture. Keep the center disk visible and neat.
Round 11 :
Join points into one round by working sc evenly between points on main disk edge, 6 sc between points (30)
Round 12 :
Working in FLO across the point ridges, 1 sc in each st around to smooth joins (30)
Round 13 :
(1 sc, 1 inc) x 10 (40)
Round 14 :
1 sc in each st (40)
Round 15 :
(3 sc, 1 inc) x 10 (50)
Info :
At this stage the star has a broad edge; we will shape the points to be more defined by working decreases and short rows over each point. Use stitch markers to mark the start of each point region (10 sts per point).
Round 16 :
Work over first 10 sts: (2 sc, 1 dec, 1 sc) across point 1; sl st to next 10 sts and repeat for all five points (45)
Round 17 :
1 sc in each st (45)
Round 18 :
Along each point apex: (sc2tog, sc) at the center of each point to form tip shaping. Work across points for a total reduction of 5 dec (40)
Round 19 :
1 sc in each st (40)
Info :
Make a second identical star piece for back if you prefer a fully stuffed star with defined thickness. Alternatively, you can work one star, stuff, and close it by working across the edge to create a rounded shape.
Round 20 :
Begin stuffing very lightly through openings; distribute stuffing into tips carefully so points keep shape.
Round 21 :
(1 sc, 1 dec) x 10 (30)
Round 22 :
(1 sc, 1 dec) x 5 (20)
Round 25 :
Fasten off leaving a long tail for sewing. Use tail to close remaining opening and attach a small ch loop at top for hanging (optional).
Info :
Weave a sturdy loop (ch 12-15, sl st to form ring) using same yarn and sew securely into star center/back to make hanging loop. Reinforce with extra stitches.
Round 26 :
If making two halves, align the two star pieces, whipstitch around edge with mattress stitch leaving small gap; stuff and close neatly
Round 27 :
Work 1 round of sc around entire star edge to neaten (optional) (st count varies)
Round 28 :
Embroider radiating lines from center with surface slip stitches or chain-stitched spokes for decorative center if desired
Round 29 :
Secure all ends and hide tails inside star stuffing with yarn needle
Round 30 :
Set star aside. It should measure approximately 8–10cm across depending on yarn weight and hook.
— Trunk & Base :
Info :
The trunk is a firm, slightly tapered cylinder worked in brown. Insert a wooden dowel or stiff wire from the base up through the trunk to the top; this creates stability for the tree. The base is a flat circle, slightly larger than trunk diameter, to keep the tree upright.
Round 1 :
6 sc in magic ring (6)
Round 3 :
(1 sc, 1 inc) x 6 (18)
Round 4 :
(2 sc, 1 inc) x 6 (24)
Round 5 :
1 sc in each st (24)
Round 6 :
1 sc in each st (24)
Info :
Work a few rounds flat to create base thickness; after round 6 we will form sides of trunk by working in continuous rounds. Insert a short circle of heavy cardboard or plastic inside base if desired for extra stability before closing.
Round 7 :
(3 sc, 1 inc) x 6 (30)
Round 8 :
1 sc in each st (30)
Round 9 :
Start trunk tube: FLO 1 sc in each st (30)
Round 10-14 :
1 sc in each st (30) (work 5 rounds to build trunk height)
Info :
Before you finish trunk tube, insert wooden dowel through center of base and up through trunk. The dowel should protrude 6–8cm above trunk top for secure star/upper attachment. Trim dowel if needed.
Round 15 :
(4 sc, 1 dec) x 5 (25)
Round 16 :
(3 sc, 1 dec) x 5 (20)
Round 17 :
1 sc in each st (20)
Round 18 :
(2 sc, 1 dec) x 5 (15)
Round 19 :
Fasten off leaving a long tail for sewing to body. Stuff base moderately to keep circular shape; keep trunk fairly empty around inserted dowel to allow snug fit.
Info :
If you prefer a heavier base, add a small weight (washer, pebbles sealed in a bag) inside base before final stuffing and sewing. Make sure any metal is well-covered and balanced.
— Tree Body (Layered Cone) :
Info :
The green tree body is worked as a stacked cone with seven distinct flared tiers. Each tier is worked in continuous rounds and shaped with increases to flare out, then slightly decreased to form a scalloped edge. Between tiers we will leave a small opening for sewing spiral garland and to funnel the trunk/dowel inside.
Round 1 :
6 sc in magic ring (6)
Round 3 :
(1 sc, 1 inc) x 6 (18)
Round 4 :
(2 sc, 1 inc) x 6 (24)
Info :
These first rounds form the tree top opening where the trunk will be inserted. Keep the opening slightly snug so the dowel is held in place. Mark the start of each round with a stitch marker.
Round 5 :
(3 sc, 1 inc) x 6 (30)
Round 6 :
1 sc in each st (30)
Round 7 :
(4 sc, 1 inc) x 6 (36)
Round 8 :
1 sc in each st (36)
Round 9 :
(5 sc, 1 inc) x 6 (42)
Round 10 :
1 sc in each st (42)
Info :
Finish first tier by working 2 more rounds even to develop height. The first tier is the topmost small cone that the star will sit on; keep it fairly lightly stuffed or empty until trunk is inserted.
Round 11-12 :
1 sc in each st (42)
Round 13 :
(6 sc, 1 inc) x 6 (48)
Round 14-16 :
1 sc in each st (48)
Info :
Now we will create a small flared edge to sit the first band of white ruffle. Work an additional round in BLO to form a defined lip where the ruffle will attach.
Round 17 :
1 sc in each st BLO (48)
Round 18 :
(7 sc, 1 inc) x 6 (54)
Round 19-21 :
1 sc in each st (54)
Info :
At the end of round 21, loosely stuff the tip area very lightly. The tree will later be stuffed more firmly nearer the base; keep upper tiers lighter for natural tapering.
Round 22 :
(8 sc, 1 inc) x 6 (60)
Round 23-25 :
1 sc in each st (60)
Round 26 :
(9 sc, 1 inc) x 6 (66)
Round 27-29 :
1 sc in each st (66)
Info :
We are building the upper half of the cone. To keep a stacked layered look, we will now create the first major flared tier edge which will form the visible ruffled shelf. Work two rounds of increases and then create a scalloped edge using shell stitches.
Round 30 :
(10 sc, 1 inc) x 6 (72)
Round 31-33 :
1 sc in each st (72)
Round 34 :
Create scalloped edge: *skip 2 sts, 5 dc in next st, skip 2 sts, sl st in next st* repeat around (scallops formed; stitch count unchanged)
Info :
Scalloped rounds define the tier edge; the white ruffle will be worked separately and sewn along this edge for the fluffy snow effect. Pin scallops so they form evenly around circumference.
Round 35 :
Continue with next tier: attach green yarn at a point 6 sts below scalloped edge and repeat increase rounds to form a wider tier: (11 sc, 1 inc) x 6 (78)
Round 36-38 :
1 sc in each st (78)
Round 39 :
(12 sc, 1 inc) x 6 (84)
Round 40-42 :
1 sc in each st (84)
Round 43 :
Create scalloped edge same as above: *skip 2 sts, 5 dc in next st, skip 2 sts, sl st in next st* repeat around
Info :
Repeat this flare + scallop sequence for each larger tier. The pattern uses six major tiers in total, each progressively wider. Work consistent even rounds between increases to control flare and height.
Round 44 :
Next tier increases: (13 sc, 1 inc) x 6 (90)
Round 45-47 :
1 sc in each st (90)
Round 48 :
Scalloped edge: *skip 2 sts, 5 dc in next st, skip 2 sts, sl st in next st* around
Round 49 :
Next tier increase: (14 sc, 1 inc) x 6 (96)
Round 50-52 :
1 sc in each st (96)
Round 53 :
Scalloped edge as before
Round 54 :
Next tier increase: (15 sc, 1 inc) x 6 (102)
Round 55-57 :
1 sc in each st (102)
Round 59 :
Final tier increase: (16 sc, 1 inc) x 6 (108)
Round 60-62 :
1 sc in each st (108)
Round 63 :
Create final scalloped edge around base of cone (same shell pattern)
Info :
At this point the cone should measure approximately 25–30cm high depending on yarn. Stuff the tree body from the bottom up with polyester fiberfill until desired firmness; keep lower tiers a bit firmer than upper ones for stability.
Round 64 :
Optional: work one round of sc around base inside edge to create a neat lip (108)
Round 65 :
Fasten off leaving long tail for sewing onto trunk base. Make sure the central opening is snug on the dowel; slide cone onto dowel over trunk and adjust height before final sewing.
— Spiral White Ruffle Garland (Make 1) :
Info :
The white garland is worked separately in a long spiral using puff or cluster stitches to create fluffy snow. It will be wrapped around the tree in a loose spiral. Make the garland long enough to wrap 5–6 times around the tree; the pattern below creates a 1.2–1.5m length depending on yarn and tension.
Round 1 :
With white yarn, ch 200 (or your desired length), do not join (foundation chain)
Round 2 :
Start puff clusters along chain: *skip 1 ch, puff in next ch (yarn over, insert hook, pull up loop three times, yarn over and pull through all loops on hook), ch1, sl st in next ch* repeat along chain to end. Fasten off leaving tail (puff clusters formed)
Info :
Puff stitch technique: yarn over, insert hook, pull up loop leaving loop height consistent; repeat 3 times in same base, yarn over and pull through all loops, ch1 to secure. Keep stitches airy for a fluffy ruffle.
Round 3 :
If you prefer a thicker garland, return and work another parallel row of puff clusters anchored into ch spaces between original puffs to create a double-layered ruffle.
Round 4 :
Make a small loop at one end (ch 12, sl st to form ring) to slip over tree top or dowel for secure anchoring
Info :
Wrap test the garland around the tree as you go; trim chain to desired length before finishing to avoid waste. The garland can be handheld and removable for storage.
Round 5 :
Optional: add small sc edge to both sides of chain to stabilize (work sc along chain edge)
Round 6 :
Fasten off and weave ends; fluff puff stitches with fingers to create fluffy snow effect
— Decorative Brown Spiral (Trunk Accent) :
Info :
The brown spiral visible down the front of the tree is a narrow braided tube or crocheted cord wrapped around trunk and sewn to the cone surface. You can braid three strands of brown yarn or crochet an i-cord/tubular hdc cord.
Round 1 :
Make 3 long strands of brown yarn approx. 30–40cm each and braid tightly; knot ends and secure to top and bottom with stitches
Round 2 :
Alternatively, crochet a chain of 40 with brown, then work 1 sc in 2nd ch from hook across to create a cord (approx length varies)
Info :
Sew the cord in a spiral pattern down the cone and tack in place every 5–6 cm with small stitches to keep it aligned over the tiers. This accent helps visually divide tiers and echoes the natural trunk.
— Base Finishing :
Round 1 :
With brown, join yarn at underside of base circle and work 1 round sc to neaten (st count equals base circumference)
Round 2 :
If you added cardboard inside base, work an extra round of sc to enclose edge and hide insert
Info :
Make sure base is level. You may need to add extra stuffing under base sides to make tree stand straight. Test on a flat surface and adjust stuffing or base insert if tree leans.
— Assembly & Final Shaping :
Info :
Assembly brings all components together: slide the cone onto the dowel, position trunk base, sew securely, attach brown spiral and wrap the white garland. Use pins to hold garland and braid in place before sewing.
Round 1 :
Slide green cone down over trunk tube and adjust so bottom edge sits flush with base rim. Ensure dowel passes through star loop at top.
Round 2 :
Sew bottom edge of cone to base with long tail from trunk using whipstitch or mattress stitch. Use small even stitches to prevent gaps (work around entire base).
Round 3 :
Position brown spiral down tree front and tack every 4–6sc to cone using matching brown tails. Keep spiral taut but not overly stretched for natural look.
Round 4 :
Wrap white puff garland in a loose spiral working around cone from top to bottom; pin in place, then sew at several anchor points using white thread to secure.
Round 5 :
Attach star: place star loop over dowel and slide down to rest on top tier; sew star base to cone fabric with small stitches to stabilize. Reinforce through dowel if necessary by stitching around dowel area.
Round 6 :
Final shaping: use fingers to puff and shape scallops and puffs. Trim any stray fibers and weave in all ends into the tree fabric.
Info :
Steam-block lightly (if yarn permits) to relax stitches and help ruffles hold shape. Avoid excessive heat with cotton rope yarn; instead dampen and shape by hand.
Round 7 :
Optional: Add tiny embroidery or bead accents to represent ornaments. Sew small buttons or beads into puff clusters if desired, ensuring any small parts are secured for safety.
Putting the final stitches on this spiral ruffle Christmas tree is such a joyful moment — the star crowns the tree and the garland gives it movement and charm. Each scalloped tier is like a little gift of texture that brightens any tabletop. I hope this pattern brings a sunny, handmade touch to your holiday décor and becomes a seasonal favorite. 🎄✨🧶