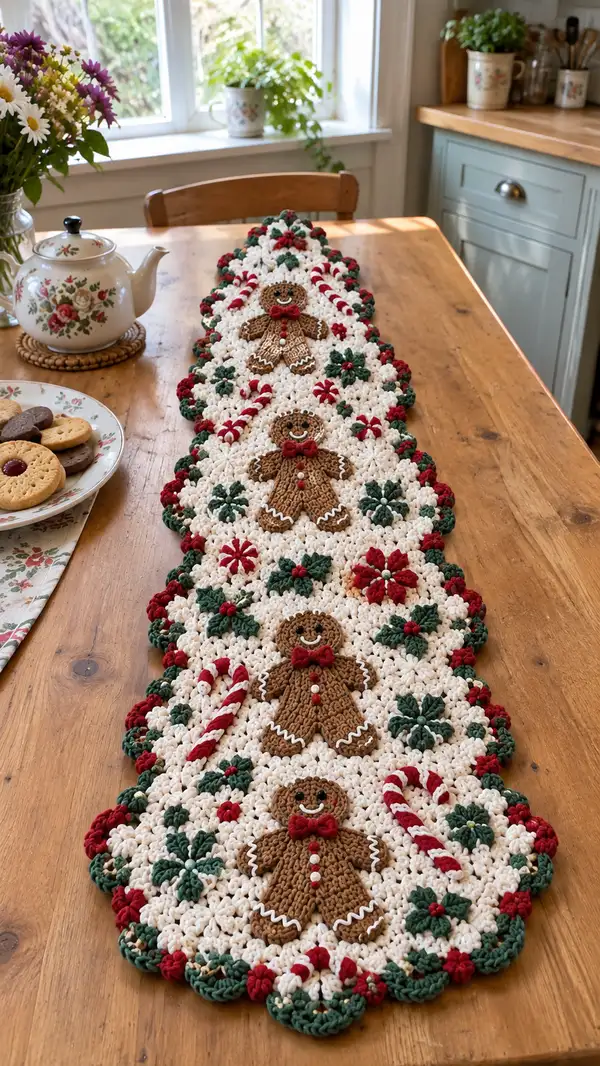
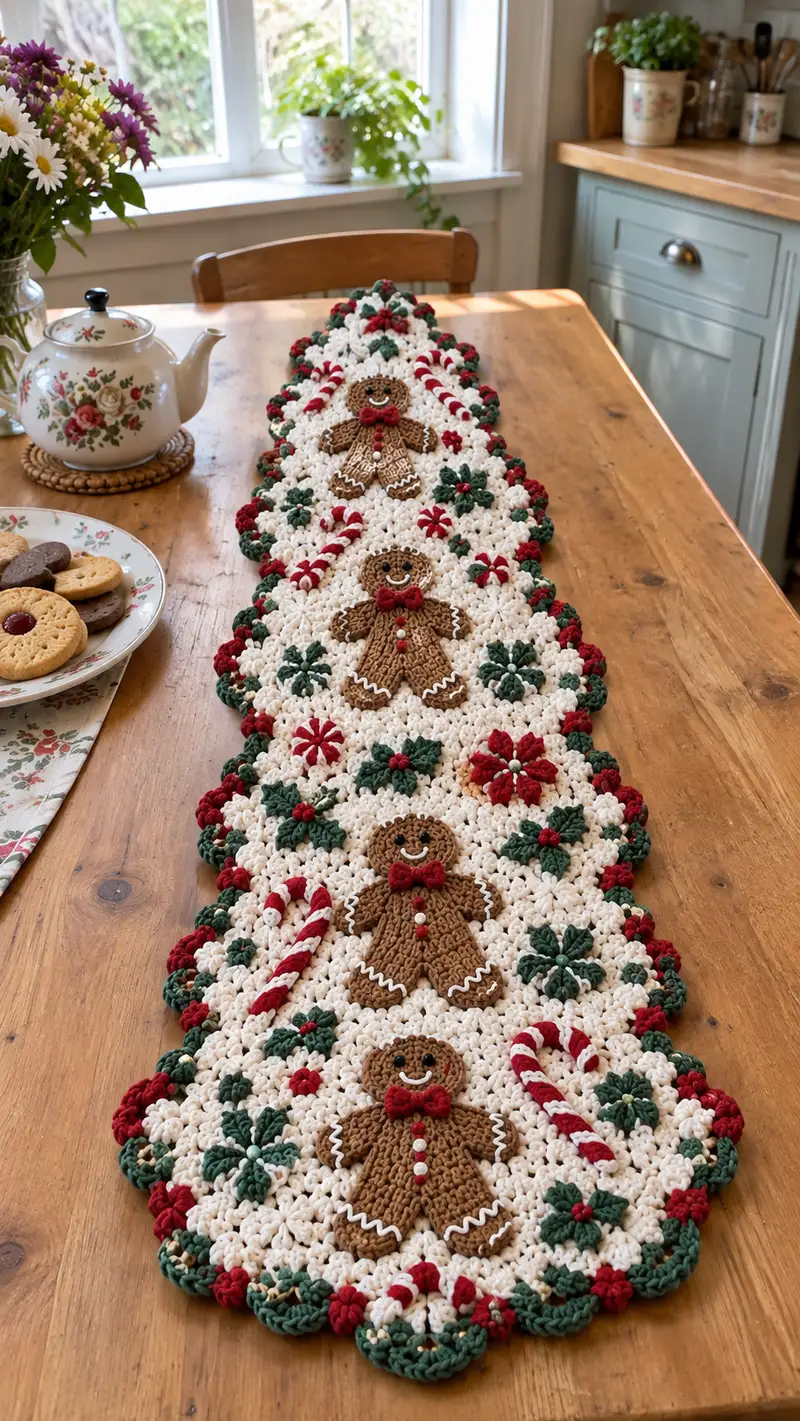
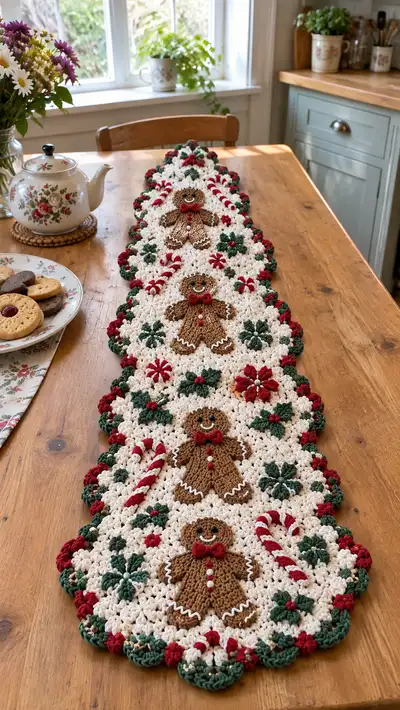
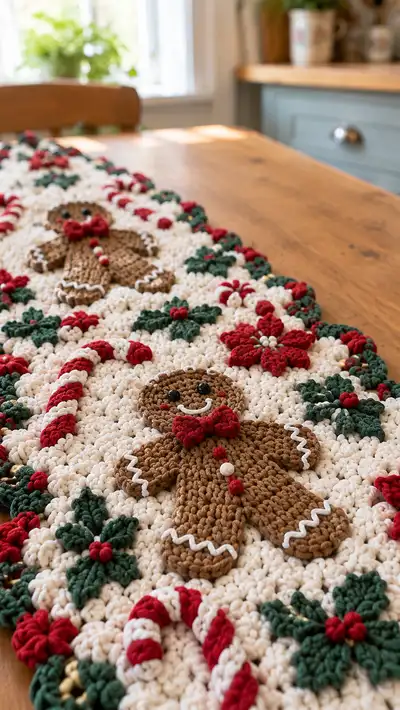
A long, cozy Christmas table runner featuring three charming gingerbread appliques, candy canes, poinsettias and holly clusters set on a textured cream background. Worked in warm brown, deep red and forest green accents, this runner has a scalloped border and raised 3D motifs for a truly handmade holiday centerpiece. Detailed stitch-by-stitch instructions guide you through every motif, joining and finishing detail so you can recreate this rustic seasonal treasure.
Progress Tracker
0% Complete
— Notes & Techniques :
Info :
This runner is worked as a series of textured background panels joined as you go then edged with scallops and decorated with appliques. The main texture is created using 3-d puff/cluster stitches worked in a grid. Puff stitch used throughout: yarn over, insert hook, pull up loop (repeat to create 5 loops on hook), yarn over and pull through all loops, ch1 to close puff. Use consistent tension so puff height remains uniform. Where a round count is given, it is the completed stitch count for that round.
— Background Panel (Make 7 panels; join to form runner) :
Info :
Each panel is a rectangular block 18 clusters wide by 10 rows tall (after setup). Panels are joined with slip stitch join as you finish the final row of a panel. Use cream yarn. Adjust number of panels to lengthen or shorten runner.
Round 1 :
Ch 37. (This gives 36 spaces for start chain, 18 cluster repeats across; chain is multiple of 2 +1.)
Round 2 :
Row 1: In 2nd ch from hook sc, *ch1, skip 1 ch, puff in next ch; rep from * across ending with sc in last ch. You should have 18 puffs and 19 sc edge spaces.
Round 3 :
Row 2: Ch1, turn, sc in first sc, *ch1, puff in next puff (into center of puff), ch1, sc in next sc; rep across. (Maintain 18 puffs across)
Round 4-11 :
Repeat Row 2 for a total of 10 puff rows. Panels will now measure approximately 12cm x 20cm depending on tension. (Each panel contains 18 puffs x 10 rows)
Info :
When you finish the 10th puff row, do not fasten off. Join next panel by chaining the foundation chain for next panel and slip stitching or join with continuous join method explained below.
Round 12 :
Join next panel: ch 1 to turn, sc evenly across the edge of panel to last st, sl st into first ch of next panel foundation, continue to work Row 1 of new panel directly into foundation chain to create an almost seamless join. Repeat until you have 7 panels joined in a long strip. After joining, fasten off and weave ends.
Info :
Blocking: lightly steam or pin panels flat to even out puff rows and make joining easier. Use pins on a flat surface to align edges before final seaming.
— Center Diamond Shaping & Top Pointed Ends (shaping to create tapered triangular runner ends) :
Round 1 :
With joined long strip, determine center by folding. Work reduction rows in puff stitch at both ends: on both ends work one less puff per row for 6 tapered rows to create pointed ends. Row 1: work standard puff row to last 2 puffs, sc2tog across the last sc and edge to reduce one puff on that side. Repeat on both ends.
Round 2-6 :
Continue reducing one puff at each end every other row until you have removed 6 puffs from each end (3 reductions per side staggered). After shaping, fasten off and weave ends. This forms the triangular tip of each end of the runner.
Info :
Make sure both ends are symmetrical by counting the number of puffs removed on each side. If you desire a sharper point, work additional reduction rows (1 puff fewer each row) until satisfied.
— Border Base (worked around entire joined runner) :
Round 1 :
With cream yarn rejoin at a corner: ch1, work sc evenly around runner edge placing approximately 1 sc for every sc or puff space along sides and 3 sc in each corner to give smooth turning. Typical total sc count around runner ~260 (will vary slightly by tension and panel count).
Round 2 :
Switch to forest green for outer edge accent: *skip 1 sc, 5 dc in next sc (shell), skip 1 sc, sl st in next sc; rep around to create scalloped shells. Aim for 65 shells around (4 shells per panel width approx). Adjust to fit geometry so shells are evenly spaced. Sl st to join, fasten off green.
Info :
Spacing tip: if shells bunch at corners, distribute extra sl st between shells to keep scallops even. You can use 4 dc shells where needed to make the count fit. Keep track so pattern is symmetric end-to-end.
Round 3 :
Optional red picot accent: With red yarn, join into center of each green shell and work: (ch3, sl st into first ch to form picot), then sl st back to shell center. Repeat on each shell. Fasten off and weave ends.
Info :
If you prefer a fuller border like the sample, add a second round of green puff clusters worked between shells: join green to each sl st space and work a 3-puff cluster (puff, ch1, puff, ch1, puff) then sl st to next shell center.
— Gingerbread Applique (Make 3 - centered down the runner) :
Info :
Each gingerbread is a flat 3D-looking applique worked in brown yarn. They are made as a single flat piece combining a round head and body with legs and arms sculpted by shaping increases/decreases. We work in continuous rounds to keep the surface smooth. Use a 3.5mm hook for tighter fabric. The finished gingerbread is approximately 8.5cm tall and 6.5cm wide.
Round 1 :
mr, 6 sc into ring (6)
Round 2 :
inc x6 around (12)
Round 3 :
(1 sc, inc) x6 (18)
Round 4 :
(2 sc, inc) x6 (24)
Round 5 :
(3 sc, inc) x6 (30)
Info :
Rounds 1-5 form the head disk. Place two 6mm black beads or embroider eyes between rounds 3 and 4, spaced 4-5 sts apart depending on facial spacing. Do not secure beads until head is flattened with face embroidery complete.
Round 6 :
1 sc in each st around (30)
Round 7 :
(4 sc, inc) x6 (36)
Round 8 :
1 sc in each st around (36)
Round 9 :
For head shaping to body join: (4 sc, dec) x6 (30)
Round 10 :
(3 sc, dec) x6 (24)
Info :
Begin working lower body: after Round 10 you will extend into a flattened body by increasing strategically to make a T-shaped torso and leg openings. Keep rounds continuous; place a stitch marker at the start of Round 11 to mark orientation (head top).
Round 11 :
Work across front half to make torso: 6 sc (front right arm join area), inc, (2 sc, inc) x3, 6 sc across middle chest (12), inc, (2 sc, inc) x3, 6 sc (this forms widened torso) — total count 36
Round 12 :
1 sc around (36)
Round 13 :
Begin leg shaping: *sc 5, dec, sc 5, dec* around to form two notches for legs (32)
Round 14 :
Place slightly deeper decreases to form leg separation: (2 sc, dec, 6 sc) x4 (28)
Round 15 :
Shape feet: (1 sc, dec, sc 5) x4 (24)
Round 16 :
(dec, sc 4) x4 (20)
Round 17 :
Finish feet outline: sc in each st around (20)
Info :
Fasten off leaving a long tail for sewing. Flatten the piece gently so head is slightly raised. Embroider icing details with white yarn: zigzag lines on hands and feet, a smile, and small dots for buttons. Sew two small red bow tie loops (see bow tie instructions) at neck. Add two small red pom buttons on torso (see small pom instructions). Use a hot-fix bead or small white bead for central button if desired.
— Gingerbread Bow Tie (Make 3 per gingerbread) :
Round 1 :
With red yarn, ch 6, sc in 2nd ch from hook and across (5 sc). Fasten off leaving long tail.
Round 2 :
Fold strip in half so ends meet; using tail, wrap center tightly 6-8 times to form bow knot and secure on reverse. Sew bow to neck area of gingerbread using long tail and neat stitches. Optionally stuff center a tiny amount to puff slightly.
Info :
Create three bows and space them identically on each gingerbread applique so the runner looks consistent. Use pins to test placement before sewing.
— Small Red Pom Buttons (Make 6 per gingerbread) :
Round 1 :
With red yarn, make a small yo-yo: ch2, 6 sc into second ch from hook, sl st to first sc (6). Fasten off leaving a tail to sew. Flatten slightly and sew to torso as buttons. Or use purchased small red beads.
Info :
Buttons should be sewn through the center and secured with backstitch to prevent loss. If using for a table runner, be mindful of small parts if children will handle it; consider embroidered dots as safer options.
— Candy Cane Applique (Make 6) :
Info :
Each candy cane is crocheted as a lightly curved spiral tube worked in alternating stripes of red and white. Finished cane is approximately 9cm long. Use worsted weight and 3.5mm hook for compactness.
Round 1 :
With white, ch 2, 6 sc in 2nd ch from hook (6)
Round 3 :
1 sc around (12)
Round 4 :
Start stripe pattern: With white, sc 3, change to red, sc 3, change to white sc 3, change to red sc 3 (12). Keep stripes tight by changing color on last yarn over of the stitch before new color.
Round 5-12 :
Continue spiraling alternating 2-3 rounds per stripe to create thick candy stripes until length ~6. To curve cane tip, decrease across the last 4 rounds in a staggered fashion: Round 13: (sc 2, dec) x3 (9). Round 14: (sc1, dec) x3 (6). Round 15: dec x3 (3). Fasten off leaving tail and use tail to sew the small tip to the side of the cane to form the hook. Stuff lightly with fiberfill (optional) before final close for a slightly rounded cane.
Info :
For a more spiral candy cane, work a simple i-cord style tube (3 sc in back loop only) lengthwise and shape by inserting a short flexible wire inside before sewing closed. For safety when used as a table runner, avoid exposed wire.
— Poinsettia Flower Applique (Make 8) :
Round 1 :
With red yarn, mr, ch1, 8 sc in ring (8). Pull ring closed. (8)
Round 2 :
*ch3, sl st into next sc* around to form 8 loops for petals. Fasten off and change to red petal color if you like deeper contrast. (8 loops)
Round 3 :
Join red to any loop, (sc, hdc, 3 dc, hdc, sc) in each loop to form full petal. Rep into each loop (8 petals). Fasten off and weave ends.
Round 4 :
With green, ch 2, make 8 small picot leaves between petals: join between petals, (sc, ch3, sl st in first ch) to create tiny leaf points. Fasten off.
Info :
Sew a small cluster of cream beads or French knots in the center to replicate the starry bead center seen in the image. Poinsettias are placed between gingerbread figures to break up the rows.
— Holly Leaf Cluster (Make 16 clusters; each cluster is 3 leaves) :
Round 1 :
With forest green, ch 5, sl st into first ch to create ring, ch2, 8 hdc into ring (8). Fasten off leaving tail.
Round 2 :
Form leaf by working along chain edge: join green to ring edge and work (sc, hdc, dc, tr, dc, hdc, sc) to form pointed leaf. Fasten off. Make 3 leaves and sew them together at base to form a cluster. Add 3 small red puffs (make small 3-sc rounds) in center as berries.
Info :
Arrange clusters so one is placed near each candy cane and around gingerbread appliques for balanced composition. Use pins to position before sewing.
— Small 3-Sc Red Berry (Make 48) :
Round 1 :
With red yarn, ch2, 3 sc in second ch, sl st to first sc (3). Fasten off leaving long tail to sew. Pull slightly to flatten into a small berry and sew into holly center.
Info :
Stitch berries through the base and add a small dab of fabric glue if needed for extra security for tabletop use.
— Edge Rosette (tiny red rosettes worked into scallop edge) :
Round 1 :
With red, ch4, join to form ring, work 12 dc into ring, sl st to join. Fasten off leaving tail. Flatten, pull center thread to form rosette and sew into scallop centers across the border alternating with green picots. Repeat around edge approximately 30 times.
Info :
These rosettes fill the scalloped shell centers pictured. Use small white beads in rosette centers for sparkle if desired.
— Detailed Assembly & Placement :
Info :
Lay your runner flat on a table and place the three gingerbread appliques evenly spaced down the centerline. Position candy canes diagonally between them and add poinsettias and holly clusters around each gingerbread to match the composition in the photo. Use pins to hold pieces in place before sewing.
Round 1 :
Sewing: Use a long tail from each applique and whip stitch through both applique base and background panel fabric. Work from the underside with small tight stitches so front does not show the join. For the gingerbread, sew around head and body, then around arms and legs, ensuring the applique sits flat but slightly raised by leaving a small loft under the center (do not overstuff).
Round 2 :
Secure candy canes by sewing through several points along the cane (top, mid, bottom) and into the background to prevent shifting. For holly clusters sew directly through the base of the leaves and through center berries. For poinsettias, secure each petal with a couple stitches at base and a central knot in the center bead cluster.
Info :
Spacing guide: If your runner length equals 7 panels, space three gingerbreads roughly one panel apart with the top and bottom gingerbread located so the mouth of each gingerbread points toward the center of the runner. Measure evenly: place first gingerbread 4 panels from one end, second at panel 4 from first, third 4 panels from second; adjust as necessary for even look.
— Icing Embroidery & Final Detail Work :
Round 1 :
With white yarn and a blunt embroidery needle, embroider a wavy icing border around hands and feet: use chain stitch or surface slip stitch to create zigzag effect. Place white dots for smiles and cheeks (use pink yarn for blush or fabric paint). Add small white lines on candy cane stripes as tiny highlights if desired.
Round 2 :
Attach tiny beads for eyes or stitch with black yarn: for beads, sew through and knot securely. If using embroidered eyes, work two small French knots or tightly worked black satin stitches. Ensure all beads are fastened from the underside and tied off several times for security.
Info :
Be careful with small beads on a table runner likely to be handled. If children will use the tabletop, consider embroidering eyes and using sewn-on yarn berries rather than beads.
— Final Border Embellishment (gold beading and final loops) :
Round 1 :
With gold or metallic thread, add decorative couching stitches spaced evenly inside the outer green scallops to pick up the golden flecks visible in the sample. Use small straight stitches and secure at back with a knot. Repeat on both ends for symmetry.
Round 2 :
Weave in all ends: use yarn needle to weave tails into back of fabric for at least 4cm. Trim close. Block runner gently, pin scallops and shapes flat and allow to dry overnight if you used spray blocking.
Info :
Final inspection: look for loose stitches, gaps between appliques, or beads not fully secured. Add a few extra stitches where necessary. The finished runner is best laundered by spot cleaning or gentle hand wash and reshape while damp.
Completing this runner is such a satisfying holiday project — each puff and applique comes together to create a warm, nostalgic centerpiece that brightens any table. The contrast of creamy snow-like background with red and green accents makes every detail pop. Whether you gift this or keep it for yourself, it's a handmade treasure full of festive charm and cozy texture. 🎄🧶 Happy stitching and enjoy your holiday centerpiece! 🎁