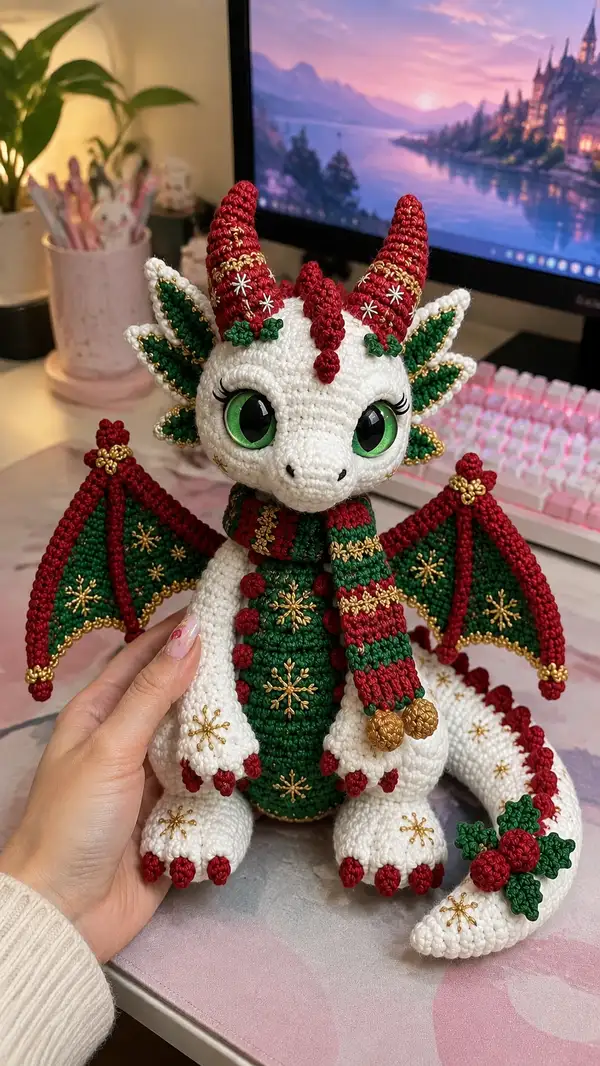
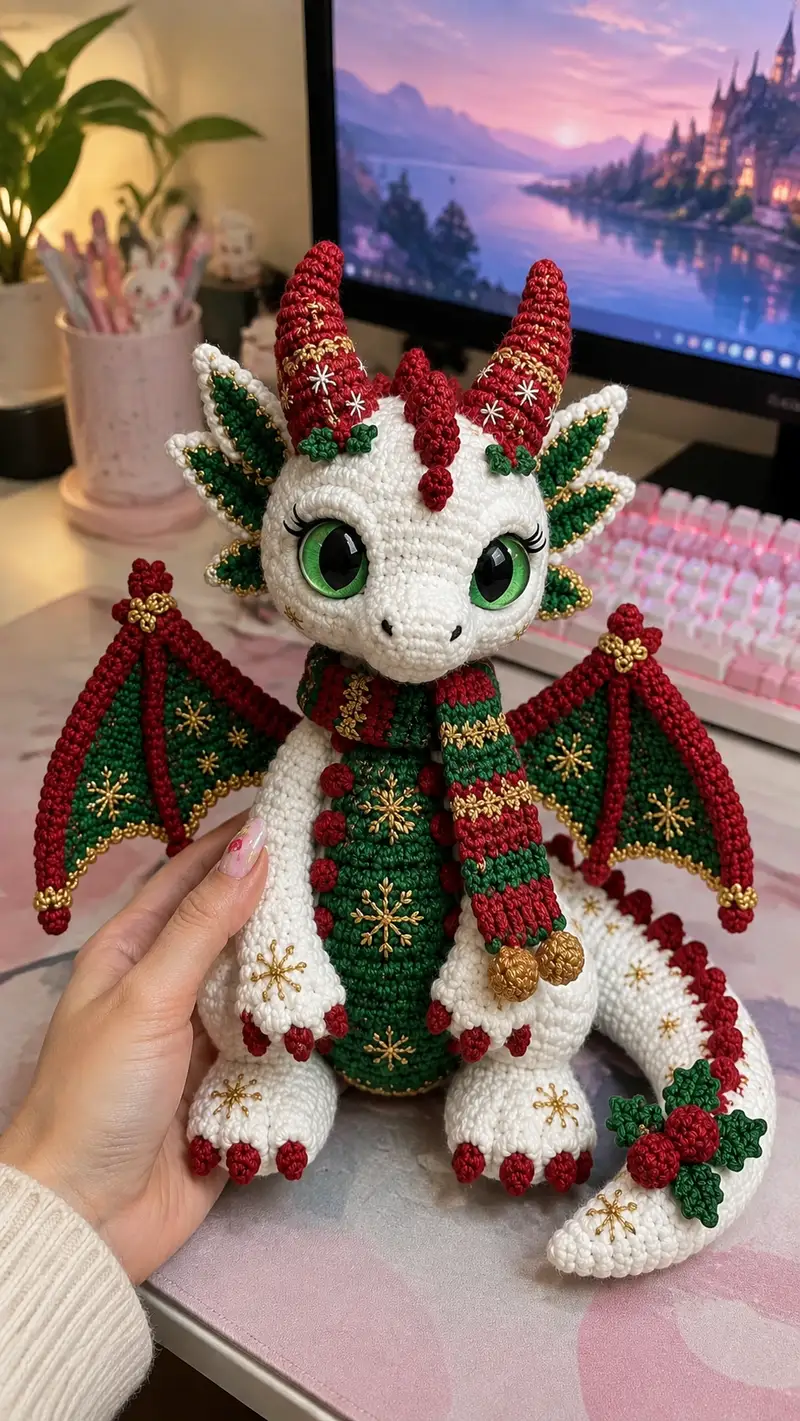
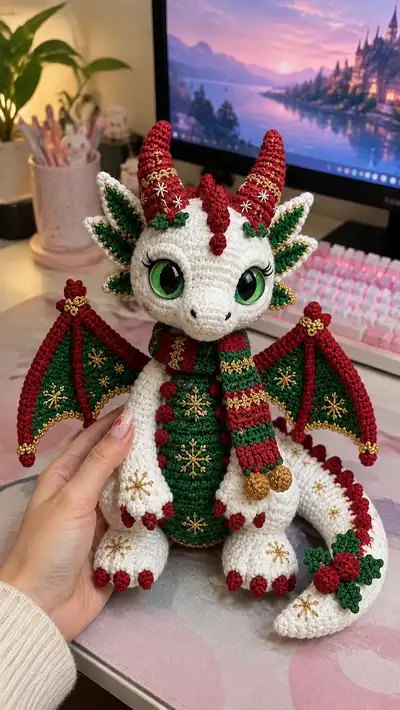
Create a charming holiday dragon dressed in Christmas colors with sparkling gold embroidery, a striped scarf, and detailed wings. This plush has big green eyes, curled horns, layered leaf-like ear frills, and a fluffy tail with holly accents. The pattern focuses on tight stitches, careful stuffing, and decorative embroidery to achieve the polished, gift-ready finish shown. Perfect for holiday gifting or as a seasonal collectible with plenty of customization potential.
Progress Tracker
0% Complete
— Head :
Round 1 :
6 sc in magic ring (6)
Round 3 :
(1 sc, 1 inc) x 6 (18)
Round 4 :
(2 sc, 1 inc) x 6 (24)
Round 5 :
(3 sc, 1 inc) x 6 (30)
Round 6 :
(4 sc, 1 inc) x 6 (36)
Round 7 :
(5 sc, 1 inc) x 6 (42)
Round 8 :
(6 sc, 1 inc) x 6 (48)
Round 9 :
1 sc in each st (48)
Round 10 :
1 sc in each st (48)
Info :
At this stage the head is increasing to create fullness. Keep tension even. Place a stitch marker at the start of the round and move each round. If using safety eyes, mark eye placement now but do not insert yet.
Round 11 :
1 sc in each st (48)
Round 12 :
1 sc in each st (48)
Round 13 :
1 sc in each st (48)
Info :
Insert safety eyes between rounds 12-14. For the look shown, place eyes on round 13 with centers approximately 10-12 sts apart (measure 11 sts between centers). Ensure eyes are symmetric by counting stitches from top center. Secure backs firmly.
Round 14 :
1 sc in each st (48)
Round 15 :
1 sc in each st (48)
Round 16 :
1 sc in each st (48)
Round 17 :
1 sc in each st (48)
Info :
Begin to shape the snout by placing a subtle decrease zone between rounds 17-22. Also plan nostril embroidery: mark two single stitches on the muzzle area approximately 3-4 sts apart that will later be embroidered in black.
Round 18 :
(6 sc, 1 dec) x 6 (42)
Round 19 :
(5 sc, 1 dec) x 6 (36)
Round 20 :
(4 sc, 1 dec) x 6 (30)
Round 21 :
1 sc in each st (30)
Info :
Begin stuffing the head firmly at this point. Stuff around the eyes first to support them, then fill the crown and snout. Add stuffing gradually between decreases to maintain smooth shaping.
Round 22 :
(2 sc, 1 dec) x 6 (24)
Round 23 :
(1 sc, 1 dec) x 6 (18)
Info :
Leave a long tail for sewing if you plan to finish the head separately and join to the body. Fasten off, weave tail inside and close using yarn needle to pull opening together if finishing head as a separate piece. If attaching to body later, do not cut tail yet; use it for joining.
Round 25 :
Optional short rounds to lengthen snout when worked continuous: join white yarn at base of snout and work 2 rounds of 30 sc (30) to stretch face if desired (adjust facial placement accordingly)
Info :
Embroider nostrils now with black yarn using a satin stitch or French knots for tiny dimples. Add eyelashes with black embroidery thread on the outer upper eye edges. For the gold snowflake cheeks shown, wait until assembly to embroider gold metallic thread snowflakes between cheek and muzzle stitches.
— Horns and Crest :
Round 1 :
Using red: 6 sc in magic ring (6)
Round 3 :
(1 sc, 1 inc) x 6 (18)
Round 4 :
(2 sc, 1 inc) x 6 (24)
Round 5-7 :
1 sc in each st (24)
Info :
These horns are worked in the round and tapered by decreasing later. Insert a small wire if you want them poseable; leave ends wrapped in yarn to prevent poking.
Round 8 :
(2 sc, 1 dec) x 6 (18)
Round 9 :
(1 sc, 1 dec) x 6 (12)
Info :
Stuff horns lightly — only a touch so they retain cone shape but remain flexible. Add tiny gold embroidery and star stitches along horns using metallic thread after attaching to head. For the ribbed look, you can stop stuffing and create bands by alternating BLO rounds in red and gold carried thread.
Round 11 :
Fasten off leaving long tail to sew onto head at positions above the eyes; place two larger horns and one small crest horn centered between them, sew securely through head rounds 6-9 for stability.
— Ear Frills / Leaf Layers (Make 4 sets) :
Round 1 :
Using green: 6 sc in magic ring (6)
Round 3 :
(1 sc, 1 inc) x 6 (18)
Round 4 :
(2 sc, 1 inc) x 6 (24)
Round 5 :
1 sc in each st (24)
Info :
Switch to white on the outer round to create a white rim. Work final round in white and then add gold edging using metallic thread by slip-stitching gold along outer edge every 2 or 3 sts to form beaded look. Make pairs for each side: three layered leaves per side for the decorative ear frill.
Round 6 :
Join white: work 1 sc in each st (24)
Round 7 :
BLO 1 sc in each st (24) to create raised edge
Round 8 :
Fasten off leaving tail for sewing. Make smaller and larger sizes by adjusting rounds; assemble as layered fan behind ears with largest at back.
— Body :
Round 1 :
6 sc in magic ring (6)
Round 3 :
(1 sc, 1 inc) x 6 (18)
Round 4 :
(2 sc, 1 inc) x 6 (24)
Round 5 :
(3 sc, 1 inc) x 6 (30)
Round 6 :
(4 sc, 1 inc) x 6 (36)
Round 7-9 :
1 sc in each st (36)
Info :
Switch to green yarn for the belly panel on Round 10. If you prefer a striped belly like the original, carry white along inside and change color at last loop of stitch before the belly area. The belly is worked as an oval panel integrated into body by changing colors along the front seam area.
Round 10 :
Change to green: 1 sc in each st around (36)
Round 11 :
1 sc in each st (36)
Round 12 :
1 sc in each st (36)
Round 13 :
(4 sc, 1 inc) x 6 (42)
Round 14-16 :
1 sc in each st (42)
Info :
Begin stuffing the body from the bottom after Round 16, adding moderate firmness but not overstuffing. The head will join to the body at the neck opening around Rounds 26-30. If you plan to insert a poseable wire spine, add it before stuffing fully.
Round 17 :
(5 sc, 1 inc) x 6 (48)
Round 18-22 :
1 sc in each st (48)
Round 23 :
(6 sc, 1 dec) x 6 (42)
Round 24 :
(5 sc, 1 dec) x 6 (36)
Round 25 :
(4 sc, 1 dec) x 6 (30)
Info :
Leave gore/neck opening large enough to sew head in later. Stuff body firmly in lower portion to keep the piece stable. If adding internal weight (sachet of rice or plastic pellets) for sitting stability, add it near the bottom before final stuffing.
Round 26 :
1 sc in each st (30)
Round 27 :
1 sc in each st (30)
Round 28 :
(2 sc, 1 dec) x 6 (24)
Round 29 :
(1 sc, 1 dec) x 6 (18)
Round 30 :
6 dec (6) - fasten off leaving long tail for joining to head
— Arms (Make 2) :
Round 1 :
6 sc in magic ring (6)
Round 3 :
(1 sc, 1 inc) x 6 (18)
Round 4 :
1 sc in each st (18)
Info :
Create hand paw pads by switching to red to make small clustered 'claw' bumps on the tips. These are worked as bobbles/5-DC bobbles or small popcorns; alternatively, you can crochet tiny spheres and sew them on.
Round 5 :
Change to red: 1 sc in each st (18)
Round 6 :
1 sc in each st (18)
Round 7 :
(2 sc, 1 dec) x 4, 2 sc (14)
Round 8 :
1 sc in each st (14)
Round 9 :
1 sc in each st (14)
Info :
Stuff hands firmly but keep upper arm area less stuffed for ease of sewing to body. Make small bobble claws by working 5 sc bobble across three staggered stitches at the tip edge: (popcorn or bobble as preferred), secure and weave in tail.
Round 10 :
Change to white: 1 sc in each st (14)
Round 11 :
1 sc in each st (14)
Round 12 :
(2 sc, 1 inc) x 3, 2 sc (17)
Round 13 :
1 sc in each st (17)
Round 14 :
(3 sc, 1 inc) x 3, 2 sc (20)
Round 15 :
1 sc in each st (20)
Round 16 :
1 sc in each st (20)
Round 17 :
(3 sc, 1 dec) x 4, 4 sc (16)
Round 18 :
Fasten off leaving tail for sewing to body at shoulder area between body rounds 14-16. Attach so palms face slightly inward.
— Legs (Make 2) :
Round 1 :
6 sc in magic ring (6)
Round 3 :
(1 sc, 1 inc) x 6 (18)
Round 4 :
(2 sc, 1 inc) x 6 (24)
Round 5 :
(3 sc, 1 inc) x 6 (30)
Round 6 :
1 sc in each st (30)
Round 7 :
1 sc in each st (30)
Info :
Create foot pad shaping by flattening the first rounds and working in rows across last round to widen base slightly. Mark toe placement for three red claw bumps across the front tip, spaced evenly.
Round 8 :
Create toe row: join red and work 1 sc in first 3 sts, ch1, turn and work tiny bobble for toe, return and continue around to create three small raised toes. Alternatively crochet 3 small spheres of 6 sc and sew on.
Round 9 :
Change to white: 1 sc in each st (30)
Round 10-14 :
1 sc in each st (30)
Round 15 :
(4 sc, 1 dec) x 5 (25)
Round 16 :
(3 sc, 1 dec) x 5 (20)
Round 17 :
(2 sc, 1 dec) x 5 (15)
Round 18 :
(1 sc, 1 dec) x 5 (10)
Round 19 :
5 dec (5) - leave long tail for sewing to body at hip area between body rounds 18-20. Stuff feet firmly to help the dragon sit upright.
— Tail :
Round 1 :
6 sc in magic ring (6)
Round 3 :
(1 sc, 1 inc) x 6 (18)
Round 4-8 :
1 sc in each st (18)
Info :
Work tail tapered sections by decreasing gradually every 4-6 rounds to create segmented look. Add red spike bumps along the dorsal side by crocheting tiny 6-sc spheres and sewing them in a line along tail rounds 5-12.
Round 9 :
(2 sc, 1 dec) x 4, 2 sc (14)
Round 10 :
1 sc in each st (14)
Round 11 :
(1 sc, 1 dec) x 4, 1 sc (10)
Round 12 :
1 sc in each st (10)
Round 13 :
(1 sc, 1 dec) x 3 (6)
Round 14 :
Fasten off leaving a long tail to sew the tail to the back of the body at round 8-10. Add holly cluster by crocheting three small green leaves and three red berry spheres (6 sc each) and sew together on tail tip.
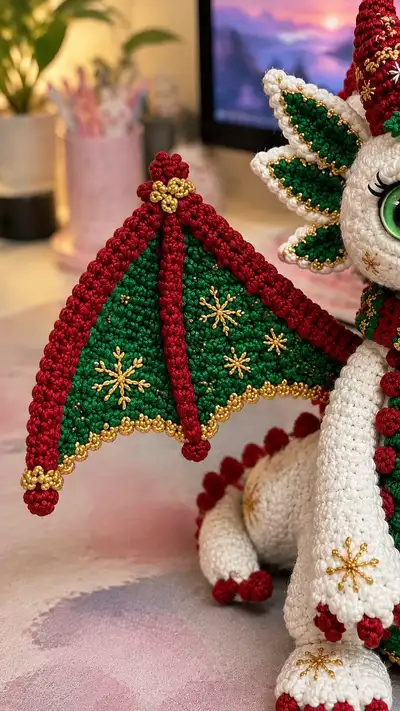
— Wings (Make 2 full wings composed of membrane and ribs) :
Membrane Round 1 :
Using green: 6 sc in magic ring (6)
Membrane Round 2 :
6 inc (12)
Membrane Round 3 :
(1 sc, 1 inc) x 6 (18)
Membrane Round 4 :
(2 sc, 1 inc) x 6 (24)
Membrane Round 5 :
(3 sc, 1 inc) x 6 (30)
Membrane Round 6-9 :
1 sc in each st (30)
Info :
Flatten the membrane into a triangular wing shape by decreasing on one side in later rounds. Count and mark the three rib positions (fold lines) where red rib strips will be attached. Embroider gold snowflakes now or after assembly using metallic thread with star stitch for crisp motifs.
Membrane Round 10 :
(5 sc, 1 dec) x 5 (25) - shape toward triangle
Membrane Round 11 :
(4 sc, 1 dec) x 5 (20)
Membrane Round 12 :
(3 sc, 1 dec) x 5 (15)
Membrane Round 13 :
Work straight row across apex to flatten into triangle: ch2, turn and sc back across to create edge length for rib attachments (this forms the thin apex tip)
Rib Construction :
Using red: make 3 long tubes for rib supports. Tube: 6 sc in magic ring, 6 inc (12), 1 sc each around until length reaches membrane from tip to wing base. Fasten off leaving long tail for sewing.
Info :
Sew ribs onto membrane by lining them along the 3 fold lines; attach securely with ladder stitch. Add red scalloped border along outer edge by working around in BLO with red: (1 sc, ch1, sl st) to create raised ridge. Add gold bead-like edge by slip-stitching metallic gold along final outer round every 2 sts for beaded effect.
Wing Final Rounds :
After attaching ribs, join red and work 2 rounds of 1 sc in each st around the wing perimeter (count will vary ~55-65 sts), second round work BLO to create defined, raised border. Add gold round of small picots: (ch3, sl st in first ch) every 4 sts to emulate beaded trim.
Wing Tip Finishing :
Create small red ball (5-8 sc sphere) and attach at each tip. Add gold embroidery dots and snowflake motifs across the green membrane using metallic thread with long stitches to create star shapes.
— Scarf and Pom-Poms :
Scarf Body Round 1 :
With red: ch 60 (or length to drape), join to first ch and work 1 sc in each ch across to form a band (60)
Scarf Round 2-8 :
Alternate stripes: Change colors every 2 rows to create red/green/white stripes. Work 1 sc in each st for each row. Total scarf length will be about 7-9 rows depending on desired bulk.
Info :
Make two small gold bobble pom-poms by crocheting 6 sc in magic ring, continue 2 rounds increasing to form small spheres, finish with metallic gold yarn or use yarn-wrapped pompoms glued to crocheted core. Attach as shown at scarf ends.
Pompom Attachment :
Sew pompoms to scarf ends securely, then embroider a gold chain stitch across the middle scarf stripe for decorative banding.
— Decorative Gold Embroidery & Snowflakes :
Info :
Use gold metallic thread and a thin needle. For snowflake star: bring needle out at center, stitch 6 straight radial stitches evenly spaced then add short diagonal stitches between each radial to form arms. Secure thread by weaving through back and knotting very small. Add tiny gold bead accents by stitching through beads and securing knot inside stuffing where possible.
Embroidering on belly and wings :
Mark center points of belly and each wing panel, work a 6-armed snowflake about 12-16 mm across for the belly and 10-14 mm for wing motifs. Ensure embroidery is tightened but not so tight it puckers the crochet fabric.
— Small Decorative Spheres / Berries (Make 6) :
Round 1 :
6 sc in magic ring (6)
Round 4 :
Fasten off and stuff lightly; leave tail to sew clusters (holly cluster of three) to tail tip and ear bases.
— Assembly Notes and Finishing Touches :
Info :
Pin all parts in place before sewing. Use the long tails left at the end of body and head to sew the head into the body opening with a ladder stitch for an invisible seam. Reinforce heavy pieces (horns, wings) by sewing through multiple rounds of both parts and knotting securely. Tuck in wire ends if used and secure with extra yarn wraps.
Final Finishing :
Weave all ends into fabric and trim. Add a light dusting of blush or fabric paint if desired for cheeks. For extra durability glue safety eye washers or add a small dot of fabric glue before fastening eye backs.
This festive dragon brings together adorable shaping and holiday sparkle into a joyfully detailed handmade friend. Every embroidered snowflake, beaded edge, and curled horn adds personality perfect for seasonal displays or heartfelt gifts. Assemble with care and enjoy the process of bringing this cozy companion to life — each stitch creates warmth and charm. Share your creation and bask in compliments; this little dragon will be treasured for years to come. 🧶🎄✨