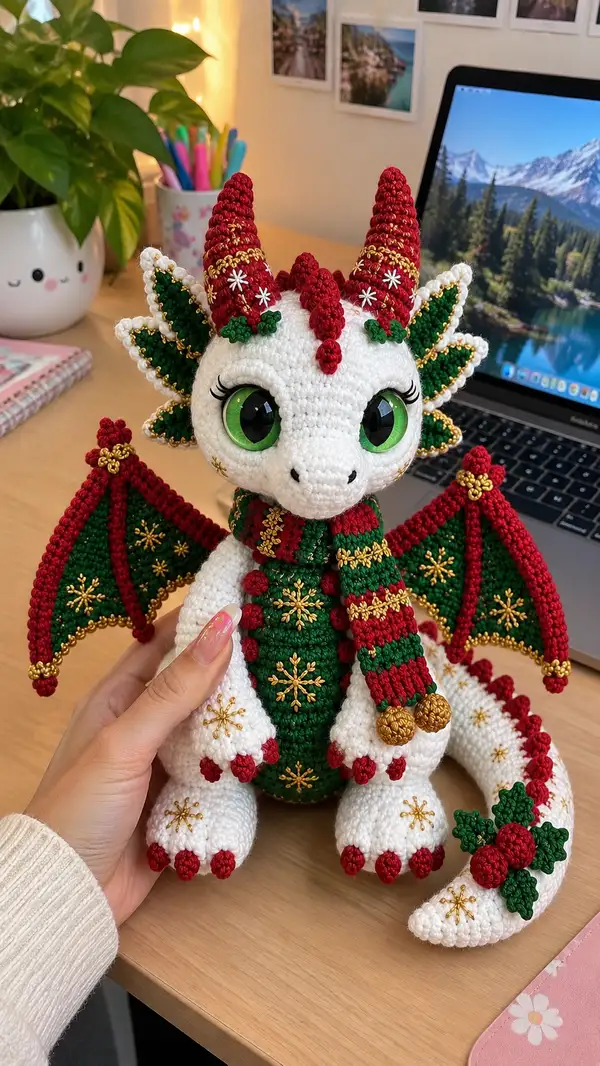
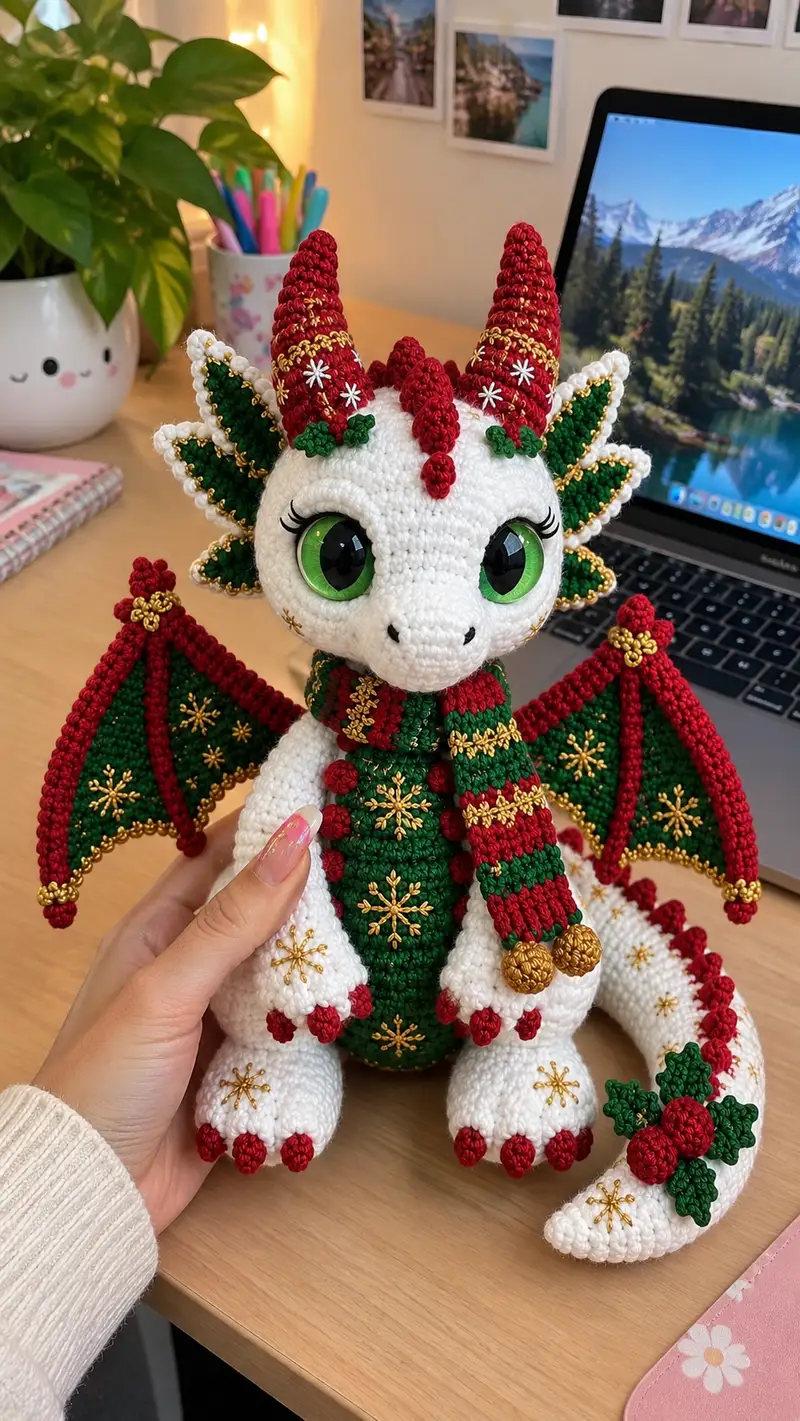
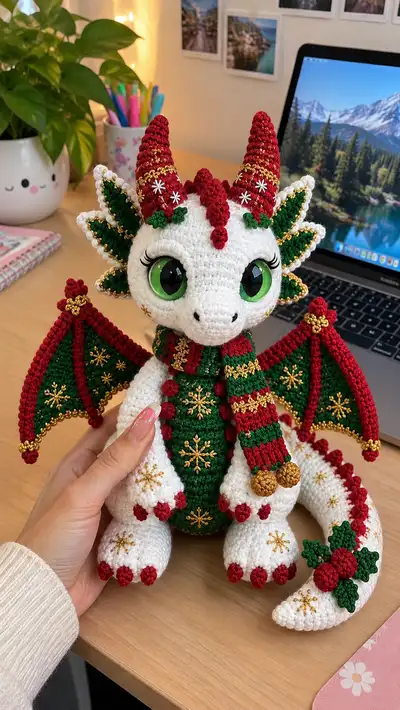
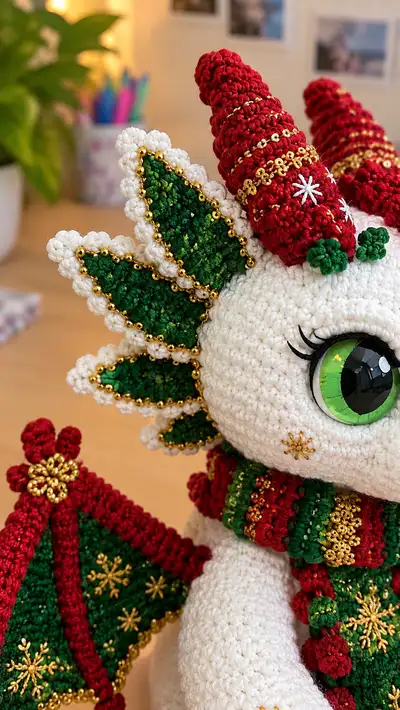
Create a charming holiday-themed dragon with bright green eyes, jewel-like gold details, and a cozy striped scarf. This amigurumi features layered leaf-like frills, curled conical horns, decorative wings with bead-trimmed edges, and a plump, cuddly body with embroidered snowflake motifs. Perfect as a seasonal gift or a festive home accent, the finished dragon is richly detailed yet built from repeatable amigurumi techniques. The pattern includes step-by-step rounds, assembly tips, and decorative finishing instructions.
Progress Tracker
0% Complete
— Head :
Round 1 :
6 sc in magic ring (6)
Round 3 :
(1 sc, 1 inc) x 6 (18)
Round 4 :
(2 sc, 1 inc) x 6 (24)
Round 5 :
(3 sc, 1 inc) x 6 (30)
Round 6 :
(4 sc, 1 inc) x 6 (36)
Round 7 :
(5 sc, 1 inc) x 6 (42)
Round 8 :
(6 sc, 1 inc) x 6 (48)
Round 9 :
1 sc in each st (48)
Round 10 :
1 sc in each st (48)
Round 11 :
1 sc in each st (48)
Info :
Place safety eyes between rounds 13-14, approximately 13-15 stitches apart center-to-center for the large, expressive eye look. Use stitch markers to note eye center points before inserting eyes. If using 14mm safety eyes, place them slightly closer than for 12mm.
Round 12 :
1 sc in each st (48)
Round 13 :
1 sc in each st (48)
Round 14 :
1 sc in each st (48)
Info :
If embroidering long lashes like in the photo, do not add them until head is assembled and eyes are secured. Plan mouth and nostril placement now by marking center front.
Round 15 :
1 sc in each st (48)
Round 16 :
1 sc in each st (48)
Round 17 :
(6 sc, 1 dec) x 6 (42)
Round 18 :
(5 sc, 1 dec) x 6 (36)
Info :
Begin stuffing head firmly but evenly. Use small bits of fiberfill and press into curved areas around eyes so they keep a smooth dome shape. Continue to check eye alignment as you stuff.
Round 19 :
(4 sc, 1 dec) x 6 (30)
Round 20 :
(3 sc, 1 dec) x 6 (24)
Round 21 :
(2 sc, 1 dec) x 6 (18)
Round 22 :
(1 sc, 1 dec) x 6 (12)
Info :
Fasten off leaving a long tail for sewing if you will attach head to the body with slip stitch method. Finish stuffing to desired firmness and close opening. Weave tail through front loops to cinch tight and sew secure.
— Facial Details & Nose :
Round 1 :
Using black yarn, embroider two small vertical nostril stitches centered between the eyes. Each nostril: 3-4 short stitches to create a tapered look.
Round 2 :
Semi-embroidery for mouth: Using black or dark grey yarn, make a small inverted 'Y' centered below nostrils. Keep stitches small and taut, securing ends inside the head.
Info :
For the eyelash effect seen in the photos, use thin black yarn or embroidery floss to stitch curved lashes on upper outer eye rims after eyes are secured and head is finished. Tuck ends inside head and knot or glue interiorly for security.
— Head Crest (center row of bumps) :
Round 1 :
Make 5 bumps individually. Bump pattern: mr, ch1, 6 sc in mr, pull tight, sl st to close (6)
Round 2 :
Fasten off leaving long tail for sewing, stitch bumps along the center top of the head from forehead to back, spacing evenly across rounds 8-12 of the head to form the crest seen in the photo.
Info :
Sew each bump firmly into place and add a few tiny stitches at the base to keep them upright. Use stuffing sparingly inside bumps to make them round but light.
— Leaf Frills Around Head (Make 6 pairs, 12 leaves total) :
Leaf Main Piece Round 1 :
ch 6, sc in 2nd ch from hook, hdc in next, dc in next, hdc in next, sc in last (approx 6 stitches across)
Leaf Main Piece Round 2 :
Working on the opposite side of foundation chain: sc, hdc, dc, hdc, sc. Join ends with sl st. Fasten off (shape is small leaf).
Leaf Border :
Using white yarn, join at leaf base and sc around leaf edge making 12-14 sc total, with (2 sc) at tip to create scallop. Fasten off leaving a tail for sewing.
Info :
Sew green leaves to head alternating with white scalloped edges to create the layered frill effect. Add gold beads along the outer white scallop by sewing each bead every 2-3 stitches, matching the photo where beads create a metallic rim.
— Horns (Make 2 spiraled horns) :
Round 1 :
mr, 6 sc in mr (6)
Round 2 :
(1 sc, inc) x 3 (9)
Round 3 :
(2 sc, inc) x 3 (12)
Round 4 :
(3 sc, inc) x 3 (15)
Round 5 :
(4 sc, inc) x 3 (18)
Round 6 :
1 sc in each st (18)
Round 7 :
(4 sc, inc) x 3 (21)
Round 8 :
1 sc in each st (21)
Info :
To create the spiral texture visible in the photos, work these horns tightly and then twist the finished cone slightly before sewing into place. Add narrow bands of metallic gold sequins by sewing through the stitches in even spaced wraps around the horn. Place horns symmetrically on head at rounds 6-8.
Round 9 :
(5 sc, inc) x 3 (24)
Round 10 :
Work 6 rounds even: 1 sc in each st (24) x6
Round 16 :
(5 sc, dec) x 3 (21)
Round 17 :
(4 sc, dec) x 3 (18)
Round 18 :
(3 sc, dec) x 3 (15)
Round 19 :
(2 sc, dec) x 3 (12)
Round 20 :
Stuff lightly near base only, curve horn slightly and fasten off leaving long tail for sewing. Sew onto head at marked positions.
— Body :
Round 1 :
6 sc in magic ring (6)
Round 3 :
(1 sc, 1 inc) x 6 (18)
Round 4 :
(2 sc, 1 inc) x 6 (24)
Round 5 :
(3 sc, 1 inc) x 6 (30)
Round 6 :
(4 sc, 1 inc) x 6 (36)
Info :
Begin working body bottom-to-top so the wide rounds form the belly. The green central belly panel will be worked later as an applied panel – mark the center front of the body now to attach that panel after stuffing. Use a stitch marker to note the start of rounds.
Round 7-10 :
1 sc in each st (36)
Round 11 :
(4 sc, 1 dec) x 6 (30)
Round 12 :
1 sc in each st (30)
Round 13 :
(3 sc, 1 dec) x 6 (24)
Round 14 :
1 sc in each st (24)
Info :
Begin stuffing body moderately between rounds 12-15, firm at bottom for stability but softer near the neck to ease attachment of head. Leave opening wide enough for head insertion later (do not fasten off).
Round 15 :
(2 sc, 1 dec) x 6 (18)
Round 16 :
(1 sc, 1 dec) x 6 (12)
Info :
Fasten off leaving very long tail for joining to head later. Stuff firmly to create the rounded chest and taper for the neck. The belly panel will be sewn on top of these rounds, so keep a neat surface for sewing.
— Belly Panel (Green, applied) :
Round 1 :
mr, 6 sc in mr (6)
Round 3 :
(1 sc, 1 inc) x 6 (18)
Round 4 :
(2 sc, 1 inc) x 6 (24)
Round 5 :
1 sc in each st (24)
Round 6 :
Sc around but work in BLO to create a defined ridge (24)
Round 7-10 :
1 sc in each st (24)
Info :
Embroider snowflake motifs on the belly panel with metallic gold thread before sewing panel onto body. Use star stitch floss techniques: a central stitch with radiating straight stitches to form snowflakes. Sew the panel to the front center of the body using mattress stitch for a nearly invisible seam.
— Arms (Make 2) :
Round 1 :
6 sc in magic ring (6)
Round 3 :
(1 sc, inc) x 6 (18)
Round 4 :
1 sc in each st (18)
Info :
Create a small rounded paw by adding five tiny red claws later; mark claw placement now by placing pins or stitch markers at equal intervals around the tip.
Round 5-7 :
1 sc in each st (18) x3
Round 8 :
(3 sc, dec) x 3 (15)
Round 9-12 :
1 sc in each st (15) x4
Info :
Stuff the hand area firmly, especially in the finger/claw region. Leave the upper arm unstuffed or lightly stuffed to make it easier to sew to the torso and allow some flexibility.
Round 13 :
(2 sc, dec) x 3 (12)
Round 14 :
1 sc in each st (12)
Round 15 :
(1 sc, dec) x 4 (8)
Round 16 :
1 sc in each st (8)
Round 17 :
Fasten off leaving long tail for sewing; position arm to body around rounds 8-11 on body sides and sew using ladder stitch for an invisible join.
— Paw Claws (Make 10 small claws) :
Round 1 :
mr, 5 sc in mr (5)
Round 2 :
1 sc in each st (5)
Round 3 :
sc5tog to close into one tight nub. Fasten off leaving long tail for sewing and attach five to each paw tip evenly spaced.
Info :
Sew claws on top front of paws aligning with the red accent seen in the photo. Use pins to check placement before stitching securely.
— Legs (Make 2) :
Round 3 :
(1 sc, inc) x 6 (18)
Round 4 :
(2 sc, inc) x 6 (24)
Round 5 :
(3 sc, inc) x 6 (30)
Round 6-8 :
1 sc in each st (30) x3
Info :
Legs are worked in the round to create the plump foot. Add embroidered gold snowflake detail on top of the foot before final closing. Make the sole slightly flattened by pressing while stuffing and adding a little extra fiberfill at the toe area for stability when sitting.
Round 9 :
(4 sc, dec) x 6 (24)
Round 10-12 :
1 sc in each st (24) x3
Round 13 :
(3 sc, dec) x 6 (18)
Round 14 :
(2 sc, dec) x 6 (12)
Round 15 :
1 sc in each st (12)
Round 16 :
Fasten off leaving long tail for sewing to the bottom of the body at the base rounds. Sew legs facing slightly outward to create a stable seated pose.
— Tail :
Round 3 :
(1 sc, inc) x 6 (18)
Round 4-7 :
1 sc in each st (18) x4
Round 8 :
(2 sc, dec) x 6 (12)
Round 9-12 :
1 sc in each st (12) x4
Round 13 :
(1 sc, dec) x 4 (8)
Round 14-16 :
1 sc in each st (8) x3
Round 17 :
Fasten off leaving long tail for sewing to back base. Before completely closing, add small greens and red crochet holly cluster: Make 3 small holly leaves and 3 small berry nubs and sew securely to tail end as decoration.
Info :
Optionally insert a short length of floral wire near the base and wrap with yarn to give the tail a slight poseable curve. Ensure wire ends are folded and taped to prevent poking through the stitches.
— Wing Structure (Make 2 wings: base ribs & membrane) :
Wing Rib Base Round 1 :
Using red yarn, ch 12, sc in 2nd ch from hook and across (11)
Round 2 :
Turn, ch1, sc across (11)
Round 3 :
Fold rib strip in half and join edges with sc to create a sturdy rib (approx 10 sc). Leave long tail for sewing.
Wing Membrane Round 1 :
With green yarn, attach at rib base and mr, 6 sc in mr (6)
Round 3 :
(1 sc, inc) x 6 (18)
Round 4 :
(2 sc, inc) x 6 (24)
Round 5-8 :
1 sc in each st (24) x4
Round 9 :
Join membrane edge to the ribs by sewing or crocheting the green membrane edge to the red rib base. Shape into a curved triangular membrane with three rib supports by sewing ribs onto membrane at even intervals to create the striped look.
Info :
Embellish wing membrane with embroidered gold snowflakes and sprinkle small gold beads along the bottom scalloped edge. Work a red sc border around the wing membrane to mirror the photo's bold edging.
Round 10 :
With red yarn, sc around wing membrane edge in even stitches approximating 40 sc, adding small picot scallops where desired (sc, ch2, sl st) to create the scalloped edge.
Round 11 :
Sew the completed wing to the body at rounds 6-8 on each side. Reinforce with extra stitching through the rib to prevent drooping.
— Wing Decorative Stars (Gold Embroidery) :
Step 1 :
Using metallic gold thread and a yarn needle, stitch star/snowflake motifs by making a small central stitch and then anchoring six straight stitches evenly spaced around the center. Knot securely on the inside or hide ends under beads.
Info :
Sew gold beads at the intersection or ends of each star to create the jeweled snowflake detail seen in the photographs. Use small stitches and a dab of fabric glue for beads if necessary.
— Scarf (Striped with pom-poms) :
Round 1 :
Using red yarn, ch 40 (or length to fit around neck comfortably), join to work in rounds to create a tube: sc in each ch and join to first st (40)
Round 2-3 :
1 sc in each st (40) x2
Info :
Switch to green yarn and work 2 rounds then back to red for a striped effect. Add gold bobble rows by carrying metallic thread alongside green and crocheting small front loop slip stitch coils to mimic the braided gold trims.
Round 4-20 :
Alternate 2 rounds red and 2 rounds green for 8-10 stripe repeats or until scarf reaches desired length (40 sts around).
Round 21 :
Finish ends with gold pompoms or crochet bobbles. Make small gold pom-poms by wrapping metallic thread around a small core, tying and trimming, or create crocheted bobble balls: mr, 6 sc, 6 inc round, sc5tog, close.
Info :
Sew scarf around neck, secure with small stitches at overlapping sections so it sits snugly and looks like the wrapped accessory in the photos. Add three small red bobbles along front of the body for decorative buttons using same bobble technique.
— Small Decorative Berries & Holly Leaves (Make clusters) :
Berry :
mr, 6 sc in mr (6). Fasten off leaving tail for sewing. Make 3 berries for each cluster.
Holly Leaf :
ch 6, sc in 2nd ch from hook, hdc, dc, hdc, sc; turn and sl st along other side of chain to close. Fasten off and block leaves slightly.
Info :
Sew clusters to tail end and near scarf as seen in photo. Use a few secure stitches and add a small dab of fabric glue under berries for extra hold if the toy will be handled frequently.
— Final Embellishments & Beads :
Step 1 :
Sew gold beads along leaf edges and wing rims as pictured, spaced evenly every 2-3 stitches. Secure beads with strong embroidery thread, passing needle twice through bead position and knotting inside the work.
Step 2 :
Use metallic gold thread to embroider additional snowflakes on legs, cheeks and belly. For cheeks, do a small three-stitch star for subtle shimmer.
Info :
Weave in all ends and hide them inside the body. Use small invisible whip stitches to close any gaps and add a few interior stitches through the body and head junction for a secure neck.
This festive dragon is a celebration of handmade charm and holiday sparkle—every bead, stitch, and embroidered snowflake brings it to life! The combination of plush white body, jewel-green panels, and ruby accents makes it a standout seasonal friend that will delight both makers and giftees. Enjoy the cozy, meditative process of stitching the many small details, and be proud when the finished dragon sits on your table wearing its scarf and holly. Happy crocheting and warm holiday cheer! 🎄🧶