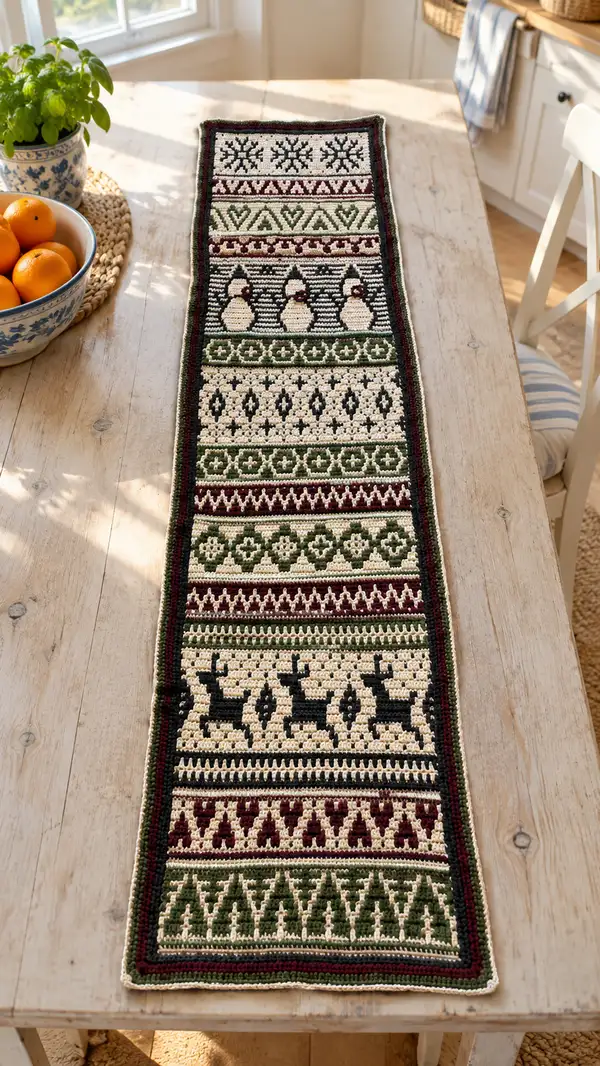
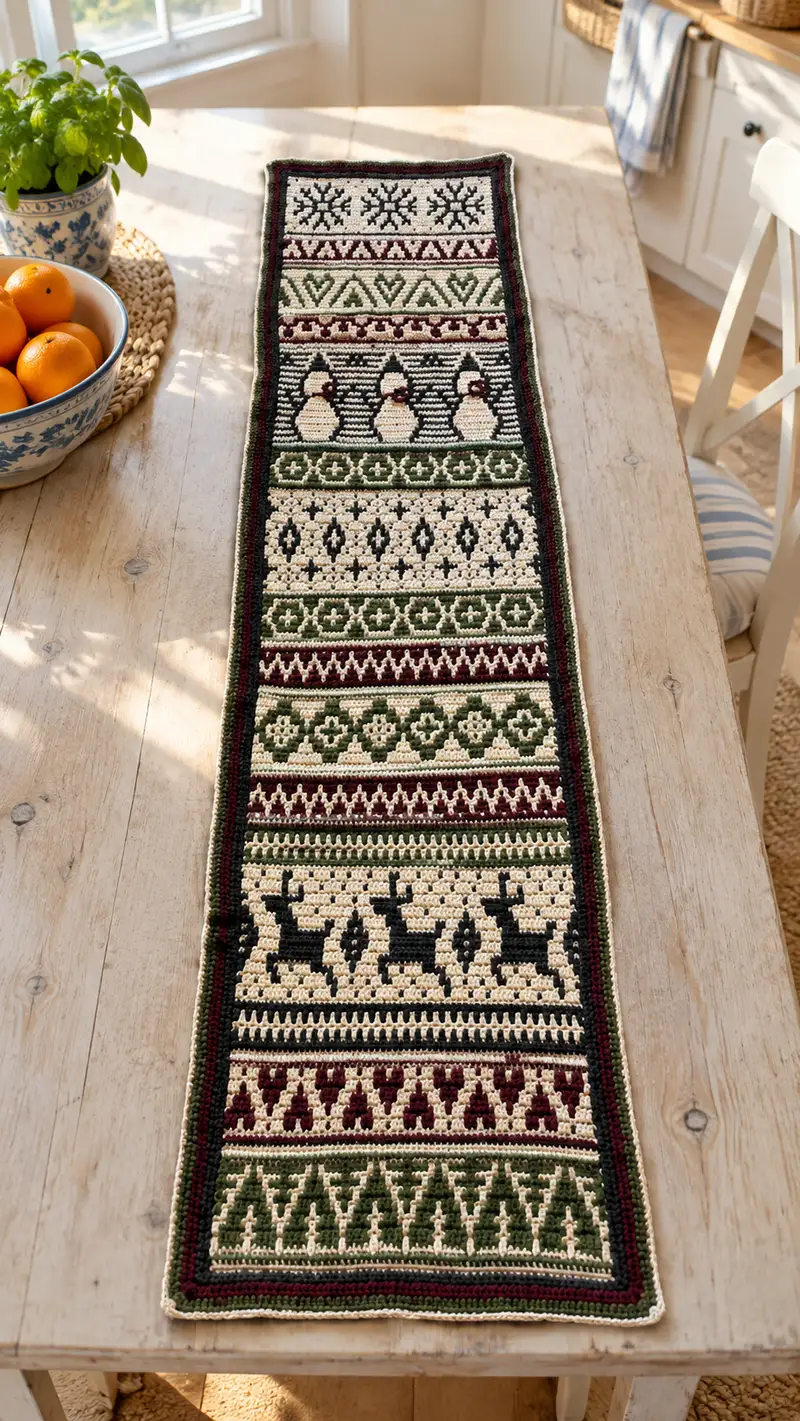
A long, cozy table runner worked in tapestry-style single crochet with classic Nordic motifs—reindeer, snowflakes, hearts and geometric bands. Shown in warm cream with deep forest green, burgundy and dark charcoal accents. Worked flat in rows and finished with a neat multicolored border for a stitched, heirloom look. Perfect for holiday settings or any rustic, farmhouse table.
Progress Tracker
0% Complete
— Notes & Gauge :
Info :
This runner is worked flat in tapestry single crochet (single crochet colorwork) across a fixed stitch count. Gauge (after tapestry tension adjustment): 18 sc = 10 cm and 10 rows = 5 cm with 3.5mm hook. Finished sample measures approximately 34 x 152 cm (13.5 x 60 inches). All rows are worked from right to left and back where applicable; join to work even rows when necessary. Maintain consistent tension so floats lie flat without pulling.
Info :
Stitch count per row across the full width: 62 stitches. Every row below uses 62 total sc unless otherwise specified. Floats are carried across the WS and trapped every 6-8 stitches as needed to keep floats tidy.
— Foundation Chain & Setup :
Round 1 :
Ch 63. Turn. (This establishes 62 working stitches across; the turning ch counts as first sc as preferred or work into 2nd ch from hook for tighter edge.)
Round 2 :
Row 1 (RS): 1 sc in 2nd ch from hook and in each ch across. (62)
Info :
Place a stitch marker in the first stitch of Row 1 and in the last stitch of the row to reference edges on future rows. This helps keep borders straight when working color changes.
Round 3 :
Row 2 (WS): Ch 1, turn. 1 sc in each st across (62). Carry unused color on WS, trap floats occasionally.
Info :
For a neat beginning edge consider working the first 3 rows in main cream color to establish a stable base before starting motifs. Use tapestry single crochet: insert hook, draw up loop in current color, finish stitch in working color as needed so floats are secured.
— Bottom Band: Triangular/Chevron Green Motif (Rows 1-12 of motif area) :
Round 4 :
Row 3: Ch 1, turn. 1 sc in each st in Cream across (62). (Establish background row)
Round 5 :
Row 4: Ch 1, turn. 8 sc Cream, 4 sc Green, 6 sc Cream, 4 sc Green, 6 sc Cream, 4 sc Green, 8 sc Cream, 4 sc Green, 6 sc Cream, 4 sc Green, 8 sc Cream. (62)
Info :
Row layout above is a repeating chevron placement across the width; counts are symmetric and total 62. Center motifs over the row by placing larger cream blocks at both ends. If you prefer a centered repeat, shift groups evenly.
Round 6 :
Row 5: Ch 1, turn. Work 1 sc in each stitch across following same color pattern as previous row to continue color blocks (62).
Round 7 :
Row 6: Ch 1, turn. 10 sc Cream, 6 sc Green, 10 sc Cream, 6 sc Green, 10 sc Cream, 6 sc Green, 4 sc Cream. (62)
Info :
Use the same technique for all color changes: insert hook in st, bring up loop, drop contrast, finish stitch with new color. Carry the unused yarn along WS, catching it under your working yarn when necessary to secure floats that are longer than 6 stitches.
Round 8 :
Row 7: Ch 1, turn. 1 sc in each st across working the color blocks to define the triangular shapes (62).
Round 9 :
Row 8: Ch 1, turn. 12 sc Cream, 2 sc Green, 12 sc Cream, 2 sc Green, 12 sc Cream, 2 sc Green, 8 sc Cream. (62)
Info :
Check symmetry at the ends every second row. If you see the chevrons skewing, adjust by shifting one stitch from the nearest block into the adjacent block to recenter motif repeats.
Round 10 :
Row 9: Ch 1, turn. 1 sc across in established colors maintaining floats at WS (62).
Round 11 :
Row 10: Ch 1, turn. 8 sc Cream, 6 sc Green, 8 sc Cream, 6 sc Green, 8 sc Cream, 6 sc Green, 10 sc Cream. (62)
Round 12 :
Row 11: Ch 1, turn. 1 sc in each st across to lock band. (62)
Info :
Finish the chevron band by working one neutral background row. Carry any unused yarn on the WS, and if floats become too long, twist them around the working yarn for a short distance to trap them and avoid snagging.
— Narrow Burgundy Divider & Small Motifs (Rows 13-22) :
Round 13 :
Row 12: Ch 1, turn. Change to Burgundy. Work 4 sc Burgundy, 54 sc Cream, 4 sc Burgundy (62). (This creates a thin burgundy line framed by cream.)
Round 14 :
Row 13: Ch 1, turn. Work 1 sc in each st across using same colors (62).
Info :
When introducing Burgundy, drop the cream at the last moment before the first Burgundy stitch and complete the stitch fully in Burgundy. Keep floats tight but not pulled.
Round 15 :
Row 14: Ch 1, turn. Pattern row: 6 sc Cream, 3 sc Burgundy, 8 sc Cream, 3 sc Burgundy, 8 sc Cream, 3 sc Burgundy, 6 sc Cream, 3 sc Burgundy, 14 sc Cream (62).
Round 16 :
Row 15: Ch 1, turn. 1 sc each st across following color changes as placed (62).
Round 17 :
Row 16: Ch 1, turn. Reverse of Row 14 to mirror the divider: 6 sc Cream, 3 sc Burgundy, 8 sc Cream, 3 sc Burgundy, 8 sc Cream, 3 sc Burgundy, 6 sc Cream, 3 sc Burgundy, 14 sc Cream (62).
Info :
These narrow divider rows set up for the next band; keep the burgundy floats short and trapped every 6 stitches. Use a bobbin or small separate balls of burgundy if you prefer to avoid long floats across the width.
Round 18 :
Row 17: Ch 1, turn. 1 sc across in established colors to lock band (62).
Round 19 :
Row 18: Ch 1, turn. Change to Forest Green for the next motif band: 10 sc Green, 42 sc Cream, 10 sc Green. (62)
Round 20 :
Row 19: Ch 1, turn. 1 sc across (62).
Info :
Switching to forest green establishes the leafy/heart motif band that follows. If you plan to customize colors, mark these transition rows so you can replicate the band spacing if rearranging motifs later.
— Heart/Leaf Band (Rows 23-36) :
Round 21 :
Row 20: Ch 1, turn. 8 sc Cream, 6 sc Green, 10 sc Cream, 6 sc Green, 8 sc Cream, 6 sc Green, 10 sc Cream, 8 sc Cream. (62)
Round 22 :
Row 21: Ch 1, turn. 1 sc across maintaining block placements (62).
Info :
Heart/leaf shapes are formed by stacking vertical green blocks centered across sequences. Keep the green floats under 8 stitches when possible or trap them behind cream stitches every 6th stitch.
Round 23 :
Row 22: Ch 1, turn. 6 sc Cream, 10 sc Green, 10 sc Cream, 10 sc Green, 6 sc Cream, 10 sc Green, 10 sc Cream. (62)
Round 24 :
Row 23: Ch 1, turn. 1 sc across following color pattern (62).
Round 25 :
Row 24: Ch 1, turn. 8 sc Cream, 6 sc Green, 10 sc Cream, 6 sc Green, 8 sc Cream, 6 sc Green, 10 sc Cream, 8 sc Cream. (62)
Info :
After Row 24, check overall band width to ensure hearts align symmetrically. Adjust by shifting a single cream stitch to the next block if needed to recentre motifs.
Round 26 :
Row 25: Ch 1, turn. 1 sc across in established colors (62).
Round 27 :
Row 26: Ch 1, turn. 10 sc Cream, 6 sc Green, 10 sc Cream, 6 sc Green, 10 sc Cream, 6 sc Green, 14 sc Cream. (62)
Round 28 :
Row 27: Ch 1, turn. 1 sc across to lock the band. (62)
Info :
If you want a stronger raised effect, work the final locking row in BLO in cream to create a subtle ridge at the band edge. BLO rows will add a decorative texture to separate bands.
— Narrow Green Rope & Motif Separator (Rows 37-42) :
Round 29 :
Row 28: Ch 1, turn. 4 sc Cream, 54 sc Green, 4 sc Cream. (62) - thin green stripe
Round 30 :
Row 29: Ch 1, turn. 1 sc across (62).
Info :
This green rope/stripe helps visually separate the heart band from the larger pictorial band coming next. Use contrasts carefully; a single contrasting stripe can be powerful between larger pictorial sections.
Round 31 :
Row 30: Ch 1, turn. 62 sc in Cream (62). Locking row.
Round 32 :
Row 31: Ch 1, turn. 1 sc across in preparation for pictorial band (62).
Info :
At the start of the pictorial band consider winding small balls or bobbins for the three main colors used for the upcoming reindeer/snowbird panel to reduce float lengths and tangling.
— Pictorial Band: Snowbirds / Small Figures (Rows 43-56) :
Round 33 :
Row 32: Ch 1, turn. 6 sc Cream, 8 sc Charcoal, 8 sc Cream, 8 sc Charcoal, 6 sc Cream, 8 sc Charcoal, 18 sc Cream. (62)
Round 34 :
Row 33: Ch 1, turn. 1 sc across following color positions (62).
Info :
These rows begin the silhouette shapes for small figures (snowbirds). They are stylized and simplified here as vertical blocks of motif color; if you prefer, substitute a charted stitch-by-stitch motif. Keep counts accurate and maintain symmetry.
Round 35 :
Row 34: Ch 1, turn. 5 sc Cream, 10 sc Charcoal, 6 sc Cream, 10 sc Charcoal, 5 sc Cream, 10 sc Charcoal, 16 sc Cream. (62)
Round 36 :
Row 35: Ch 1, turn. 1 sc across (62).
Round 37 :
Row 36: Ch 1, turn. 6 sc Cream, 12 sc Charcoal, 6 sc Cream, 12 sc Charcoal, 6 sc Cream, 12 sc Charcoal, 8 sc Cream. (62)
Info :
When shaping the head/body of each small figure, reduce or expand charcoal blocks by 2-4 stitches between rows to suggest shaping. Keep changes mirrored across repeats so the band reads as a row of small silhouettes.
Round 38 :
Row 37: Ch 1, turn. 1 sc across locking the row (62).
Round 39 :
Row 38: Ch 1, turn. 10 sc Cream, 6 sc Charcoal, 8 sc Cream, 6 sc Charcoal, 10 sc Cream, 6 sc Charcoal, 16 sc Cream. (62)
Round 40 :
Row 39: Ch 1, turn. 1 sc across (62).
Info :
Check motif repetition across the width; if you prefer larger silhouettes, swap counts to increase each figure's width but remember total must remain 62. Document any changes for symmetry when repeating the pattern further up the runner.
Round 41 :
Row 40: Ch 1, turn. 62 sc in Cream (62). Locking neutral row.
Round 42 :
Row 41: Ch 1, turn. 1 sc across (62).
— Floral/Geometric Band in Green (Rows 57-72) :
Round 43 :
Row 42: Ch 1, turn. 8 sc Green, 6 sc Cream, 8 sc Green, 6 sc Cream, 8 sc Green, 6 sc Cream, 20 sc Green. (62)
Round 44 :
Row 43: Ch 1, turn. 1 sc across (62).
Info :
This floral/geometric band is built of alternating green clusters and cream dividers. The rows are repeated and mirrored to create a band of rosettes and diamonds — a visual anchor for the runner.
Round 45 :
Row 44: Ch 1, turn. 6 sc Cream, 10 sc Green, 6 sc Cream, 10 sc Green, 6 sc Cream, 10 sc Green, 14 sc Cream. (62)
Round 46 :
Row 45: Ch 1, turn. 1 sc across (62).
Round 47 :
Row 46: Ch 1, turn. 8 sc Green, 6 sc Cream, 8 sc Green, 6 sc Cream, 8 sc Green, 6 sc Cream, 20 sc Green. (62)
Info :
To emphasize rosette centers, on every third pass you can add a single contrasting stitch (burgundy) at central positions; trap that color on the WS when not in use. This is optional but adds depth.
Round 48 :
Row 47: Ch 1, turn. 1 sc across (62).
Round 49 :
Row 48: Ch 1, turn. 62 sc in Cream to lock the band (62).
Round 50 :
Row 49: Ch 1, turn. 1 sc across (62).
— Large Reindeer Band (Rows 73-96) :
Round 51 :
Row 50: Ch 1, turn. Start reindeer pictorial sequence: 6 sc Cream, 10 sc Charcoal, 8 sc Cream, 10 sc Charcoal, 6 sc Cream, 10 sc Charcoal, 12 sc Cream. (62)
Round 52 :
Row 51: Ch 1, turn. 1 sc across following motif placements (62).
Info :
The reindeer silhouettes are stylized blocks in charcoal over cream. The charted silhouette across multiple rows creates the head, body and legs. Keep the three repeat motifs evenly spaced. Use bobbins for charcoal to reduce float length.
Round 53 :
Row 52: Ch 1, turn. 8 sc Cream, 12 sc Charcoal, 8 sc Cream, 12 sc Charcoal, 8 sc Cream, 8 sc Charcoal, 8 sc Cream. (62)
Round 54 :
Row 53: Ch 1, turn. 1 sc across (62).
Round 55 :
Row 54: Ch 1, turn. 6 sc Cream, 14 sc Charcoal, 8 sc Cream, 14 sc Charcoal, 6 sc Cream, 14 sc Charcoal. (62)
Round 56 :
Row 55: Ch 1, turn. 1 sc across (62).
Round 57 :
Row 56: Ch 1, turn. 10 sc Cream, 8 sc Charcoal, 10 sc Cream, 8 sc Charcoal, 10 sc Cream, 16 sc Charcoal. (62)
Info :
Vary the charcoal block widths by 2-4 stitches between rows to sculpt the head and leg shapes. The above counts approximate the silhouette; check and tweak to your eye if you prefer more detailed antlers or legs — keeping total 62.
Round 58 :
Row 57: Ch 1, turn. 1 sc across (62).
Round 59 :
Row 58: Ch 1, turn. 62 sc in Cream to separate pictorial bands (62).
Round 60 :
Row 59: Ch 1, turn. 1 sc across (62).
Info :
If you want more detailed reindeer features, chart the silhouette on graph paper and convert squares to stitches; each square = 1 sc. Working this pattern, maintain the same stitch count by swapping block widths, not changing total count.
— Mid Runner Repeat Bands & Locking Rows (Rows 97-112) :
Round 61 :
Row 60: Ch 1, turn. Repeat the green rosette band sequence: 8 sc Green, 6 sc Cream, 8 sc Green, 6 sc Cream, 8 sc Green, 6 sc Cream, 20 sc Green. (62)
Round 62 :
Row 61: Ch 1, turn. 1 sc across (62).
Round 63 :
Row 62: Ch 1, turn. Narrow burgundy divider: 4 sc Burgundy, 54 sc Cream, 4 sc Burgundy. (62)
Round 64 :
Row 63: Ch 1, turn. 1 sc across (62).
Info :
These repeats create balance in the runner and echo the bands worked earlier. If your table requires a different length, repeat any of the motif bands above to reach desired measurement (always in multiples of the band height to keep overall symmetry).
Round 65 :
Row 64: Ch 1, turn. 1 sc in each st in Cream (62).
Round 66 :
Row 65: Ch 1, turn. Start a narrow burgundy row: 6 sc Cream, 3 sc Burgundy, 44 sc Cream, 3 sc Burgundy, 6 sc Cream. (62)
Round 67 :
Row 66: Ch 1, turn. 1 sc across (62).
Info :
Count carefully as you begin to mirror the lower half of the runner. This ensures the top area will balance the bottom visually when the runner is complete and symmetrically pleasing on the table.
Round 68 :
Row 67: Ch 1, turn. 62 sc in Cream (62).
Round 69 :
Row 68: Ch 1, turn. 1 sc across (62).
— Top Snowflake Band & Final Motifs (Rows 113-120) :
Round 70 :
Row 69: Ch 1, turn. Begin snowflake/ornament band: 6 sc Charcoal, 8 sc Cream, 8 sc Charcoal, 8 sc Cream, 6 sc Charcoal, 8 sc Cream, 18 sc Charcoal. (62)
Round 71 :
Row 70: Ch 1, turn. 1 sc across to form snowflake petals in the charted band (62).
Info :
Snowflakes are stylized by alternating small charcoal blocks and cream pixels over 4-6 rows to form star-like shapes. If you prefer, design your own snowflake on graph paper and convert squares to stitches; ensure symmetry across the runner width.
Round 72 :
Row 71: Ch 1, turn. 8 sc Cream, 6 sc Charcoal, 10 sc Cream, 6 sc Charcoal, 8 sc Cream, 6 sc Charcoal, 18 sc Cream. (62)
Round 73 :
Row 72: Ch 1, turn. 1 sc across (62).
Info :
After completing the snowflake band, work two neutral cream rows to give breathing space before the final border. This helps visually separate the pictorial top from the edge treatment.
Round 74 :
Row 73: Ch 1, turn. 62 sc in Cream (62).
Round 75 :
Row 74: Ch 1, turn. 1 sc across (62).
Round 76 :
Row 75: Ch 1, turn. 4 sc Burgundy, 54 sc Cream, 4 sc Burgundy. (62)
Info :
Lock the top pattern with one or two rows of cream and a final thin burgundy stripe to mirror the lower half. This gives a framed look before the crochet border is worked around the runner.
— Finishing Border (Worked all around after row 120) :
Round 77 :
Row 76: Fasten off and weave in ends along WS for all bobbins. Block the flat panel lightly if desired—pin to measurements and steam or wet-block according to yarn label. Let dry fully before edging.
Info :
To work the border you will crochet around the entire rectangle; this is best done after blocking so edges sit square. Join border color (Forest Green) in a corner stitch using sl st.
Round 78 :
Border Row 1 (around): With Forest Green, join in a corner. Ch 1, work 1 sc evenly along the long edge in each row end (approx 120 edge sts along long side), 3 sc in corner stitch, continue along opposite long side with 1 sc in each row end, 3 sc in corner, then along short ends 1 sc in each row end, finishing with sl st to first sc. This rounds the corner with 3 sc clusters for a neat turn.
Round 79 :
Border Row 2: Ch 1, turn. Work 1 sc in each sc around, placing 3 sc in each corner cluster made previously. (Work remains even—count will depend on blocking and row end counts.)
Info :
To maintain even border tension, keep the same number of edge stitches per long side on both sides. If necessary, add or skip up to 2 sc evenly along the long edges to make border lie flat.
Round 80 :
Border Row 3: Switch to Burgundy. Ch 1, pick up in same stitch and work 1 sc in each st around, placing 3 sc in corners. (Color contrast gives a framed effect.)
Round 81 :
Border Row 4: Switch to Charcoal. Work 1 sc in each st around to create a thin dark stripe. Fasten off and weave ends securely on WS.
Info :
For extra crisp edges, work a final round in slip stitch in cream across the very outer edge, or use single crochet in BLO of the last round to create a raised frame. Weave all ends neatly into the border floats.
Round 82 :
Optional Edging: With cream, work crab stitch (reverse sc) around the outer edge for a subtle rope finish. This is worked left-handed around each stitch to create a neat outward-facing ridge.
Round 83 :
Finishing: Pin the runner flat and give final light steam or wet-block following yarn manufacturer instructions. Trim any stray fibers and reweave any ends that show on RS. Press gently to finish.
Info :
Label the back with care instructions if you plan to gift the runner: hand wash cold, reshape and dry flat; avoid tumble drying to preserve color flecks and shape.
Round 84 :
Pattern Variation Tip: To shorten the runner, remove repetitions of larger pictorial bands (reindeer/rosette), preserving symmetry by removing equal bands from top and bottom. To lengthen, repeat any motif band sequence, remembering to maintain the border counts.
Info :
Color substitution: This pattern reads beautifully in any two- or three-color palette. Use muted neutrals for a modern farmhouse look or jewel tones for a festive holiday runner. Document color changes to reproduce later or make a matching set.
This Festive Nordic Table Runner transforms a simple table into a cozy, handmade focal point. The classic motif bands bring warm charm to holiday mornings and everyday meals alike. Working the runner is a satisfying mix of rhythm and color — a little effort that yields a beautiful, long-lasting heirloom. 🧶 Enjoy the meditative pace of tapestry crochet and share your finished runner with loved ones for a timeless gift. ✨