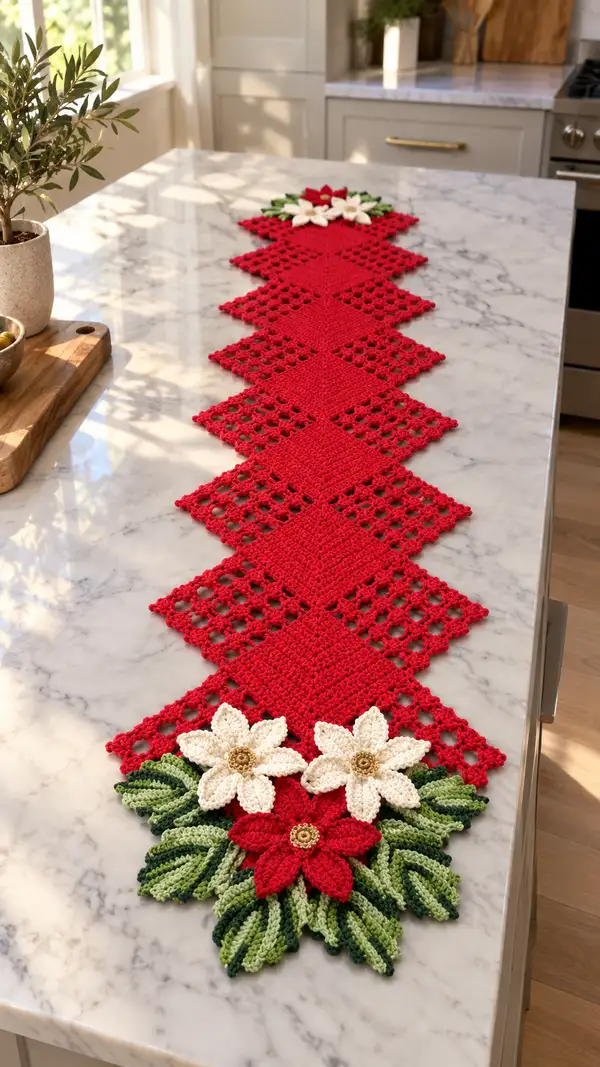
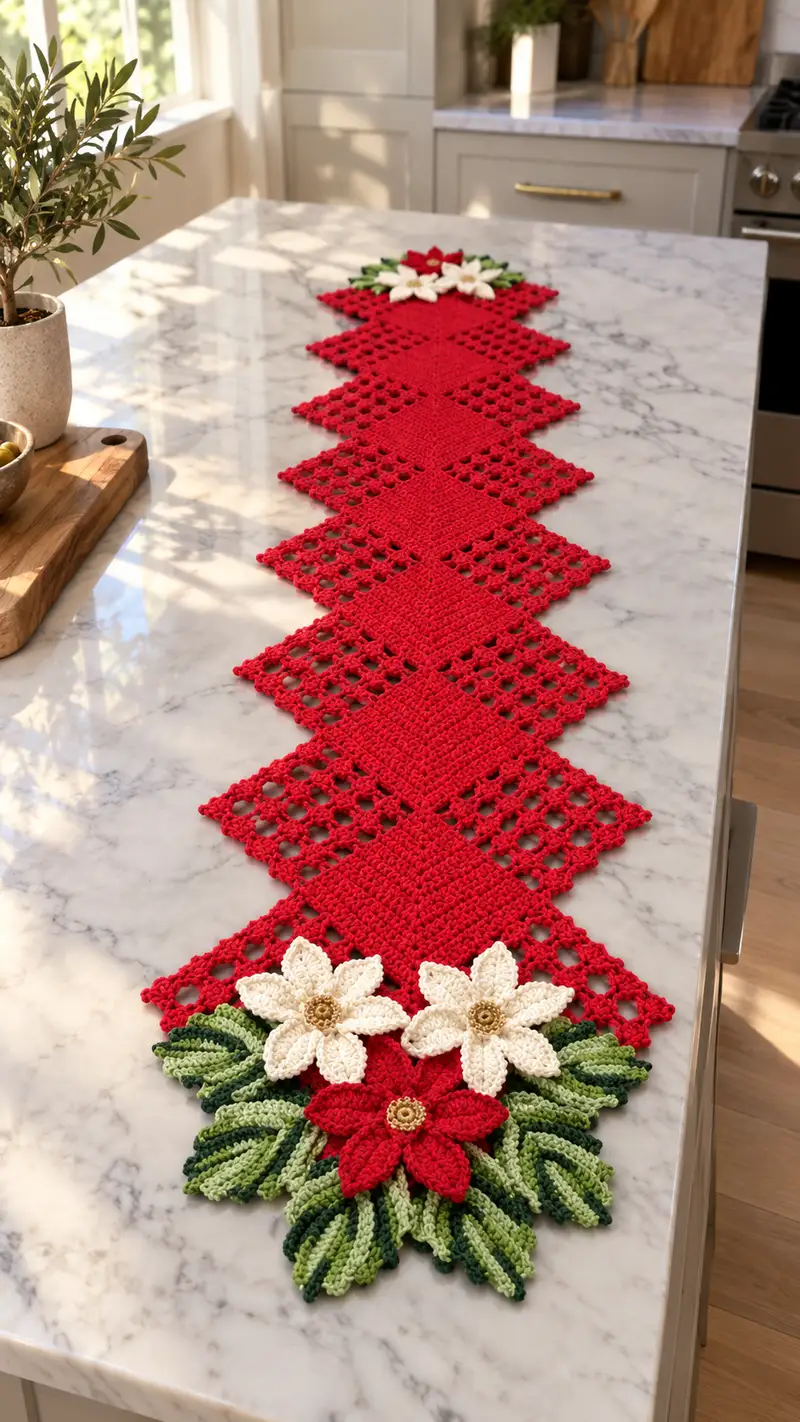
A long, elegant table runner made from connected diamond motifs with openwork lattice edges, finished with layered crocheted poinsettias and sculpted leaves at each end. Rich red diamonds form the body of the runner while cream and green floral clusters create the festive focal points. This pattern covers motif construction, join-as-you-go assembly, scalloped edging and fully crocheted flowers and leaves for a handmade holiday centerpiece.
Progress Tracker
0% Complete
— Gauge & Finished Size :
Info :
Gauge: 16 stitches and 18 rows = 10cm in sc pattern on 4.0mm hook. Finished dimensions of shown runner: approximately 12" (30cm) wide at widest diamond points and 60" (152cm) long with 9 diamonds (adjust by number of motifs).
— Notes :
Info :
Work motifs separately and join-as-you-go along one side to keep alignment straight. Use stitch markers at the corner points so that diamond tips line up. When carrying yarn across wrong side, keep floats loose to avoid puckering. Block each motif flat before joining for best results.
— Materials & Color Calls :
Info :
Main body: Color A = Holiday Red. Flower petals: Color B = Cream (off-white) and Color C = Scarlet Red (accent flower). Leaves: Color D = Light Green, Color E = Dark Green. Centers: Color F = Gold or Tan.
— Diamond Motif (Make 9) :
Round 1 :
Ch4, sl st to first ch to form ring. Ch3 (counts as dc), 2 dc in ring, ch2, 3 dc in ring, ch2, 3 dc in ring, ch2, 3 dc in ring, ch2, join with sl st to top of ch3. (4 corner clusters, ch2 corners)
Round 2 :
Sl st into next 2 dc and into corner ch-2 sp, ch3, 2 dc in same sp, ch2, 3 dc in same sp (forms corner), *ch1, in next corner ch-2 sp work 3 dc, ch2, 3 dc; rep from * twice more; ch1, join with sl st to top of ch3. (Corner cluster scheme retained. Work overall as granny square pattern)
Round 3 :
Sl st to next ch-1 sp, ch3, 2 dc in same sp, ch1, 3 dc in same sp (corner cluster continued), *ch1, 3 dc in next ch-1 sp, ch1, (3 dc, ch2, 3 dc) in next corner ch-2 sp; rep from * around; ch1, join. (This expands cluster count; round forms a square approx 3 clusters per edge)
Round 4 :
Sl st to the first ch-1 sp along edge, ch3, 2 dc in same sp, ch1, 3 dc in same sp; *ch1, 3 dc in next ch-1 sp; rep across each edge placing (3 dc, ch2, 3 dc) in corner ch-2 sps; join. (Square now wider; continue to building openwork)
Info :
From Round 5 onward we will alternate open lattice rounds with solid rounds to create the open/solid diamond effect. Keep corners consistent so square can be rotated as diamond when joining.
Round 5 :
Change to Filet/openwork round: Ch4 (counts as dc + ch1), *sk next 2 dc, (dc, ch1, dc) in next ch-1 sp; rep across to corner, in corner work (dc, ch2, dc), rep around sides; join with sl st to top of ch4. (This round introduces chain-1 mesh spaces along edges)
Round 6 :
Solid clustering round: Sl st into next ch-1 sp, ch3, 2 dc in same sp, ch1, 3 dc in same sp; *ch1, 3 dc in each ch-1 sp across edge, treat corner ch-2 sp as (3 dc, ch2, 3 dc); join. (This fills the mesh back into solid clusters to create alternating texture)
Round 7 :
Repeat Round 5 pattern (openwork ladder) across all four sides, keeping corner ch-2 spaces for turning. Join. (Square now has alternating solid/open rows giving a lattice when diamonds are attached)
Round 8 :
Repeat Round 6 solid cluster round. Join. (Square center slightly larger; approximate total clusters per side now 6 cluster groups)
Round 9 :
Increase corner round to expand motif for larger diamond shape: In each corner ch-2 space work (3 dc, ch2, 3 dc) as always, and along edges work 3 dc clusters in every ch-1 space created previously; join. (Motif is growing consistently)
Round 10 :
Open mesh repeat: Ch4, then *(dc,ch1,dc) in each ch-1 sp along edge, continue around placing corner (dc,ch2,dc) in corner spaces; join. (This round creates a matrix of small chain spaces along each edge which will produce the visible open lattice on alternating motifs)
Round 11 :
Solid round: Work 3 dc clusters in each ch-1 sp across edges and (3 dc, ch2, 3 dc) in corners; join. (Square is now approximately 14–16 clusters across edge depending on how you tension)
Info :
At this stage test layout by rotating one square to diamond orientation. If your squares look slightly rectangular, steam-block gently to even out sides before continuing. We will create a more defined diamond point in the next rounds.
Round 12 :
Working into ch-1 spaces along the edge, place (dc, ch1, dc) in every second ch-1 sp to begin narrowing edges; corners as (3 dc, ch2, 3 dc); join. (This begins to sculpt minor points at the center of each side to emphasize diamond shape when rotated)
Round 13 :
Solid round: 3 dc clusters into each ch-1 sp, corners same as before; join. (Stabilizes shape and evens edges)
Round 14 :
Work a reverse picot decorative round: Ch1, sc in each dc and in center of each cluster, in corner ch-2 sp work (sc, ch3, sc) to form a small picot arch; join. (This gives the diamond tips refined ends for a crisp edge)
Round 15 :
Border foundation round: Ch1, sc evenly around entire square placing 3 sc in each corner ch-2 space to flatten corners; join. (This round creates a consistent texture for joining and bordering later) (Count: approximate number of sc around will depend on your prior cluster counts; expect roughly 84–110 sc around single motif for worsted yarn on 4.0mm hook)
Round 16 :
Finish round for motif: FLO single crochet round to create a ridged edge: Sl st to next stitch, 1 sc in each st FLO around, placing 3 sc in corner spaces; join and fasten off leaving 16–20" tail for joining. Block to exact diamond shape and allow to dry before assembly.
Info :
Make 9 motifs total for runner as photographed (or adjust number for desired length). Alternate motifs that remain more solid (repeat Round 6 and Round 11 as extra solid rounds) with motifs that maintain more open rounds for visual rhythm. Label motifs as S (solid center) or O (open center) if desired, to create staggered pattern on assembly.
— Joining Motifs (Join-as-you-go Method) :
Info :
We recommend joining motifs as you complete the last round (Round 16) using slip-stitch joins into corresponding FLO sc ridges on previously placed motif. Join along one full diagonal side for each diamond to create the zig-zag runner. Use the long tail from motif to sew if preferred.
Round 1 :
Position your first motif (center of runner). Work Round 15 and 16 and fasten off. Place second motif adjacent so one corner meets the side of first motif at mid-edge. Using long tail, whip stitch through the 3 sc corner group on motif A to the 3 sc corner group on motif B across each corresponding stitch. Use even spacing.
Round 2 :
If using join-as-you-go: on joining motif B's final sc round, when you reach a stitch that corresponds to a join point on motif A, insert hook into that stitch on motif B, then into the matching stitch on motif A and sl st to join, continue around joining along the entire side; fasten off at end of join. This method yields an invisible seam.
Round 3 :
Repeat for each motif: place them in order so that diamonds alternate alignment: solid, open, solid, open to create texture contrast. Join motifs consecutively until you have the full runner. When joining two motifs end-to-end on a diagonal, ensure corner alignment: the tip of the diamond will point to the adjacent diamond's center.
Info :
Pin motifs together on a flat surface before joining to double-check alignment. Use blocking mats to keep points straight. If seams gap, add a small mattress stitch along join for reinforcement.
— Runner Foundation Edging (Once All Motifs Are Joined) :
Round 1 :
With Color A (red) and 4.0mm hook attached to any corner, ch1, sc evenly around the entire runner edge placing 3 sc in each diamond point corner and 1 sc across each side sc; when reaching a join seam place an extra sc every 2 stitches to maintain flat edge; join with sl st to first sc. (This evens the raw edges)
Round 2 :
Ch3 (counts as dc), *skip next st, (dc, ch1, dc) into next st to create scalloped meshes along the openwork and to complement motif lattice; rep around ensuring 3 dc groups in corner points; join. (Creates a decorative arching scaffold for scalloped outer edge)
Round 3 :
Scallop finish: In each ch1 sp from previous round work (sc, hdc, 3 dc, hdc, sc) to form full scallop shell. In corner points work (sc, hdc, 5 dc, hdc, sc) to preserve corner projection; join and fasten off. Weave tails securely and lightly steam block scallops to shape.
Info :
Edge rounds stabilize runner and provide a finished, professional look. If you want a more open edge, substitute picot shells in Round 3 by working (sc, ch3 sl st to sc) between small shells.
— Large Poinsettia Flower (Make 6: 3 per end cluster) :
Info :
Each clustered end in photograph uses three layered flowers: two cream flowers and one red flower, arranged with numerous sculpted leaves. We'll provide one detailed flower template to repeat in both colors and instructions for layering.
Flower Base Round 1 :
With Color F (gold), ch4, sl st to form ring. Ch1, work 8 sc into ring. (8)
Flower Base Round 2 :
Inc in each stitch around (16). (16)
Flower Base Round 3 :
(1 sc, inc) x8 (24). (24)
Info :
This disc will become the center backing for the layered petals. Fasten off Color F leaving a 10" tail to sew the center later. We will now create petals individually and stitch them onto this base.
Petal (Make 6 petals per flower) - Petal 1 Round 1 :
With petal color (Color B or C) ch9. (foundation chain length defines petal size; adjust by ±2 chains for larger/smaller petals)
Petal Round 2 :
Starting in 2nd ch from hook: sc, hdc, 2 dc, 3 dc in next 2 sts, 2 dc, hdc, sc. (This builds a peaked petal centered on middle chains) (Total stitches along petal: 12–14 depending on increases)
Petal Round 3 :
Turn and work along the opposite side of foundation chain: sc in first, hdc, 2 dc, 3 dc, 3 dc, 2 dc, hdc, sc in last; sl st to first sc to close petal. Fasten off leaving a 8–10" tail for sewing. Pin petal to base disc and repeat to create 6 petals spaced evenly around the center. (Petal count: 6)
Petal Info :
Stitch placement: use the 24-st center disc as anchor. Place petals so their inner bases slightly overlap at the center and secure with mattress stitch to center disc using tail. For a fuller bloom, overlap petal bases by 1–2 stitches and stack a second layer of slightly smaller petals on top (repeat petal with ch7 foundation for layer 2).
Petal Layer Round 1 :
Make second layer of 6 smaller petals using ch7 foundation and same shaping sequence scaled down: sc, hdc, 2 dc, 3 dc, 2 dc, hdc, sc. Attach offset between first layer petals to give depth. Fasten off and weave in tails.
Center Embellishment Round 1 :
With Color F gold, attach to disc center and ch1, work 12 sc in the center hole across both layers to create a solid center bump; finish with a small round of French knots using embroidery thread if desired to mimic real poinsettia center. Sew center to flower base and weave tail across back of base for security.
Info :
For the red accent flower, you can make a single, slightly larger flower (ch11 foundation petals) to sit beneath the cream ones and create visual depth. Slight stuffing (tiny bit of fiberfill) in the petal inner fold before sewing will encourage petals to arch upward, giving a sculpted look.
— Sculpted Leaves (Make 10–12 per cluster) :
Leaf Foundation Round 1 :
With Color D (light green) ch18. (Foundation length sets leaf size; ch18 gives medium-large leaf.)
Leaf Round 2 :
Starting in 2nd ch from hook: sc, hdc, 2 dc, 3 dc, 3 dc, 2 dc, hdc, sc along the first side to the tip (works 8 sts), at tip work (sc, ch2, sc) to turn, then work back along opposite side : sc, hdc, 2 dc, 3 dc, 3 dc, 2 dc, hdc, sc to base; sl st to join at base. Fasten off leaving long tail. (Leaf symmetrical with a small ch2 picot at tip)
Info :
Work a set of leaves in Color D and Color E (dark green) alternating to get the two-tone layered effect in photo. Stagger placement when sewing onto runner ends. To create a curled ridge, after stitching leaves to base, pinch and stitch a running seam down center of leaf to form central vein.
Leaf Variation Round 1 :
For textured leaves, repeat foundation ch18 but on return work in BLO for two rounds to create a raised ridge; then finish with OUTER edge picot: (sc, ch3, sl st into sc) spaced evenly along leaf edge for a serrated appearance.
Assembly Info :
Arrange the large red flower at the center of the floral cluster with two cream flowers staggered above and to the sides as seen in the image. Arrange leaves around base fanning outward. Pin into position and baste with sewing thread, then reinforce with neat whipstitches using yarn tail of base disc.
— Alternative: Single Large Layered Poinsettia (if you prefer one large flower) :
Round 1 :
Create a larger center disc (make 36 sc round): ch4, join, ch1, 12 sc in ring; Round 2: inc around (24); Round 3: (1 sc, inc) x12 (36). (36)
Round 2 :
Make 8 large petals using ch13 foundation and a deeper petal shaping sequence (sc, hdc, 2 dc, 5 dc, 5 dc, 2 dc, hdc, sc) which will give a dramatic large petal. Attach 8 petals evenly. Add smaller secondary layer of 8 petals using ch9 foundation offset between the large petals.
Info :
This single large flower gives a very graphic look and is a good option if you'd like only one focal flower at each end instead of three separate flowers.
— Attaching Floral Clusters to Runner :
Info :
Decide on exact placement first: floral cluster should be centered over the tip diamond at each end. Pin the flower base over the diamond point so that petals drape over the scalloped edge. Use the long tail from the flower center to sew through the runner's fabric backing in multiple passes to anchor the flower firmly. Add leaves around the base and sew through both layers so the set is secure.
Round 1 :
When sewing, insert needle through the runner at the back of a corner sc cluster, through the center disc of flower, then back through the runner several times; tie off a secure knot on the underside and weave tail into runner to hide.
Info :
Use small hidden whip stitches rather than large visible stitches. If the runner will be handled often, sew twice around base and consider adding a dab of fabric glue under the base for extra adhesion.
— Final Shaping & Blocking :
Info :
Once all pieces are attached, block the entire runner gently: spray with water and pin flat on blocking board to precise diamond points. For petals and leaves, shape by hand and allow to dry. If you want stiffer petals and leaves for display-only, use a diluted fabric starch spray and shape on a foam pad then let dry.
Round 1 :
Check all seams and weave in any tails left from joining motifs and flowers. Trim any stray fibers. Press lightly with a steam iron at a safe distance to set shape, avoiding direct heat on synthetic fibers.
Info :
Care: Spot clean as needed. For larger cleaning, hand wash gently in cool water and reshape while wet. Do not tumble dry; lay flat to dry.
— Optional Embellishments :
Info :
For a more luxurious look add a few small beads or French knot accents in gold to the flower centers. Tiny seed beads glued into the center of the gold disc can give sparkle. Sew on with strong beading thread, and secure with a dab of fabric glue if needed.
Finishing this runner is such a delight — watching nine diamonds and a cluster of blooms come together into one flowing holiday centerpiece is incredibly satisfying. The contrast between the red latticework and the cream poinsettias gives instant seasonal charm. With a little blocking and careful assembly you end up with a polished heirloom-quality piece you'll be proud to display. 🎄🧶