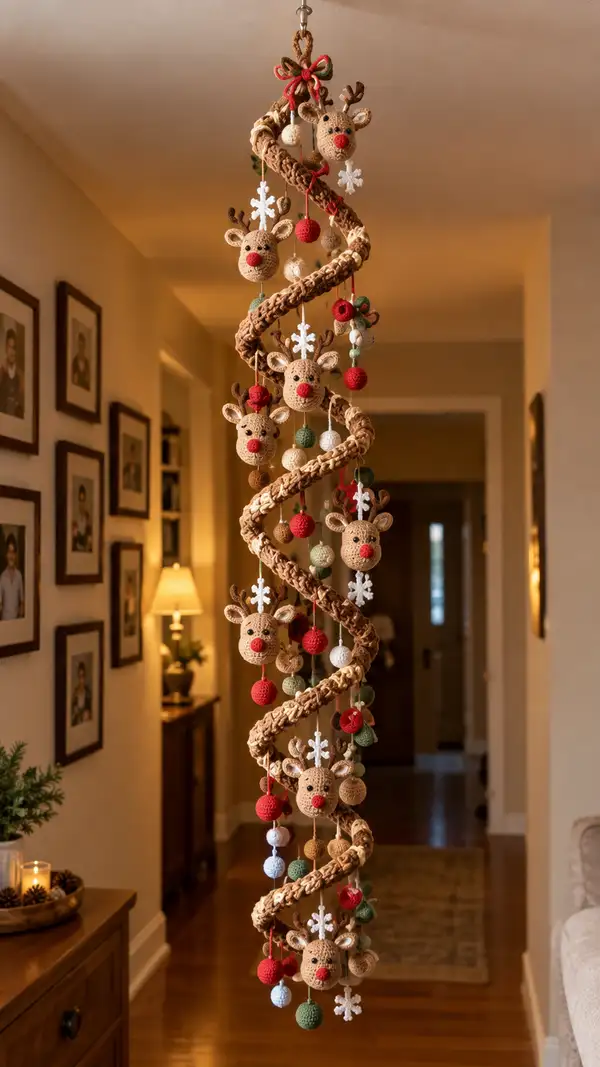
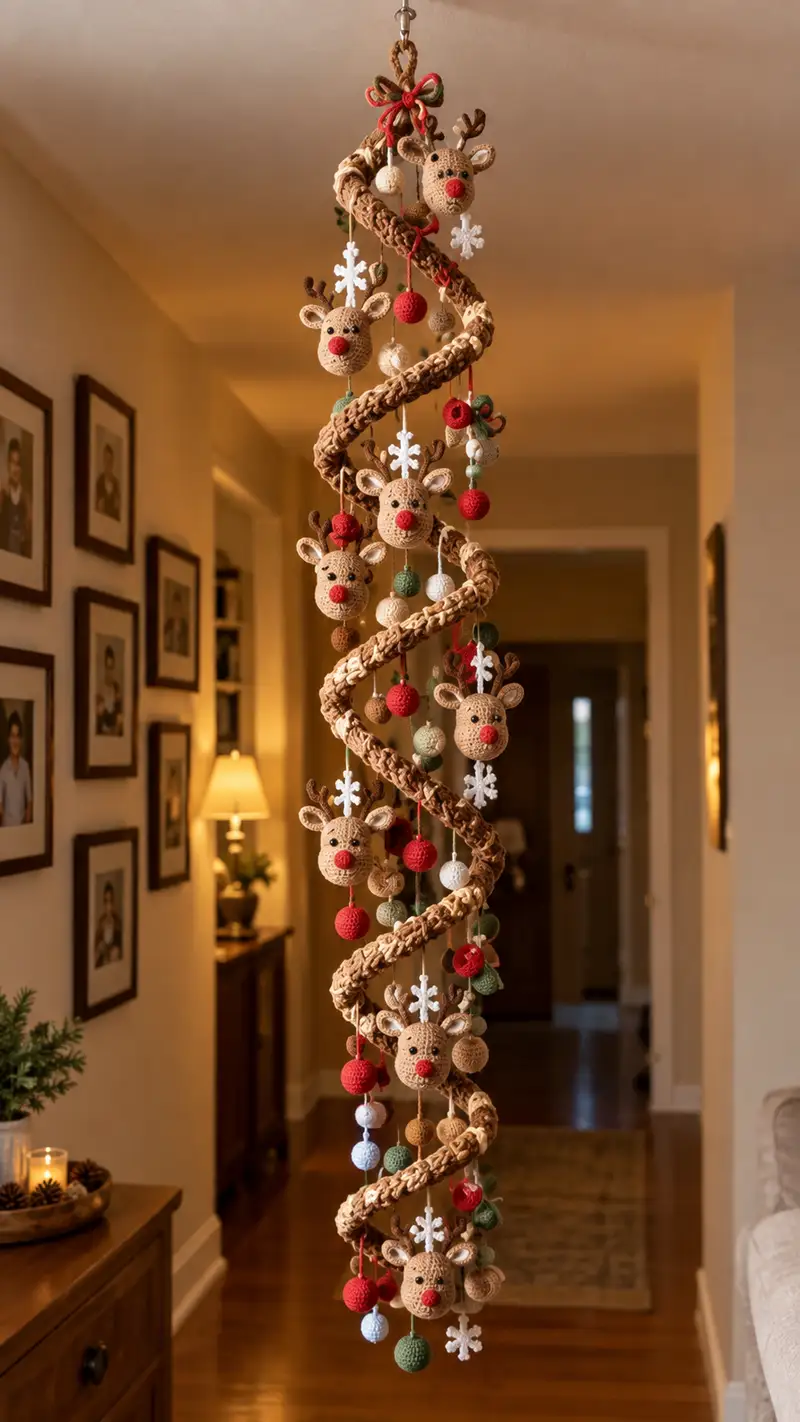
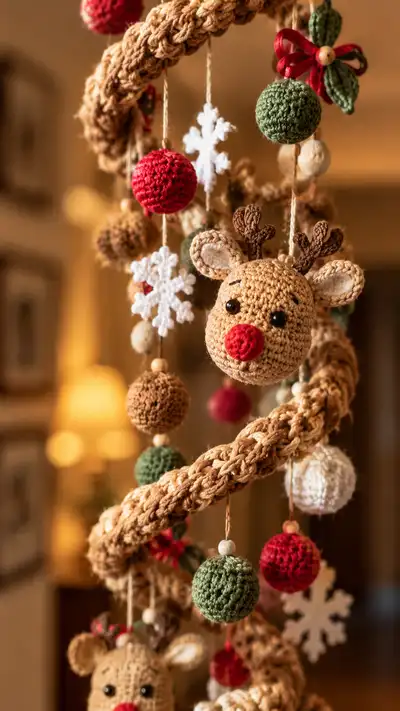
Create a whimsical hanging spiral garland adorned with tiny crocheted reindeer heads, festive balls, and snowflakes. This pattern recreates a tall spiral mobile with warm beige ropes, red noses, green and red ornaments, and delicate white snowflakes. Perfect as a holiday centerpiece or winter hallway decoration — the finished piece is lightweight, festive, and packed with charming handmade detail.
Progress Tracker
0% Complete
— Head :
Round 1 :
6 sc in magic ring (6)
Round 3 :
(1 sc, 1 inc) x 6 (18)
Round 4 :
(2 sc, 1 inc) x 6 (24)
Round 5 :
(3 sc, 1 inc) x 6 (30)
Round 6 :
(4 sc, 1 inc) x 6 (36)
Round 7 :
(5 sc, 1 inc) x 6 (42)
Round 8 :
(6 sc, 1 inc) x 6 (48)
Round 9-14 :
1 sc in each st (48)
Info :
Place safety eyes between rounds 11-12, approximately 8-10 stitches apart for a gentle, friendly expression. Mark starting stitch with a stitch marker and count carefully before placing eyes. For 6mm eyes, position them at round 12 with 9 stitches between centers; for 8mm eyes place with 10-11 stitches between centers.
Round 15 :
(6 sc, 1 dec) x 6 (42)
Round 16 :
(5 sc, 1 dec) x 6 (36)
Info :
Begin stuffing head firmly once you have completed Round 16. Use small amounts of fiberfill, pushing into the face area with a stuffing tool or blunt pencil to create an even shape. Stuff more around the cheeks to keep the oval face.
Round 17 :
(4 sc, 1 dec) x 6 (30)
Round 18 :
(3 sc, 1 dec) x 6 (24)
Round 19 :
(2 sc, 1 dec) x 6 (18)
Info :
Lightly shape the chin area with a little extra stuffing, keeping the muzzle area fuller. If adding a sewn-on nose, leave the center front slightly more pronounced and avoid overstuffing the very bottom so you can sew the nose piece flat and secure.
Round 20 :
(1 sc, 1 dec) x 6 (12)
Round 21-25 :
1 sc in each st (12) — work even to form short neck tube for attaching to hanging cord or braid
Info :
Finish stuffing the head so it is firm but slightly yielding. Leave a long tail for sewing. If you plan to insert a small hanging loop or core (like cord or coiled wire) sew it into the neck tube now before closing: tuck the cord into the 12-st tube and secure with a few stitches through the tube circumference.
Round 26 :
Dec around (6) — if closing fully for a small finished sphere; otherwise fasten off leaving long tail for sewing onto braid (12)
Info :
Fasten off leaving long tail if you will sew head to the spiral cord. If you prefer a perfectly closed head for hanging, continue decreasing to 6 and close the hole with a yarn needle. Secure thread inside head and weave in tail.
— Nose :
Round 1 :
6 sc in magic ring (6)
Round 3 :
(1 sc, 1 inc) x 6 (18)
Round 4 :
1 sc in each st (18)
Round 5 :
(1 sc, 1 dec) x 6 (12)
Round 6 :
Dec around to 6 and fasten off leaving long tail for sewing (6)
Info :
Sew the red nose centered at the bottom front of the head using the long tail. Use small whipstitches around the base to keep the nose tight and pronounced. Add a bit of stuffing to the nose before sewing to keep it rounded.
— Inner Ear (Make 2) :
Round 1 :
6 sc in magic ring (6)
Round 3 :
(1 sc, 1 inc) x 6 (18)
Round 4 :
1 sc in each st (18)
Round 5 :
(1 sc, 1 dec) x 6 (12)
Round 6 :
1 sc in each st (12)
Info :
Fasten off and leave a tail for sewing. These inner ear pieces are worked in cream/off-white and will be sewn into the larger outer ear to create contrast. Slightly curve the inner piece when sewing to give the ear a natural fold.
— Outer Ear (Make 2) :
Round 1 :
6 sc in magic ring (6)
Round 3 :
(1 sc, 1 inc) x 6 (18)
Round 4 :
(2 sc, 1 inc) x 6 (24)
Round 5 :
1 sc in each st (24)
Round 6 :
FLO: 1 sc in each st (24) for a defined rim
Info :
Sew the cream inner ear to the outer ear with a few neat whipstitches around the bottom half, then attach the completed ear to the head between rounds 6-8 on each side. Angle ears slightly forward for a friendly look. Leave a long tail for sewing and stuff outer ear lightly if you prefer firmness.
— Antler (Make 2) :
Round 1 :
6 sc in magic ring (6)
Round 3 :
(1 sc, 1 inc) x 6 (18)
Round 4-6 :
1 sc in each st (18)
Info :
To create two prongs branching from the main antler, you will work short 'branch' tubes attached to a base. Leave a tail about 30cm long for sewing the branch into place at the top of the antler base.
Round 7 :
(4 sc, dec) x 3 (15)
Round 8 :
1 sc in each st (15)
Round 9 :
Start branch A: ch 6, join to make small loop or work in rounds along the chain to create a short tube: 4 sc in loop, 4 sc around (4)
Round 10 :
Slipstitch back to base and fasten off branch A; start branch B the same way on opposite side (4)
Round 11 :
Secure branches by stitching through the antler base and anchoring with the long tail left earlier. Shape branches upward and curve slightly. Fasten off and weave in ends.
Info :
Use darker brown yarn for antlers. For sturdier antlers that hold shape, insert a short length of floral wire into the base tube before closing and wrap with yarn to conceal. Bend to desired shape, fold wire ends back, and glue or stitch closed.
— Decorative Ball (Make many) :
Round 1 :
6 sc in magic ring (6)
Round 3 :
(1 sc, 1 inc) x 6 (18)
Round 4 :
(2 sc, 1 inc) x 6 (24)
Round 5-6 :
1 sc in each st (24)
Round 7 :
(2 sc, 1 dec) x 6 (18)
Round 8 :
(1 sc, 1 dec) x 6 (12)
Round 9 :
6 dec (6) — stuff lightly and close or fasten off leaving long tail for sewing (6)
Info :
Make balls in red, green, cream and brown using the same pattern. For slightly larger balls add an extra increase round (3 sc, 1 inc) x 6 to reach 30 sts and then work even a couple of rounds. Insert small wooden beads on the hanging cord between balls for spacing and visual warmth.
— Large Ornament Ball (Optional) :
Round 1 :
6 sc in magic ring (6)
Round 3 :
(1 sc, 1 inc) x 6 (18)
Round 4 :
(2 sc, 1 inc) x 6 (24)
Round 5 :
(3 sc, 1 inc) x 6 (30)
Round 6-9 :
1 sc in each st (30)
Round 10 :
(3 sc, 1 dec) x 6 (24)
Round 11 :
(2 sc, 1 dec) x 6 (18)
Round 12 :
(1 sc, 1 dec) x 6 (12)
Round 13 :
6 dec (6) — stuff and close (6)
Info :
Make a mix of small and large balls. Attach balls to hanging twine between wooden beads and space evenly along each strand. Use contrasting colors for festive impact.
— Snowflake Motif (Make several) :
Step 1 :
Ch 6, join with sl st to form ring
Step 2 :
Ch 3 (counts as dc), 2 dc in ring, ch 3, sl st in ring. Repeat 6 times to create 6 points (6 petal clusters)
Step 3 :
At each point: sl st to the ch-3 space, ch 3, 2 dc, ch 3, sl st. Finish and weave in ends
Info :
Work snowflakes in cream or white using 3.0mm hook for delicate detail. Block lightly by pinning to a flat surface and spraying with water or starch to keep shape. Attach to hanging cord at alternating heights.
— Spiral Cord: Cord A (Make 3) :
Round 1 :
6 sc in magic ring (6)
Round 3 :
(1 sc, 1 inc) x 6 (18)
Round 4-60 :
1 sc in each st (18) — work even to desired length (approx 130-160 cm before braiding); for a shorter mobile reduce rounds accordingly
Info :
Work Cord A, B and C the same way. Use a 3.5mm hook and beige/warm tan yarn. Keep cords consistent in length. If you prefer a thicker cord, increase to 24 sts by adding one more increase round: (2 sc, inc) x 6 to reach 24 and work even.
— Assembly of Spiral Rope :
Step 1 :
Make three long cords as above in all beige tones or mix light/dark tans for depth.
Step 2 :
Lay the three cords parallel and braid them tightly for the entire length, securing both ends with temporary clips or elastic bands
Step 3 :
Once braided, stitch along the braid length with matching yarn to hold it together and maintain spiral shape when suspended. Optionally insert a thin wire or rope core inside one of the cords before braiding to give structure.
Info :
To create the helical spiral shape seen in the image, loosely coil the braided rope around a cylindrical object (like a cardboard tube) and tack it at intervals with hidden stitches. Alternatively, hang the braid from a ceiling hook and twist gently while adding decorations so it naturally forms a spiral.
— Hanging Strands (Stringing ornaments) :
Step 1 :
Cut natural twine lengths for each hanging strand — variety of lengths between 10cm and 40cm to create tiers
Step 2 :
Thread a small wooden bead at the top of each strand, then add an ornament ball, a wooden spacer, a snowflake or reindeer head as desired. Knot securely above and below beads to maintain spacing
Info :
When stringing reindeer heads, pass the twine through the neck tube left from Round 21-25 and knot inside the head. Use extra stitches around the neck to anchor the thread so the head hangs straight. Hide knots inside the head where they won't be seen.
— Reindeer Decoration Assembly :
Step 1 :
Sew inner ears into outer ears then attach ears to head at rounds 6-8, spacing them 16-18 stitches apart depending on desired width
Step 2 :
Sew antlers to the top of the head slightly behind the ears. Use the tail left from the antler base to stitch through several neck rounds to anchor securely
Step 3 :
Embroider tiny eyebrow arches above eyes with two short slanted stitches, use dark brown yarn and a yarn needle for neat results
Info :
Carefully position facial features for a cute expression: eyes about 9-11 stitches apart on round 12, nose centered at the lower front. Pin features before sewing to check balance and symmetry.
— Final Decorative Elements (Leaves and Bow) :
Leaf (Make 3) :
Ch 8, sc in 2nd ch from hook, hdc, 2 dc, hdc, sc, sl st into starting ch, fasten off and weave in ends. Make three and stitch together to form a sprig.
Bow :
Ch 20, sc across, fasten off, gather center tightly with a contrasting yarn and trim ends to make bow loops. Sew a small wooden bead at center.
Info :
Sew bows and leaf sprigs near the top of the spiral and at intermittent points for a balanced look. They add a cottage/homemade aesthetic and hide any braid anchoring stitches.
— Finishing Touches :
Step 1 :
Clip and secure all yarn tails by weaving them into nearest stitches at least 3-4 cm. Trim flush after secure weaving
Step 2 :
Check each hanging strand for knots and slippage. Add a drop of fabric glue to secure important knots if desired, especially at top loop connections
Info :
Hang the spiral mobile and adjust spacing visually — you may need to move a few strands to make the overall composition balanced. The mobile looks best when spaced with about 10-15 cm between major clusters vertically.
This spiral reindeer mobile brings holiday magic to any hallway or corner — each tiny reindeer face and colorful ornament is a little hand-stitched smile. Sewing the braid, stringing the ornaments, and adding snowflakes becomes a meditative, joyful process that ends in a stunning hanging display. Hang it for season-long charm or gift it to someone who loves handcrafted decor. 🧶❤️🎄