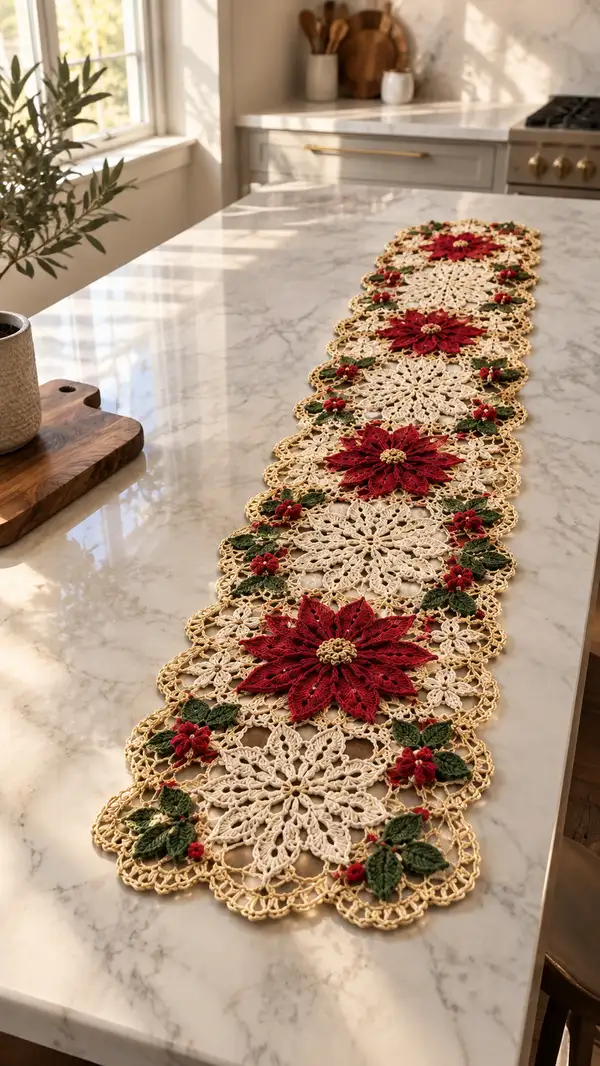
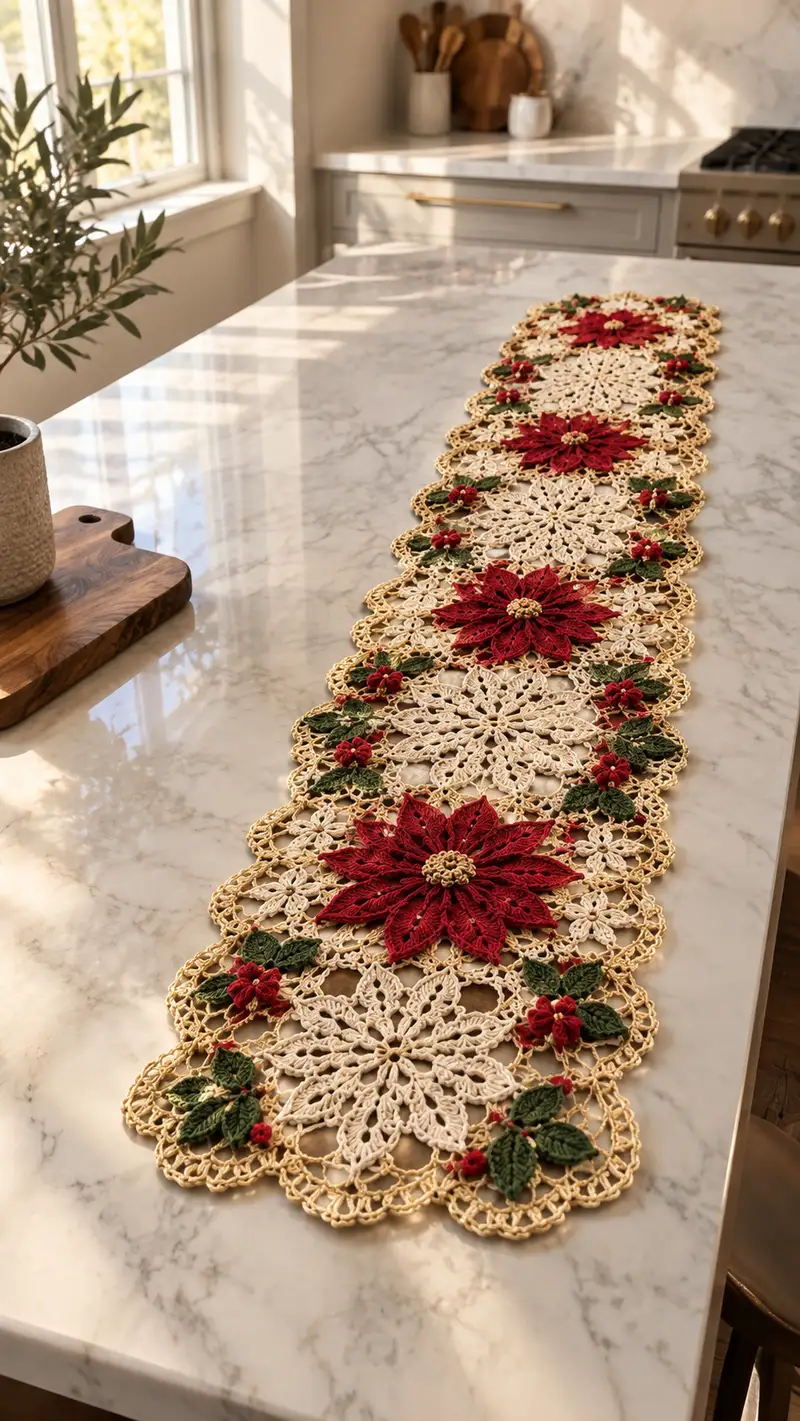
Create a beautiful holiday table runner composed of delicate cream snowflake medallions, layered red poinsettia motifs, deep green leaves and tiny red berry accents, edged with a metallic-gold scalloped border. This modular design is made from crochet thread for a refined, lace look and can be lengthened by adding extra motif repeats. The finished runner lays flat and blooms with texture and seasonal charm—perfect for a dining table or buffet centerpiece.
Progress Tracker
0% Complete
— Pattern Overview :
Info :
This runner is modular: build individual motifs (Snowflake Medallion, Poinsettia Flower, Small 3D Flower, Leaf and Berry clusters), then join them into a strip and finish with a gold scalloped border. The sample runner pictured uses five large cream medallions alternating with four large layered poinsettias (poinsettias are worked separately and attached to the medallions), with leaf clusters and small flowers joining edges. Adjust motif counts to customize length.
Info :
Use size 10 crochet thread with a 1.5mm hook to match gauge. Work tightly and evenly; lace requires consistent tension to block flat. Block each motif to exact shape before joining for best results.
— Snowflake Medallion (Make 5–7 depending on length) :
Round 1 :
Make a mr, ch1, 12 sc in ring, pull tight and join with sl st to first sc (12)
Round 2 :
Ch3 (counts as dc), dc in same st, *ch3, 2 dc in next st; rep from * around, join with sl st to top of ch3 (12 groups, 24 dc, 12 ch3 sps)
Round 3 :
Sl st into first ch3 sp, ch1, sc in same sp, *ch5, sc in next ch3 sp; rep from * around (12 sc, 12 ch5 sps). Join with sl st to first sc (total 12 points forming chain loops)
Round 4 :
Sl st into first ch5 sp, ch1, (sc, hdc, 3 dc, hdc, sc) all into same ch5 sp to form a pointed petal; *sl st into next ch5 sp, (sc, hdc, 3 dc, hdc, sc) in same sp; rep around (12 petals). Join with sl st to first sc (12 petals)
Info :
Ensure petals are fanned outward evenly. Use stitch marker at the beginning of round if needed. Gently pull on chains to even tension around petal bases.
Round 5 :
Sl st to the center of first petal, ch4 (counts as tr), tr into petal center, ch2, *2 tr into next petal center, ch2; rep around (12 petals, ch2 sps between petals). Join with sl st to top of ch4.
Round 6 :
Ch1, sc in same st, *ch7, sc in the gap between petal bases (in space between petals where ch3 from round3 sits); rep around (12 sc, 12 ch7 sps). Join with sl st to first sc.
Round 7 :
Work shell into each ch7 sp: (2 dc, ch3, 2 dc) into each ch7 sp, sl st into next sc; rep around (12 shells). This creates a scalloped outer ring.
Round 8 :
Ch1, sc in same st, *ch9, sc into center of shell (ch3 of shell); rep around (12 sc, 12 ch9 sps). Join.
Info :
At this stage the medallion measures approximately 16–18 cm across before blocking with 1.5mm hook and size 10 thread. Adjust by changing hook +/- one size for tighter or looser lace.
Round 9 :
Sl st into first ch9 sp, ch1, (sc, hdc, 5 dc, hdc, sc) into ch9 sp to make elongated petal shell; *sl st to next ch9 sp, repeat across (12 elongated petals). Join with sl st to first sc (12 petals)
Round 10 :
Ch3, dc in same st, *ch5, (dc, ch1, dc) into top of next elongated petal, ch5; rep around to form delicate arches; join (24 dc distributed, 12 arches)
Round 11 :
Ch1, sc into first arch center, *ch11, sc into next arch center; rep around (12 sc, 12 ch11 sps). Join
Info :
Use light blocking steam or damp spray; pin each petal and arch flat to keep shape. Blocking here helps medallions align when joining with poinsettias and border.
Round 12 :
Sl st into ch11 sp, ch1, (sc, hdc, 7 dc, hdc, sc) into ch11 sp to create outer lace petals; rep around (12 petals). Join.
Round 13 :
Ch2 (counts as hdc), hdc in same st, *ch7, 2 hdc into top of next lace petal; rep around creating hdc arches (24 hdc total with 12 ch7 sps). Join.
Round 14 :
In each ch7 sp, work (sc, ch3, sc) to form tiny picot arches; sl st into next st between petals; rep around (12 picot arches). Join.
Round 15 :
Ch1, sc in same st, *ch5, sc between the two petals (in space between petals); rep around creating delicate chain loops to anchor future join points (12 sc, 12 ch5). Join.
Info :
Leave a 20–25 cm tail for joining if you plan to use whip stitch for joining multiple medallions; alternatively, fasten off and weave in ends later. Blocking now will produce consistent dimension for joining.
Round 16 :
Sl st into next ch5 sp, ch1, (sc, 3 dc, sc) into ch5 sp to elevate outer edge; *sl st to next ch5 sp, repeat (12 raised shells). Join.
Round 17 :
Ch1, sc in same st, *ch3, picot, ch3, sc into next raised shell center to create a decorative lace ring (12 sc, 12 picots). Join.
Round 18 :
Working into the spaces created in round 17, *(ch5, sl st in second ch from hook to create a small loop), rep around to add delicate loops which will later be used for attaching leaves and small flowers (12 loops). Join.
Round 19 :
Ch1, sc all around the outer edge placing 2 sc in larger gaps and 1 sc in tighter spots to even out the circumference. After completing this round you should have roughly 72–80 sc depending on spacing; this evens outer edge before border join. Join.
Round 20 :
Fasten off leaving long tail for joining motifs. Weave ends inside and clip close after joining. Block flat to set final size and shape.
— Poinsettia Flower (Large Layered - Make 4 and optionally small for centers) :
Info :
Each poinsettia is made in layers: a small center disk (gold), a first layer of 8 small red petals, and a second layer of 8 larger red petals worked around. Petals are worked as shaped shells using chains and tall stitches (dc/tr/dtr) and finished with a faux-seed center made of gold thread and a tight cluster of slip-stitch bobbles. Poinsettia is worked flat and attached after both layers and center are complete.
Round 1 :
With gold thread, make mr, ch1, 6 sc in ring, join with sl st (6)
Round 2 :
Ch2, 2 hdc in each st around (12). Join.
Round 3 :
Ch1, sc in same st, *ch3, sc in next st; rep around to create loops for petal anchors (12 sc, 6 ch3 sps). Join. Fasten off gold and switch to red for petals.
Info : Change to red yarn. Work petals with slightly larger hook (1.5mm) if desired for a bit of lift.
Round 4 :
Join red into any ch3 sp, ch1, (sc, hdc, 3 dc, hdc, sc) all in same ch3 sp to make first small petal; *sl st to next ch3 sp, repeat around for 6 small petals (6 petals). Join
Round 5 :
Ch1, sc in petal center, *ch5, sc at base where next petal meets join point; rep around (6 sc, 6 ch5). Join.
Round 6 :
Work (2 dc, ch3, 2 dc) into each ch5 sp to make shell; join (6 shells). This first layer creates a small star.
Round 7 :
Fasten off and make a new round of larger petals anchored between the small petals: join red into a space between two small petals, ch1, (sc, hdc, 5 dc, hdc, sc) into that space; *rep into each space between small petals around to create 6 larger petals. Join (6 larger petals)
Info :
For a fuller look, make the poinsettia with 8 petals rather than 6 by starting with 8 sc in the center and adjusting anchors accordingly. The sample uses an 8-petal layout; math below uses 8 petals for final counts. If you started with 6, simply adapt repeats to 6 where noted.
Round 8 :
If making 8-petal flower: Remake center disk as mr, ch1, 8 sc in ring (8). For consistency we will assume 8 petals for subsequent counts. Join red and work Round 4 style into 8 ch3 sps producing 8 small petals. Then make 8 larger petals as described (8 larger petals). Each larger petal = (sc, hdc, 7 dc, hdc, sc) into anchor space.
Round 9 :
Ch1, sc around entire petal ring placing 2 sc at the deeper gaps so the round has consistent count. Target stitch total ≈ 72 sc (if 8 petals, aim for 72 sc), adjust by adding or omitting extra sc in wider gaps.
Round 10 :
Working behind the first petal layer, prepare second petal layer by ch6 loops: *ch6, sl st to back base between petals; rep 8 times to create 8 loop anchors around back. Join.
Round 11 :
Into each ch6 loop, work petal: sl st into loop, ch1, (sc, hdc, 9 dc, hdc, sc) into loop to create large bold petal. Repeat for each loop (8 large petals). Join.
Round 12 :
Ch1, sc around petal bases placing 2 sc in the very wide gaps; total sc should be approximately 96 depending on petal fullness. Join.
Info :
Splay large petals outward and pin on blocking mat to form the star look. Use steam or wet blocking to shape petals with slight curl to the tips. Blocking helps the layered petals sit beautifully on the flat medallion beneath.
Round 13 :
With gold thread, embroider/attach a small cluster in the center: join gold into center hole, ch1, 12 sc around inner center to make a slightly raised disc (12). Finish off leaving a tail to sew to medallion center.
Round 14 :
Create small surface texture on petals: Using red thread and a spare hook, work a surface slip-stitch line along the center of each large petal from base to tip to give vein detail. Fasten off and weave ends beneath petals.
Round 15 :
Optional: For extra dimension, add a second round of tiny petal ridges on top of large petals: pick up red yarn at petal mid, ch3 and work (sl st, ch3) in spaced intervals to form raised ridges. Secure and weave ends. Fasten off and leave sewing tail for attaching to medallion.
Info :
When attaching poinsettia to medallion, place it centered over the medallion so petals are evenly distributed and the gold center sits at medallion heart. Use whip stitch from underside to avoid visible stitching on top of petals.
— Leaf (Make 16–24 clusters) :
Round 1 :
With green, ch10, sc in 2nd ch from hook, hdc in next, dc in next 2, tr in next 2, dc in next, hdc in next, sc in last and then work along opposite side of chain to mirror: hdc, dc, tr, dc, hdc, sc into final ch; sl st to join at base to form a symmetrical leaf (approx 18 sts total around). Fasten off leaving long tail for sewing.
Round 2 :
Rejoin at leaf center base and work surface ridge: ch1, sc along midline from base to tip placing 1 sc into each top stitch to create midrib. Fasten off. (This adds texture and slight curl.)
Round 3 :
Info : To make a fuller leaf cluster, make two leaves and overlap slightly when sewing on medallion edge. Block leaves lightly to shape curves and veins.
Round 4 :
Optional: For veined detail, use darker green embroidery thread and stitch thin veins radiating from midrib to edges. Weave ends beneath leaf.
— Small 3D Flower / Berry Cluster (Make multiple for corners and joins) :
Round 1 :
With red thread, make mr, ch1, 6 sc in ring, join (6)
Round 2 :
Ch2, 2 hdc in each st around (12). Join.
Round 3 :
Ch1, *make puff stitch: yo, insert in st, pull up loop 4 times, yo and pull through all loops, ch1 to close puff; sl st into next st; rep around to form 6 puff petals. Fasten off leaving tail for sewing (6 puff petals)
Round 4 :
For tiny berries: with coral/red, make a little bobble: ch2, 5 sc into 2nd ch from hook, join and pull tight to make tiny sphere. Sew these in clusters of 3 near leaf bases.
Info :
Vary berry size by changing number of sc in bobble (4–6 sc). Sew clusters with short tails so they sit slightly raised and appear natural between leaves and small flowers.
— Joining Motifs into Runner Strip :
Info :
Block all motifs to flat shape and exact dimensions before joining. Layout motifs on blocking mat in desired order (sample uses [Medallion - Poinsettia - Medallion - Poinsettia - Medallion - Poinsettia - Medallion], adjust for your table). Pin motifs so outer chain loops align. Use a fine needle and matching thread or sl st joins to attach motifs through outer loops created in Round 18 of the medallion.
Join Step 1 :
With cream thread, position two medallions edges touching. Using long tail from medallion round 20, whip stitch through the outer chain loops (or sl st join with thread) matching loop-to-loop. For an invisible seam, use ladder stitch through both motifs' outer spaces. Join motifs flush without pulling tight; maintain slight tension to keep lace flat.
Join Step 2 :
Attach poinsettia to medallion: center poinsettia over medallion. From underside of medallion and poinsettia, use gold center tail and whip stitch through central rounds (rounds 12–13 of poinsettia and round 1–3 of medallion) to secure. Sew a ring of small stitches around center then weave tail across petals underside. Avoid visible top stitches.
Join Step 3 :
Sew leaf clusters into the outer ch5 loops of medallion where decorative loops were reserved in round 18. Use two leaves per cluster and add a 3D puff flower and 2–3 tiny berries beside them as pictured. Space clusters evenly around the medallion edges to match photo placement (clusters typically sit between scalloped shells).
Info :
Use pins to hold leaves and flowers on the medallion while sewing. Check the runner layout for symmetry before permanently sewing. If you prefer a more open lace, join motifs with sl st only at 4–6 points per join instead of full seam.
— Decorative Gold Scalloped Border (Final Edge) :
Info :
After all motifs are joined into a long strip, work the gold scalloped border to unify and finish edges. The border works into the outermost stitches and loops around the entire runner; work slowly and pin each scallop before committing to picots for best regularity.
Round 1 :
With gold thread and working along entire runner edge, join with sl st at a discreet point, ch1, sc evenly around outermost edge placing 1 sc in narrow points and 2 sc in wider gaps. Maintain stitch count divisible by scallop repeat — aim for a total divisible by 6 for even scallops. Join with sl st.
Round 2 :
Ch5, *(5 dc, ch3, 5 dc) into next wide gap to form a large shell; sl st into center between shells or into a base sc as guide; rep around creating scalloped shells across the entire outside edge. Join with sl st.
Round 3 :
Ch1, sc into center of each gold shell, *ch5, picot, ch5, sl st into next center to create decorative picot points between shells; rep around. Join.
Info :
For a pronounced metallic shine, avoid excessive steam on metallic threads — gentle damp blocking recommended. The gold scallop should float slightly above the cream medallion edges giving a framed look.
Round 4 :
Work a final refining round: into each picot arch, (sc, ch3, sc) to form small loops; into each shell tip add a small picot (ch3, sl st in first ch) to sharpen points. Fasten off and weave ends into backing of lace.
Round 5 :
Optional reinforcement: Using cream thread and small whip stitches, secure the inner border of gold scallops to medallion shells at 4 points per shell if scallops feel floppy. Weave in ends and trim.
— Finishing and Blocking :
Info :
After all joins and final border completed, wash runner gently in lukewarm soapy water or hand-spray with water. Lay flat on blocking mat, pin each scallop and petal to exact positions, and leave to dry completely. Use rust-proof pins and measure spacing to ensure a straight runner edge.
Final Touch :
Trim stray threads and use a tiny bit of craft glue on knot ends if desired for extra security (test glue on scrap thread first). Store flat or rolled to avoid bending petal tips.
Info :
To customize length, make additional medallions and poinsettias and join as shown. For a runner twice as long, simply double motif repeats. Keep consistent motif orientation for best visual flow of poinsettia centers and leaf clusters.
This festive runner combines delicate crochet lace with bold seasonal color to make an heirloom-worthy centerpiece. Each motif is a small act of patience and attention — the layered poinsettias, tiny berries and gold scallop border come together to create a piece that looks spectacular on any holiday table. Whether you make one for yourself or gift to someone special, this runner brings warmth, texture and handmade charm to the home. Enjoy every stitch, and happy crocheting! 🎄✨