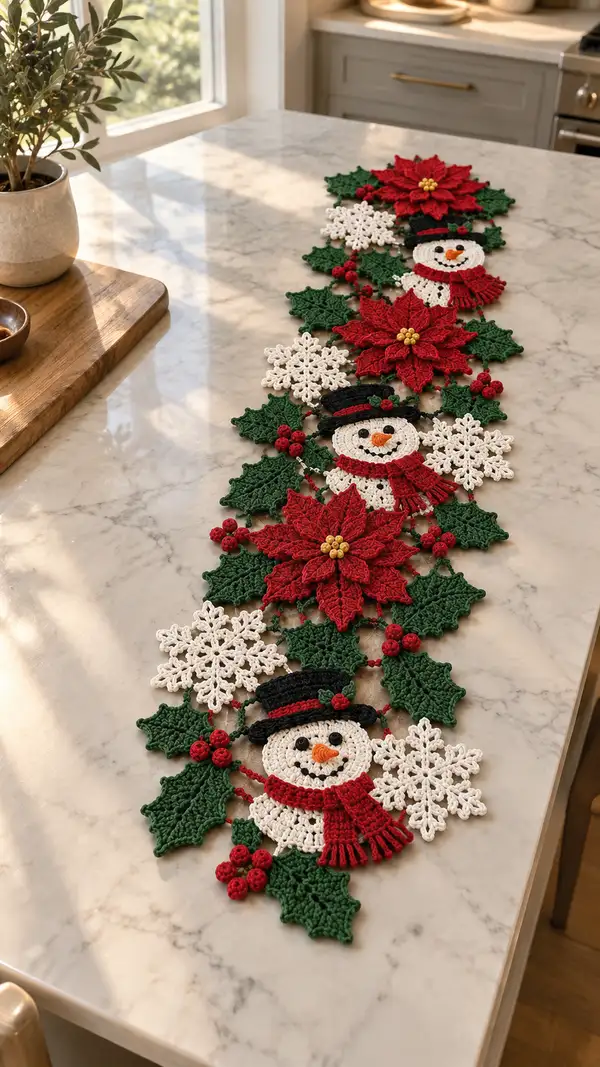
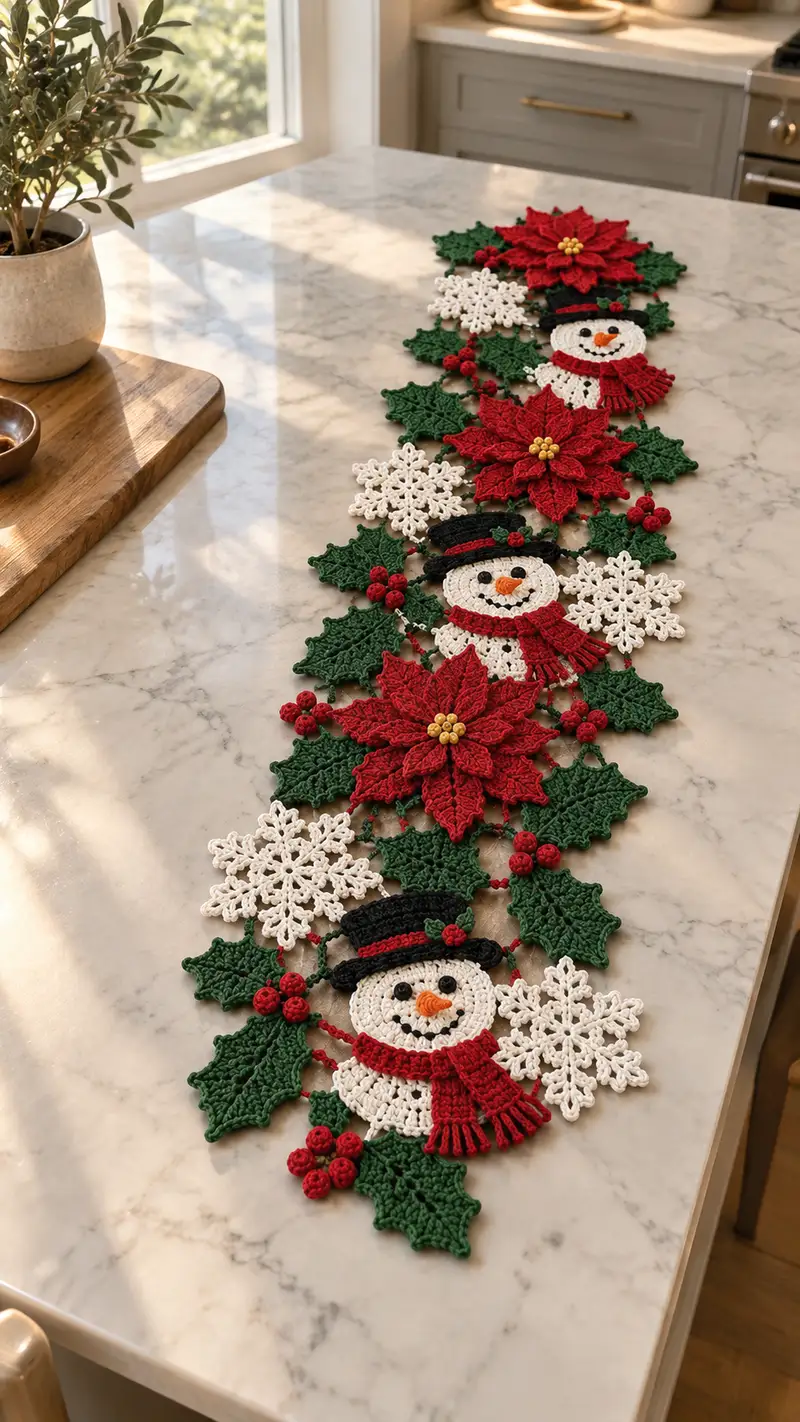
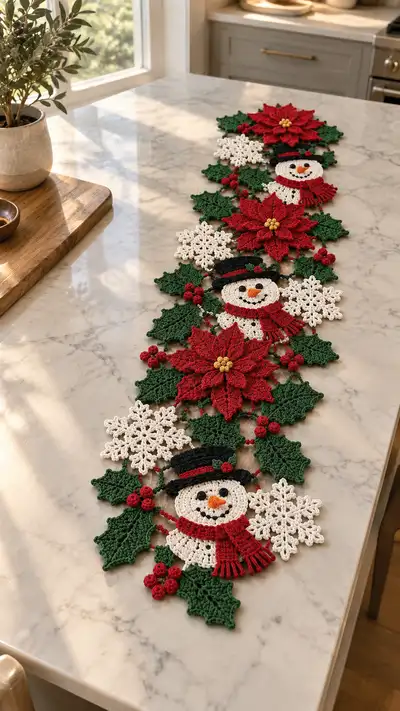
Create a stunning holiday table runner made from joined crochet motifs: layered poinsettias, delicate snowflakes, jolly snowmen, holly leaves and berry clusters. This pattern walks you through each motif, color changes, and the connecting chains to assemble a long runner perfect for mantle or table. The finished runner features rich reds, deep greens, crisp white, and small golden seed beads to finish the poinsettia centers.
Progress Tracker
0% Complete
— Overview & Notes :
Info :
This runner is modular: you will make 3 poinsettias, 3 snowmen units (head+hat+scarf), 5 snowflakes, multiple holly leaves and small berry clusters, and join them with decorative chains and small joining picot loops. The sample measures approximately 36-40 inches long and about 8-10 inches wide at the widest poinsettia sections using worsted weight cotton yarn and a 3.5mm hook. Adjust number of motifs to lengthen or shorten the runner.
Info :
Work tightly, especially for small pieces like berry clusters and hat brims. Use stitch markers at the beginning of each round. Block each motif flat after finishing and before assembly to get crisp edges. I recommend cotton or cotton-blend worsted yarn for good stitch definition and a flatter finish on a table.
— Poinsettia Motif (Make 3) :
Info :
Each poinsettia has a small center seed bead cluster, a layered inner petal set and an outer petal set. Work in red for petals and add small gold seed beads at the center. This pattern uses 8 petals for both inner and outer layers.
Round 1 :
With red, mr, 8 sc into ring. Pull tight (8)
Round 3 :
(1 sc, inc) x8 (24)
Round 4 :
1 sc in each st (24)
Round 5 :
Switch to ch-loop foundation for petals: *(ch 8, sl st into next st) repeat 8 times to create 8 loops around the circle*
Info :
Make sure loops are evenly spaced; if you have 24 sts then placing a sl st in every 3rd stitch creates 8 loops. Keep tension even so all loops sit the same size.
Round 6 :
Working on first loop: sl st into loop base, ch2 (counts as hdc), (hdc, dc, tr, dc, hdc) across loop, sl st to base to finish petal. Rep across each of 8 loops for inner petal layer (8 petals)
Round 7 :
1 sc in top of each petal base around to form a neat ring for outer petals connection (8)
Round 8 :
Ch 10 into each petal base to form larger loops for outer petals: *(ch 10, sl st in next sc) x8
Round 9 :
For outer petal: sl st into loop base, ch2, (hdc, dc, dc, tr, tr, dc, dc, hdc) across loop, sl st to base. Rep for 8 petals to form bold outer petals.
Round 10 :
1 sc evenly around the bases of outer petals (16) - this count refers to petal bases; use even spacing to maintain shape
Info :
Optional: to create a more 3D petal effect, work the outer petal rounds in BLO on the previous round so petals stand up. If using beads, sew six gold seed beads together as a small cluster and sew securely at center.
Round 11 :
Surface texture row (optional): *In BLO, 1 sc in each st around the petal base to create a defined ridge* (16)
Round 12 :
Fasten off leaving 12-16" tail for sewing center. Sew gold beads in center or embroider small french knots with yellow thread for seed centers. Weave ends and block flat.
Info :
Repeat to make 3 full poinsettia motifs for the sample runner. If you prefer deeper petals, add one more treble row to the outer petal instructions to increase petal height.
— Snowflake Motif (Make 5) :
Info :
Snowflakes are lacy motifs worked in white. Each snowflake has 6 points. Work with a slightly smaller hook (3.25mm) if you want a crisper lace edge.
Round 1 :
mr, ch3 (counts as first dc), 11 dc into ring, sl st to top of ch3 to close (12) (forms 6 points later)
Round 2 :
*(ch4, sl st into next dc) repeat around creating 12 chain loops for points (12 chains)
Round 3 :
Work each ch4 loop: sl st into loop, ch3 (counts as dc), 2 dc, ch2, 3 dc, sl st to base. Repeat across all 12 loops to form double-pointed look (12 small motifs)
Round 4 :
Join every other small motif to create 6 main points: *sl st to base of first small motif, ch6, sl st to base of next small motif across center* repeat around forming 6 long loops
Round 5 :
In each ch6 loop: sl st, ch2, (dc, tr, dc), picot (ch3 sl st in 3rd ch), (dc, tr, dc), sl st to base. Repeat for all 6 loops to form 6 lacy snowflake points.
Round 6 :
1 sc evenly in and around center ring to tidy (12)
Info :
Block snowflakes pinning each point out to its full span and allow to dry. Use starch spray lightly if you want rigid snowflakes for table display.
Round 7 :
Fasten off leaving long tail for sewing. If desired, add a tiny bead at each point tip by sliding a bead onto the working tail and securing with a few stitches.
— Snowman Face Disc (Make 3 for runners) :
Info :
Snowman face is worked in white flat rounds to form a lacy disc that becomes the head + upper body. We will make a slightly textured disc with a decorative scalloped edge to show scarf and hat attachments.
Round 1 :
mr, 6 sc in ring (6)
Round 3 :
(1 sc, inc) x6 (18)
Round 4 :
(2 sc, inc) x6 (24)
Round 5 :
1 sc in each st (24)
Info :
Place safety eyes or sew on black buttons between Rounds 3-4 spaced about 6-7 sts apart. Mark placement with removable stitch markers. If using felt or embroidered eyes, wait until after assembly to add eyebrows/mouth.
Round 6 :
*(ch4, sl st in next st) around to create 12 ch loops for a lacy texture (12 loops)
Round 7 :
Work into each ch4 loop: sl st to loop, ch3, 2 dc, ch2, 2 dc, ch3, sl st to base. Repeat for all 12 loops to enlarge disc
Round 8 :
1 sc evenly around all stitches to tidy up edge (24)
Round 9 :
Scalloped edge: *(sl st, ch3, 3 dc, ch3, sl st) in every other st around to create decorative scallops. Aim for 12 scallops
Round 10 :
Fasten off leaving long tail for sewing hat and scarf to edges. Embroider a smiling mouth using black #8 embroidery thread with small backstitches. Sew an orange crocheted carrot nose onto center - see nose section.
Info :
To make the carrot nose: With orange, mr, 6 sc in ring, Rnd2: (1 sc, inc)x2 =8; Rnd3: 1 sc in each st (8). Fasten off leaving tail and sew to face projecting outward. Slightly stuff the nose with a tiny bit of fiberfill if you want a raised effect.
— Snowman Hat (Make 3) :
Info :
Hat is worked in black with a thin red band accent. Hat has a top cylinder and a brim worked in rounds. Work tightly.
Round 1 :
With black, mr, 6 sc in ring (6)
Round 3 :
(1 sc, inc)x6 (18)
Round 4-6 :
1 sc in each st (18) (work 3 rounds to create hat height)
Round 7 :
Change to red (Info before round): Info : Change to red yarn. Work 1 round in red to create hat band: 1 sc in each st (18)
Round 8 :
Switch back to black. Brim round: *ch2, then working in FLO of next stitch 1 hdc across 18 sts to flare brim slightly* (18)
Round 9 :
Work 36 sc around brim by placing 2 sc in each brim st to form flat rim (36)
Round 10 :
Fasten off leaving long tail for sewing. Optionally add small green holly leaf (work leaf motif, see holly leaf) and a tiny red bead on side of hat.
Info :
Block hat lightly to flatten brim and keep crown cylindrical. Sew hat onto snowman disc so brim sits over scalloped edge; position slightly to one side for a playful look.
— Snowman Scarf (Make 3) :
Info :
The scarf is a small strip worked in rows with fringe. The scarf is sewn onto the neck area (lower edge of face disc) so the scarf tails hang slightly.
Row 1 :
With red, ch 22, sc in 2nd ch from hook and across (21)
Row 2-6 :
Turn, ch1, sc in each st across (21) (work 5 rows for a short thick scarf)
Info :
For textured fringe, use BLO on the final row: ch1, 1 sc in each st BLO to create a defined top edge that makes a neat fold over the snowman disc. Add fringe by cutting 12 strands of yarn 3.5" long and knotting them evenly across one short edge.
Row 7 :
Fasten off leaving long tail for sewing. Fold scarf and position around lower edge of snowman disc and sew in place with invisible stitches. Add fringe to both ends by knotting and trimming evenly.
— Holly Leaf (Make 12) :
Info :
Holly leaves are worked flat with pointed serrated edges. Make 12 to intersperse between poinsettias and snowmen. Work in green.
Round 1 :
With green, ch8, sc in 2nd ch from hook and across to create small base (7 sc)
Round 2 :
Ch1, turn, (2 sc in first st, 1 sc in next 3 sts, 2 sc in last st) (9)
Round 3 :
Work along one long side to create point serrations: *ch3, sl st into next st, ch3, sl st into next st* across to make 4 small picot-like points, then work back along other side mirroring the same stitches to create symmetrical leaf. At the end, join with sl st and sc across base to make neat finish.
Round 4 :
1 sc around entire leaf edge placing (sc, ch2, sc) at each serration point to accent points. Fasten off leaving tail for sewing.
Info :
For a more defined leaf, work Round 4 in BLO on Round 2 to create a raised central vein. Block leaves to hold point shape. Make more leaves if you want fuller runner edges.
— Holly Berry Cluster (Make 15 clusters) :
Info :
Each cluster is 3 small crocheted balls sewn together. Work balls tightly and leave long tails for sewing into clusters.
Ball Round 1 :
With red, mr, 6 sc in ring (6)
Ball Round 2 :
Inc around (12)
Ball Round 3 :
1 sc in each st (12)
Ball Round 4 :
(1 sc, dec) x4 (8)
Ball Round 5 :
4 dec (4) - finish shaping, stuff very lightly if desired
Ball Round 6 :
Fasten off leaving long tail. Make 3 balls and sew them together into clusters of 3. Make 15 clusters for the sample runner.
Info :
Alternatively, for a flatter berry look, substitute 3 tiny puff stitches onto a single join point rather than making full balls. Use light stuffing if you need a slight dome.
— Connecting Chains & Joining Motifs :
Info :
Motifs are joined with short chains and picot loops to create open lacy connections. Maintain consistent tension on chains so the runner lays flat. Attach chains to specified anchor locations on each motif (described below).
Connector Chain Unit :
Ch10, sl st to anchor point on motif A, ch6, sl st to anchor point on motif B. Repeat between every pair of motifs around edges until full runner is assembled. Secure ends with a small knot hidden behind motif and weave tail through a few stitches.
Info :
For a neater look, use BLO or work the chain into small sc loops placed specifically at the seam locations (for example, every other scallop of the snowman disc, or between base petals of poinsettia). Mark joining points with pins before sewing digitally joining with yarn needle.
Connector Round 1 :
Make decorative picot loops at edges: *sc into edge stitch, ch3, sl st into top of ch3 to form picot, skip 1 st, sc in next st* repeat along intended joining edge to create a line of picots to sew chain to (use matching color of the motif edge)
Connector Round 2 :
For stronger joins, whip stitch chain ends to both motif picots using doubled thread and secure with small backstitch through motif foundation. Hide knots and tails inside motif edges behind petals or scallops.
Info :
Plan your layout before sewing. I placed (from one narrow end) leaf-snowflake-poinsettia-snowman-poinsettia-snowflake-poinsettia-snowman-snowflake-leaf across the sample runner; you can mirror or change sequence to taste.
— Assembly Layout & Step-by-Step Joining :
Info :
Block all motifs flat and lay them on a table in final layout. Pin pieces in place. Work from one end to the other joining adjacent motifs as you go so the motif edge does not shift.
Joining Step 1 :
Sew poinsettia to neighboring holly leaves by aligning inner petal base to leaf tip and stitch with mattress/whip stitch using long tail from poinsettia. Create 3-4 secure stitches per contact point so petals do not lift out of position.
Joining Step 2 :
Join each snowflake to leaves and poinsettia with 3 connector chains (ch10,ch6,ch8 style) anchored to picots or scalloped scallops. Keep chains taught but not tight; they should hold motifs together without puckering.
Joining Step 3 :
Sew snowman hat brim onto the scalloped top edge of the snowman disc aligning brim to cover 6-8 scallops depending on hat size. Sew scarf across lower scallops so it looks wrapped around the neck and tails lie over adjacent leaves.
Joining Step 4 :
Sew berry clusters into small gaps between leaves and petals using long tails. Secure clusters by passing needle through motif backs a couple times to anchor and prevent shifting. For added security, tack clusters with a tiny dot of fabric glue under each knot (optional).
Info :
Use small, even stitches and avoid visible long tail ends. Hide sewing tails inside the join and weave at least 2 inches inside motifs before trimming. Press lightly with steam to settle seams after assembly.
— Finishing Touches :
Info :
Sew gold seed beads at poinsettia centers. Embroider mouth, eyes, or button details for snowmen. Trim fringe on scarves evenly. Re-block runner gently after all pieces are joined to unify shape and lay flat.
Final Step :
Weave in all ends securely, trim close to work, and give the runner a final light steam block. Add felt pads under heavy areas if using on delicate surfaces.
Info :
Store folded flat or rolled with tissue to preserve shape. Hand-wash gently in cool water and re-block to dry to maintain shape and crisp edges of motifs.
Completing this festive table runner is a joyful process — each motif is a little celebration of seasonal textures and colors. The layered poinsettias add rich depth, the snowflakes bring airy elegance, and the smiling snowmen give a playful holiday touch. I love how the modular construction lets you scale the runner to fit any table. 🎄🧶 Lay it down, light some candles, and enjoy the handcrafted warmth it brings to your home! ✨