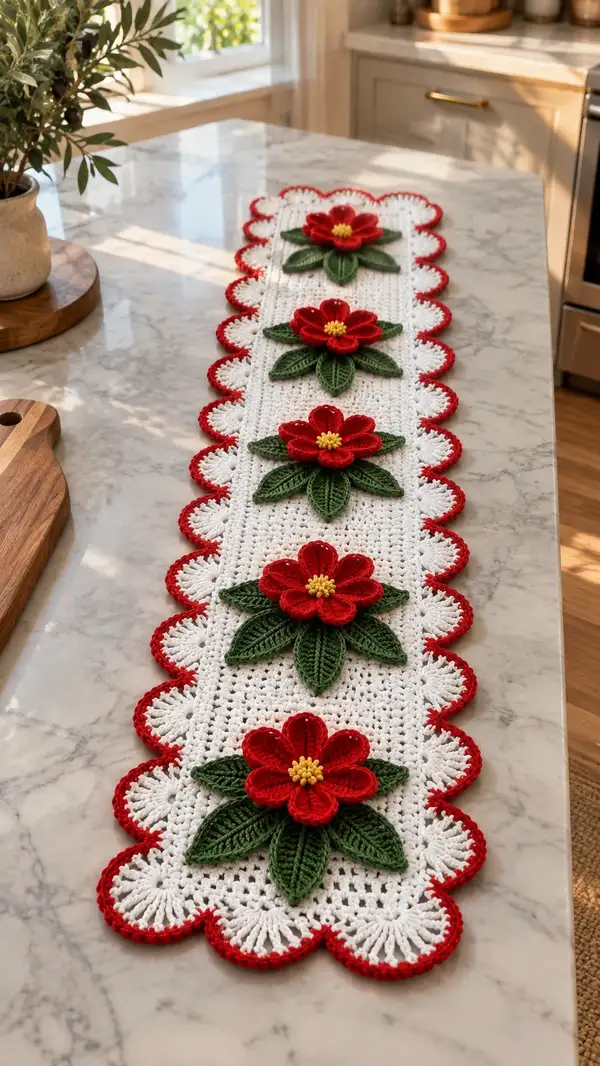
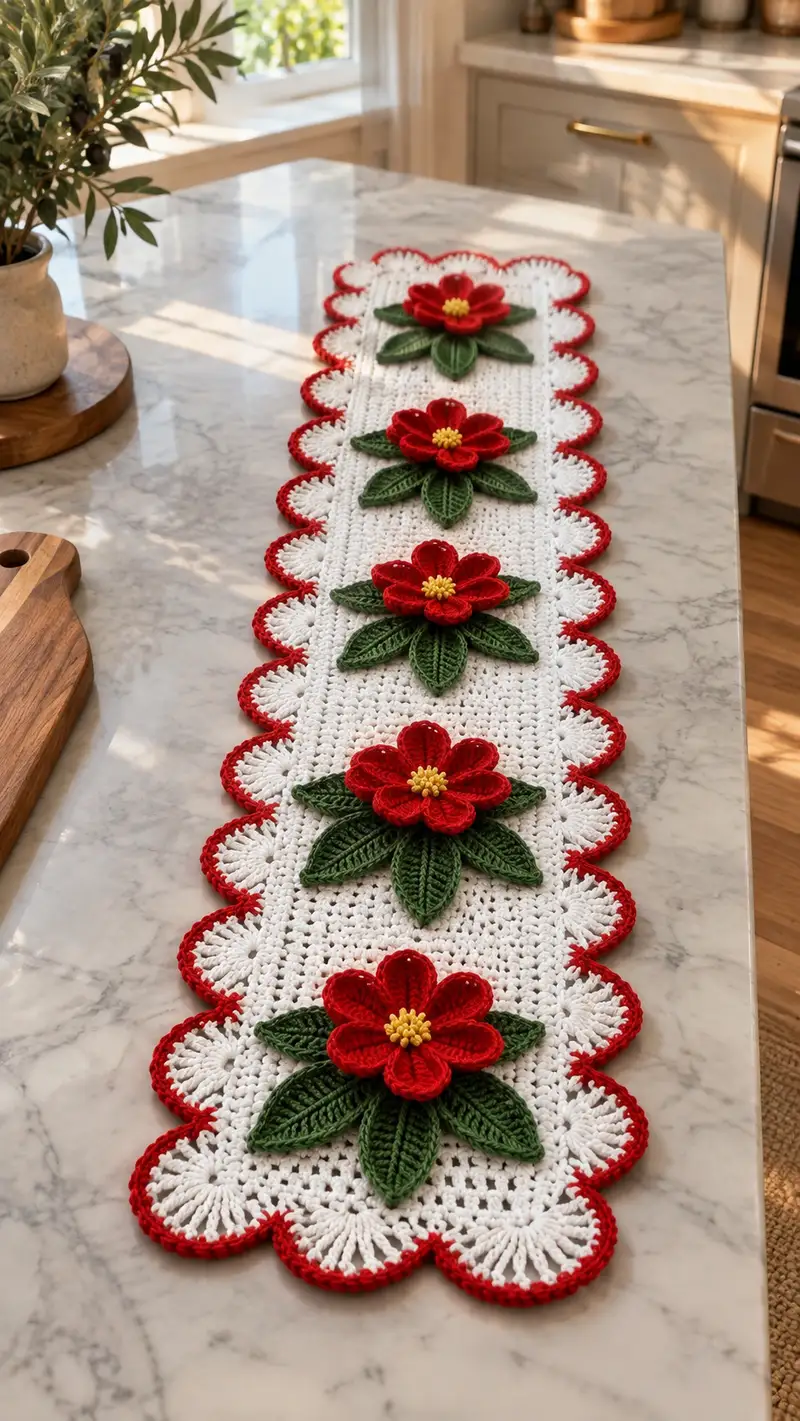
Create a beautiful holiday table runner featuring five layered poinsettia motifs set on a crisp white crocheted panel. Bold red scalloped edges frame the runner while deep green leaves and a bright yellow center complete each floral cluster. This pattern includes detailed step-by-step instructions for the base panel, scalloped edging, layered flowers, leaves, and assembly — perfect for gifting or holiday decor.
Progress Tracker
0% Complete
— Notes & Gauge :
Info :
Gauge: 12 dc x 10 rows = 4 inches in worsted weight yarn with 4.0mm hook. Gauge is not strict for decorative runner, but consistent tension will give best results for motif spacing and border fit.
Info :
Finished measurements (approx): Width 8.5" (21.5 cm). Length 38-40" (96-102 cm) including scalloped ends with five flower motifs evenly spaced along the length. Adjust foundation chain and number of rows to lengthen or shorten.
— Materials Recap :
Info :
White main color (MC), Red flower color (RC), Green leaf color (GC), Yellow center color (YC). Use worsted weight yarn (#4). 4.0mm hook recommended for body; 3.5mm hook optional for leaves and petals for better shaping.
— Base Panel (work flat in rows) :
Setup :
Foundation chain: Ch 126 using MC. This chain gives a working width of approximately 8.5" and space for five floral placement zones. If you prefer a narrower or wider runner, add or subtract multiples of 24 stitches to keep motif spacing proportional.
Round 1 :
With MC, ch 3 (counts as dc), dc in 4th ch from hook and in each ch across. Turn. (124 dc)
Round 2 :
Ch 2 (counts as hdc), hdc in each st across. Turn. (124 hdc)
Round 3 :
Ch 3, *sk 1 st, dc in next st; repeat from * across to last st, dc in last st. Turn. (124 dc)
Round 4 :
Ch 1, sc in each st across through back loop only (BLO) to create a subtle ridge. Turn. (124 sc)
Round 5 :
Ch 3, dc in next 3 sts, *ch 1, sk 1, dc in next 4 sts; rep from * across ending with dc in final 4 sts. Turn. (124 dc, with ch-1 mesh spaces)
Info :
The first 6 rows set the textured body. Keep even tension and use stitch markers at both ends to be sure row counts stay accurate for motif alignment.
Round 6 :
Ch 2, hdc in each st and ch-1 space across (work 1 hdc in each ch-1 space); turn. (124 hdc)
Round 7 :
Ch 3, dc in each st across. Turn. (124 dc)
Round 8 :
Ch 1, sc in BLO in each st across. Turn. (124 sc)
Round 9 :
Ch 3, *dc in next 2 sts, ch 1, sk 1; rep from * across to end, ending with dc in last 2 sts. Turn. (Approximately 124 dc and ch-1 spaces)
Round 10 :
Ch 2, hdc in each st and in each ch-1 space across. Turn. (124 hdc)
Info :
We will continue repeating a 6-row textured repeat to create a stable base for motif attachments. Maintain markers at the first and last stitch of each row to keep straight edges for the scalloped border later.
Round 11 :
Repeat Round 7 (Ch 3, dc in each st across). Turn. (124 dc)
Round 12 :
Repeat Round 8 (Ch 1, sc in BLO across). Turn. (124 sc)
Round 13 :
Repeat Round 9 (Ch 3, dc 2, ch1, sk1 repeat). Turn. (124)
Round 14 :
Repeat Round 10 (Ch2, hdc across including ch-1 spaces). Turn. (124)
Round 15 :
Ch 3, dc in each st across. Turn. (124)
Info :
At the end of Round 15, mark the stitch positions that will be centers for the five poinsettia motifs. To place evenly on 124 sts, mark the following stitch numbers counted from one edge: 13, 37, 61, 85, 109 (these are approximate centers allowing 24 stitches per motif zone). Use safety pins or removable stitch markers to note these points on the panel while continuing rows.
Round 16-36 :
Work 21 rows of the repeat pattern to create the central panel height before any motif attachment. Repeat Rounds 4-10 in sequence (BLO ridge row followed by mesh row pattern) until you have completed Row 36. Maintain stitch count (124) for each row.
Info :
Check your length now: you should have the panel long enough that the five marker positions are within the central area and there are about 6-8 rows of white panel above and below each motif center. Adjust by adding/subtracting repeats in this middle section if you want motifs closer together or further apart.
Round 37 :
Ch 3, dc across. Turn. (124)
Round 38 :
Ch 1, sc in BLO across for a neat surface. Turn. (124)
Round 39 :
Ch 3, dc in each st across. Turn. (124)
Round 40 :
Ch 1, sc across in BLO. Turn. (124)
Info :
We have created the central panel. Fasten off MC if you plan to work the scalloped white fans in a separate round; however, for continuity keep the MC attached and proceed directly to working the scallop foundation on the edges so the scallops sit flush to the panel.
— Scalloped Fan Edge (white fans built around the perimeter) :
Info :
We will create a white fan scallop worked along both long sides and the short ends. Fans are formed by shell clusters; spacing must be even. Measure and plan fan placements before crocheting: for 124 sts width, you will work a fan roughly every 6 stitches along long edges to make 20+ fans per side. Begin along one long side first, then work around ends and opposite side.
Round 41 :
With MC, ch 1 and work 1 sc into the side of the first row at the corner (turn to work along row edge). Sc evenly along the side edge placing approximately 20 sc evenly along the long side (counting side loops created by rows). When you reach the end, work 3 sc into the corner stitch and continue along the short end with sc evenly spaced to next corner. Continue around entire perimeter placing approximately equal sc spacing. Join with sl st to first sc. (sc around, stitch count varies by side)
Round 42 :
Ch 1, *skip 2 sc, in next sc work [1 sc, ch 2, 7 dc, ch 2, 1 sc] (this creates a fan shell), sk 2 sc; rep from * along side edges placing a fan at each repeat. At corners work an extended fan made of [1 sc, ch2, 9 dc, ch2, 1 sc]. Join with sl st to first sc. Fasten off MC. This yields scalloped white fans around the runner.
Info :
Count fans across each long side to ensure symmetry. Adjust by adding or removing a fan in a place where spacing can be shifted slightly. Fans should be large and deep, resembling small half-circles along each edge. Blocking at this stage helps the fans to sit flat.
— Red Outer Edging (contrasting outline) :
Info :
The red edging is worked as a small sc round around all fans and body edges to create a bright outline and finished look. Work the red edging after fans are blocked if desired.
Round 43 :
Join RC with a sl st to the outermost stitch at one fan tip. Ch 1, sc evenly around fans and along straight body edges working 2 sc in the top of each fan cluster to create a slightly raised ridge along each fan crest. Work 3 sc in each corner fan tip. Join with sl st to first sc. Fasten off and weave in ends. (stitch count will vary but should create a continuous sc round outlining the runner)
Info :
If you prefer a thicker red edge, work a second sc round in RC around the edge. The red outer line in the photo is a single contrasting line; one round is sufficient but two will appear bolder.
— Poinsettia Flower (Make 5 identical motifs) :
Info :
Each flower in the photo is a layered motif with two petal layers (outer large petals, inner smaller petals), sculpted leaf layer beneath, and a cluster of yellow center bobbles. Use the 3.5mm hook for the petals and leaves to achieve firm shaping. Work all parts separately and assemble by sewing to the base panel.
Round 1 :
With RC, ch 6, join with sl st to first ch to form ring. Ch 1. (Foundation ring with 6 chains)
Round 2 :
Ch 1, work 12 sc into ring; join with sl st to first sc. (12 sc)
Round 3 :
Ch 2 (counts as hdc), in same st work 2 hdc, *hdc in next st, 2 hdc in next st; rep from * around. Join. (18 hdc)
Round 4 :
Ch 1, sc in same st, *ch 3, sk 1, sc in next st; rep from * around. Join. You will have 9 ch-3 loops for making petals. (9 loops)
Info :
Outer layer will use 9 petal loops for a full look. If you prefer 8 or 6 petals, adjust the Round 4 loop count accordingly for symmetry. For this design we will work 9 outer petals and 9 inner petals offset slightly for fullness.
Round 5 (Outer Petals) :
Working in each ch-3 loop: [sl st into loop, ch 1, (sc, hdc, 3 dc, hdc, sc) in loop, sl st to join at base] — repeat in each loop around to form 9 large petals. Fasten off RC and weave ends. Petal counts: 9 large petals.
Round 6 (Inner Petal Layer Setup) :
With RC, re-join to the center of the motif at the front between petals. Ch 1, sc evenly between petals across the central ring to create 9 small anchor points. Join with sl st. (9 sc)
Round 7 (Inner Petals) :
Ch 2, in same st work [hdc, 3 dc, hdc] all into each sc anchor (create a smaller petal). Repeat around to create 9 inner petals. Fasten off and weave ends.
Info :
Shape petals by pinning them onto a block or flat surface and steam-block lightly if using acrylic-synthetic blends. Slight stuffing or a drop of fiber in the base of each petal helps petals keep a sculpted upright shape when sewn down.
Round 8 :
Optional: For a slightly cupped petal, attach RC at the base and work 1 sc around the base of each petal and then work 1 sc in the next petal base, pulling slightly as you fasten off to create cup curvature. Fasten off.
Info :
Make 5 of the above complete flower petal assemblies (outer + inner petals). Keep all petal edges neat by weaving ends inside the petal base where they will be invisible after assembly.
— Leaf (Make 6 leaves per flower; 30 leaves total) :
Round 1 :
With GC, ch 10. Row-turn to work along chain: sc in 2nd ch from hook, hdc in next, dc in next 2, tr in next 2, dc in next 2, hdc in next, sc in last. (Leaf foundation shaped on chain of 10)
Round 2 :
Work back along the opposite side of the foundation chain: sc in first, hdc in next, dc in next 2, tr in next 2, dc in next 2, hdc in next, sc in final. Join with sl st to first sc at base. (Even, symmetrical leaf)
Round 3 :
Ch 1, in each st around work 1 sc to tidy the edge. Sl st to join and fasten off. If desired, with contrasting darker green yarn use surface FPdc to embroider a central vein: work FPdc down the center line of the leaf, then BPdc to create subtle ribs. Fasten off and weave ends.
Info :
Leaves are sculpted by working with a slightly smaller hook and by pulling the ends when sewing to the base so that they sit slightly lifted. Make 6 leaves per flower: arrange as 3 pairs slightly offset under the flower for a full look.
— Flower Center (Make 5 centers) :
Round 1 :
With YC, ch 6, join to form ring. Ch 1, work 12 sc into ring. (12 sc)
Round 2 :
Ch 1, *[yo, push yarn through ring to front and draw up a loop 3 times to make a small bobble-like knot] or work a bobble stitch: (yo, insert, pull up loop) x 3 then complete bobble with sl st; rep bobble into each st around for a dense center cluster. You should have 12 small bobbles. Fasten off leaving tail for sewing.
Info :
For a neat center, you can also use a small cluster of French-knot-like surface embroidery with sewing yarn or seed beads; sew the yellow pieces into a dense circular cluster at the center of the flower. Ensure centers are small enough to sit snug inside the inner petal layer.
— Final Flower Assembly (per flower) :
Info :
Place petals, leaves, and center pinned onto the base panel before sewing. Use the marked stitch positions on the base panel to center each flower. Each flower will be sewn through the base panel and anchored with neat stitches so the flower sits firmly on the runner.
Step 1 :
Lay out one assembled flower (outer + inner petals) on your work surface. Position 6 leaves beneath in a radial arrangement forming a star; pin each leaf base to the underside of the motif to gauge placement. The leaves should slightly overlap and extend beyond the petals so they are visible.
Step 2 :
Sew inner petal layer to outer petal layer at the base using matching RC yarn and whip stitch around the inner ring to secure. Use small, neat stitches and pull slightly to cup petals if desired.
Step 3 :
Attach the yellow center to the middle of the inner petal layer using YC tail. Sew through the center of the bobble cluster into the petal base several times to anchor it firmly. Weave ends to the back.
Info :
Before sewing the assembled flower to the runner, pin it to the runner at the previously marked center stitch (13, 37, 61, 85, 109). Ensure vertical spacing feels even between flowers. If your panel length differs slightly, re-calculate centers by dividing overall stitch count equally.
Step 4 :
Sew the petals to the runner: from the front, insert your needle through the base ring of the outer petal, then through the panel at the marked center point; repeat around the petal bases with 6-9 evenly spaced stitches to attach the outer layer securely. Repeat with the inner petal layer with smaller stitches to attach it slightly elevated above the outer layer.
Step 5 :
Turn the panel over and place leaves beneath the sewn petal base so leaf tips extend beyond petals. Sew each leaf base around the central attachment area with GC yarn, catching the panel and petal base to secure leaves firmly. Use additional passes of thread near the central stitches to bind all layers together snugly.
Info :
Sewing tip: use small running stitches around the bottom ring of the flower, catching both petal base and panel loops. For extra security, stitch in a circular path twice. Hide knot and ends on the underside and weave several inches of tail through the body before trimming.
— Repeat Notes :
Info :
Complete 5 identical flower assemblies and attach them to the marked centers along the runner. Work from one end to the other so spacing appears visually even across the runner. Pin and step back to check alignment before final sewing.
— Additional Decorative Edge Detail (Optional Beaded Accent) :
Round 1 :
If you want to add glint to the centers or petals, sew tiny glass or seed beads (gold or clear) into the yellow center or onto a few petal tips using a thin beading needle and thread. Space beads sparingly for subtle sparkle.
Info :
Be careful if the runner will be laundered; secure beads with multiple passes or consider hand-wash only. Alternatively, use tiny French knots in metallic embroidery thread to mimic sparkle without beads.
— Final Finishing :
Info :
Weave in all loose ends on the underside. Lightly block the entire runner to flatten the mesh and encourage fans to lie evenly. Use a steamer or a damp cloth with low iron on the reverse for acrylic blends, or wet-block for natural fibers. Shape the fans by pinning and allowing to dry completely before removing pins.
Info :
If any petals look floppy, tack the base of the petal with a single thread stitch to the panel to lift it slightly. You may also add a small hidden drop of fabric glue under petals for extra hold, especially at the center attachment point.
Round Summary :
This pattern contains the following main worked elements: Base panel rows 1-40 (textured mesh), perimeter fans rounds 41-42 in white, outer red edging round 43, flower construction rounds 1-8 (per flower), leaf rounds 1-3 (per leaf), center bobble rounds 1-2 (per center), and assembly steps. Repeat flower motif sections five times for a total of five flower motifs. This rich set of instructions yields a fully detailed, decorative table runner with accurate placement and finishing tips for a polished holiday centerpiece.
Info :
Congratulations! You have completed the pattern sections. Review all attachments and blocking one more time, trim stray fibers and allow your runner to relax for 24 hours before placing centerpieces on it to preserve the shape of fans and petals.
This festive table runner brings handmade holiday charm to any table with layered poinsettias and a scalloped edge! The rich red petals, textured green leaves, and sunny yellow centers create a classic seasonal look that’s both elegant and tactile. Assemble each motif with care and watch the runner transform a dining space into a warm, festive setting. 🧶✨ Happy stitching, and enjoy showing off your beautiful handcrafted centerpiece! 🎄