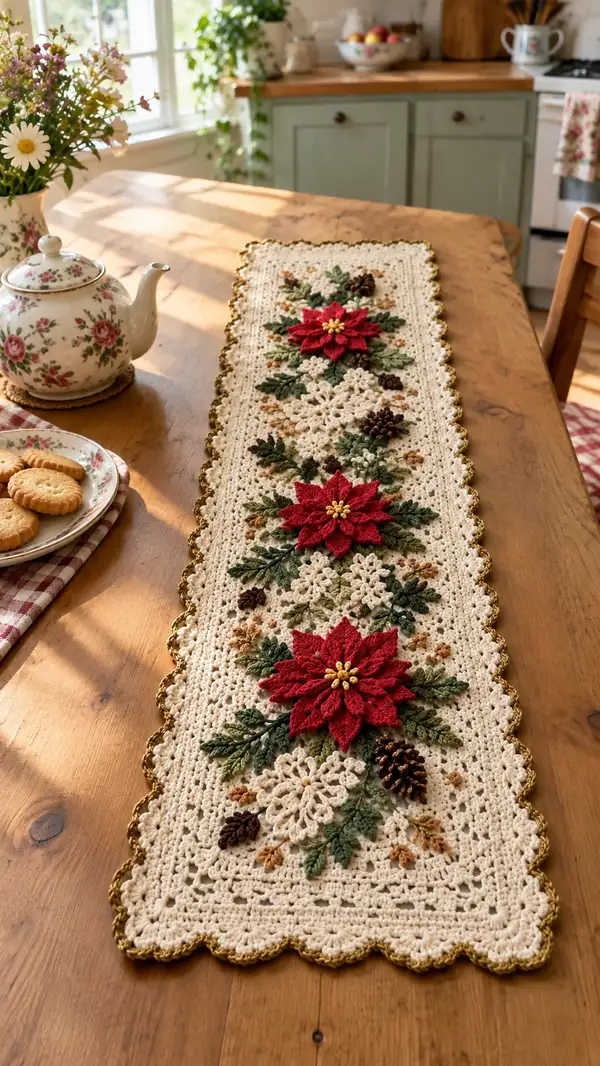
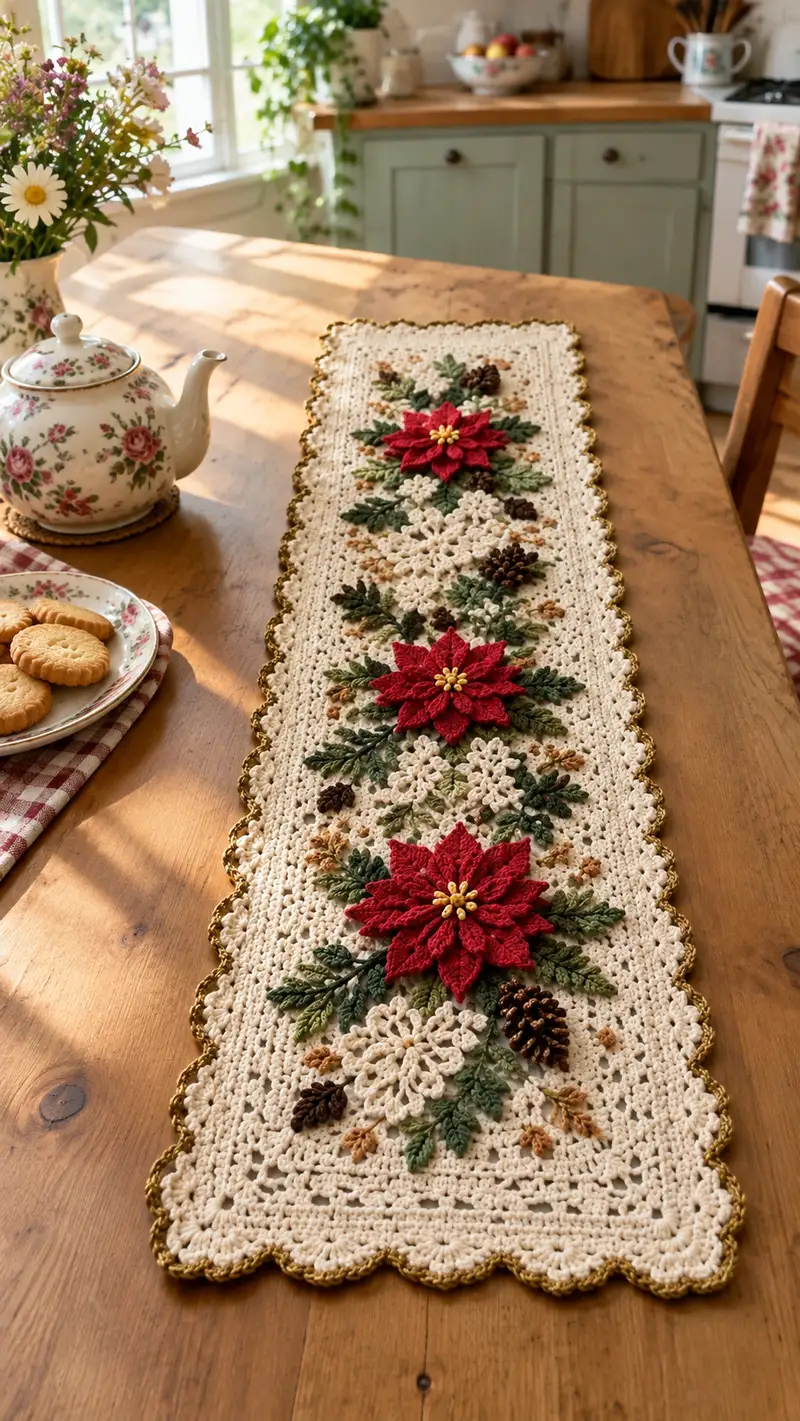
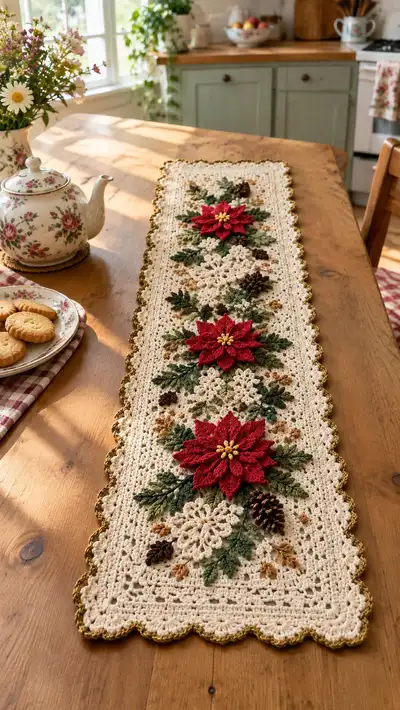
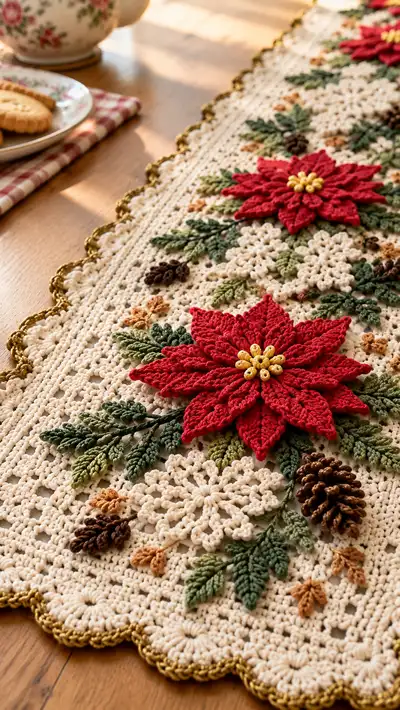
Create a timeless holiday centerpiece with this Festive Poinsettia Table Runner. The runner features three layered red poinsettia appliques with raised textured petals, lacy cream background, leafy greenery, tiny pinecone accents and a shimmering gold scalloped edge. This pattern uses simple stitch combinations and surface crochet applique to deliver a heirloom quality runner that dresses your table for the holidays.
Progress Tracker
0% Complete
— Notes & Gauge :
Info :
Gauge is not critical for a table runner but affects finished width and motif scale. Using worsted cotton with a 3.5mm hook, the ground panel worked as given measures approximately 12 x 42 inches for the runner shown (three poinsettia placement) — adapt chain count to desired length. Work tightly for motifs so they sit neatly on the base. Block the base panel flat before attaching appliques.
— Base Panel (Foundation & Lacy Body) :
Foundation :
Ch 101, turn. (101 chains total; foundation width for a mid-sized runner - change multiple of 4+1 for wider/narrower)
Row 1 :
1 sc in 2nd ch from hook and in each ch across (100 sc). Turn. (100)
Row 2 :
Ch 3 (counts as dc), sk next st, *dc in next st, ch 1, sk next st* rep across, end with dc in last st (creates the open ladder foundation). Turn. (50 dc clusters, counted as 100 sts across with ch-1 spaces)
Row 3 :
Ch 1, sc in first dc, *ch 3, sk ch-1 sp, sc in next dc* rep across ending sc in top of turning ch. Turn. (Approximately 51 sc placements)
Info :
From row 4 onward we will work a repeating motif that creates the lacy ground: alternating shells and open chain arches. Maintain same width; stitch counts will be shown as representative counts. Place stitch markers at both short ends every 10 rows to monitor straightness.
Row 4 :
Ch 3, 2 dc in first sc, *sk ch-3 sp, sc in next sc, sk ch-3 sp, (dc, ch2, dc) in next sc* rep across, end 3 dc in top of turning ch. Turn. (50 shell groups)
Row 5 :
Ch 1, sc in each dc and sc across working into ch-2 sps as sc clusters: (100 sc). Turn. (100)
Row 6 :
Ch 3, *sk 2 sc, shell (3 dc) in next sc, ch 1, sc in next sc* rep across, end ch 3. Turn. (50 shells; overall width maintained)
Row 7 :
Ch 1, sc in each st across (100 sc). Turn. (100)
Row 8 :
Ch 3, dc in next 2 sts, *ch 2, skip 2 sts, 3 dc in next st* rep across; end with dc in turning ch. Turn. (Approximately 50 shell clusters)
Info :
Repeat Rows 4-8 for the lacy body until you have completed 36 rows total across the base, or desired runner length before adding appliques. The photos show 36 working rows in a tight repeat with small square patterning between applied motifs. If length is longer, add repeats in multiples of 5 rows to keep motif alignment.
Row 9-16 :
Work Rows 4-8 twice more as a set to build texture and openwork (maintain same counts). (100 sc equivalent)
Row 17 :
Ch 1, sc in each st across for a tidy band (100 sc). Turn. (100)
Row 18-24 :
Repeat Rows 4-8 once more. This builds the center area where motifs will sit; keep fabric flat and block before applique. (100 sc equivalent)
Info :
Blocking: Wet-block the base panel to measurements, pin flat and let dry. This stabilizes stitches and helps appliques sit properly. Do not attach motifs until base is fully dry.
Row 25 :
Ch 1, sc across to start a solid working band where appliques will be sewn (100 sc). Turn. (100)
Row 26-36 :
Work Row 4-8 pattern again for another 11 rows to create the bottom section mirroring the top. Finish Row 36 with a sc band: Ch 1, sc across (100 sc). Fasten off and weave in ends. The main panel now consists of 36 rows of lacy repeats and solid bands framing the center placement area.
Info :
Mark positions for three poinsettia placements along center axis: roughly at rows 8-12 (near top), rows 18-22 (center), and rows 28-32 (bottom) centered horizontally. Use stitch markers to pin positions; measure equal spacing between flowers for even layout.
— Poinsettia Applique (Make 3 identical large flowers) :
Center Disk :
Ch 2, 8 sc in 2nd ch from hook, sl st to join (8). (8)
Round 2 :
Ch 1, 2 sc in each st around (16). Sl st to join. (16)
Round 3 :
Ch 2, *dc in next st, ch 1* rep around making 16 dc separated by ch1 sps, sl st to top of starting ch (16 dc + ch-1 sps). (16)
Info :
Round 3 forms a small ring where petal bases will be attached. For a raised center, you may add a small bead cluster of 6-8 seed beads stitched into the center after petals are sewn.
Petal Set A (Outer Petals) - Make 8 :
Join red yarn to one ch-1 sp on Round 3. Petal consists of a layered sequence worked into the ch-1 sp and adjacent dc base to form a pointed raised petal.
Petal A - Round 1 :
Ch 1, sc in ch-1 sp, ch 1, sc in same sp, sl st into next st to anchor (creates a small base). Fasten off. (2 small sc + anchor)
Petal A - Round 2 :
Join yarn back in base, ch 2, 3 dc in base, ch 1, 3 dc in base (cluster), ch 2, sl st to base top. Fasten off. (6 dc cluster creating a rounded petal)
Petal A - Round 3 (Texture) :
Join yarn and working in FLO of the cluster, sc around cluster edge, then 3 fpdc (front post double crochet) worked down petal center to create raised ridge, finish with sc to secure at base. Fasten off. This gives a bold sculpted petal shape. Make 8 of these placed evenly around center. (varied sts, petal counts 8)
Info :
Work petals with a tight tension; block petals flat before assembly if needed. Place outer petals evenly spaced, slightly overlapping so petals radiate outwards like shown. Pin each petal, baste with yarn tails, and then secure with matching yarn and whip stitch through center disk and petal base.
Petal Set B (Inner Layer) - Make 8 (smaller) :
Start in between Petal A bases on Round 3. Ch 1, sc in ch-1 sp, ch 2, tr in same sp, ch 2, sl st; work one round of sc around and 2 fpdc down center for texture. Fasten off. Arrange these smaller petals between large petals, staggered to create a dense layered floral head. (8)
Petal Set C (Top Layer Tiny Petals) - Make 8 :
Work tight small pointed petals using: ch 2, 5 dc in base (cone), sl st, finish with sc edge. These tiny top petals tuck under the bead centers giving extra fullness. (8)
Bead Center :
Sew six to eight gold seed beads or make small yellow bead-like French knots with yarn: Thread yarn needle with gold yarn, pull small tight loop then insert needle and create 6 small knots arranged in a circle and secure at back. Alternatively string seed beads and stitch them through center disk, secure with several passes of thread. (6-8 beads)
Info :
Make 3 poinsettia appliques following above steps. For a dramatic look flatten each layered flower slightly with a warm iron through a cloth after basting and before final sewing. Leave long tails to sew through base panel.
— Leaves and Sprigs (Varied Sizes) :
Large Leaf (Make 6 per flower) :
Ch 15, sc in 2nd ch from hook, hdc in next, dc in next 3, tr in next 3, dc in next 3, hdc in next, sc in last. Turn and work back along opposite side: sc in next, hdc, dc3, tr3, dc3, hdc, sc. Sl st to join at base. (Approximately 26 sts including both sides)
Info :
Work leaves with BLO or FLO on return pass for a ribbed texture; use a slightly smaller hook (3.0mm) to tighten veins if desired. Make 6 large leaves per poinsettia and 8 medium leaves for filler between flowers.
Medium Leaf (Make 8 per flower cluster) :
Ch 9, sc in 2nd ch, hdc, dc, tr, dc, hdc, sc, continue back down opposite side repeating. Sl st to join. (Approx 16 sts)
Small Fern Sprig (Make 12 per flower cluster) :
Ch 20, starting at 3rd ch from hook: *sc in next st, ch 3, sl st into same st to form little petiole* rep along chain to the end to create mini leaves all along the stem. Fasten off leaving long tail for sewing. (Approx 6-7 mini leaves per sprig)
Info :
Leaf color variation: Work some leaves in deep forest green, some in olive green to give natural variegation. Pin leaves around each poinsettia as shown in photos: large leaves radiating outward and small fern sprigs tucked between petals and underside of flower for depth.
— Snowflake/Doily Accent Motif (Make 6 small floral lacy motifs) :
Round 1 :
MR, ch 3 (counts as dc), 11 dc into ring, sl st to join (12). (12)
Round 2 :
Ch 1, sc in same st, *ch 5, sk 2 dc, sc in next dc* rep around to create 6 loops (6 loops). Sl st to join.
Round 3 :
Into each ch-5 loop: *(sc, hdc, 3 dc, hdc, sc)*. Sl st to join. (Creates small lacy snowflake petals; repeated 6 times)
Info :
These delicate lacy motifs are worked in cream/ivory and will be clustered between poinsettia placements to mimic small snowflakes or floral clusters. Work them slightly flat and steam-block if necessary to keep small points even.
— Pinecone Accent (Make 6 small pinecones) :
Round 1 :
Ch 2, 6 sc in 2nd ch from hook, sl st to join. (6)
Round 2 :
Ch 1, 2 sc in each st around (12). (12)
Round 3 :
Ch 1, *sc in next st, sc in next st, bobble in next st* rep around making 4 small bobbles. (12 with 4 bobbles)
Round 4 :
Ch 1, sc around, then work a round of overlapping sc clusters around body: *sl st, ch 2, (sc, ch 1, sc) into same st to form scale* rep around then stow tail and slightly stuff with fiberfill. Fasten off leaving long tail for sewing. (pinecone shape)
Info :
Use a darker brown for finished look. Make pinecones small and lightly stuffed so they sit naturally on top of the panel without creating lumps under the base panel when sewn in place.
— Assembly & Applique Placement :
Info :
Dry-block the base panel flat. Pin three poinsettia centers on marked positions at rows 10, 20, and 30 (or adapted based on your base row counts). Arrange leaves, sprigs, snowflake motifs and pinecones around each flower following the layered composition seen in the photo: large leaves beneath each flower, medium leaves and sprigs extending towards center, snowflake motifs tucked into negative space and pinecones clustered near stem areas.
Step :
Baste each applique with long yarn tails across base to secure placement. Use a blunt tapestry needle and matching yarn to sew through motif bases and into ground band using small whip stitches; avoid pulling too tight so the lace ground does not pucker. Sew all appliques with 3-4 passes for durability. Hide tails through backs of motifs and weave in securely.
Info :
For extra stability, secure each poinsettia center with 1-2 diagonal stitches through the base panel into the center disk so the flower cannot lift. Similarly, tack each pinecone at two points to prevent rotation. Use sewing pins to check three-dimensional placement before final sewing.
— Embroidered Tiny Berries & Accent Stems :
Stems :
Using stem stitch or surface slip-stitch in ochre and brown, embroider small meandering stems from poinsettia bases outward. Work with a tapestry needle using a strand of yarn folded for strength. Each tiny stem is approximately 6-10 mm long depending on scale. (Multiple small stems)
Berry French Knots :
Using gold or tan yarn, make small French knots or yarn 'beads' and sew in small clusters near leaves and snowflakes for visual interest. Space clusters evenly across central axis. (10-15 small knots per runner)
Info :
If using beads, secure each bead with two passes of fine thread through the applique center and knot on the back, then hide knot with a few secure stitches. Keep bead clusters symmetrical between the three poinsettias when possible.
— Border & Scallop Edge :
Info :
Border is worked after appliques are attached and the whole runner is gently blocked one last time. Use metallic gold yarn held single for the scalloped edging to add shimmer. Corner shaping is important to keep scallops uniform.
Round 1 (Border Attachment) :
With right side facing, join gold yarn at one corner. Ch 1, work 1 sc evenly into each row end around the perimeter placing 3 sc in each corner row to maintain square corners. Work evenly so the border lies flat. Join with sl st to starting sc. (Perimeter sc count variable; keep edges smooth)
Round 2 (Scallop Setup) :
Ch 1, *sk 2 sc, (5 dc) in next sc, sk 2 sc, sc in next sc* rep around forming scallops; work 3 sc in corner sc to negotiate corner. Join. (Approximately 25-30 scallops total depending on length)
Round 3 (Finish) :
Ch 1, sl st into 2nd dc of each 5-dc shell to create a small picot effect, sc between shells to secure. Fasten off and weave ends. This gives a crisp metallic scallop edging as seen in the photos. (Final decorative scallop)
Info :
Alternate border: If you prefer a softer edge, work a round of hdc followed by a scallop row in the same color as base instead of metallic. Make sure the number of scallops matches across opposite sides for symmetry.
— Finishing Touches :
Info :
After sewing and weaving ends, lightly steam-block the completed runner to settle motifs. Do not press beads directly with iron. Trim stray fibers and check underside for secure tails. If using seed beads, consider adding a tiny dab of fabric glue to knot ends for extra security if runner will be used frequently.
Care Instructions :
Hand wash gently in cool water with mild detergent. Reshape and air dry flat. Avoid high heat or aggressive wringing to preserve appliques and beads.
This Festive Poinsettia Table Runner is a beautiful blend of vintage lace and bold botanical applique—perfect for your holiday table or as a thoughtful handmade gift. Each carefully assembled petal, leaf and pinecone adds layered texture and a handcrafted charm that will spark compliments at every gathering. The gold scalloped edge gives the final luxurious touch, making this runner a holiday heirloom you'll enjoy year after year. 🧶🎁