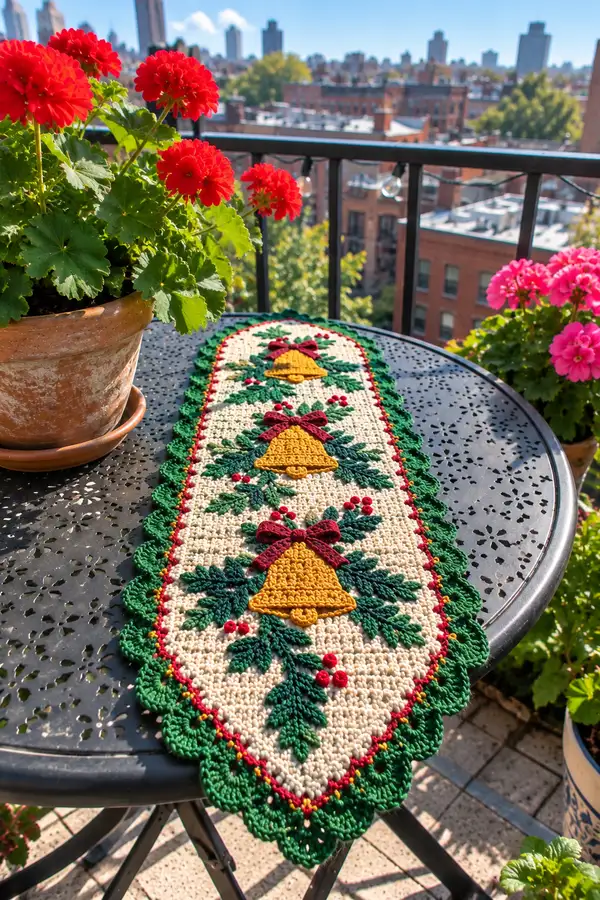
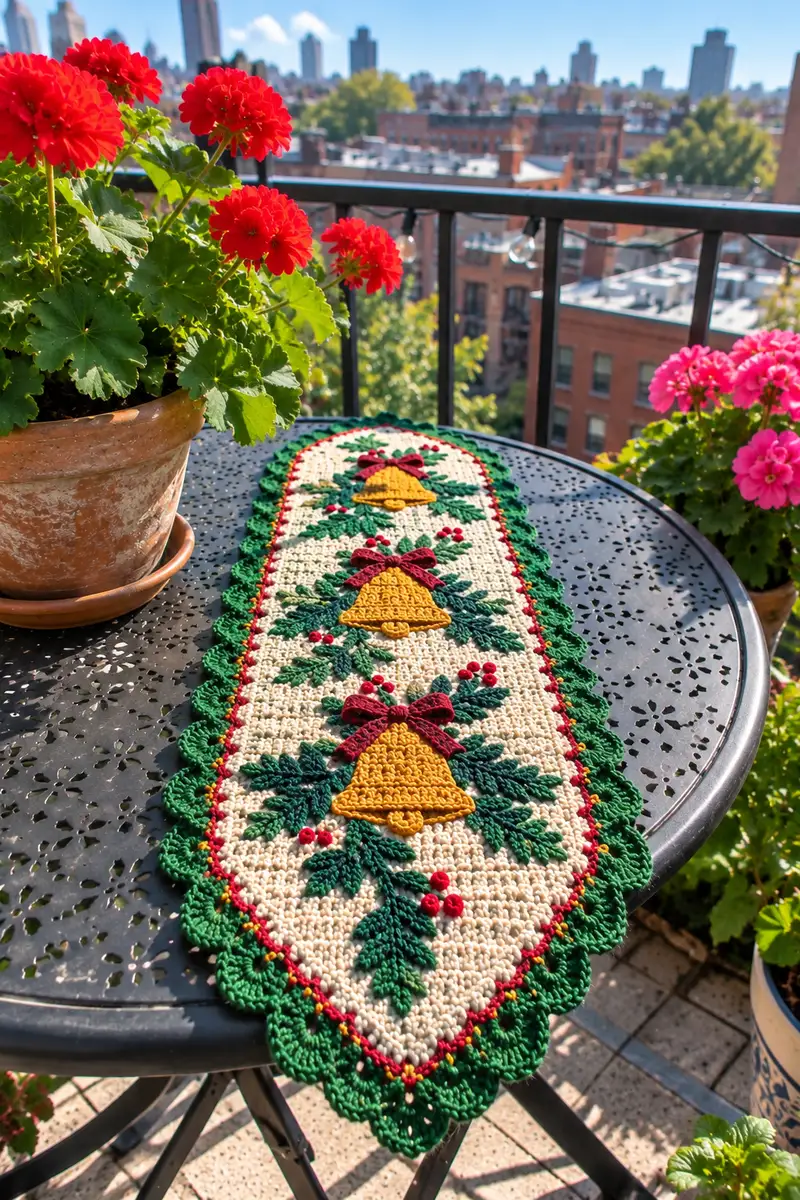
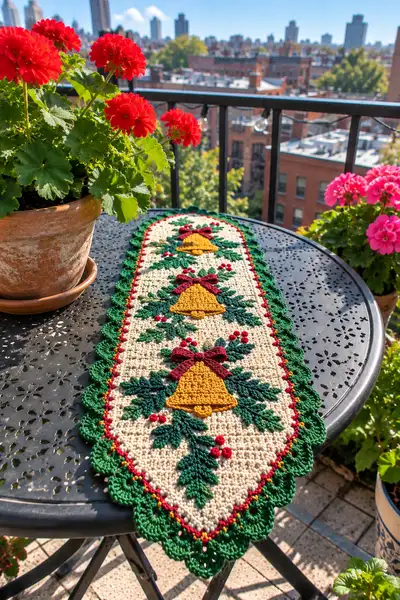
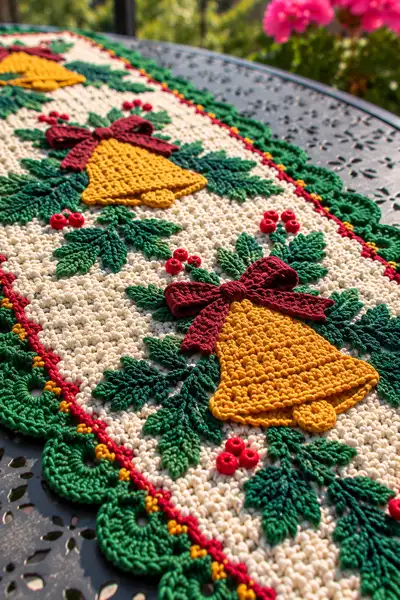
A festive, vintage-style table runner featuring three golden bells, evergreen sprigs, deep red bows and bright holly berries on a creamy background. The piece is finished with a scalloped evergreen border and tiny yellow and red accent picots. Perfect for a holiday centerpiece, this pattern combines appliqued motifs and textured stitches for a heirloom-quality decorative runner.
Progress Tracker
0% Complete
— Materials, Gauge & Notes :
Info :
Gauge is not critical for length but is important for density: 20 sc x 24 rows = 10 cm in DK cotton with 3.5mm hook. Work tightly enough that stuffing and background don't show through; use a hook one size down if you tend to crochet loosely. This pattern uses many separate appliques sewn on the base; block pieces before assembly for a crisp finish.
Info :
Abbreviations used are standard US terms. The runner base is worked as a rectangle with a foundation chain; semi-circular ends are created separately and joined to short edges. Appliques are worked flat and sewn on with small, even stitches.
— Base Rectangle (Main Body) :
Foundation :
Ch 34. This forms the central body width; finished width will be approximately 12-14 cm depending on gauge.
Row 1 :
Sc in 2nd ch from hook and in each ch across (33 sc). Turn. (33)
Row 2 :
Ch 1, sc in each st across (33). Turn. (33)
Row 3-6 :
Repeat Row 2 (33). These first rows create a sturdy foundation edge. (33)
Info :
If you want a slightly wider runner, add chains in multiples of 2 to your foundation chain. Keep the same number of rows for length for proportionate results.
Row 7-16 :
Ch 1, sc in each st across (33). Turn. Maintain even tension to keep the rectangle straight. (33)
Info :
At this stage decide where you will place three evenly spaced bell motifs lengthwise. Mark the center of the rectangle and measure equal spaces for top and bottom bells. We'll add appliques later, so precise markings now help with placement.
Row 17-28 :
Ch 1, sc in each st across (33). Turn. Continue working even to form main field. (33)
Row 29-40 :
Ch 1, sc in each st across (33). Turn. When you reach Row 40 the rectangle should be long enough to place three bells between the ends; if you prefer a longer runner, repeat additional rows in multiples of 4. (33)
Info :
Work the rectangle using the cream color yarn. Use stitch markers at the first and last st of each row to avoid accidentally adding or skipping stitches across long rows.
— Short Edge Semi-Circles (Make 2) :
Info :
Each short edge gets a worked semi-circle to soften the ends. These are made as half of a full circle and then joined to the short edge of the rectangle by evenly distributing the stitches.
Round 1 :
Make a mr and work 6 sc into the ring. Tighten ring and join with sl st to first sc. (6)
Round 2 :
Ch 1, (1 sc, inc) x 6 around (18). Join with sl st to first sc. (18)
Round 3 :
Ch 1, (2 sc, inc) x 6 around (24). Join. (24)
Round 4 :
Ch 1, (3 sc, inc) x 6 around (30). Join. (30)
Round 5 :
Ch 1, (4 sc, inc) x 6 around (36). Join. (36)
Info :
This creates a full circle of 36 stitches; you will use exactly half of this circle (18 stitches) along one short edge, and the remaining half will be the visible end. When attaching to the rectangle, divide the short edge into 18 equal points for even joining.
Round 6 :
Ch 1, sc in each st around for extra depth (36). Join and fasten off. We will join the semi-circle to the short edge by lining up 18 stitches along the rectangle short edge: mark every other stitch along the short edge of the rectangle (the short edge is 33 sts long; move markers to approximate spacing and ease the fabric). Sew with mattress stitch distributing 18 sts evenly across the short edge; for best fit slip some slight gathers at the corners as needed.
Info :
Repeat for the other short edge. When both semi-circles are attached, your runner will have softened ends. Block the joined ends flat before proceeding to appliques.
— Textured Background Surface (Optional Moss Stitch Surface Rows) :
Info :
The center field in the photo uses a dense textured stitch similar to an alternating moss/seed stitch. If you prefer this texture instead of plain sc, work the following surface rows next across the rectangular portion only.
Row A1 :
With cream, join at a corner and ch 1, sc evenly around the edge of the rectangle (work 1 sc in each row-end stitch) to create a clean turning edge. (Work counts depend on rectangle edge length)
Row A2 :
Turning to face the surface, ch 1, *sk 1 st, dc in next st, ch 1, sc in top of ch gap from previous row*; rep across to create small textured clusters. This will create a dense nubby texture; work 20-26 rows depending on depth desired.
Info :
If you choose to keep plain sc, skip the textured rows; appliques will still sit well on a plain background.
— Golden Bell Applique (Make 3 identical) :
Info :
Each bell is worked flat in mustard gold yarn and consists of a bell body (worked in rounds that form a small dome), a small clapper circle, and a decorative scalloped lower edge. Place three bells evenly along the runner center as shown in the photo.
Bell Round 1 :
Make a mr, ch 1, 6 sc in mr. Pull ring tight and join with sl st. (6)
Bell Round 2 :
Ch 1, (1 sc, inc) x 3 on first side to form a half-round, continue (1 sc, inc) x 3 on second half so you still form a small circle effect — for flat dome increase scheme we will work: (1 sc, inc) x 6 across entire round. Result (9). Note: change to working flat and do not join if you prefer a seamless dome.
Bell Round 3 :
Ch 1, (2 sc, inc) x 6 (12). (12)
Bell Round 4 :
Ch 1, (3 sc, inc) x 6 (18). (18)
Bell Round 5 :
Ch 1, (4 sc, inc) x 6 (24). Shape the dome slightly by working even: ch 1, sc in each st around for next rounds. (24)
Bell Round 6-8 :
Ch 1, sc in each st around (24). These rounds form the body height of each bell. Fasten off leaving a long tail for sewing. (24)
Bell Info :
For a flatter bell that looks like the photo (not very domed), after Round 5 you can switch to slip-stitch rows or single crochet rows in the back loop only (BLO) for one or two rounds to flatten and create a defined lower edge. Place a subtle scalloped edging by making small shell stitches on the bottom edge as described below.
Bell Scallop Edge :
With bell color, join under the last round at the lower edge and *skip 1 st, (5 dc) in next st, skip 1 st, sl st in next*; rep around to create small shells. Adjust number of shells so they align visually pleasingly; fasten off and weave tails. The scalloped edge will be attached to the background with a small gap for dimensionality. (Adjust shells to about 8-10 nets depending on bell width)
Bell Clapper :
Using the same mustard yarn and 2.75-3.0mm hook, make a tiny circle: mr, 6 sc in ring, sl st to join (6). Fasten off leaving tail to sew at bottom center of bell; stuff very lightly if desired for a raised clapper. Sew centered under the scalloped edge. (6)
Info :
Make three bells identical. Block each bell flat but with slight dome retained so when sewn on they sit proud of the background. Use the long tails to baste position before final sewing.
— Decorative Bow Applique (Make 3) :
Info :
Each bow is worked in deep burgundy color in three parts: two loops and a center knot. The loops are long flat pieces folded to create the bow effect and then gathered with the knot piece.
Bow Loop 1 :
Ch 22, sc in 2nd ch from hook and across (21 sc). Turn. (21)
Bow Loop 2 :
Ch 1, sc across 21, turn. Repeat 4 rows of sc for body of loop. Stiffen lightly with a starch spray if you want crisp loops. Fasten off leaving long tail to sew. Make second loop identical. (21)
Bow Center Knot :
Ch 6, sc in 2nd ch from hook and across (5 sc), ch 1, turn. Repeat 6 rows to create a short tight band. Wrap this band around the two loop pieces where they overlap on the bell top and sew the knot closed. Fasten ends and weave in tails on underside. (5)
Info :
Lay bow loops over the top center of each bell and baste in place with long tails. The knot cinches the loops and hides the joining seam. Optionally add a small bit of adhesive behind the knot to keep it from slipping during sewing.
— Evergreen Leaves (Large) - Make 9 :
Info :
Large layered leaves are the backbone of the sprig surrounding each bell. They are worked from the center spine outward to create a toothed leaf. Make 3 large leaves for each bell cluster (9 total) alternating deep greens for depth.
Leaf 1 - Round 1 :
With forest green, ch 14. Sc in 2nd ch from hook and next 3 ch (4 sc), then 3 dc in next ch (forming a tip cluster), continue on the other side of chain: sc in next 4 ch, then 2 sc in last ch to form base. Fasten off and leave long tail for sewing. This is a simple leaf; to add more texture continue with the following rounds.
Leaf 1 - Round 2 :
Rejoin at base, ch 1, sc across 4 sts on side, at tip work (ch 2, 3 dc, ch 2) in tip to create fuller tip, continue sc across opposite side, sl st to join at base. Fasten off. Each leaf will have approx 12-16 sts total depending on shaping.
Leaf Info :
To create serrated edges like the photo, on each side of the leaf after establishing the tip, work: *sc, hdc, dc* in successive stitches to form ridged teeth. Alternating yarn color between forest green and evergreen green for adjacent leaves will add depth.
— Evergreen Leaves (Small) - Make 12 :
Round 1 :
Ch 10, sc in 2nd ch from hook and across 8 sc, ch 1, turn. On return work *2 sc in same st, sc in next 3, 3 dc in next (tip cluster), sc in next 3, 2 sc in last* - gives a small leaf shape. Fasten off leaving long tail. (approx 16)
Info :
Mix sizes and shades when arranging sprigs. Sew larger leaves first, then overlay smaller leaves to recreate layered effect in the photo.
— Holly Berries (Make 9 clusters) :
Berry Round 1 :
With scarlet red and 2.75mm hook make a mr, 6 sc in ring, sl st to join (6). Fasten off leaving a long tail for sewing. For slightly raised berries, make 2 rounds: Round 2: ch 1, (1 sc, inc) x 3 (9). (9)
Info :
Group berries in clusters of 3 and sew them onto runner near each bell where the sprigs converge. Use a small dab of glue to stabilize the berries if needed and then secure by sewing through the base of each berry into the runner.
— Small Accent Leaves and Sprigs (Make many) :
Sprig Pattern :
Ch 6, sc in 2nd ch from hook (5), then working back in chains: *ch 3, sl st in 2nd ch from hook, sl st in next ch* to create small twig-like leaves. Fasten off. Make 2-3 small sprigs per bell for fill. (pattern repeat)
Info :
Use these small sprigs to fill gaps and to anchor berry clusters. All small pieces should be lightly blocked and allowed to dry flat before assembly.
— Bow Tail and Tails Detailing :
Bow Tail :
Ch 40, sc in 2nd ch from hook and across (39 sc), turn and sc one more row for thickness. Fold in half and tack at narrow end to form tapered tails. Make two tails per bow and attach under the bow loops as seen in the photo. Fasten off and weave ends. (39)
Info :
If you prefer a curved tail like the photo, after folding, press with a little starch and pin in a gentle S shape to dry for persistent curve.
— Assembly of Motifs onto Runner :
Info :
Before attaching, lay the blocked runner flat and place the three bells evenly spaced along the longitudinal center line. Place layered leaves behind each bell and position berry clusters and bows. Pin everything in place to check balance before sewing.
Step :
Sew the bell base to the runner with long tails using a whipstitch or slip-stitch attachment, leaving scallops slightly free for shadow. Sew the clapper to the bell bottom center. Then tack down each leaf with small invisible stitches at their bases and along 2-3 points to keep them dimensional.
Info :
Use tiny stitches and matching yarn to avoid showing on the cream background. Ensure the leaves are lifted slightly by stitching only the base and a spot near the middle rib so the tips remain elevated.
— Decorative Border Row (worked in cream and then accent rows) :
Round 1 :
With cream yarn and 3.5mm hook, join at any stitch along the runner perimeter, ch 1, work 1 sc evenly around the entire runner, placing 3 sc in corner short-edge joins to ease the curve. Join with sl st. This evens the edge and prepares for the picot line. (work counts vary by perimeter)
Info :
Mark the starting point and the center on each long edge to maintain symmetry for the following colored accent row.
Accent Row - Yellow Picot Row :
Change to mustard yellow. Ch 1, *sl st in next 3 sc, (ch 3, sl st in top of ch to form picot)* rep around placing picots evenly; at corners place picots to highlight points. Join and fasten off. This creates small yellow dots as seen in the photographed runner.
Info :
Use the yellow picots sparingly to echo the mustard of the bells. They should be tiny bright pops on the edge.
Red Accent Row :
Change to scarlet red. With 3.5mm hook, join and work a single round of sc in each st around, but on long-edge counts, work *sc in next 3, ch 1, sl st in next* to create a fine dotted red line just inside the green scallop that will follow. Join and fasten off. (counts depend on perimeter)
Info :
This thin red line gives the runner a crisp festive outline before the larger green scallop is added.
— Scalloped Green Edge :
Round 1 :
With Evergreen Green and a 3.5mm hook, join at the long edge center and ch 3 (counts as dc), *sk next st, 7 dc in next st, sk next st, sl st in next 2 sts*; repeat along the long edges making larger shells for a bold scallop. On short ends space shells evenly (use 4-5 shells per short semi-circle). Join and fasten off. This yields large scallops like pictured. (Adjust number of shells to match runner length)
Round 2 :
To refine scallop shape: Join green in the center of each shell and work (ch 1, sc, ch 1, 3 dc) across the shell center to create a decorative fan, sl st to the next valley. Repeat around. Fasten off and weave all ends. (counts variable)
Info :
Make sure shells align opposite the red accent line for that double-contrast look. Blocking after scallops will open them into crisp fans and help the runner lie flat.
— Final Surface Embellishments :
Info :
With small yarn needle and matching floss, tack any raised elements (bow center knots, small berry bases) so they won't shift in use. If desired, add a few French knot style surface stitches with red yarn for extra berry detail.
Step :
Use tiny stitches of cream yarn to hide any sewing on the reverse side to keep the front neat. Trim all tails and weave them at least 3-4 cm into the fabric for secure finishing.
Info :
Lightly steam-block the entire runner in place (avoid direct iron on cotton yarn; use steam from a distance or a damp cloth between iron and shell) to open scallops and settle appliques. Allow to dry flat overnight pinned to blocking board.
— Care Instructions :
Info :
Hand wash in cool water with mild detergent and reshape while damp. Air dry flat. Avoid wringing. For long-term storage, wrap in acid-free tissue paper to avoid yellowing or dye transfer.
Finishing this runner is such a rewarding project — each bell and leaf adds to the handmade charm of your holiday table. The layered appliques give wonderful texture and depth, and the scalloped green border frames it beautifully. I hope you enjoy every stitch and the warm glow it brings to your home! 🎄🧶