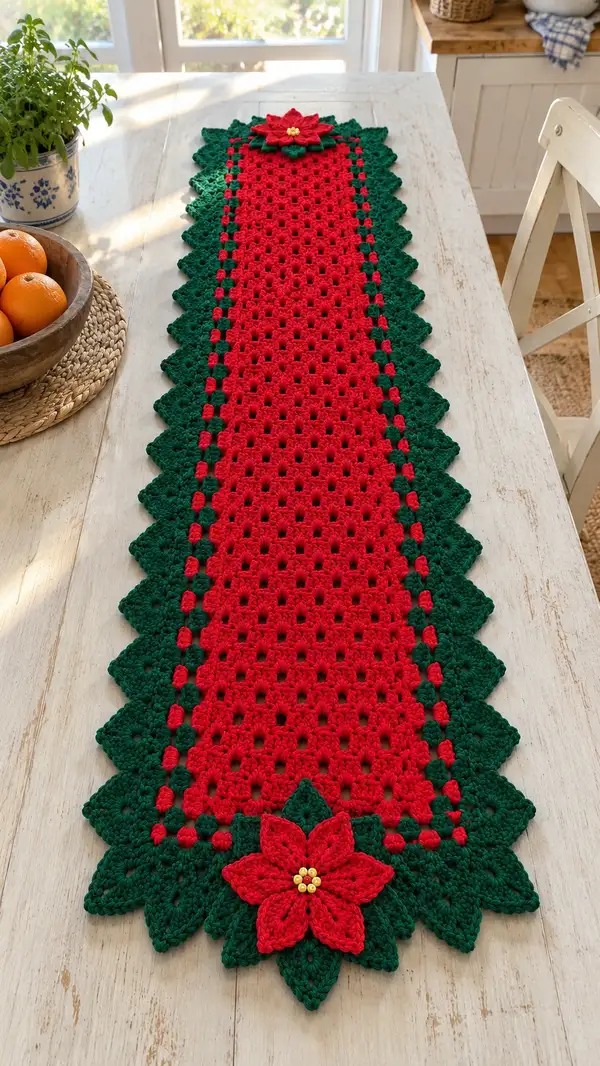
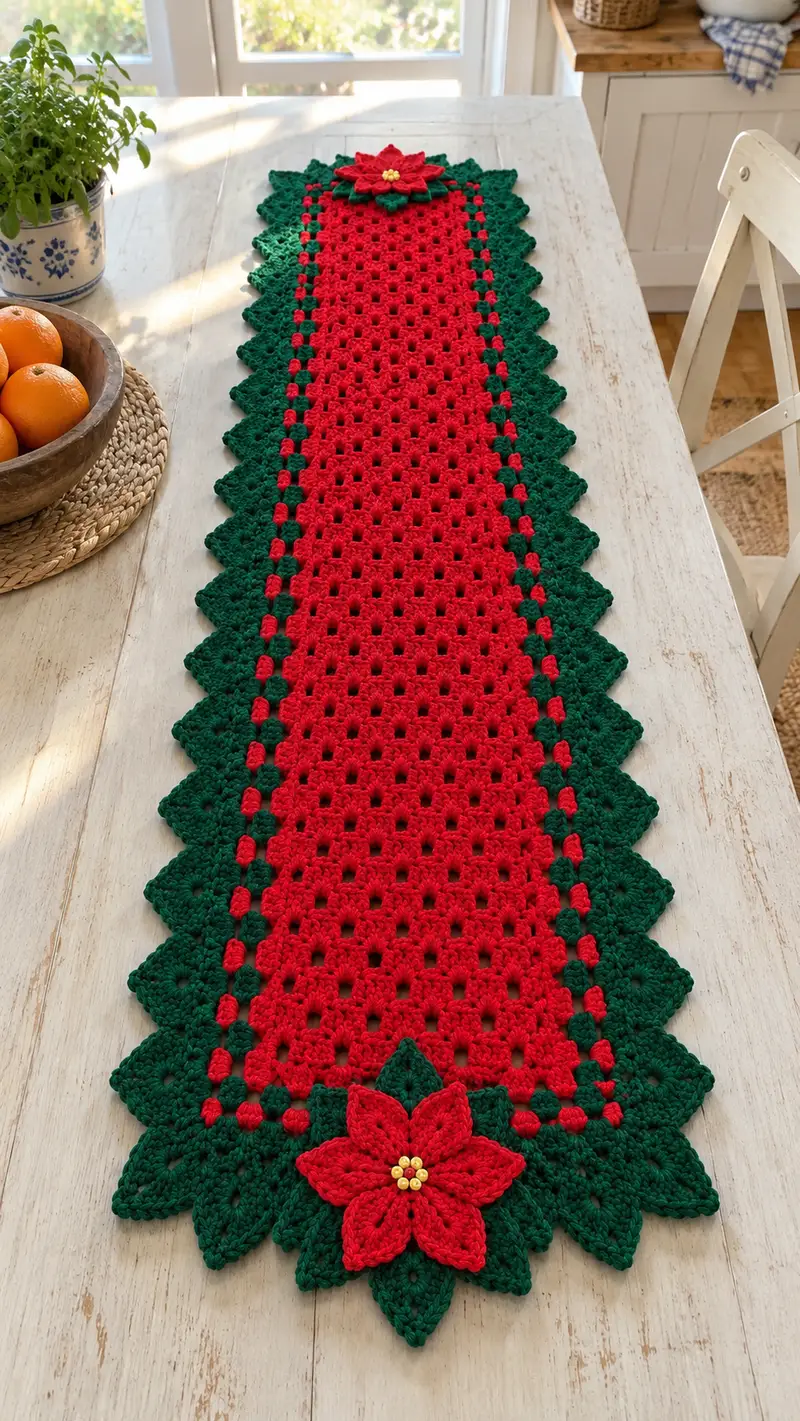
A classic holiday table runner worked in bright red and deep green, featuring a textured granny-style center, scalloped triangular border, and two large poinsettia motifs at each end. This runner is designed to sit elegantly down a dining or console table and adds handmade holiday cheer. The pattern includes step-by-step rounds, clear Info tips for color changes, edging, and attaching the poinsettias with beaded centers. Suitable for crocheters comfortable with clusters and shaping.
Progress Tracker
0% Complete
— Notes & Gauge :
Info :
This pattern produces a runner approximately 12" (30 cm) wide by 60" (150 cm) long using the gauge and yarn listed. Gauge: 10 granny clusters across = approximately 5" (12.5 cm) when using 5.0 mm hook and worsted yarn. You can adjust length by adding or removing center cluster repeats. Always check your tension and adjust hook size if needed.
Info :
Terminology: I use US crochet terms throughout. Clusters are written as 'cluster' or 'sp3cl' for a 3-double crochet cluster that is joined at the top. When a round/row says 'repeat across', it refers to the number of cluster repeats specified by your foundation chain.
— Foundation & Center Panel (Granny Cluster Center) :
Round 1 :
Chain 121 (this is the foundation chain; this count gives 40 cluster repeats across the width and an edge turning chain). If you prefer a narrower or wider runner, make chain in multiples of 3 + 1 (for each additional 3 chains add about one cluster to the width).
Info :
Check that your chain is not twisted and place a stitch marker in the last chain to mark your turning point for the first row. Count your chain in groups of three to confirm multiples — 121 = 3 x 40 + 1.
Round 2 :
Row 1: With red yarn, in 4th chain from hook work: (3 dc, ch1) into the same chain to form the first granny cluster. *Skip next 2 ch, in next ch work (3 dc, ch1).* Repeat from * to * across until you reach the last chain; finish with a final 3-dc cluster into the last chain. You should have 40 clusters across. End this row with ch3 and turn. (40 clusters)
Round 3 :
Row 2: Work into ch1 spaces only: *(3 dc, ch1) in next ch1 sp.* Repeat across working one cluster into each ch1 space from previous row. End with ch3 and turn. (40 clusters)
Info :
The ch3 counts as first dc for turning. Maintain a neat edge by making the first and last cluster of each row worked fully into the turning chain or turning ch space so edges remain straight.
Round 4 :
Row 3: Repeat Row 2. Continue repeating Row 2 to build the center panel. Keep track of row numbers with a row counter or notebook. (40 clusters)
Round 5-10 :
Rows 4-9: Work 6 additional rows of cluster repeats exactly as Row 2. Maintain even tension and ensure each row ends with ch3 for consistency. (Each row = 40 clusters)
Info :
Place stitch markers at both ends of the center panel every 8 rows to keep track of your repeats and to help with later alignment of the border. This also prevents accidental increases or decreases when changing rows.
Round 11-20 :
Rows 10-19: Continue working even cluster rows. Work a total of 60 center rows (including the initial rows) for a mid-length runner — this means repeat the cluster row until you reach 60 rows total. If you want the runner longer, add additional cluster rows in multiples of 2 or 4 until you reach desired length. (40 clusters each row)
Info :
At this stage the panel should be a consistent rectangle of red clusters framed by a thin red column at the right and left edges — the small vertical columns visible in the photo are formed by the end-of-row ch3 and first cluster repeats; keep them tidy by pulling the ch3 upright when turning.
Round 21-30 :
Rows 20-29: Continue working even cluster rows to build length. If you want to stop at a shorter length, work until you have an odd number of rows so that the joining rows for the border align symmetrically (this pattern uses an even center row count by default). (40 clusters each row)
Round 31-40 :
Rows 30-39: Continue cluster repeats. By row 40 the runner should measure approximately half the desired length if you are making a longer runner — the pattern pictured uses 60 center rows before the border rounds begin so the total center body equals 60 rows. (40 clusters)
Info :
If you are customizing the runner width: To add width, increase foundation chain in multiples of 3 to maintain cluster pattern. If you change width, re-calculate cluster counts across; each extra 3 chains equals one extra cluster repeat.
Round 41-60 :
Rows 40-59: Complete center panel by finishing at 60 total rows (counting Row 1 as the first cluster row). End after a right-side-up cluster row so that the top and bottom of the runner mirror each other. Fasten off red yarn and weave in the tail long enough to attach to border if you prefer sewing, otherwise leave ends to be woven under the border stitches. (40 clusters)
Info :
Before attaching the border, block the center panel flat on a blocking mat to ensure clusters align cleanly and the edges are straight. This helps the scalloped border sit evenly and makes attaching poinsettia motifs easier.
— Primary Border Setup (Joining Green Border to Center) :
Round 1 :
Attach green yarn at one short end corner of the runner with a sl st, ch1, sc evenly along the edge into the side of the cluster rows. Place approximately one sc into the side of each cluster (into the top of the ch3 turning chain or the top of the cluster where it aligns). Maintain 60 sc along the long side for each 10 cluster height (approximate; adjust to match your panel height). This first round establishes a firm frame. (sc count varies with height - place sc evenly)
Info :
Place 2-3 extra sc at each corner to help the border turn without puckering. Work slowly and evenly and use pins to keep the work taut while you stitch the sc row. You are creating a foundation round onto which the scallop points and triangular shells will be worked.
Round 2 :
Round 1 (Border): With green, work *ch3, sk 1 sc, sl st into next sc* all the way around as a decorative ladder-like spacer; this builds the little green square column visible inside the scalloped border. Space these evenly so you have a consistent column of ch3 spaces bordering the red panel. (Spacing should create about 40 ch3 loops along each long side to mirror red clusters)
Info :
This pattern uses these ch3 loops as the place to work the scallop points in subsequent rounds. Take care to keep the ch3 loops consistent; if you have too many or too few, the scallops will skew.
— Scalloped Triangular Points (Edge Points) :
Round 1 :
Point Setup Row: Working in green and using the ch3 loops from Border Round 2 as your base, *into next ch3 loop work: (sc, ch2, 5 dc shell, ch2, sc) – this forms a triangular fan.* Skip the next ch3 loop and repeat across the long edge. You should create about 20 triangular fans (point groups) along each long edge depending on your width; adjust so the fans fill the edge evenly. (approx 20 fans per side)
Info :
Each triangular fan equals one scallop point visible in the photo. The fan uses a 5-dc shell to create a pronounced point. Leave a small ch-space between fans so they don't merge; this creates the distinct 'sawtooth' edge.
Round 2 :
Round A: Into the tip of each 5 dc shell from previous round work: ch1, sc, ch1; into each side of the fan (in the 2-ch spaces on each side) work *2 dc* to broaden the base. This rounds and opens the fans and prepares them for a later point shell. Maintain symmetry by working the same number of side dc on every fan. (each fan now has a 5-dc tip and 4 side dc total)
Round 3 :
Round B: Work behind the fans along the outer edge with *ch3, sl st into the base space between fans* to create a foundation for the next scallop layer. This gives a layered look where the green points project outward. (foundation chain around perimeter)
Info :
At the short ends of the runner you will want to plan where to place the large poinsettia center. Mark that center point with a removable stitch marker so the two poinsettias are aligned when you add them later.
Round 4 :
Round C: Into each 5-dc tip work a smaller 3-dc cluster: *ch1, (3 dc cluster into tip), ch1, sl st into next base* to firm up the tip and create the textured point seen in the photo. Repeat across both long sides. (same number of tips as fans)
Info :
If you prefer broader points, replace the 3-dc cluster with a 5-dc shell. For a more delicate point, use 2 dc. Consistency across all points is the visual key.
Round 5-10 :
Rounds D-F: Repeat alternating rounds of side strengthening (2 dc into side spaces) and tip reinforcement (3-dc cluster into tip) for 6 rounds total, alternating to build height and texture. These rounds create the layered triangular motif: every two rounds deepen the scallop so it becomes a pronounced, layered point. (points remain matched on both sides)
Info :
Add subtle shaping by doing the outermost tip reinforcement in BLO on the last round to create a raised ridge across the scallop edge if desired. This is optional but yields a very crisp shadow and depth on the scallops.
— Border Finishing Rows (Edge Crisping and Picot Detail) :
Round 1 :
Final Edge Row 1: With green, work into outermost loops: *sc, picot (ch3, sl st into first ch), sc* across the entire outer edge, placing one picot at each tip and one picot at each base for a beaded scalloped look. This small detail is what makes the edge look neatly finished and decorative. (picots at every tip and base)
Info :
Picots can be substituted with small bobbles if you prefer a heavier look. To make a bobble, work 5 partial dc into one st and close together. Keep the height minimal so the runner still lays mostly flat.
Round 2 :
Final Edge Row 2: Work one round of sl st across the outermost edge to tidy and secure the picots and bobbles. Weave in all ends along the backside of this sl st round so the front remains clean.
Info :
When weaving in ends, insert the tail into the tip region and weave backward through the last 6-8 sts to lock before trimming. Use a hook to help pull tail through if necessary.
— Poinsettia Motifs (Make 2 identical motifs) :
Round 1 :
Center Circle: With yellow or gold yarn, make a magic ring, ch1, 8 sc into ring (8). Pull ring closed and sl st to first sc. Fasten off and weave tail to the back if you will add beads; otherwise leave tail for sewing. (8 sc)
Info :
The small center disc will be used as the base for the bead cluster. If you prefer, instead of using yellow yarn you may leave the center open and sew beads directly into the magic ring area later. Make sure center is tight and flat.
Round 2 :
Attach red yarn with sl st to any sc of the yellow center. Ch3 (counts as first dc), work 2 dc into same st, *skip 1 sc on center, into next sc work (3 dc)* repeat around creating 4 groups of 3 dc separated by skipped center scs; sl st to top of ch3. (4 petals begun)
Round 3 :
Petal Setup: For each of the 4 base groups: (from back loop of the base group) ch2, 1 hdc in same base, ch2, 7 dc into the space over the group, ch2, 1 hdc into the base on the other side of the group, ch1, sl st into next base. This creates 4 wide petals spaced evenly. (4 large petals)
Info :
Petals should be slightly cupped. To shape each petal, block lightly or pinch while stitches are still slightly damp. If petals are too floppy, use a smaller hook for the petal rounds to tighten fabric.
Round 4 :
Petal Layer 2: Fasten off and then rotate the flower so petals sit between petals of a second layer. Re-attach red yarn at base between two petals and work 8 petals around as follows: *ch2, (sl st at base, ch2, 1 sc in base, ch2, 5 dc into loop over previous petal, ch2, 1 sc in next base)* Repeat this pattern to create 8 smaller petals layered above the 4 large petals. (8 smaller petals)
Round 5 :
Petal Shaping: Work 2 rounds of surface slip stitches around each petal to define ridges. In the first round come up in the center of each petal and work *sc, hdc, sc* along the center line of the petal to create mid-rib texture. Repeat for each petal. (surface ridges on 12 petals total if counting both layers)
Info :
The layered petal approach yields the full poinsettia look. Use stitch markers to hold the top layer in place while you add the lower layer to guarantee even spacing. If you want a fuller flower, make the top layer 12 petals instead of 8 by repeating the petal pattern more densely.
Round 6 :
Leaf Base (Green): With green yarn, attach at back between two lower petals and work 6 small leaves directly into the back of the flower as decorative foliage. For each leaf: ch4, sc into second ch from hook, hdc into next ch, dc into next ch, sl st into flower base. Repeat around the back to create 6 small leaves. These are primarily decorative and help the flower sit flat on the runner. (6 leaves)
Round 7 :
Bead Center: Using a long sewing needle and gold beads, thread 6-8 beads on a length of strong thread. Sew through the yellow center disc securing beads tightly together. Stitch disc to center of poinsettia and tie knot securely on the back. Alternatively, sew each bead individually into the magic ring area to create the clustered center seen in the photo. Fasten off threads and hide ends within the back of the flower. (6-8 beads)
Info :
If you prefer not to use beads, embroider a small raised French-knot-style cluster with yellow yarn or create a small yarn pom-pom to secure at the flower center. Beads add a bright metallic punch consistent with the pictured runner.
Round 8 :
Poinsettia Finishing: Block the flower by pinning petals flat and using a light steam to set shape. Let dry fully. Repeat to make a second identical poinsettia. Make sure both flowers look mirror-symmetric so they read the same when sewn to both ends of the runner. (2 motifs total)
Info :
For an even more authentic look, slightly curl the petal tips by pinning them under a rolled towel, dampening lightly, and letting dry overnight. This gives a natural petal curve like the picture.
— Corner Point & End Row Shaping (Short Ends with Leaf Points) :
Round 1 :
Short-End Fan Row: At each short end where the poinsettia will be attached, work a denser cluster of scallops to produce extra large leaf points. Start by inserting green yarn at corner and work: *2 sc in corner, ch3, 5 dc shell, ch3, 2 sc in corner* across the short end until you have created 5 triangular fans that form a wide leaf bed for the poinsettia. (5 fans at each short end)
Round 2 :
Round 2: Into the tip of each short-end fan work a 7-dc shell to emphasize the leaf point: *ch1, (7 dc shell) into tip, sl st into next base.* This will produce a deeper triangular leaf that's taller and more pronounced to mirror the picture. (5 pronounced leaves)
Info :
These pronounced leaves will be the base where the layered green backing leaves of the poinsettia rest. Make sure they are centered on the short end and that the two short ends match perfectly to keep visual balance for the finished runner.
Round 3 :
Edge Crisping at Short Ends: Work one round of sc around the short end fans, placing two sc into each shell valley and three sc into each shell tip to keep the points stiff and neat. Finish with a round of sl st to tidy. Fasten off and weave in ends. (sc round to tidy)
Info :
When attaching poinsettia, position it centered on these short-end leaves. Use straight pins to hold the poinsettia in position and check for symmetry before sewing.
— Attaching Poinsettias & Final Assembly :
Round 1 :
Position Flower: Place the completed poinsettia centered on the short-end leaf bed you prepared. The bottom petals should tuck slightly under the outer green leaves to appear sunken into the border. Pin in place through the center and around the lower leaves to prevent shifting. (1 position per end)
Round 2 :
Sewing Petals: Using a matching green thread/yarn and a yarn needle, whip stitch the back leaves of the poinsettia to the scalloped leaf points first, stitching through the leaf base and into the green shell bases of the runner. Make small, tight stitches so the join is secure but invisible from the front. Continue by sewing the red petals into the red/green seam with hidden stitches at the petal base. (secure both poinsettias firmly)
Info :
When sewing beads, take care not to let needle pass through petals where it would show on the front. Work through the back layers and knot securely. Add a drop of fabric glue under the bead cluster only if you are sure it will not show.
Round 3 :
Check Shape: After sewing, lay the runner flat and adjust petals and scallops so everything sits evenly. Use blocking pins to re-shape the scallops and flower petals as necessary. Let dry thoroughly if you have used any water blocking. Remove pins and tidy any loose ends on the back. (final shaping)
Info :
For long-term use, you may wish to sew a light muslin backing to the underside of the runner to keep beads secure and reduce abrasion on furniture surfaces. If adding a backing, sew it on by hand around the outermost sl st round, leaving a small opening to remove dust as needed.
— Optional Embellishments and Variation Rounds :
Round 1 :
Raised Centre Row (optional): If you prefer a padded center for the poinsettia, create a narrow band of stuffing: crochet a 2-3 row cord in green and place it under the flower center, then whip stitch the flower and cord to the runner; this yields a raised bloom similar to floral centerpieces. (1 padded band)
Info :
Adding a padded band or thin batting requires secure sewing and a backing to prevent shifting. Use small running stitches when attaching so padding stays in place when laundered carefully.
Round 2 :
Adding Fringe (optional): To create a fringe at the short ends, cut 2" (5 cm) lengths of red and green yarn, fold in half and use a crochet hook to pull through target points around short-end shell bases, knot and trim evenly. This creates a more rustic look and can be done before final blocking. (fringe optional)
Info :
If adding fringe, ensure strands are tied tightly and woven under stitches for durability; long, loose fringe will snag during use.
— Care & Blocking :
Info :
Wash carefully by hand in lukewarm water with mild detergent. Gently blot excess water and pin to blocking mats to shape scallops and bloom petals. For acrylic yarn, use a low steam iron at arm's length for shaping; check label for fiber instructions. Remove beads before washing if unsure of their finish.
Info :
Store runner flat or rolled to avoid crushing scallops. Avoid placing heavy centerpieces over the poinsettia which can flatten petals over time.
Completing this festive table runner is such a rewarding holiday project — it transforms a simple table into a seasonal centerpiece with handmade charm! The combination of granny-cluster texture, scalloped green points, and layered poinsettias creates a timeless look you’ll enjoy year after year. Gather your yarn, pick your favorite beads, and make a runner to share as a welcoming gift or to keep for your own cozy holiday table. 🧶✨🎄