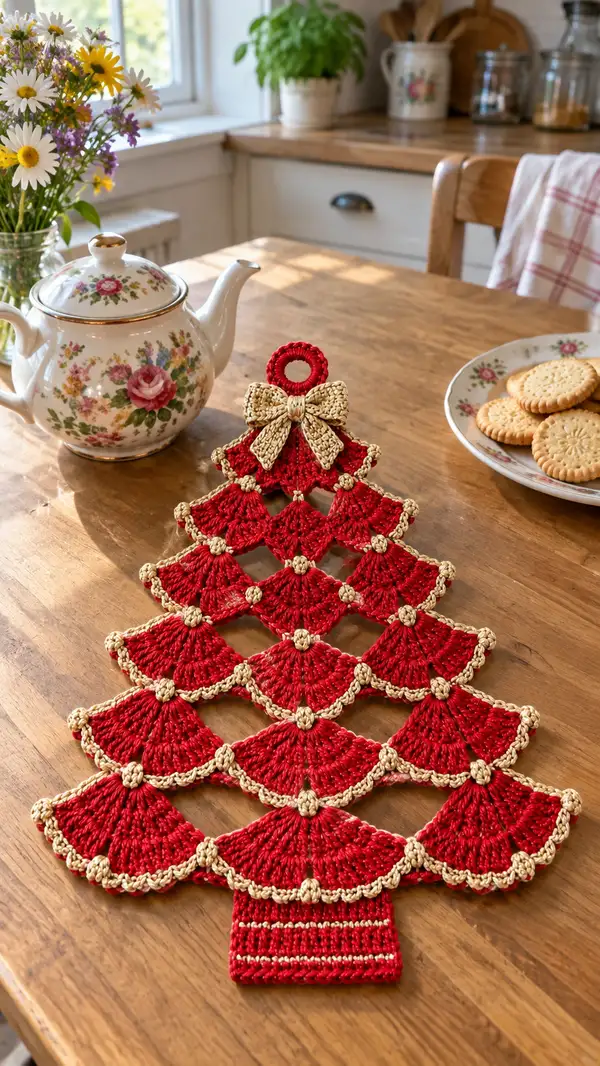
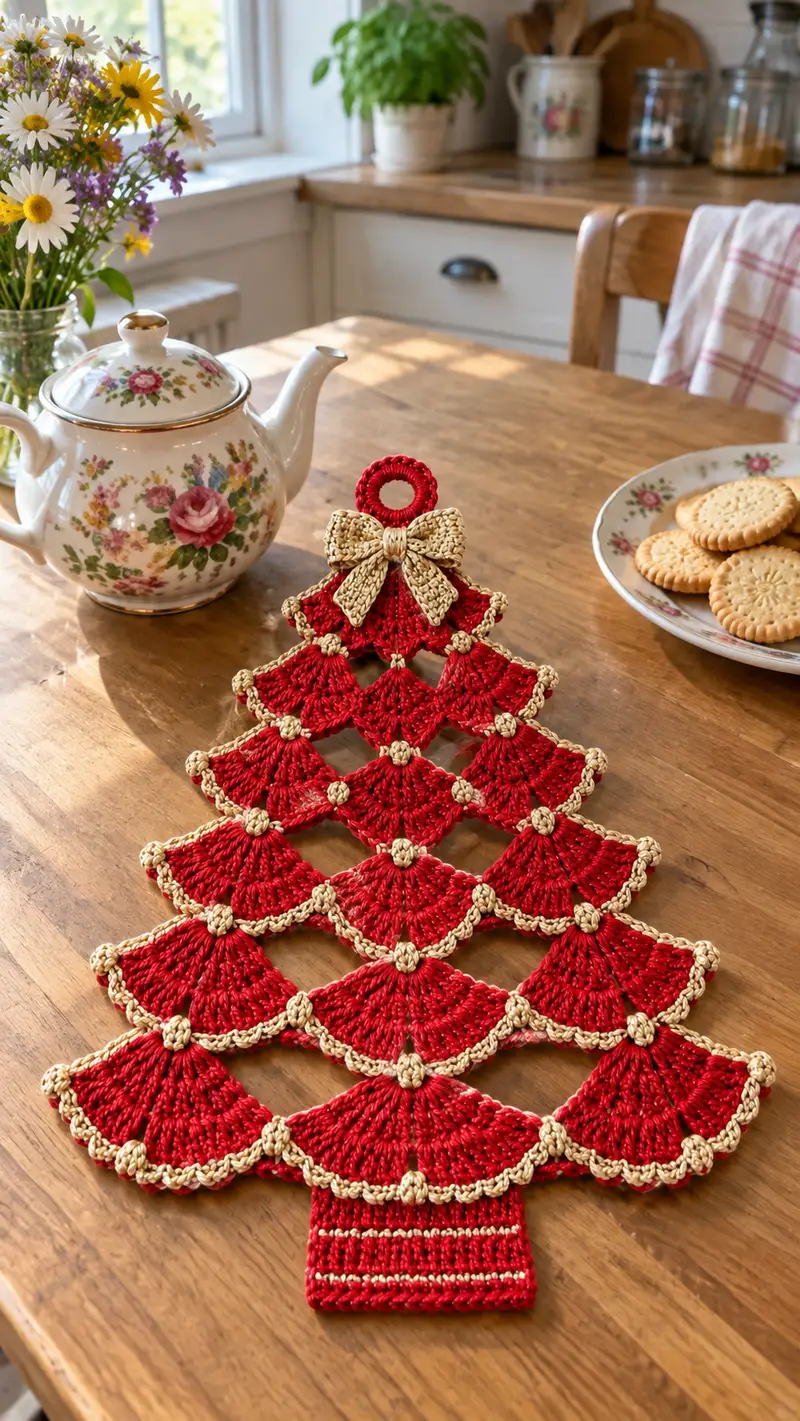
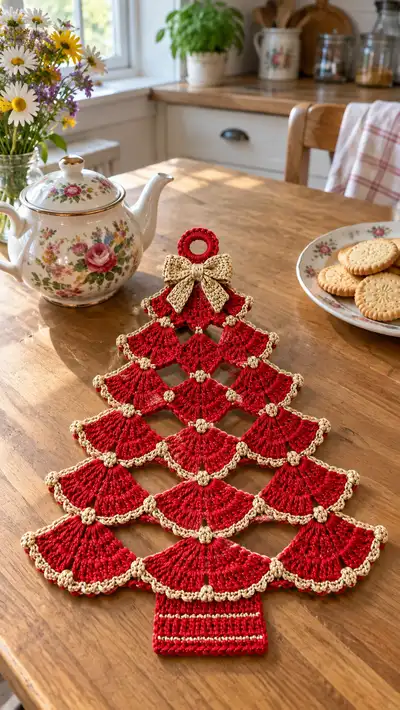
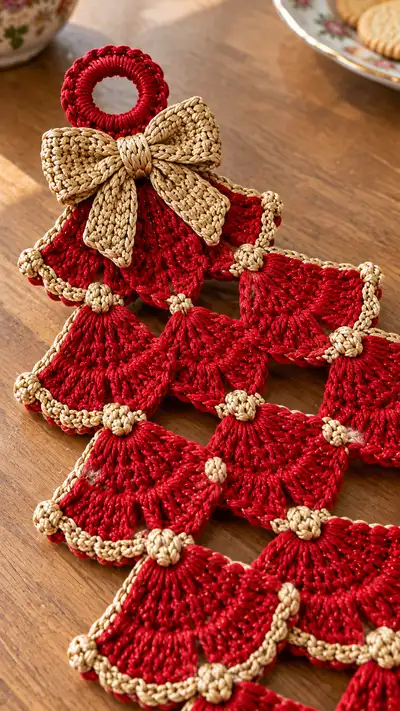
A lacy, elegant Christmas tree-shaped table runner composed of red fan motifs joined by tiny gold bobble joins, edged in metallic gold and finished with a woven top loop and large gold bow. The layered fans create a scalloped, dimensional tree silhouette perfect for holiday tabletops. Worked in cotton or cotton-blend with a metallic accent, this project is decorative, sturdy, and gift-ready.
Progress Tracker
0% Complete
— Fan Motif (Make 15 identical fans) :
Round 1 :
With red yarn, make a magic ring. Ch3 (counts as first dc), work 11 dc into ring. Join to top of ch3 with sl st. (12)
Round 2 :
Ch3 (counts as dc), 1 dc in same st, *ch1, skip next st, 2 dc in next st; rep from * around to create 6 little V-spaces. Join with sl st to top of ch3. (12 clusters of 2 dc separated by ch1)
Round 3 :
Ch3 (counts as dc), in each ch1 space make (1 dc, ch2, 1 dc) forming 6 small shell arches. Join with sl st. (12 dc + 6 ch2 loops)
Info :
Keep tension even; these small shells become the anchor points for later larger shells. Place a stitch marker in the first st of round 3 to help alignment if you plan to join motifs as you go.
Round 4 :
Change to a slightly larger shell: work in each ch2 space (ch3, 4 dc, ch2, 5 dc, ch1) - this makes a fan segment. Repeat across all 6 spaces (6 fans across semicircle). Join with sl st. (each fan contains 9 dc typically; total stitch-equivalent around 54 dc with 6 ch1 separators)
Round 5 :
Ch1, sc in same st, *ch3, skip to center of next fan (approx 4th dc of fan), sc in center dc; rep across creating small arches along fan edges. At end, sl st to first sc. (6 sc + 6 ch3 loops)
Round 6 :
Work extended shell into each ch3 loop to create the more pronounced scallop: (ch3, 7 dc, ch3) in each loop. This gives a rounded fan edge. Join with sl st. (6 large scallops)
Info :
Round 6 is where the motif gets its width. Check that shells are even; if one shell is slack, tighten by adjusting the tension on the initial ch3 in that shell. Count dc to ensure consistency (7 dc per scallop).
Round 7 :
Ch1, sc in first dc of shell, *ch2, sk 3 dc, sc in next dc (center of shell); rep across to create small picot foundations between scallops. Sl st to first sc. (6 sc + 6 ch2 spaces)
Round 8 :
In each ch2 space work: (sc, ch3, sc) to make tighter spacing for the gold bobble joins later. Sl st to join. (6 small arches)
Round 9 :
Ch1, sc in same st, *2 hdc in next 3 dc of scallop, ch1, 2 hdc in next 3 dc; rep across the semicircle to compress scallop at base and make the fan more triangular. Sl st to join. (approx 36 hdc total)
Info :
Optional: At this stage block the fan flat if desired to even the scallops and ensure consistent shape across all motifs — pin to shape and spray lightly with water, allowing to dry completely.
Round 10 :
Change to gold accent yarn with an Info join (see below) and sl st to first sc: Info: Change to gold yarn. Fasten red tail in between stitches and begin edging in gold. Carry unused red yarn inside if you plan to join later or fasten off red and weave ends.
Round 11 :
With gold yarn, ch1, sc evenly around the outer curve of the fan working 2 sc in the valley points where shells meet (approx 30–34 sc total depending on shell spacing). Join with sl st and fasten off gold or continue into bobble if joining immediately. (approx 32 sc)
Round 12 :
Info: If making separate bobble joins now, do not fasten off. For independent motif finishing, sl st to the central base st and fasten off red yarn leaving long tail for sewing (approx 12–18 in / 30–45cm). Weave in ends or leave to join later.
Round 13 :
Optional decorative picots along gold edge: ch3, sl st into 1st of 3 chs to form picot at every 4th sc around. This creates the delicate gold edging photo shows. Fasten off and weave ends. (picots approx 8–10)
Round 14 :
Info: Repeat motif exactly 15 times to create the full tree layout (bottom row 5 motifs, next 4 motifs, next 3 motifs, next 2 motifs, top 1 motif). Make motifs flat and consistent in size; blocking helps unify size.
— Gold Bobble Join (Make 14 joins/centers) :
Round 1 :
With gold yarn, ch4, join with sl st to form small ring. (ch4 loop)
Round 2 :
Ch1, 8 sc into ring, sl st to first sc. (8)
Round 3 :
Ch1, (2 sc in next st) x8 to slightly puff the join into a small knob. (16)
Round 4 :
Info: For a raised bobble similar to the photo, replace Round 3 with a 5-dc bobble made as follows: yo, insert hook, pull up loop, yo pull through 2 loops twice (repeat 5 times) leaving last loop on hook, yo and draw through all loops, ch1 to close. Secure with sl st. This yields a pronounced bobble look.
Round 5 :
Ch1, sc evenly around to tidy; join and fasten off leaving tail for sewing. If you prefer smaller joins, stop after Round 2 and sew directly. (approx 16 sc)
Info :
Make 14 of these gold buttons: 5 between each adjacent fan intersection and additional ones for the top and edges as pictured. These are both decorative and structural joins.
— Joining Fans into Rows (Tier Assembly) :
Info :
Layout plan: bottom row (Row A) uses 5 fans, Row B uses 4 fans, Row C uses 3 fans, Row D uses 2 fans, Row E uses 1 fan. There are 14 interior joins between fans and 9 joins along the scalloped edges to create the layered overlap.
Round 1 :
Place 5 fans for bottom row in a straight line, right sides up, edges touching so adjacent scallops meet. Use gold yarn and a tapestry needle to sew a gold bobble join through the picot point where the scallops meet — stitch through both motif edges and through the bobble tail to secure. Repeat between each adjacent pair (4 joins for bottom row). Secure firmly. (Row A joins 4)
Round 2 :
Row B: Place 4 fans above Row A, offset so each Row B fan sits in the valley of 2 beneath into a diamond lattice. Join each Row B fan to the two fans below with gold bobble joins at both lower edge points (8 joins across Row B). For each join: align center points, use gold yarn through motif edge and bobble center, sew multiple passes to secure. (Row B joins 8)
Round 3 :
Row C: Place 3 fans above Row B, join each to two fans below with bobble joins (6 joins). Row D: Place 2 fans, join to two fans below with 3 joins total. Row E: Top single fan attaches to two fans below with 2 joins. Overall count will equal 14 interior joins plus edge stabilization (see Info).
Info :
When sewing joins, keep motifs slightly overlapped so the top fan sits partially over the two beneath—this creates the tiered tree silhouette and shadowing visible in the photo. Use blocking pins to hold placement while sewing.
Round 4 :
Edge stabilization: Once core joins are sewn, add small sc seams along intersection points with gold yarn to maintain spacing—work 3 sc through both motif edges at every bobble join so looks neat and prevents sagging (approx 30 small sc passes across entire tree).
Round 5 :
Info: Be careful not to pull too tightly when stitching joins — slight looseness preserves the lacy, layered look while preventing puckering. Check that tree remains flat on a table as you join; adjust spacing if necessary.
— Edge Scallop Trim (Work continuous around assembled tree edges) :
Round 1 :
With gold yarn and 3.0mm hook, attach to bottom left scallop outermost sc. Ch1, sc evenly around the outer perimeter of the assembled tree edge, working 2 sc in each valley between scallops to accentuate the scalloped shape. Join with sl st. (approx 100 sc depending on arrangement)
Round 2 :
Ch3, *skip next sc, work 5 dc in next sc for a bold shell, skip next sc, sl st into next sc; rep across entire edge to make continuous shells matching the fan edges. Sl st to join and fasten off. (approx 20 shells)
Info :
This gold scallop trim is visible in the photo as a neat gold rim on each fan tier; adjust dc count inside shells to match the size of your fan shells so the edge sits smoothly.
— Trunk (Make 1) :
Round 1 :
With red yarn, ch12, join to work in the rnd or work flat in rows for a rectangular trunk. For a solid small trunk, we will work flat rows: Row1: sc in 2nd ch from hook and across (11 sc). Turn.
Round 2 :
Work in BLO to create ridged knit-like texture: ch1, sc in BLO across (11 sc). Turn.
Round 3 :
Repeat Round 2 for additional 10 rows total to reach approximately 1.75–2 inches tall (or proportional width to tree base). Count rows: do 12 rows including Row1 and Row2. (Row count 12 gives trunk height)
Info :
After desired length, fold rectangle in half (short edges together) and seam sides with sc through both layers to create a hollow tube trunk. Stuff lightly with polyester filling before fully closing to give a bit of stability. Sew trunk to bottom center fan with neat whip stitch through trunk shell and base fan center.
Round 4 :
Optional gold stripe: before seaming trunk, work 2 rounds of single crochet in gold across the trunk in rows 4 and 8 to mimic the subtle gold lines visible in the reference photo. Fasten off and weave ends in neatly. (approx 11 sc per row)
— Wrapped Top Loop (Make 1) :
Round 1 :
Use a small plastic or wooden ring approx 25mm wide. With red yarn, attach to ring and wrap tightly with sc stitches around entire ring until fully covered. If ring is small, ch1, sc around ring. Fasten off and weave ends. (wrapped ring)
Round 2 :
Info: For a firm look as in the photo, wrap two strands of red together (or use red + thin metallic thread) while crocheting to create a chunky wrapped ring. Once wrapped, sew the ring to top fan center using multiple passes through base and ring to anchor securely.
Round 3 :
To create the decorative small red coil inside the ring (as in photo), with red yarn work 1 sc in each stitch around ring for 3 rounds creating a rope-like wrapped coil. Fasten off and hide ends inside ring.
— Decorative Bow (Make 1 large bow) :
Round 1 :
With gold yarn and 3.0mm hook, ch22. Row1: sc in 2nd ch from hook and across (21 sc). Turn. (bow tail foundation)
Round 2 :
Ch1, sc in BLO across (21 sc). Turn. Repeat Row2 for a total of 6 rows to create a slightly stiff band. Fasten off leaving long tail for tying. (6 rows)
Round 3 :
Fold the band and gather center tightly to create the bow shape: wrap with gold yarn multiple times to cinch, then secure with tying tail. Shape loops so they sit wide and flat as in photo. Fasten off and hide ends. (bow loop 1)
Round 4 :
Make two tails: ch18, sc back across (17 sc) for each tail, work 3 rows in BLO, fasten off and attach tails beneath bow body with a few stitches. Trim tails to desired length and angle ends. (2 tails)
Round 5 :
Info: Add a small wrapped band (approx 1” long) of gold around bow center: ch6, sc across 5 sts in 3 rows, wrap around bow center and sew ends. This neat wrap is visible in the photo and hides cinching stitches.
Round 6 :
Attach bow to top fan: place bow centered above top fan scallop, sew through base of bow and top fan with strong gold yarn. Sew wrapped ring on top behind bow so the bow sits in front of the ring as pictured. Reinforce with a few extra stitches and weave ends in.
— Decorative Gold Knot Buttons for Edge Points :
Round 1 :
Using gold yarn and small hook, make a magic ring and work 6 sc into ring. Pull tight. (6)
Round 2 :
Ch1, (2 sc in next st) x6. (12)
Round 3 :
Slip stitch around outer edge and fasten off leaving long tail for sewing. Make 10–12 small gold knots to sew at each scallop meeting point around the tree edges and interior joins to match the photo. (10–12 knots)
Info :
These small knots add the highlighted gold dots visible at every scallop intersection in the reference image; they also help secure layered fans by catching multiple layers with a tiny anchor stitch.
— Final Assembly and Finishing :
Round 1 :
Info: Block the assembled tree laying flat on a towel or blocking mat; pin each scallop to flatten and shape. Lightly steam or spray with water and allow to dry fully to set shape. This ensures a neat, flat runner as shown in the photos.
Round 2 :
Once dry, weave in any remaining tails and tidy the reverse side so it lies flat on the tabletop. If you want a slightly stiffer runner, press a lightweight fusible interfacing to the trunk backside (careful with heat and yarn type).
Round 3 :
Attach trunk bottom to the assembled lowest fan by sewing across the whole seam area with matching red yarn. Reinforce with additional stitches to avoid sagging when displayed vertically.
Round 4 :
Attach wrapped ring and bow to top fan center: position ring behind bow and sew through ring and fan base with gold yarn. Fasten off and weave ends tightly. Check bow placement visually and adjust loops if needed.
Round 5 :
Info: Optionally add a small loop of ribbon or a magnet to the trunk back if you plan to hang or attach the runner to a decorative board. For table use, add small non-slip pads beneath the trunk and center to keep runner from sliding.
Round 6 :
Gently steam once more and shape loops of the bow so they sit open and full. Trim any stray fibers from metallic yarn to keep the piece polished.
Round 7 :
Congratulations! Your tree runner is complete — place on table, under a small dish or teapot for a festive centerpiece, or use as a decorative hanging by the top loop.
This lacy Christmas tree runner brings instant holiday charm to any tabletop — the layered red fans and gleaming gold accents feel both vintage and modern. Each scalloped tier builds into a cohesive, dimensional silhouette that makes a striking centerpiece. Whether you tuck a teapot on top or hang it by the wrapped loop, this piece is a delightful handmade celebration of the season. 🎁🎀