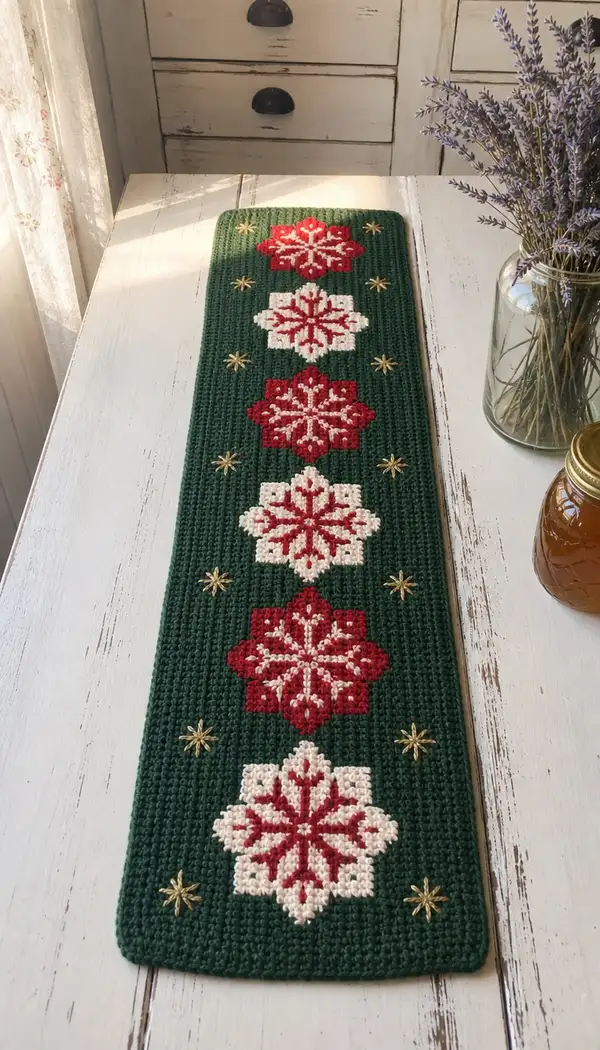
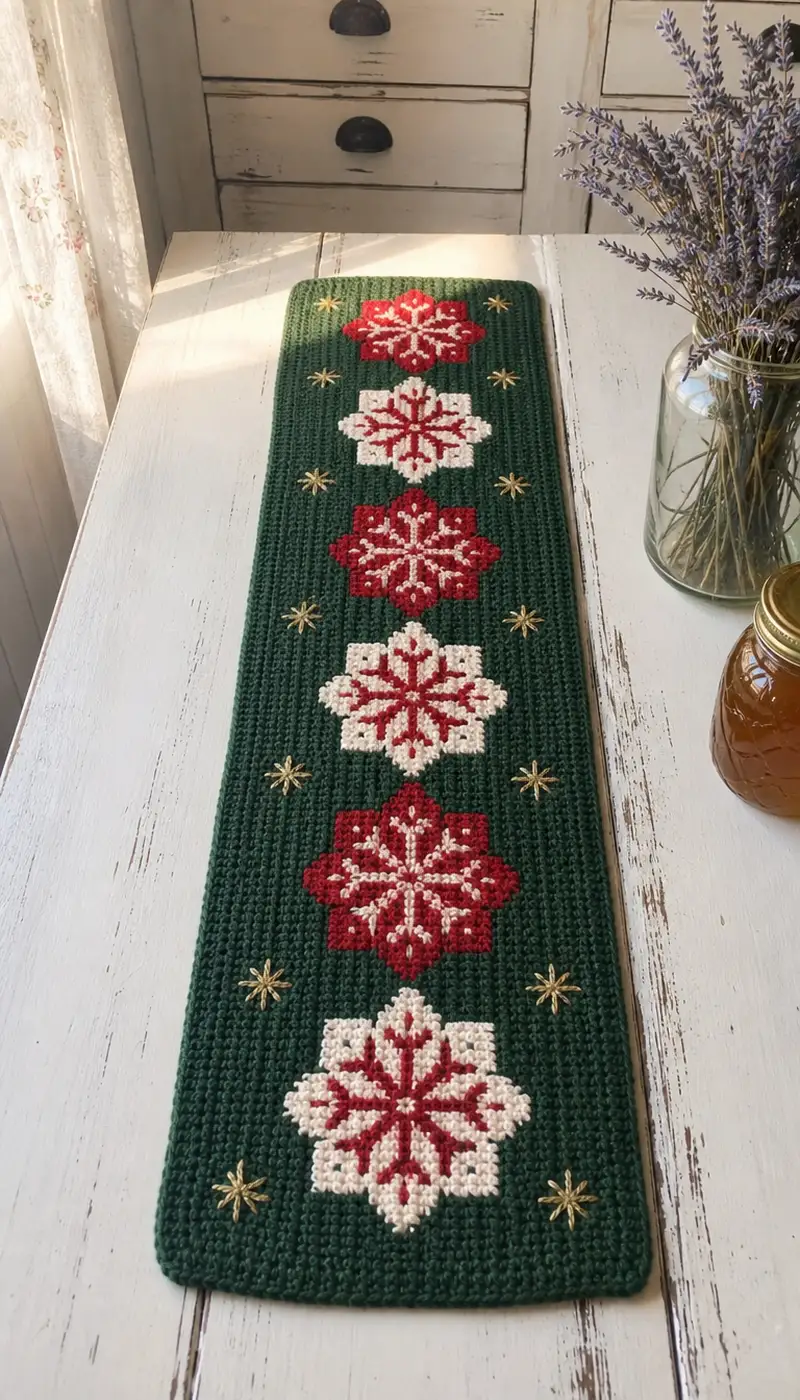
Create a beautiful holiday table runner worked in tapestry single crochet with alternating red and cream snowflake medallions on a deep forest green field. This long, narrow runner features six centered snowflake motifs, delicate gold embroidered stars, and a neat scalloped crochet border for a polished, vintage-inspired finish. A perfect seasonal accent for your farmhouse table or holiday display.
Progress Tracker
0% Complete
— Runner :
Notes :
This runner is worked flat in tapestry single crochet. Throughout the pattern you will carry the unused color along the wrong side as floats. Maintain even tension when carrying yarn so floats are not too tight (which will pucker) or too loose (which will sag). The foundation chain is 67 chains (this yields 67 stitches across). Each row begins with ch1 and 1 sc in the first stitch unless otherwise specified. Count your stitches each row to keep the piece rectangular. The motif block is centered across the width and spans 21 stitches; that leaves 23 background stitches on each side (23 + 21 + 23 = 67).
Materials Reminder :
Forest green is abbreviated as 'G', Cranberry red as 'R', Cream/off-white as 'C', Gold embroidery for stars will be added after crocheting.
Gauge :
Gauge is not strict for this accessory but aim for 20 sc and 22 rows = 4 inches in single crochet with 4.0 mm hook. Adjust hook if needed to match fabric density for the runner to lie flat and look similar to pattern photo.
Foundation :
Ch 68, sc in 2nd ch from hook and across for 67 sc. (67)
Row 1 :
Ch1, turn. Sc in each st across in G (67)
Row 2-6 :
Ch1, turn. Sc in each st across in G (67) — work 5 more rows of even background to create a clean base before the first medallion (Rows 2-6 = 5 rows)
Info :
Place a stitch marker in the first stitch of Row 6 to mark the base edge. These first 6 rows are full-background rows; they create a stable starting border and help center the first motif properly.
Row 7 :
Ch1, turn. Sc in each st across first 23 sts in G. Change to C on next st. Work motif block (21 sts) as: C10, R1, C10 (21). Change to G and sc in remaining 23 sts. (67)
Row 8 :
Ch1, turn. Sc 23 G. Motif block: C9, R1, C1, R1, C9 (21). Sc 23 G. (67)
Row 9 :
Ch1, turn. Sc 23 G. Motif block: C8, R1, C3, R1, C8. Sc 23 G. (67)
Row 10 :
Ch1, turn. Sc 23 G. Motif block: C7, R1, C5, R1, C7. Sc 23 G. (67)
Row 11 :
Ch1, turn. Sc 23 G. Motif block: C5, R1, C9, R1, C5. Sc 23 G. (67)
Info :
When you change colors within the row, work the last yarn-over of the previous color and complete the stitch with the new color to create a neat color join. Carry unused color on the wrong side, catching floats every 4-6 stitches by twisting the active and carried yarns together.
Row 12 :
Ch1, turn. Sc 23 G. Motif block: C4, R1, C11, R1, C4. Sc 23 G. (67)
Row 13 :
Ch1, turn. Sc 23 G. Motif block: C3, R1, C13, R1, C3. Sc 23 G. (67)
Row 14 :
Ch1, turn. Sc 23 G. Motif block: C4, R1, C11, R1, C4. Sc 23 G. (67)
Row 15 :
Ch1, turn. Sc 23 G. Motif block: C5, R1, C9, R1, C5. Sc 23 G. (67)
Row 16 :
Ch1, turn. Sc 23 G. Motif block: C7, R1, C5, R1, C7. Sc 23 G. (67)
Row 17 :
Ch1, turn. Sc 23 G. Motif block: C8, R1, C3, R1, C8. Sc 23 G. (67)
Row 18 :
Ch1, turn. Sc 23 G. Motif block: C9, R1, C1, R1, C9. Sc 23 G. (67)
Row 19 :
Ch1, turn. Sc 23 G. Motif block: C10, R1, C10. Sc 23 G. (67)
Row 20-26 :
Ch1, turn. Sc in each st across in G (67) — work 7 full background rows to separate the medallions and provide even spacing (Rows 20-26 inclusive = 7 rows).
Info :
The first medallion (Rows 7-19) used C as the primary medallion color and R as the contrast (a cream medallion with cranberry star). The next medallion will invert those colors so the medallions alternate visually down the runner. Keep the motif block column positions identical for each medallion to maintain alignment.
Row 27 :
Ch1, turn. Sc 23 G. Motif block (now R primary, C contrast): R10, C1, R10. Sc 23 G. (67)
Row 28 :
Ch1, turn. Sc 23 G. Motif block: R9, C1, R1, C1, R9. Sc 23 G. (67)
Row 29 :
Ch1, turn. Sc 23 G. Motif block: R8, C1, R3, C1, R8. Sc 23 G. (67)
Row 30 :
Ch1, turn. Sc 23 G. Motif block: R7, C1, R5, C1, R7. Sc 23 G. (67)
Row 31 :
Ch1, turn. Sc 23 G. Motif block: R5, C1, R9, C1, R5. Sc 23 G. (67)
Info :
When carrying yarn, try to keep floats under 6 stitches whenever possible. For longer uninterrupted runs you may carry the yarn and catch it by twisting once in the working fabric or by weaving it in later if you prefer fewer catches but be mindful of tension.
Row 32 :
Ch1, turn. Sc 23 G. Motif block: R4, C1, R11, C1, R4. Sc 23 G. (67)
Row 33 :
Ch1, turn. Sc 23 G. Motif block: R3, C1, R13, C1, R3. Sc 23 G. (67)
Row 34 :
Ch1, turn. Sc 23 G. Motif block: R4, C1, R11, C1, R4. Sc 23 G. (67)
Row 35 :
Ch1, turn. Sc 23 G. Motif block: R5, C1, R9, C1, R5. Sc 23 G. (67)
Row 36 :
Ch1, turn. Sc 23 G. Motif block: R7, C1, R5, C1, R7. Sc 23 G. (67)
Row 37 :
Ch1, turn. Sc 23 G. Motif block: R8, C1, R3, C1, R8. Sc 23 G. (67)
Row 38 :
Ch1, turn. Sc 23 G. Motif block: R9, C1, R1, C1, R9. Sc 23 G. (67)
Row 39 :
Ch1, turn. Sc 23 G. Motif block: R10, C1, R10. Sc 23 G. (67)
Row 40-46 :
Ch1, turn. Sc in each st across in G (67) — background spacer (Rows 40-46 = 7 rows).
Info :
At this point you have completed two medallions (Rows 7-19 and Rows 27-39). Continue repeating the medallion sequence (cream medallion block followed by green spacer, then red medallion block and spacer) until you have six medallions in total. Keep the same 21-stitch motif block centered across the width for all medallions.
Row 47 :
Ch1, turn. Sc 23 G. Motif block (cream primary): C10, R1, C10. Sc 23 G. (67)
Row 48 :
Ch1, turn. Sc 23 G. Motif block: C9, R1, C1, R1, C9. Sc 23 G. (67)
Row 49 :
Ch1, turn. Sc 23 G. Motif block: C8, R1, C3, R1, C8. Sc 23 G. (67)
Row 50 :
Ch1, turn. Sc 23 G. Motif block: C7, R1, C5, R1, C7. Sc 23 G. (67)
Row 51 :
Ch1, turn. Sc 23 G. Motif block: C5, R1, C9, R1, C5. Sc 23 G. (67)
Row 52 :
Ch1, turn. Sc 23 G. Motif block: C4, R1, C11, R1, C4. Sc 23 G. (67)
Row 53 :
Ch1, turn. Sc 23 G. Motif block: C3, R1, C13, R1, C3. Sc 23 G. (67)
Row 54 :
Ch1, turn. Sc 23 G. Motif block: C4, R1, C11, R1, C4. Sc 23 G. (67)
Row 55 :
Ch1, turn. Sc 23 G. Motif block: C5, R1, C9, R1, C5. Sc 23 G. (67)
Row 56 :
Ch1, turn. Sc 23 G. Motif block: C7, R1, C5, R1, C7. Sc 23 G. (67)
Row 57 :
Ch1, turn. Sc 23 G. Motif block: C8, R1, C3, R1, C8. Sc 23 G. (67)
Row 58 :
Ch1, turn. Sc 23 G. Motif block: C9, R1, C1, R1, C9. Sc 23 G. (67)
Row 59 :
Ch1, turn. Sc 23 G. Motif block: C10, R1, C10. Sc 23 G. (67)
Row 60-66 :
Ch1, turn. Sc in each st across in G (67) — background spacer rows (Rows 60-66 = 7 rows)
Info :
You've now completed four medallions (Rows 7-19, 27-39, 47-59). Continue the alternating pattern two more times for a total of six medallions across the length of the runner. Keep track of which medallion color you last worked so alternation stays consistent. Use small sticky notes or a row counter if helpful.
Row 67 :
Ch1, turn. Sc 23 G. Motif block (R primary): R10, C1, R10. Sc 23 G. (67)
Row 68 :
Ch1, turn. Sc 23 G. Motif block: R9, C1, R1, C1, R9. Sc 23 G. (67)
Row 69 :
Ch1, turn. Sc 23 G. Motif block: R8, C1, R3, C1, R8. Sc 23 G. (67)
Row 70 :
Ch1, turn. Sc 23 G. Motif block: R7, C1, R5, C1, R7. Sc 23 G. (67)
Row 71 :
Ch1, turn. Sc 23 G. Motif block: R5, C1, R9, C1, R5. Sc 23 G. (67)
Row 72 :
Ch1, turn. Sc 23 G. Motif block: R4, C1, R11, C1, R4. Sc 23 G. (67)
Row 73 :
Ch1, turn. Sc 23 G. Motif block: R3, C1, R13, C1, R3. Sc 23 G. (67)
Row 74 :
Ch1, turn. Sc 23 G. Motif block: R4, C1, R11, C1, R4. Sc 23 G. (67)
Row 75 :
Ch1, turn. Sc 23 G. Motif block: R5, C1, R9, C1, R5. Sc 23 G. (67)
Row 76 :
Ch1, turn. Sc 23 G. Motif block: R7, C1, R5, C1, R7. Sc 23 G. (67)
Row 77 :
Ch1, turn. Sc 23 G. Motif block: R8, C1, R3, C1, R8. Sc 23 G. (67)
Row 78 :
Ch1, turn. Sc 23 G. Motif block: R9, C1, R1, C1, R9. Sc 23 G. (67)
Row 79 :
Ch1, turn. Sc 23 G. Motif block: R10, C1, R10. Sc 23 G. (67)
Row 80-86 :
Ch1, turn. Sc in each st across in G (67) — background spacer rows (Rows 80-86 = 7 rows)
Info :
Two medallions remain. Work them as the next cream medallion (Rows 87-99 approximate) followed by the final red medallion (Rows 107-119), using the exact motif row mapping used above. Keep a tally of completed medallions — this prevents accidental repetition of the same color twice in a row.
Row 87 :
Ch1, turn. Sc 23 G. Motif block (cream primary): C10, R1, C10. Sc 23 G. (67)
Row 88 :
Ch1, turn. Sc 23 G. Motif block: C9, R1, C1, R1, C9. Sc 23 G. (67)
Row 89 :
Ch1, turn. Sc 23 G. Motif block: C8, R1, C3, R1, C8. Sc 23 G. (67)
Row 90 :
Ch1, turn. Sc 23 G. Motif block: C7, R1, C5, R1, C7. Sc 23 G. (67)
Row 91 :
Ch1, turn. Sc 23 G. Motif block: C5, R1, C9, R1, C5. Sc 23 G. (67)
Row 92 :
Ch1, turn. Sc 23 G. Motif block: C4, R1, C11, R1, C4. Sc 23 G. (67)
Row 93 :
Ch1, turn. Sc 23 G. Motif block: C3, R1, C13, R1, C3. Sc 23 G. (67)
Row 94 :
Ch1, turn. Sc 23 G. Motif block: C4, R1, C11, R1, C4. Sc 23 G. (67)
Row 95 :
Ch1, turn. Sc 23 G. Motif block: C5, R1, C9, R1, C5. Sc 23 G. (67)
Row 96 :
Ch1, turn. Sc 23 G. Motif block: C7, R1, C5, R1, C7. Sc 23 G. (67)
Row 97 :
Ch1, turn. Sc 23 G. Motif block: C8, R1, C3, R1, C8. Sc 23 G. (67)
Row 98 :
Ch1, turn. Sc 23 G. Motif block: C9, R1, C1, R1, C9. Sc 23 G. (67)
Row 99 :
Ch1, turn. Sc 23 G. Motif block: C10, R1, C10. Sc 23 G. (67)
Row 100-106 :
Ch1, turn. Sc in each st across in G (67) — background spacer rows (Rows 100-106 = 7 rows)
Row 107 :
Ch1, turn. Sc 23 G. Motif block (final medallion R primary): R10, C1, R10. Sc 23 G. (67)
Row 108 :
Ch1, turn. Sc 23 G. Motif block: R9, C1, R1, C1, R9. Sc 23 G. (67)
Row 109 :
Ch1, turn. Sc 23 G. Motif block: R8, C1, R3, C1, R8. Sc 23 G. (67)
Row 110 :
Ch1, turn. Sc 23 G. Motif block: R7, C1, R5, C1, R7. Sc 23 G. (67)
Row 111 :
Ch1, turn. Sc 23 G. Motif block: R5, C1, R9, C1, R5. Sc 23 G. (67)
Row 112 :
Ch1, turn. Sc 23 G. Motif block: R4, C1, R11, C1, R4. Sc 23 G. (67)
Row 113 :
Ch1, turn. Sc 23 G. Motif block: R3, C1, R13, C1, R3. Sc 23 G. (67)
Row 114 :
Ch1, turn. Sc 23 G. Motif block: R4, C1, R11, C1, R4. Sc 23 G. (67)
Row 115 :
Ch1, turn. Sc 23 G. Motif block: R5, C1, R9, C1, R5. Sc 23 G. (67)
Row 116 :
Ch1, turn. Sc 23 G. Motif block: R7, C1, R5, C1, R7. Sc 23 G. (67)
Row 117 :
Ch1, turn. Sc 23 G. Motif block: R8, C1, R3, C1, R8. Sc 23 G. (67)
Row 118 :
Ch1, turn. Sc 23 G. Motif block: R9, C1, R1, C1, R9. Sc 23 G. (67)
Row 119 :
Ch1, turn. Sc 23 G. Motif block: R10, C1, R10. Sc 23 G. (67)
Row 120-126 :
Ch1, turn. Sc in each st across in G (67) — final background spacer rows to mirror the beginning (Rows 120-126 = 7 rows)
Info :
You have now completed the rectangular field with six centered medallions. Count your medallions across the length; there should be six full medallions centered with equal green spacers between them. If your last row count is not 126, adjust the number of initial or final spacer rows evenly to keep symmetry.
Border Round 1 :
Work around entire rectangle in sc. From the RS, ch1 and turn your work to work along the short edge: Sc in each stitch along the side edge (these are the ends of rows — work 1 sc in each row end). In each corner work 3 sc to round the corner slightly. Continue along the long edge across the top, placing 3 sc in the corner at the opposite short edge and then along the bottom edge across, placing 3 sc in the final corner. Join with sl st to first sc. Aim to keep stitches even; you should end with approximately 2 sc for every row end plus sc across the cast-on row. (Work evenly, counting approximately 126 sc on each long side if you worked 126 rows.)
Border Round 2 :
Ch1. Sc in same st and each st around, placing 2 sc in each corner st to maintain a smooth rounded corner. Join with sl st. Keep tension slightly looser than body to avoid puckered edging. (Count should be roughly consistent with Round 1.)
Border Round 3 :
Ch1. Sc in BLO in each st around to create a subtle ridge. Work 2 sc in each corner. Join with sl st. Fasten off and weave in ends on the wrong side. The BLO round helps define the runner edge and slightly flattens corners for a neat finish.
Info :
Weave in tapestry floats and color ends carefully to the wrong side using a yarn needle. If floats are long they can be anchored by weaving them across a few stitches or by adding small running stitches of the carried color along the wrong side. Blocking: wet-block or steam-block gently to even out the piece and to settle motifs into a flat plane; pin corners gently and allow to dry completely.
Embroidery - Gold Stars :
After blocking, mark star placement centers: place a gold star between each medallion at the center of the spacer rows; there are 5 spaces between 6 medallions and additional corner stars if desired near the top and bottom spacers. Using metallic gold embroidery thread and an embroidery needle, work a simple 8-point star: Bring the thread up at the star center, make a long straight stitch outward to about 7-9 mm, come back through center, repeat at 45-degree increments for 8 points. Secure thread on the wrong side with small knots and weave ends in. Use a small amount of clear-drying fabric glue on the knot if you want extra holding power for metallic threads.
Finishing :
Weave in all ends, trim flush. If desired, add a small non-slip pad on the underside center if using on a slippery surface. Store flat to preserve shape; if folded, place tissue paper between folds to prevent deep creasing.
Final Dimensions :
Using the yarn and hook suggested, the finished runner measures approximately 12 inches (30 cm) wide by 48-52 inches (122-132 cm) long depending on final number of spacer rows and blocking. Adjust foundation chain or spacer row count to lengthen or shorten the runner to suit your table.
Info :
To make a narrower or wider runner, add or subtract multiples of 2 stitches to the foundation chain and shift motif block placement accordingly (keep motif block width 21 stitches and adjust side green stitch counts equally).
This elegant snowflake runner brings vintage holiday charm to any table and is a satisfying project that shows off careful tapestry work and tiny embroidered stars. The repetitive motif blocks make it meditative to crochet while the color swaps keep each section exciting. I love how the gold stars catch the light and how the deep forest green makes the red and cream medallions pop. 🧶✨ Spread holiday warmth through your home with every stitch — happy crocheting! 🎄