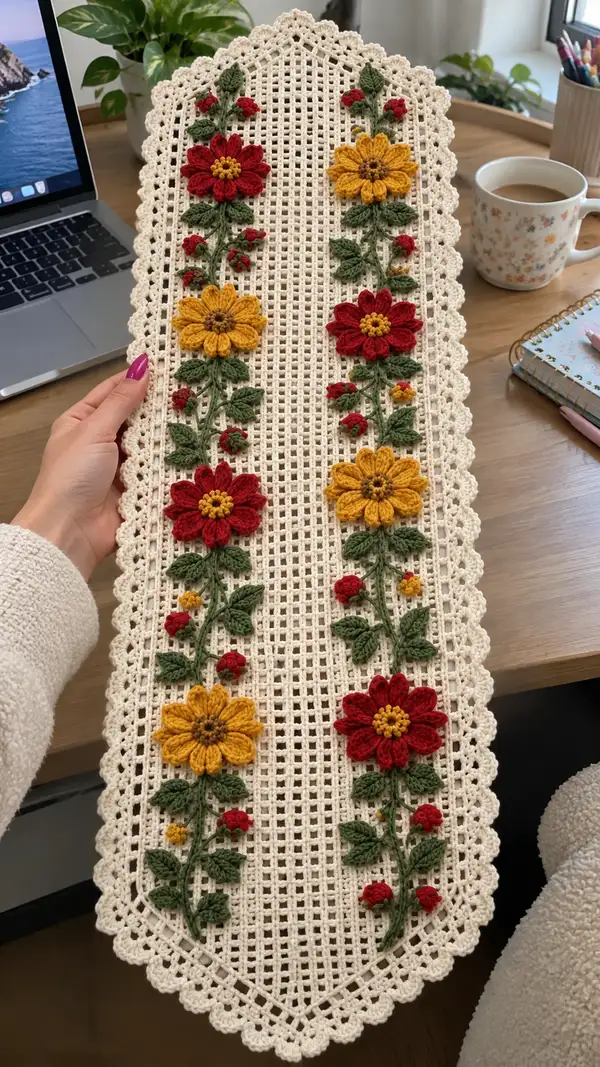
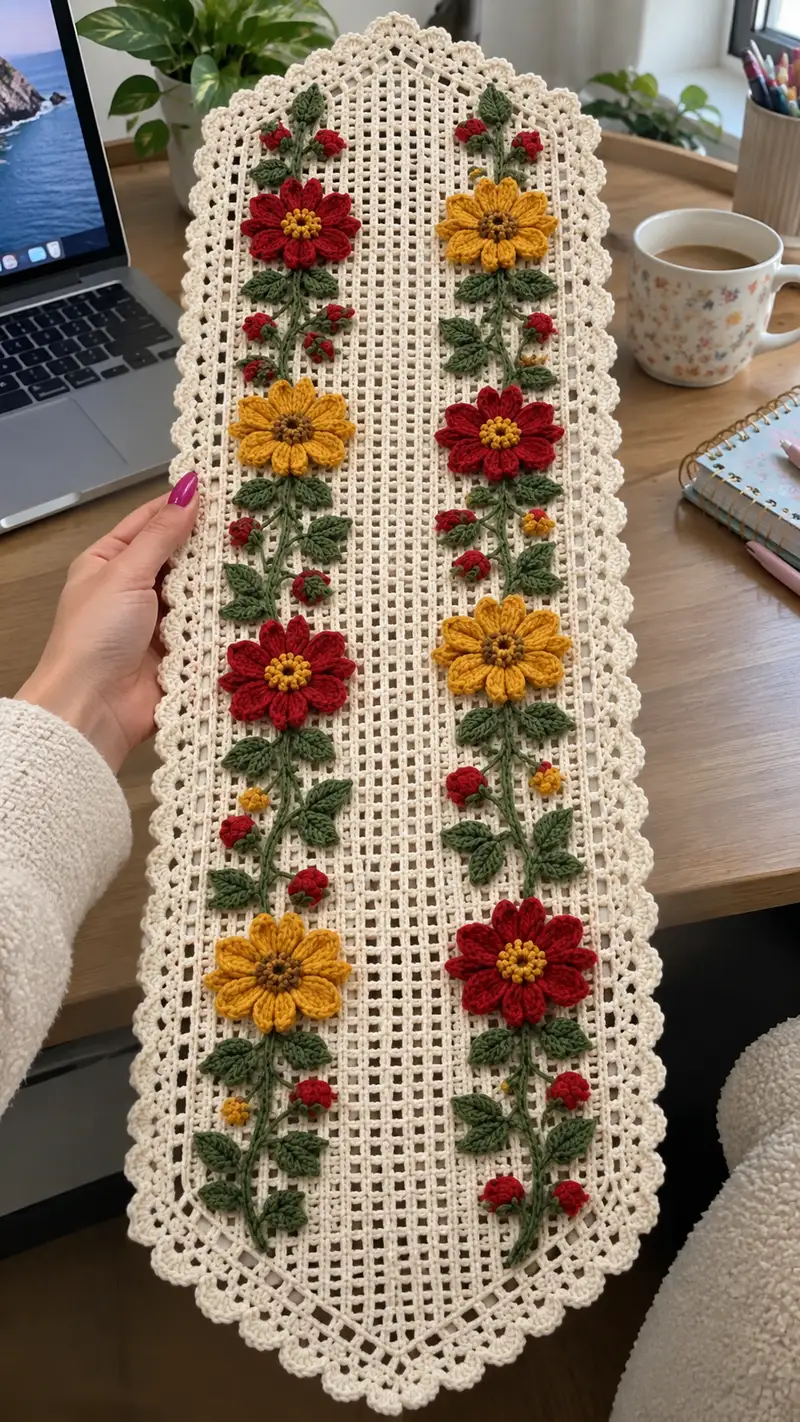
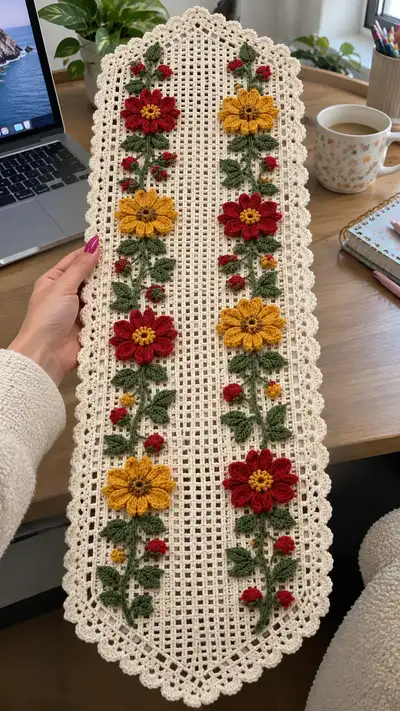
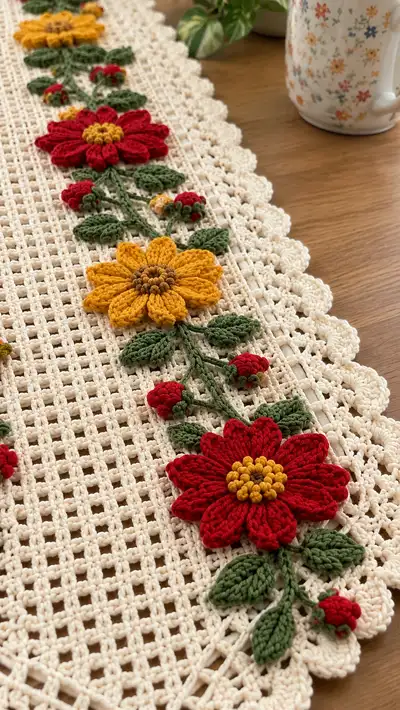
A vintage-inspired rectangular table runner worked in a delicate filet mesh with raised 3D floral appliques. The cream mesh base features two symmetrical vertical vines of mustard and deep red layered flowers, leafy green stems, and small rosebuds. Finished with a scalloped lace border, this runner adds handcrafted charm to any table or dresser.
Progress Tracker
0% Complete
— Overview :
Info :
This pattern describes a rectangular filet mesh runner with two embroidered vines of layered appliques. Work the mesh base first, finish with a scalloped border, then crochet individual floral units (large flowers, centers, leaves, buds, stems) and sew them in place. All motifs are made separately and appliqued to the blocked mesh for a raised effect.
Info :
Gauge is not critical because this is a decorative runner, but aim for a firm, even tension so the mesh stays crisp and clean. The example photos show a finished runner approximately 32cm wide by 78-85cm long; adjust foundation chain length for a different size.
— Filet Mesh Base (Foundation & Body) :
Round 1 :
Chain 123 (this is the foundation chain; 123 gives a neat width for a runner approximately 30–34cm depending on yarn and tension; ch 3 counts as first dc).
Round 2 :
Row 1 (RS): Dc in 4th ch from hook (counts as dc), *ch 2, sk 2 ch, dc in next ch; rep from * across until last 3 chains, dc in last chain—end with dc. You should have a repeating mesh of (dc,ch2) across. (Count depends on your chain; each mesh uses 1 dc + 2 ch). Mark the first dc as row start.
Info :
The mesh square used here is a standard openwork created by dc, ch2, skip 2. Each full mesh square uses 1 dc and 2 chains; count your total meshes across after Row 1 to plan motif placement. Block the chain gently if it feels uneven before continuing.
Round 3 :
Row 2 (WS): Ch 3 (counts as dc), turn. Dc in first dc, *ch 2, sk next ch-2 space, dc in next dc; rep across to end. Maintain mesh pattern and keep turning chain tall enough to register as a dc.
Round 4-30 :
Continue working Mesh Rows as in Row 2: ch 3, turn, dc into first stitch, *ch 2, sk next ch-2 sp, dc in next dc; rep across. Work a total of 28 rows of mesh (Rows 1–30 inclusive give you the central panel length before starting to place the first floral group). (Maintain consistent stitch count each row.)
Info :
Every 6–8 rows, check alignment of your mesh by counting meshes from the side to ensure columns stay straight. Use stitch markers at the edges every 10 rows if helpful. The mesh is reversible but decide which side you want as RS and keep motifs on that side.
Round 31-56 :
Work an additional 26 rows of mesh exactly as Round 3, for a total of 56 mesh rows. This long central area will accommodate three large flower positions in each vertical vine. Keep the same mesh count across every row; do not increase or decrease for these rows. (56 rows gives the runner its main working length before border.)
Info :
Mark three vertical placement points for flower groups along mesh length on each side column. Using a ruler/measuring tape, mark the RS where you want large flowers to sit—space them evenly so they visually align with the photos (roughly every 9–10 rows center to center). We'll place motifs after the mesh and before the final scalloped border to ensure proper alignment.
Round 57-64 :
Work 8 more mesh rows (ch 3, turn, dc, ch 2, sk, dc pattern) to complete the center panel before preparing edge shaping and border rounds. Keep the same stitch count and square spacing.
Info :
At this stage, you may block the entire mesh panel to exact dimensions. Pin the panel slightly rectangular and steam-block or wet-block to flatten the grid. Blocking helps appliques sit flat and keeps the scalloped border even.
— Edge Preparation Rows (to shape scalloped ends) :
Round 65 :
RS: Ch 1, turn. Work 1 sc evenly across top edge into each dc and ch-2 space around the short edge (head/end) of runner. At each corner, work 3 sc into the corner to give a small rounded turn. (This creates a neat edge for scallop foundation; stitch count equals number of vertical edge posts.)
Round 66 :
WS: Ch 1, turn. 1 sc in each sc across the short edge. Maintain consistent edge stitch count. Place 1 sc in each row-end to square the ends for scalloping. (The edge should now be closely stitched to create a firm base for scallops.)
Info :
Check that the short ends are neat: counting sc across the end helps ensure symmetrical scallops. If the ends feel fussy, add or reduce 1–2 sc in corners to balance the scallops later.
— Scalloped Lace Border (Long Sides) :
Round 67 :
Attach cream yarn at a corner (RS). Working along the long side: *sc in next 3 sts, (5 dc in next st) for a shell, sc in next 3 sts; rep along long side. At each short end, work (sc, ch 2, sc) into same stitches to round the corner gently. Continue to the other long side and finish with sl st to join. Count shells to be even on both sides (adjust by adding 1 sc between shells if necessary).
Info :
The shell used here is 5 dc shell for a firm scallop similar to the photo. If your shell spacing doesn't land evenly, adjust by spacing shells 4 sc apart instead; the goal is symmetrical scallops on both long edges.
Round 68 :
Ch 1, turn. Work sc across, placing 3 sc across each shell spread to reinforce. In the center of each 5-dc shell, place a picot (sl st, ch 3, sl st into top dc) to create the little puckered scallop edge as shown in the photo. Repeat around perimeter. Fasten off and weave ends.
Info :
Use a smaller 3.0mm hook for the scallop rounds if you prefer a firmer edge. Blocking now will shape the scallops into crisp rounded arcs like those in the reference images.
— Large Flower Motif A (Make 5: mustard and red alternates) :
Round 1 :
With mustard or red (petal color), make a magic ring. Ch 1, work 8 sc into magic ring. Pull ring closed. (8)
Round 2 :
(Inc around): (1 sc, inc) x 8 = 24 sc. (24)
Round 3 :
Ch 1, *[fpdc around next st] 3 times to create a puff petal base then ch 1 to anchor* — we will form petals by working in front post loops. Work an even circle of heights: (1 sc in next 2 sts, sc in next 2 sts) across to position petals evenly. (24)
Info :
The large flower petals are formed with elongated post stitches worked around a central round; using front post double crochet or front post treble creates raised petal ridges. You can use bobble or puff stitches for a rich textured petal as in the pictures.
Round 4 :
Petal set: *Ch 2, [in same st: (tr, tr, tr) cluster closed together], sl st to next sc; rep around to create 8 petals. Finish with sl st to join. (8 petals)
Round 5 :
Petal finishing: Into each petal base, work 6 hdc evenly around the petal cluster to define petal edges, then sl st at base to hold. This yields broad petals with a raised center line. Fasten off petals leaving a long tail for sewing. (8 petals x 6 hdc)
Info :
If you prefer a fuller petal like the red flower in the photo, work shorter, tighter hdc stitches around the petal cluster; for a flatter petal use dc instead. Keep tension consistent to ensure petals lie flat on the mesh when sewn.
Round 6 :
Center cluster (small brown/yellow): With brown, ch 2, work 12 sc into a magic ring, pull closed, do not fasten off. Join yellow yarn and work 12 small bobble clusters (each: *ch1, insert hook in sc, yo, pull up loop, yo, pull through 2 loops* rep 2 more times to form a 3-loop bobble then close) into each of the 12 sc to create a raised center cluster. Fasten off leaving tail for sewing. (12 cluster studs)
Info :
Small bobble centers are created with 3-loop bobbles or popcorn stitches. Use minimal stuffing in the center if you want a slight domed look (very little fiberfill, about a pea-sized bit). Sew the center to the petal base using the long tail.
— Large Flower Motif B (Alternate shape - layered petal variant) :
Round 1 :
With alternate color (red or mustard depending on placement), ch 4 and join to form a ring. Work 10 sc into ring. (10)
Round 2 :
(Inc): (1 sc, inc) x 10 = 30 sc. (30)
Round 3 :
Form inner petal ridges: *[fpdc around next st] then ch 1, sl st to next st* rep around to form 10 raised petal bases. (10)
Round 4 :
Outer petals: Into each raised petal base, work: (ch 2, 2 dc, tr, 2 dc, ch 2), sl st to the base between petal bases. This yields 10 wide, rounded petals. Fasten off. (10 petals)
Round 5 :
Center: With mustard or brown, create 14 sc in magic ring and attach to center with small cluster stitches to resemble the textured bead-like look. Fasten off leaving tail for sewing. (14)
Info :
You will make 10 large flowers total (5 per long column) alternating colors as pictured: top-to-bottom (red, mustard, red, mustard, red) on one column and the same mirrored on the other. Adjust center counts to keep centers proportionate.
— Leaf Unit (Make 20-30) :
Round 1 :
With green yarn, ch 6. Sc in 2nd ch from hook, hdc in next, dc in next, hdc in next, sc in last. (5 sts across chain crown)
Round 2 :
Working on opposite side of foundation chain, sc in same last ch (turning point), hdc in next, dc in next, hdc in next, sc in last. Fasten off leaving tail for sewing. This creates a small symmetric leaf. (10 sts total around)
Info :
To get the sculpted central vein effect, work one round of slip stitches around the leaf edge in BLO to cause a slight curl; or add a single line of stem stitch with yarn needle later.
Round 3 :
Optional vein: With a contrasting slightly darker green, embroider a single central running stitch from base to tip and pull slightly to create a raised vein. Knot and hide yarn tail on WS. Fasten and trim.
— Small Bud (Make many) :
Round 1 :
With red, ch 2. Work 6 sc into the ring, pull tight (6). (Create a tight round bud)
Round 2 :
With green, create 3 small leaf caps using (ch 3, sl st in base) around the bud by joining green and making tiny ch loops and sl sts to form calyx. Fasten off leaving a tail for sewing. Bud should be approximately 0.8–1.2 cm in diameter depending on yarn weight.
Info :
Buds are decorative and are sewn slightly raised to the mesh; do not stuff. Make multiple sizes: a full bud (6 sc) and a teeny bud (4 sc) to give visual interest along the vine.
— Stem & Vine (Make 4 long vines to sew onto mesh) :
Round 1 :
With green, ch 45 for a long vine length (adjust to mesh spacing). Row 1: Starting in 2nd ch from hook, sc across (44 sc). Fasten off. This creates a flat, narrow tape to sew down for the stem.
Round 2 :
Optional: For a tubular stem, chain 30, join in the round and sc spiral for 10 rounds to create a small cord, then fasten off. Stretch slightly when sewing to give a rounded stem appearance. Make several cords for thicker stems where flower clusters attach.
Info :
In the reference, stems look slightly raised and twisted; create this effect by using small I-cord style tubes or by crocheting a loose chain stitched into the mesh and then working sc around it to bulk it up. Sew stems in place with long running stitches to anchor them in the mesh squares.
— Assembly: Placing Motifs on Mesh :
Round 1 :
Block and pin the mesh flat. Decide which side is RS. Using a washable fabric pen or tailors chalk, mark the positions for the 5 flower centers along each vertical column—these should align roughly every 9–10 mesh rows. Use the same horizontal offset from the long edge on both columns to ensure symmetry.
Round 2 :
Position stems: Lay a stem cord along your marked vertical columns. Tack the stem at its top, bottom, and one stitch between each flower position using small invisible whip stitches with matching green thread. Ensure stems curve slightly as in the photo for a natural feel.
Info :
Sew motifs on RS with the same color yarn used for the motif for neatness. Use a yarn needle to sew the underside of petals and the backs of leaves so stitches don’t show on front. Work small, hidden stitches through the mesh squares rather than around surface loops for a secure anchor.
Round 3 :
Attach large flowers: Place each large flower so its center lands on the marked mesh square. Using long tails from the flower pieces, sew the center into the mesh by stitching through the underside of the center into adjacent dc posts, then secure each petal base at 2–3 points so petals remain slightly lifted from the background. Repeat for all 10 large flowers.
Round 4 :
Sew leaves: Place pairs or singles of leaves along the stems at intervals matching the photo. Sew just the base of each leaf into the stem and through one or two mesh bars to anchor. Slightly angle leaves to create a natural staggered look. Add a couple of leaves near flower bases for fullness.
Round 5 :
Sew buds: Tuck buds into clusters near flowers and between leaves. Use a small knot at the back to anchor the bud, then bury ends into the mesh. Use tiny stitches to hold the bud's calyx to the mesh so the bud appears to grow out of the stem.
Info :
Work slowly and pin each motif before sewing to test spacing. If petals are too flat, steam block them lightly after sewing to help them open. Use contrasting thread sparingly; match yarn color wherever possible for invisible joins.
— Additional Small Details (Tiny Flowerlets & Accent Dots) :
Round 1 :
Create small 3-sc pinwheel flowers: ch 2, work 3 sc in ring, pull tight, join, fasten off. Attach these as tiny accents between large flowers and buds.
Round 2 :
To make tiny mustard accent dots (photo shows small yellow dots), work a small bobble of 4 loops into a magic ring and sew into mesh where needed. These little clusters give the same hand-stitched beaded look.
Info :
Placement of tiny accents is what brings the runner to life. Sprinkle them asymmetrically within each cluster to mimic the organic look in the photos.
— Finishing Touches :
Round 1 :
Weave in all ends on the WS using a yarn needle. Take extra care to bury tails inside stem cords or behind leaves so nothing is visible on RS. Trim close to work after weaving.
Round 2 :
Light blocking: Spray the assembled runner lightly, pin to blocking board to true shape, and let dry. Block scallops to round them gently and ensure the runner lies flat. Avoid heavy steam on synthetic blends.
Info :
If you plan to launder the runner, use a gentle hand wash and lay flat to dry. The cotton yarn will soften after washing and blocking, giving a slightly less stiff finish similar to the photos.
Round 3 :
Optional: For extra durability, brush a tiny amount of diluted fabric stiffener onto the scallops (test on a swatch first) to preserve shape if the runner will be used frequently.
Info :
Careful finishing is what makes appliqued pieces look professional: tidy stitches, consistent blocking and matching thread will result in a clean, museum-quality finish.
Finishing this floral filet runner is such a joyful moment—watching the textured flowers lift off the mesh feels like magic! The layered petals and tiny buds add so much personality, and the scalloped border frames everything perfectly. Take a moment to block it gently and admire your handiwork; it will make a beautiful heirloom piece or thoughtful gift. 🧶🌼 Enjoy every stitch and the cozy warmth it brings to your home. ✨