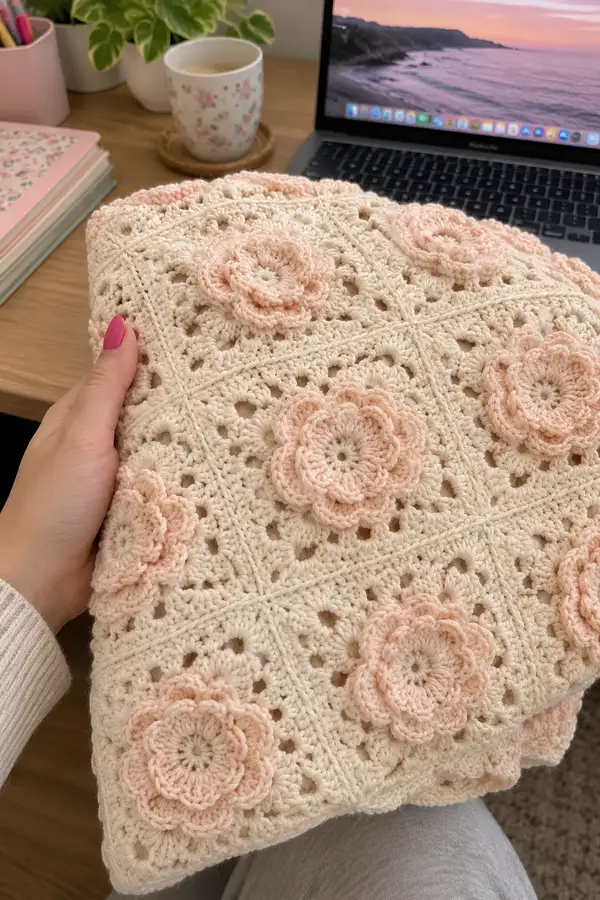
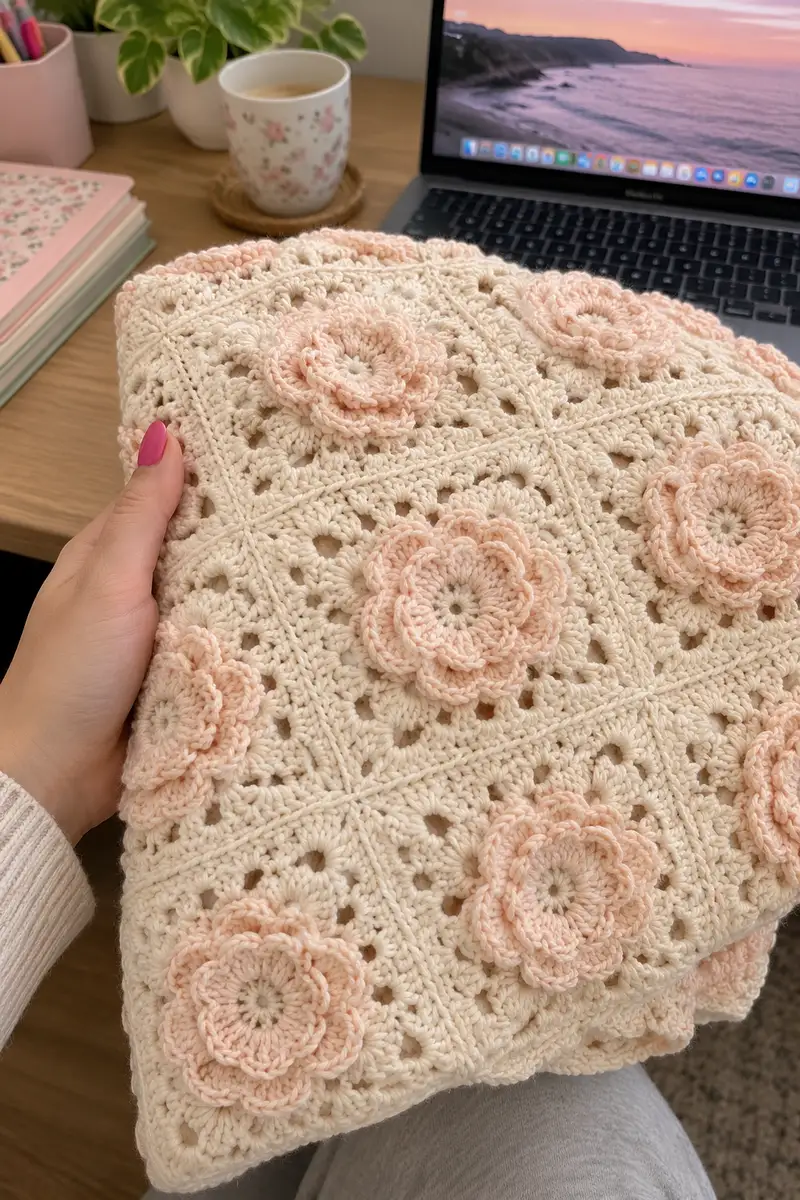
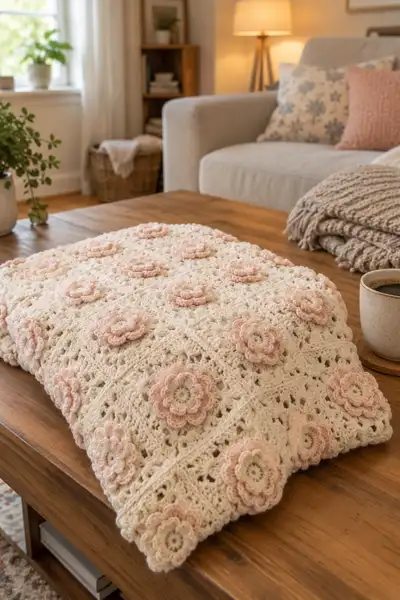
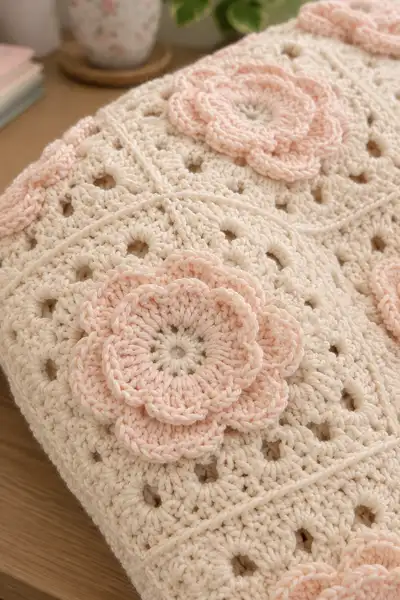
A soft, romantic bedspread made from lacy cream granny squares topped with layered 3D peach blossoms. This pattern teaches you to crochet textured floral granny squares, assemble them into a large bedspread and finish with a sculpted scallop border. Designed to create a cozy, vintage-inspired throw or full bedspread with dimensional flowers that pop.
Progress Tracker
0% Complete
— Notes & Gauge :
Info :
Gauge is not critical for pattern modularity, but for sizing reference: one finished square measures approximately 16 cm (6.25") across when worked with worsted weight yarn and a 4.5mm hook. Adjust hook to get neat, lacy texture and crisp petal definition. This pattern is modular: make as many squares as you need for your desired blanket size. Each square uses one layered flower.
— Flower Center :
Round 1 :
Make a magic ring, ch 1, 6 sc in magic ring. Pull tight. (6)
Round 2 :
Inc in each st around (2 sc in each st). (12)
Round 3 :
(1 sc, inc) x 6. (18)
Round 4 :
(2 sc, inc) x 6. (24)
Round 5 :
(3 sc, inc) x 6. (30)
Info :
Change to peach/flower color now if using contrast. Fasten off main color tail neatly and join accent color with sl st in any stitch. This will create a clean two-tone flower. Leave a 15-20 cm/6-8" tail for sewing later if you plan to sew the flower in place directly from this piece.
Round 6 :
Ch 1, 1 sc in each st around. (30)
Round 7 :
Ch 1, (2 sc in next st, 1 sc in next 4 sts) x 5, 2 sc in last st to end evenly. (36)
Round 8 :
Ch 1, 1 sc in each st around to even out (36)
Info :
Round 6-8 form a stable disc for the petal base; maintain even tension. The counts above place the base stitches where petals will anchor — every 3rd stitch approximately.
— Petal Layer 1 (Inner Petals) :
Round 9 :
Join peach color if not already. Ch 1, *sl st into next st, ch 1, sl st into next st; rep from * around to create small loop foundation (36 anchor points). End with sl st to first sl st. (36)
Round 10 :
*Insert hook around the foundation sl st loop from previous round, ch 1, (sc, hdc, 3 dc, hdc, sc) all worked into same loop to make a rounded petal. Sl st into next sl st; rep from * around. You will make 12 petals by working into every 3rd anchor approximately: (sc,hdc,3dc,hdc,sc) x 12. (12 petals)
Info :
Petal spacing: if you find your loop spacing uneven, adjust by working petals into the visual gaps on the disc so petals sit evenly. Use stitch markers to mark the 12 petal positions before you start round 10.
Round 11 :
Ch 1, sl st behind each petal into the disc to anchor petals closer to the disc; sl st around behind petals (12 sl st). Fasten off and weave in ends or leave tail for sewing. (12)
Info :
Optional slight blocking: place petals flat and pin into shape to hold curvature before adding outer layer. Mist with water and let dry for crisp petals.
— Petal Layer 2 (Outer Layer, Larger Petals) :
Round 13 :
Rejoin peach color in any space between inner petals behind petal base. Ch 2 (counts as hdc), *work (hdc, 3 dc, hdc) into space between inner petals, ch 1, sl st into top of next inner petal to anchor; rep from * around to produce 12 larger outer petals. (12 larger petals)
Round 14 :
Ch 1, working behind and slightly overlapping the previous round, sl st into back loops of base disc to create a neat joined edge behind petals; rep around. Fasten off and weave in ends. (continuous join)
Info :
These outer petals give the flower volume; vary tension to make petals sit up (looser) or flatter (a bit tighter). If you prefer two-toned petals, switch to a lighter peach for round 13 to create a subtle highlight on outer petals.
Round 15 :
Optional: add a decorative picot row behind outer petals by rejoining yarn in back loops and working *sc in next st, ch 3, sl st in 3rd ch* around to produce a textured rim. (36 picots)
Info :
Fasten off leaving a long tail (~20-25 cm) to sew the flower to the square later. Press lightly when dry to shape petals if desired.
— Square Foundation (Start from finished flower) :
Info :
Each square is constructed around the flower to create a framed lacy granny square. Work the first square rounds directly onto the flower base by joining yarn in back loops or by starting a new square disc and sewing flower on later. Below instructions show working square rounds joined to the flower; if you prefer to sew the flower later, make the square up to Round 9 then sew flower on securely in the center.
Round 1 :
With main cream color, join with sl st into any back loop of the flower disc or into any stitch at the edge of the disc. Ch 3 (counts as dc), work 11 dc evenly around the disc edge into available stitches and spaces, join with sl st to top of ch 3. (12 dc) — forms a small round that will be squared out.
Round 2 :
Ch 3 (counts as dc), dc in same st, *dc in next 2 sts, (2 dc, ch 2, 2 dc) in next st to form corner; rep from * 3 times, dc in next 2 sts, join with sl st to top of ch 3. (4 corners with small sides of 2 dc)
Info :
Round 2 turns your circle into a square by creating four corner clusters (2 dc, ch 2, 2 dc). Count stitches carefully to keep sides even. If your first round had 12 dc, placing corner clusters opposite each other creates 4 sides with 2 dc each between corners.
Round 3 :
Ch 3 (counts as dc), dc in next 2 sts, *dc in next 3 sts, (2 dc, ch 2, 2 dc) in corner ch-2 sp; rep from * around to grow square evenly; join. (This round increases side sections to 3 dc between corners)
Round 4 :
Ch 3, dc in each dc across to corner, (2 dc, ch 2, 2 dc) in corner ch-2 sp; rep around. (sides now increase — count will be 4 dc between corners depending on exact placement)
Info :
Maintain even stitch placement by counting dc on each side after each round. If you find sides longer on one edge, adjust by spacing two more dc across the shorter edges on the next round to even out. Use stitch markers at each corner cluster to help locate corners quickly.
Round 5 :
Ch 3, dc in each st across to corner, (2 dc, ch 2, 2 dc) in corner; rep around. (Gradually your square will measure approx 10-11 cm after this round; counts vary by tension)
Round 6 :
Ch 3, dc in next 4 sts, *dc in next 5 sts, (2 dc, ch 2, 2 dc) in ch-2 corner; rep from * around. Join. (Each side expanded to 5 dc between corners)
Round 7 :
Ch 1, sc in each st around working 2 sc in each corner cluster (one in first dc of cluster, one in last dc of cluster) to create a neat square rim. Join with sl st. (even edging, counts vary)
Info :
Switch to the 4.5mm hook if you used a 4.0mm for petals; the square body benefits from a slightly larger hook to keep the lacy texture open. Blocking now helps the square hold shape.
— Square Lace Rounds (Openwork Panels) :
Round 8 :
Ch 3 (counts as dc), *skip 2 sts, (dc, ch 2, dc) in next st (forms mesh shell), skip 2 sts, dc in each of next 2 sts; rep from * around, join. This creates little open diamond meshes between clusters. (count depends on side length)
Round 9 :
Ch 3, dc in each dc and in each ch-2 sp work (dc, ch 2, dc) to keep corners and mesh on grid; join. (maintains lace)
Round 10 :
Ch 1, 1 sc in each st around working (sc, ch 2, sc) in corner ch-2 spaces to stabilise. Join. (stabilising round)
Info :
If you intend to join squares by slip stitch or whip stitch, keep this stabilizing round as the outermost round of the square to provide a neat seam. If you will join later with single crochet join, omit this round and work the join directly into the openwork round for a different texture.
Round 11 :
Ch 3, *dc in next 3 sts, ch 1, sk 1, dc in next 3 sts; rep across each side and place (2 dc, ch 2, 2 dc) in corners. Join. (This introduces small chain spaces across sides to echo the lattice seen in photos)
Round 12 :
Ch 1, sc in each dc and chain space around to tidy mesh, placing 2 sc in corners. Join. (tidy border)
Info :
At this point each completed square should measure roughly 16 cm (6.25") across depending on yarn and tension. Make a sample square and measure — adjust hook size if needed to match dimension for consistent assembly.
— Square Final Framing Rounds :
Round 13 :
Ch 3, dc in next 4 sts, *(dc, ch 2, dc) in corner, dc in next 5 sts; rep around. Join. (frames the square with larger side stitches)
Round 14 :
Ch 1, sc in each st around. Join. (This creates a defined edge for joining squares later.)
Info :
Fasten off leaving a tail for seaming if you plan to join squares by sewing. If you will use a slip-stitch or single crochet join, finish off neatly and weave ends before joining.
— Flower Attachment :
Info :
If you made your flowers separately, center the flower on the square and baste in four cardinal points with a contrasting thread to hold the flower while you sew. Use the long tail left from the flower disc to sew through the square center and over the base of each petal for a secure hold. Sew around the base of the flower with small whip stitches, anchoring petals down just at their bases but allowing outer petals to stand freely.
Round 1 :
Using the long tail left on the flower, position the flower in the center of the square. From the back of the square, bring the tail through to the center hole of the flower, pull gently, and knot inside the disc to anchor. (secure center)
Round 2 :
Weave the tail at the base of each inner petal: insert needle through petal base and through the square around the same point; repeat twice per petal. Tie off and weave end to the back. Repeat with outer layer tail if necessary. (secure petal bases)
Info :
Do not sew through the top ridge of each petal — instead sew through the base faces. This allows petals to remain dimensional and keeps the sculptural look. Pin the flower in place while sewing to avoid shifting.
— Making Many Squares (Production Notes) :
Info :
Work in batches: make all flower centers first, then inner petals, then outer petals; next make all square foundations and lace rounds, then attach flowers. This assembly-line approach speeds up production and keeps yarn management tidy. Keep a small notebook to record number of squares finished per batch to match sets for rows and columns later.
Round 1 :
Repeat Square Foundation Rounds for each square until you have the number required for your desired blanket size. For a throw approx 120 x 150 cm you might make 6 x 8 = 48 squares (estimate depends on finished square size). Record the exact number to make joins consistent. (make required squares)
Info :
Example counts: baby blanket 4 x 5 = 20 squares; lap throw 5 x 6 = 30 squares; twin bedspread 8 x 10 = 80 squares. Adjust quantity to fit your bed size and desired cover margin.
— Joining Squares (Preferred Join: Single Crochet Seam) :
Info :
Blocking all squares before joining ensures consistent size and neat joins. Dry each square pinned to a measured template if you want precise geometry. Below instructions assume you will join square to square using single crochet seam with right sides facing you.
Round 1 :
Place two squares with right sides facing and join in a corner st with sl st. Working through both loops of both squares, *sc in each st across until you reach the corner ch-2 sp; in corner ch-2 sp work (sc, hdc, sc) across both squares; rep across seam and finish. This creates a raised seam that reads like a ridge between squares.
Round 2 :
When joining rows of squares, align the flower centers for alternating layout if you prefer staggered appearance. Use pins to hold each square in place and work the join slowly to ensure seam tension remains even. (join rows)
Info :
Alternate join method (Join-As-You-Go): you can also use the Join-As-You-Go (JAYG) technique on the last round of each square by slip stitching into adjacent finished squares as you work the final framing round. If using JAYG, be consistent with which side you join on for every square to keep the pattern direction consistent.
— Central Seam Row Rounds (for large blankets) :
Round 1 :
After joining each square into rows, join rows together by single crocheting through both edges of adjoining rows: place rows side by side and sc through matching sc rows at each intersection. Work slowly and keep corner intersections measured to avoid warping. (row join)
Round 2 :
In wide blankets, add an intermediate anchoring seam across the middle panel to stabilize the blanket and prevent heavy flattening at flower points. Use a tapestry needle and a whip stitch through the back loops of seam rows spaced every 6-8 squares to hide stitching and add durability. (stabilize)
Info :
If you choose to block squares after joining, block the entire blanket carefully with pins and steam press gently to set shape. Heavy blocking can stretch squares; secure only to desired final dimensions.
— Border Preparation Rounds :
Round 1 :
With blanket assembled, work 1 round sc all around the outside edge to create a tidy base for the decorative border. Work (2 sc) in each corner to keep corners square. (even edging)
Round 2 :
Ch 3 (counts as dc), *dc in next 3 sts, ch 2, sk 2, dc in next 4 sts; rep around placing (2 dc, ch 2, 2 dc) in each corner. Join. This creates an open scalloped base for the decorative shell border. (texture foundation)
Info :
Work border on a flat, well-lit surface to keep tension even. Use stitch markers to mark corner points and sides so shell patterns align and remain symmetrical around corners.
Round 3 :
Ch 1, sc in each st and ch-space around placing 3 sc in corner ch-2 spaces to stabilize. Join. (stabilize round)
Round 4 :
Ch 1, *sk 2, (5 dc shell) in next st, sk 2, sc in next st; rep around to form shell-and-space edge. Work (sc, 5 dc, sc) in corner st to keep corners smooth. Join. This creates the first row of dramatic scallops around the blanket. (shell count varies by blanket perimeter)
Info :
For a bedspread with high-visibility scallops (like the inspiration images), repeat additional shell rounds to build up thickness. The photos show rounded layered scallops roughly the height of the flower petals, so plan to work 3-4 shell rounds in the border for similar depth.
— Border Build-Up Rounds (multiple decorative rounds) :
Round 5 :
Ch 2, hdc in each dc of shells across the previous round, placing (hdc, ch 2, hdc) in the center of each shell to form raised ridges for the next shell to sit on. Join. (ridge formation)
Round 6 :
Ch 1, sc in each st around, placing 3 sc in corner ch-2 spaces. Join. (tidy round)
Round 7 :
Ch 3, (7 dc shell) in next st across the center of previous shell ridges for an oversized scallop. Sk 3, sc in next st; rep around. Join. Repeat for a total of 3 shell-building rounds to achieve a full scalloped edge impression. (large scallops)
Info :
For a subtle finish, do only 2 shell rounds; for a dramatic scallop like in the images, do 3-4 shell rounds. If you're working a large bedspread, occasional gaps may appear at corners—fix by adding extra sc or a half shell in transitions.
Round 8 :
Ch 1, sc across to smooth, join. Fasten off and weave in ends. Optionally add a final decorative picot or reverse sc round to the very edge for a delicate finish: *sc, ch 3, sl st in 3rd ch* across scallops to add a tidy picot rim. (final trim)
— Finishing Rounds (Optional Decorative Rope Between Squares) :
Round 1 :
To emphasize the grid between squares, work an optional raised rope row between joined squares by pulling up a loop around the join seam (BLO only) and working 1 sc in BLO across the join; this will visually outline each square. Work slowly and evenly across the whole blanket. (rope outline)
Info :
This rope outlining technique provides additional stability and accentuates the square motif. Try it first on a small swatch join to practice consistent tension; inconsistent tension will ripple the joined blanket edge.
— Care Instructions :
Info :
Machine wash cold on gentle cycle and lay flat to dry or hand wash gently. To preserve 3D petals, reshape while damp and dry flat on a towel. Avoid heavy agitation that could mat petals or distort lacework.
Info :
Weave in all tails securely and trim ends close to fabric. For fragile joins, apply a tiny dot of fabric glue to the hidden back of seam tails before tucking for extra security (test on scrap first).
— Tips & Troubleshooting Rounds :
Info :
If your petals sit too flat, reduce hook size for petal rounds or block with pins to lift. If petals curl excessively, lengthen chain foundation or add an extra sc base underneath to flatten curvature. Keep flower centers tight to prevent the petals from collapsing inward.
Info :
For color consistency across many skeins, alternate skeins every two squares (work two rows from skein A, two rows from skein B) to avoid visible color stripeing or dye lot differences. Store completed squares flat to avoid creasing during assembly.
This floral granny-square bedspread brings vintage charm to any room with its lacy squares and dimensional peach blossoms. Each square is small and satisfying to crochet, and the flowers add a delicate sculptural detail that really catches the eye. Whether you make a small throw or a full bedspread, the modular construction makes scaling easy. 🧶🌸 Wrap yourself in handmade comfort and enjoy the slow, rewarding process of creating something beautiful. Happy crocheting! 🎀