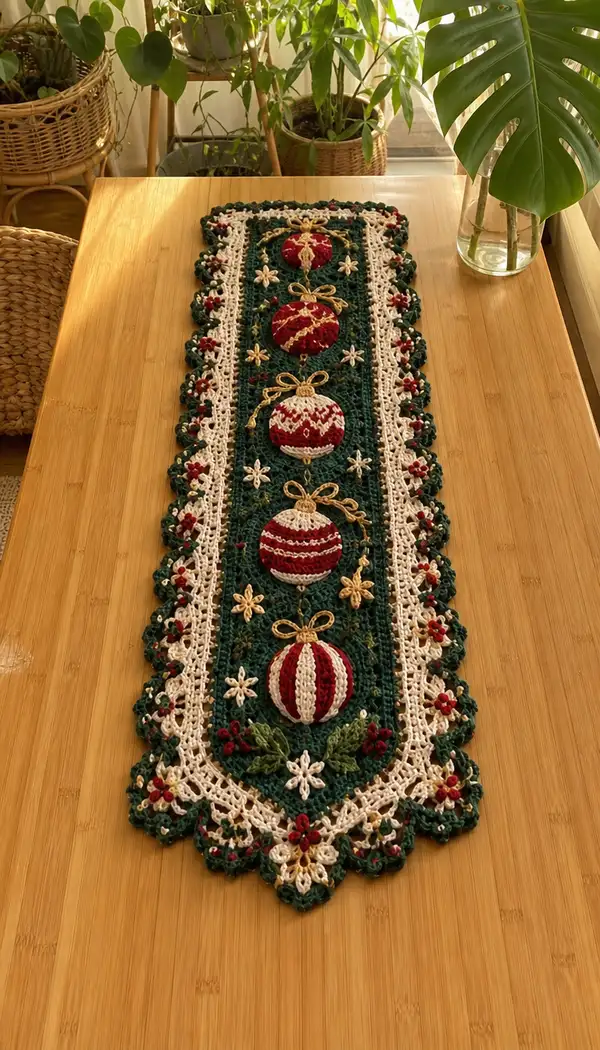
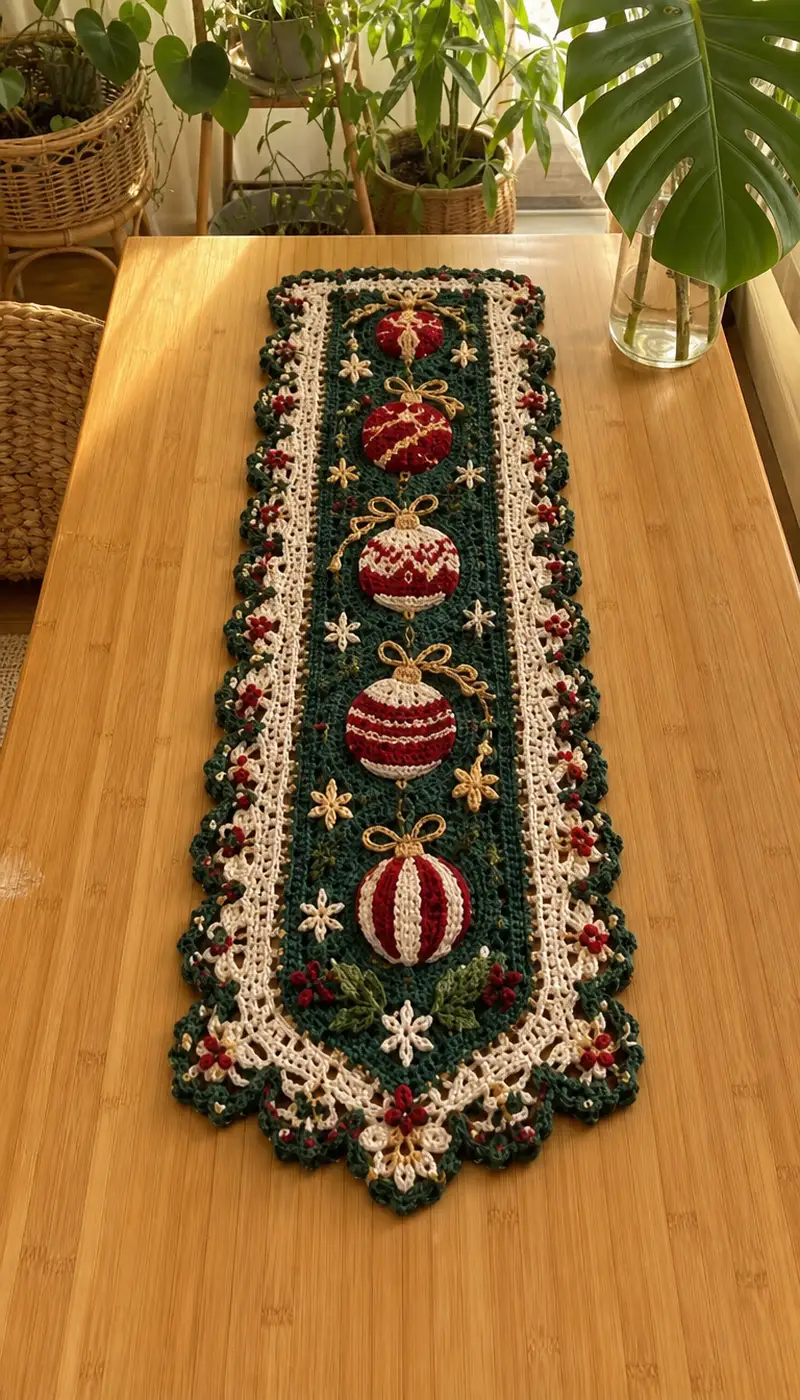
A festive, intricately detailed table runner worked in rich forest green, cream and cranberry accents featuring five padded bauble appliques, holly leaves, star flowers and a scalloped lace border. The runner is designed to lay flat with a textured central lace panel and raised ornaments that give a heirloom, hand-stitched look. Detailed colour-change notes, assembly tips and finishing instructions are included to help you recreate this seasonal centerpiece.
Progress Tracker
0% Complete
— Materials & Gauge :
Info :
Gauge is flexible for this decorative piece. Using 3.5mm hook with worsted cotton, 10 dc x 8 rows = 4 in (10 cm). Final runner pictured measures approximately 34-36 in (86-92 cm) long and 8-9 in (20-23 cm) wide after blocking. Adjust chain length to make runner longer or shorter as desired.
— Central Lace Panel (work as one long strip) :
Round 1 :
Foundation chain 121 (or any odd-numbered chain to achieve desired width). Turn, 1 dc in 4th ch from hook (counts as dc + ch1 space foundation), *ch1, sk 1 ch, 1 dc in next ch* across to last ch, 1 dc in last ch. (Approx 60 dc & 60 ch-1 spaces across; stitch count will equal 121 chains worked into as 61 main points)
Round 2 :
Ch3 (counts as dc), turn, dc in base of ch3, *ch1, dc in next ch-1 sp* across, ending with dc in top of turning ch. (61 dc positions, 60 ch-1 spaces)
Round 3 :
Ch3, turn, dc in base, *dc in next dc, ch1* across to create a staggered mesh; end with dc in turning ch. (61 dc + 60 ch-1 spaces)
Round 4 :
Ch1, turn, sc in first st, *ch3, sk next dc, sc in next dc* across; this creates vertical ch-3 mesh columns. (Approx 30-31 ch-3 spaces across)
Info :
Switch to Forest Green if not already. The main panel is worked in a repeating mesh and shell pattern that will give a lacy but stable ground for appliques. Use stitch markers at every 10th mesh to keep count across long rows.
Round 6 :
Ch3, turn, dc in base, *dc in next sc, ch1, dc in next sc* across the row of sc and ch-3 spaces to re-establish the dc mesh grid. (61 dc positions)
Round 7 :
Ch1, turn, sc in first st, *(sk 1 st, shell in next st) x 1, sk 1 st, sc in next st* across. Shell = (2 dc, ch2, 2 dc) in shell base. This creates small shell motifs repeated across. (Count will remain approx 61 main repeat points)
Round 8 :
Ch3, turn, dc in base and into shell stitches to make a uniform top, placing dc evenly across and between shells. Maintain 61 dc placement across.
Round 9 :
Ch1, turn, 1 sc in each st BLO across (61 sc). (This creates a ridge to anchor bauble appliques.)
Info :
Place stitch markers to mark the centers where baubles will be attached. For five baubles evenly spaced along a 121-chain strip, mark positions approximately at stitch columns: 11, 31, 51, 71, 91 (counting from one end). These markers correspond to bauble center columns and will be used later to attach padded circles and embroidery stringing.
Round 10 :
Ch3, turn, dc in each st across (61 dc). (Work 61 dc to keep mesh stable)
Round 11 :
Ch1, turn, sc in first st, *ch3, sk next 2 dc, sc in next dc*; repeat across to create open mesh rows between the anchored ridges. (This will create ch-3 tall spaces; maintain even repeats across row)
Round 12 :
Ch3, turn, dc in base, *dc in next sc, ch1, dc in next sc* to re-establish solid stitches over the mesh (61 dc positions).
Round 13 :
Repeat Rounds 9-12 three times more (work as rounds 9-12 repeated) to achieve 4 complete repeats in total, keeping the ridge rows at Rounds 9 and 21 for bauble anchoring. After these repeats you will have built approximately 14 rows of textured mesh suitable for appliques.
Info :
Begin measuring placement for baubles now. The central bauble will be aligned with the middle marker (stitch column 51). The top and bottom baubles will be positioned so that there is approximately 2.5-3 in (6-7.5 cm) of mesh between adjacent baubles. Adjust spacing for your table length by adding or subtracting repeats of the mesh set (Rounds 9-12).
Round 14 :
Ch1, turn, 1 sc in each st BLO across (61 sc). This row will be used to sew the baubles to the panel. Keep counts even and use a contrasting marker yarn to mark the exact centre of the bauble columns if helpful.
Round 15 :
Ch3, turn, dc in each st across (61 dc). Continue working even to build a tall field for the appliques to sit upon comfortably. Repeat the 4-row mesh repeat (Rounds 11-14) a total of 3-5 times depending on how tall you want the runner to be between baubles; maintain stitch counts consistently.
Info :
If you want the central green field to be wider, increase foundation chain in multiples of the mesh repeat (add 8 or 10 chains per extra motif). Always keep your initial chain odd to maintain symmetry when centering baubles.
— Bauble Appliques (Make 5 identical padded baubles) :
Info :
Each bauble is made as a padded dome (worked flat as concentric rounds, then joined and stuffed) using two-part construction: front dome (decorated) and back flat circle. Use Cranberry for main body and Cream for highlights, with Gold embroidery for bow and string. Use 3.0-3.5mm hook for firm stitches.
Round 1 :
With Cranberry, MR, 6 sc in magic ring (6)
Round 2 :
Inc in each stitch around (12)
Round 3 :
(1 sc, inc) x 6 (18)
Round 4 :
(2 sc, inc) x 6 (24)
Round 5 :
(3 sc, inc) x 6 (30)
Round 6 :
(4 sc, inc) x 6 (36)
Info :
Change to cream for highlight stripes on designated rounds. For striped patterns, carry the unused color along the inside or cut and weave in ends depending how tidy you want the back. Work tension slightly tighter than in the flat panel so the padded dome holds shape.
Round 7 :
1 sc in each st around (36) — work in Cranberry unless creating a cream stripe here
Round 8 :
For the striped baubles: change to Cream. (2 sc in cream, 4 sc in cranberry) pattern options: for the large striped ornament, work 1 round of cream sc in every 8th stitch to form a narrow band; for snowflake-style, work alternating stitches as described below. Maintain total 36 stitches by evenly working into existing st count.
Round 9 :
Switch doctoring the pattern: 1 sc in each st around (36). If creating vertical ribbed bauble (striped vertically), consider working front post/back post combinations on the round 8-10 to create raised ribs. Example rib: *(fpdc around next st, bpdc around next st)* repeat (18 fpdc + 18 bpdc total).
Round 10 :
1 sc in each st (36). Begin shaping the dome top by knitting small reductions next rounds.
Round 11 :
(4 sc, dec) x 6 (30)
Round 12 :
(3 sc, dec) x 6 (24)
Round 13 :
(2 sc, dec) x 6 (18)
Round 14 :
(1 sc, dec) x 6 (12)
Round 15 :
6 dec (6) — Fasten off leaving long tail for sewing for the front dome. Stuff lightly through the opening and close with yarn needle if working as fully closed dome. For padded appliques you will leave a slightly open edge to seam to the back circle.
Info :
Make a matching flat back circle for each bauble so the dome can be sewn to it and stuffed between. The flat back will be worked to match the dome diameter and then joined around the edge to create a small pouch for stuffing.
Back Circle Round 1 :
MR, 6 sc in ring (6)
Back Circle Round 2 :
Inc in each st around (12)
Back Circle Round 3 :
(1 sc, inc) x 6 (18)
Back Circle Round 4 :
(2 sc, inc) x 6 (24)
Back Circle Round 5 :
(3 sc, inc) x 6 (30)
Back Circle Round 6 :
1 sc in each st (30) — Fasten off leaving long tail for join
Info :
Place the dome onto the back circle aligning the bottom edge. Begin whipstitching around the perimeter using the long tail. Before fully closing leave a small gap to insert polyester fiberfill. Stuff lightly to create a gentle dome shape then finish sewing closed. Repeat to make five padded baubles.
Embellishment Rounds for Bauble Surface :
Round 1 :
Using gold yarn and an embroidery needle, stitch a vertical 'string' from top center of circle to about 4-6 rounds down the front using chain stitch or surface slip stitch. For each bauble, anchor the top string to the same top center stitch that will align with the panel marker.
Round 2 :
Embroider bows with gold: make a simple looped bow on the top of the string using an embroidered chainloop and tiny knot center. Anchor both ends to the top perimeter stitches with small running stitches. Alternatively, use a small crocheted bow: ch6, sl st in 2nd ch from hook to form loops, gather center with gold thread and sew to top.
Round 3 :
For cream snowflake or stripe detailing, use cream yarn to surface crochet shallow lines or tiny popcorn stars on the cranberries. Example decorative star: embroider six short straight stitches radiating from one point then anchor with center stitch.
Info :
Keep decorations relatively low-profile so the baubles lay neatly on the green mesh. Test placement by laying each bauble on the panel before sewing — this ensures even spacing and avoids crowding the lace border.
— Holly Leaves & Berry Clusters (Make sets per end and between baubles) :
Leaf Pattern Round 1 :
With leaf green, ch9. Row 1: sc in 2nd ch from hook, hdc in next, dc in next 2, tr in next 2, dc in next, hdc in next, sc in last. Fasten off leaving long tail to sew. (Leaf is 8 stitches across at widest point.)
Info :
Make pairs of leaves for each holly cluster. Slightly curve leaves by using working slightly looser tension in the tip stitches. Optionally add a second row: join at base and work 6 sc around to create a small cluster base for sewing.
Berry Cluster :
With cranberry, MR, 6 sc in ring. Fasten off and leave tail to sew three berries together in a triangular cluster using small running stitches so the berries remain rounded.
Info :
Sew a cluster of three berries between leaf pairs at the base and top of runner motifs and between baubles as decoration, aligning with the cream lace border as shown in reference photo.
— Small Star Flowers (Make 10-12) :
Round 1 :
With cream yarn, MR, ch2 (counts as hdc), (2 dc, ch2, sl st in ring) x 5 to create 5 small petals. (10-12 tiny petals across several motifs)
Info :
These star flowers are worked in two parts: a tiny central picot star (worked into a magic ring) and an outer petal layer for dimension. Use a contrast color center (gold) to add a decorative knot. Sew stars flat to panel between bauble columns to fill negative space.
— Inner Cream Lace Border (Work along both long sides) :
Round 1 :
Attach cream yarn at one short end corner. Ch3, sc evenly spaced along the long side edges into the edge loops of the green panel so that you have approx 61 stitches along each side (use pins to ensure even stitch placement). The count should mirror the panel width; avoid stretching edges while attaching.
Round 2 :
Ch3, *sk 1, (5 dc, ch2, 5 dc) shell in next st, sk 1, sc in next st* along the side to create scalloped shell groups anchored by single scs. This will create repeating shells along the length; ensure an even number of shells by adjusting spacing slightly.
Round 3 :
Ch1, sc in each st across the short end and along shells to create a continuous lace strip. Work evenly to the other end and repeat for the opposite long side. Fasten off after second side is complete.
Info :
Work the inner lace border first, block it gently against the panel so that the shells lay open and even. The cream border provides a contrast visual frame and a base for the outer scalloped edge.
— Outer Scalloped Edge with Flower Points :
Round 1 :
With Forest Green, re-attach at corner, ch1, sc evenly around the outer edge of the cream lace border, placing 3 sc into each ch-2 sp to maintain shape. Aim for approx 120-130 sc total around the full runner circumference depending on panel width and shells counted.
Round 2 :
*(Ch3, 2 dc, ch3, sl st into base) to form a pointed scallop, sl st into next sc; rep across each sc group to create small scalloped points. Where a floral point is desired (at the shell centers), replace pointed scallop with 5 small petals: (MR, ch2, (2 dc, ch2, sl st) x5) sewn onto point immediately. Continue around corner to next side.
Round 3 :
Ch1, sc in each st around to tidy scallops; place small berries of cranberry between scallops by sewing MR 6-sc berries onto each outer join using contrasting thread to anchor.
Info :
The outer scaffold uses a denser hook if you prefer more pronounced scallops; try 3.0mm for more defined points. Pin the scallops out while wet blocking to get even, rounded edges.
— Corner Points & End Caps :
Round 1 :
At each short end, create a pointed lace chevron by working *(ch3, 3 dc in same sp, ch3, sl st) into the end cluster. Repeat on opposite end mirror image. These caps create the elegant tapered ends visible in the photo.
Round 2 :
Work two rows of picot edging around the caps using (ch3, sl st into base) picots spaced every 3 sc to accent the lace and tie the design into the main scallops. This completes the end shaping and ensures the runner tapers to decorative points at both ends.
Info :
Blocking these caps is critical to get the tapered point crisp. Use a fine mist of water and pin from the center outward to shape.
— Decorative Embroidery & Gold Stringing :
Round 1 :
Using gold yarn and a large-eyed embroidery needle, stitch a continuous chain-surface stitch down the center of the runner connecting the top of each bauble. Anchor at the top and bottom with a tiny knot hidden under a bow applique or under the top cream circle.
Round 2 :
At each bauble top, make a crocheted or embroidered bow as a separate small element: Crochet small bow - ch6, sl st in 2nd ch and across to make a flat strip, pinch center and wrap with gold yarn then sew in place. Sew the bow directly over the gold string anchor point.
Info :
Keep embroidery light: surface slip stitch or chain stitch will lie flush. If using thicker metallic yarn, secure ends with small drops of fabric glue under the bow to avoid unraveling.
— Assembly & Placement :
Round 1 :
Place all five padded baubles onto the panel, aligning their top center with the stitch marker columns placed earlier (columns 11, 31, 51, 71, 91). Pin each bauble carefully in place so they sit evenly spaced down the center ridge row (Round 14 from Central Panel).
Round 2 :
Sew each bauble to the green panel using the long tail from the back circle: whipstitch through the back circle edge and into the panel ridge row. Use small, close stitches so that the seam is secure and nearly invisible. Leave no gaps where stuffing might escape.
Round 3 :
Sew holly leaf pairs and berry clusters at both ends of the runner as well as between lower bauble positions as in photo. Use thread to anchor leaf bases to the cream lace seam so they appear layered under the lace border and above the green panel for a cohesive look.
Info :
Always baste heavy appliques first with large contrasting thread to check placement. Once satisfied, sew permanently with matching yarn and finish by weaving ends into the back of the panel so no knots show on the front.
— Finishing Touches :
Round 1 :
Weave all loose ends into the back of the lace or into the inner folds of the bauble seam. Use the tapestry needle to split yarn plies and bury tails under adjacent stitches for a neat finish.
Round 2 :
Block the completed runner on a flat surface, pinning scallops and end points to size. Apply a light steam or gentle wet block and allow to dry completely. This will open the lace and flatten the panel so it lays perfectly on a table.
Round 3 :
Optional: add small fabric-backed adhesive pads under the baubles if you want them to sit higher; otherwise leave them sewn flush for a gentler dome.
Info :
Label or photograph placement for future reproduction. Keep a small sample swatch with notes on number of repeats in the mesh so you can recreate the runner in different lengths later.
Assembly Instructions
- Attach bauble domes to their matching back circles first; whipstitch the dome edge to the back circle using the long tail, stuffing the dome lightly before finishing and closing the seam.
- Pin each completed bauble to the central panel aligning the top center of the bauble with the row marked for attachment (Central Panel Round 14). Sew the back circle perimeter to the panel with small tight stitches through the panel ridge row.
- Position leaf pairs and berry clusters at both ends and between baubles as decorative clusters. Pin them so leaves appear to tuck under portions of the cream lace border, then sew through leaf base and lace to anchor.
- Sew the inner cream lace border to both long sides of the green panel before adding the outer scalloped edge. Attach the lace by single crochet along the panel edge (see Inner Cream Lace Border Round 1) for a stable join.
- Once inner lace is attached, pin the outer scalloped edge around the entire runner circumference. Sew the scallops into place with invisible stitches, making sure points align with shell centers on the lace border.
- Finish by sewing gold embroidered string and bows to bauble tops. Anchor ends of the embroidery under cream bow centers and weave in embroidery tails to the back to avoid snags.
Important Notes
- 💡Use stitch markers consistently at the beginning of each repeat to avoid counting errors and maintain proper spacing for bauble centers
- 💡Stuff baubles gradually and test against the panel before final closure; overstuffing creates a domed look that may unbalance the runner
- 💡Block the central panel and lace borders before assembly for the most professional, flat finish - pin scallops to shape and allow to dry fully
- 💡When sewing appliques, use small, tight stitches and hide your knots beneath the edge seam to prevent bulk under the baubles
- 💡For a neater back, carry colours where possible or weave in ends immediately after a color change rather than leaving long tails
- 💡If adjusting runner length, add or subtract full mesh repeats (Rounds 9-12 in Central Panel) to maintain pattern repeat symmetry
- 💡When embroidering in metallic or gold yarn, test a small sample to ensure the yarn lies flat without splitting; secure with tiny knots and a dab of fabric glue if needed
Finishing this runner gives you an heirloom-quality seasonal accent that ties a room together beautifully. Each padded bauble, leaf and delicate scallop adds texture and festive charm to your table. The layered lace and embroidered gold details create a nostalgic, handcrafted centerpiece you will enjoy year after year. 🧶✨ May every stitch remind you of cozy holiday gatherings and thoughtful gift-giving. Happy stitching and share your creation with pride! 🎄