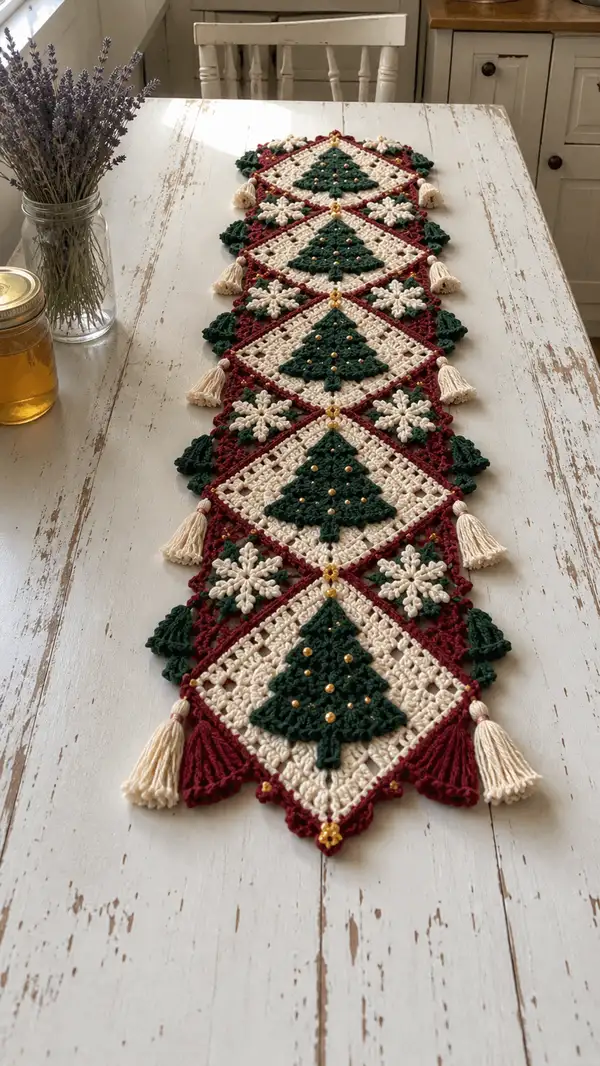
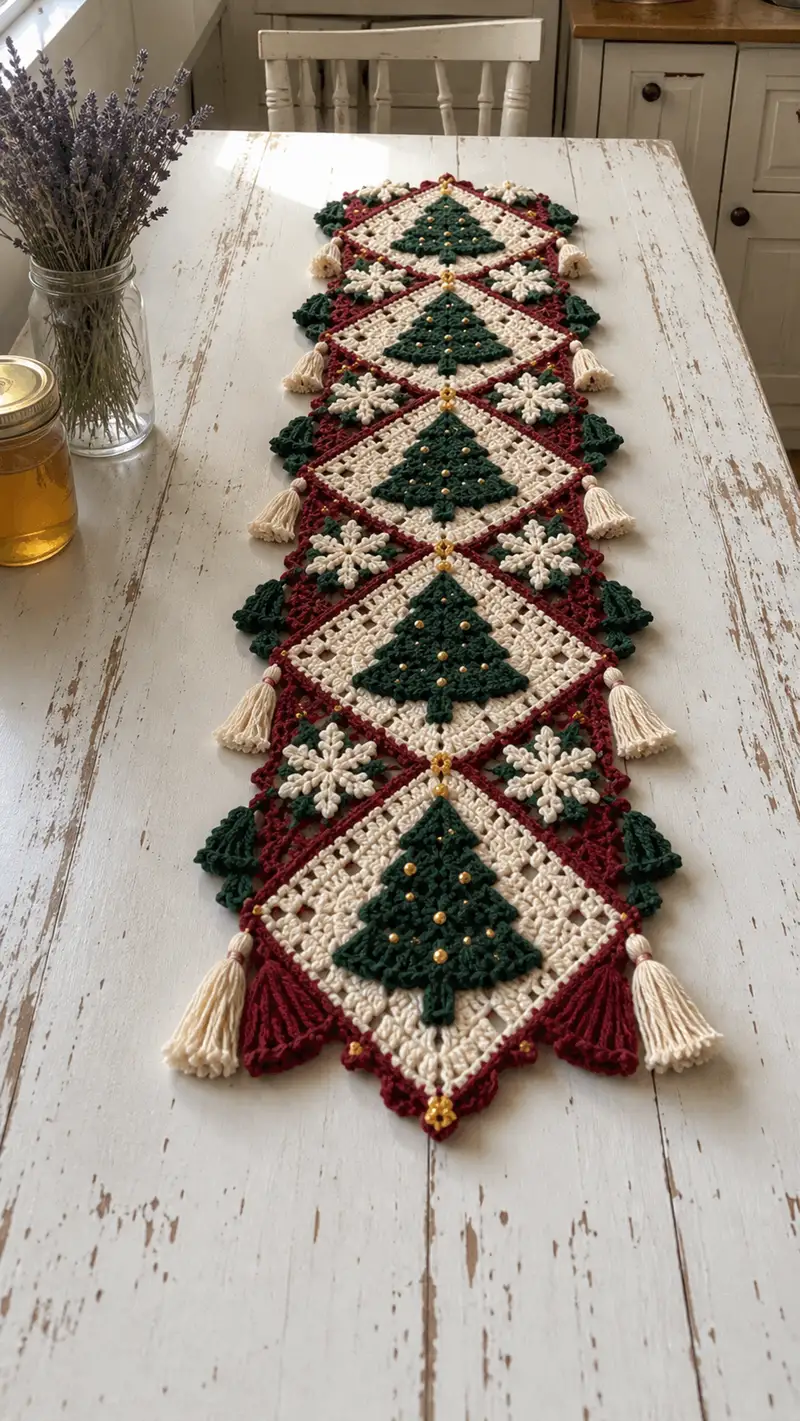
Create a festive, heirloom-quality table runner featuring diamond-shaped granny motifs in ivory, deep forest green tree appliques and rich burgundy borders. This runner is embellished with ivory tassels and golden bead accents for a classic Christmas look. The pattern includes detailed motif construction, appliques, joining and finishing steps for a polished holiday centerpiece. Perfect for gifting or dressing your table for the season.
Progress Tracker
0% Complete
— Main Diamond Granny Square (Make 6 or more as desired) :
Round 1 :
With Ivory, make a magic ring. Ch2 (counts as first dc), 11 dc in ring. Join with sl st to top of ch2 (12 dc total) (12)
Round 2 :
Ch2, 1 dc in same st, *ch1, 2 dc in next st; rep from * around, join with sl st to first ch2 (12 groups of 2 dc with ch1 spaces between) (24 dc groups but worked as 12 2-dc groups)
Round 3 :
Ch2, 2 dc in same st, ch1, *3 dc in next ch1 space, ch1; rep from * around ending with 3 dc in last ch1 space, join (12 clusters of 3 dc separated by ch1) (36)
Round 4 :
Ch3 (counts as dc), dc in next 2 sts, ch1, 3 dc in next ch1 sp (corner made), *dc in next 3 sts, ch1, 3 dc in next ch1 sp; rep from * around, join (work square corners evenly making 4 corner groups of 3 dc each) (approx 48 dc)
Info :
This first set creates a small round/granny base to be worked into a diamond shape later by working on one diagonal for the diamond orientation. Keep tension consistent; use a stitch marker for the start of each round to keep track.
Round 5 :
Ch2, 1 dc in each st across the next set of 12 sts until you reach a ch1 corner space, work 3 dc, ch1, 3 dc in that corner, continue around working 1 dc in each dc and 3dc,ch1,3dc in each corner space, join (approximately 60 dc)
Round 6 :
Ch2, dc in next 4 sts, (3 dc, ch1, 3 dc) in each corner ch1 space, dc in each dc around, join (approximately 72 dc)
Round 7 :
Ch2, dc in each dc across, making corner clusters (3 dc,ch1,3 dc) in each corner, join (expand square to approx 84-96 dc depending on tension)
Info :
If you prefer a looser lacy background for the tree to sit on, replace some dc rounds with alternating dc-ch1-dc patterns to create larger mesh holes. For the photo look, we maintain steady dc rounds to hold the applique securely.
Round 8 :
Change to Burgundy. Ch1, sc in each dc around, working 3 sc in each corner space (creates neat burgundy frame). Join with sl st. (sc count approx 100)
Round 9 :
Ch2, *sk1, dc in next st, ch1; rep around to create small openwork rows inside the burgundy frame. Join. (This creates an internal diamond mesh for the ivory center)
Round 10 :
Change to Ivory. Ch2, 1 dc in each st across for two rounds to flatten the center and give a firm base for applique. Join each round. (maintain same stitch count as previous round)
Info :
Work the square as a diamond by orienting a corner to the top when assembling; the square is constructed normally but will be rotated at joining. Add a stitch marker to the top corner of the diamond to help position the tree applique later (mark the center of the diamond).
Round 11 :
Ch2, dc in each st across for 3 rounds (this is Rounds 11-13) to build a slightly raised center (keeps the tree applique anchored). (count consistent with previous)
Round 12-13 :
1 dc in each st (same stitch count) (use these rounds to fine-tune center size)
Round 14 :
Change to Burgundy. Ch1, sc in each st around including corners where you work 3 sc in corner ch spaces to maintain square edge. Join with sl st. (neat burgundy outline established)
Info :
At this stage you should have a diamond/square with a firm ivory center and burgundy border. Block the motif lightly to square it and keep sides even. Repeat to make as many motifs as you want in the runner—photo shows six diamonds joined in a long strip.
Round 15 :
Optional decorative picot row: With Burgundy, ch1, sc in same st, *ch3, sl st into base of chain to form picot, sc in next st; rep around corners work 3 picots into each corner. Join. (adds small scalloped points at frame)
Info :
Make 6 identical diamond granny squares for the pictured length. If you want a longer runner, make additional diamonds and follow the same joining method. Keep one motif aside to experiment with bead placement before committing to all motifs.
— Tree Applique (Make 1 per diamond) :
Round 1 :
With Forest Green and 3.5mm hook, make a magic ring. Ch1, 6 sc in ring. Pull tight. Join with sl st to first sc (6)
Round 2 :
Ch2 (counts as first dc), dc in same st, ch1, (2 dc in next st, ch1) x 5, join (12 dc clusters separated by ch1) (12 clusters, 24 dc)
Round 3 :
Ch2, (3 dc in next ch1 sp, ch1) x 12, join (forms a small round of shells) (12 shells)
Info :
This small round is the base of the Christmas tree; the tree is built up in triangular tiers. Keep the center slightly tight so the applique lays flat on the ivory center.
Round 4 :
Ch1, sc in same st, ch3, turn the work so you can start making a triangular tier: working across 5 shell groups make 5 V-shaped tier shells: *in the next shell group: (sc, ch3, sc) in top of shell; rep from * across for the width of the first tier. Fasten off tail slightly long for sewing (first tier made)
Round 5 :
Rejoin at center top of first tier (the center stitch), ch2, (2 dc, ch1, 2 dc) in center V to create a small peak, then in the stitch to either side work (1 dc, ch1, 1 dc), leaving the next side open—this forms the first triangular peak. Fasten off. (this gives a small triangle base)
Round 6 :
Rejoin at center bottom of triangle and work a row of small clusters across to expand the triangle: ch2, (dc, ch1, dc) in each ch3 V across the base to create 5 small peaks. (5 peaks)
Info :
The tree is built as three or four triangular tiers stacked. Keep each tier slightly wider than the one above. Work short rows anchored to the center line and to side stitches to maintain the tree shape. Use a smaller hook if you want a denser tree.
Round 7 :
Make Tier 2: Rejoin at top center, ch2, (3 dc, ch1, 3 dc) in center V, (2 dc, ch1, 2 dc) in adjacent Vs to widen the triangle. Work across creating 7 peaks for this tier. Fasten off. (approx 7 peaks)
Round 8 :
Work a base row connecting tier edges: rejoin at bottom of tier 2, ch2, dc in each ch1 space across, joining to tier 1 edges as you go (this secures tiers together)
Round 9 :
Make Tier 3 (largest): rejoin at top center of tier 2, ch2, (4 dc, ch1, 4 dc) in center V, (3 dc, ch1, 3 dc) in adjacent Vs, continue to create a broad tier with 9 peaks. Fasten off and weave ends. (approx 9 peaks)
Info :
The tree in the photo has three clear tiers plus a tiny trunk. The tiers are built as small shell clusters to create texture; keep the lower tier the widest. Count peaks each tier to maintain symmetry—5, 7, 9 is a reliable progression for 3 tiers.
Round 10 :
Trunk: Rejoin at center bottom and work 4 sc in a short foundation chain of 4–6 ch, turn and sc back across 4 sc for 3 rows to build a short trunk (3 rows). Fasten off with a 20cm tail for sewing. (trunk width 4 sc)
Round 11 :
Surface texture: Using Forest Green and working in FLO, embroider small staggered surface loops by working small chains and anchoring with sl sts to create the raised bumpy 'needles' if you like. Alternatively, use bobble stitches at staggered positions: *in selected dc clusters work (dc, bobble, dc) to create greenery texture. Space 6-10 bobbles across the tiers as desired.
Info :
Before attaching beads, position the tree on the ivory center to check scale. The finished tree should fit within the diamond center leaving approx 1.0–1.5 cm of ivory border on each side inside the burgundy frame. Adjust tier widths by adding/subtracting dc clusters if necessary.
Round 12 :
Sewing edge: With tiny sc edging in Forest Green, work sc all around the tree applique to tidy the edges and leave a tail for sewing. Use evenly spaced sc and keep counts to 1 sc per top stitch where possible (approx 40–60 sc depending on tier sizes).
Round 13 :
Attachment Prep: Place the tree on the center of the ivory section of a diamond motif. Pin at the top corner and bottom center to check orientation: the tree trunk should point toward one corner (the diamond orientation). Note where the trunk will cover the center stitch marker.
Round 14 :
Sew the tree down using matched Forest Green yarn and whip stitch through the back of the applique and into the dc base of the motif. Sew the trunk first, then each tier's side points every 3–4 stitches to keep the tree flat. Fasten off and weave in ends on the back.
Info :
Use small, even stitches when sewing the applique for an invisible attachment. If you plan to machine wash the runner, use tiny securing stitches and consider adding fabric glue under the trunk for extra hold before washing.
— Snowflake Motif (Make 5 for alternate diamonds) :
Round 1 :
With Ivory and 3.5mm hook: Make a magic ring, ch2, 10 hdc into ring, join with sl st to first hdc (10)
Round 2 :
Ch3 (counts as dc), *ch2, sl st into next st, ch2, dc in same st; rep around to create 5 small petal loops (make 5 points). Join (5 petals)
Round 3 :
Rejoin at base of each petal and work: (ch4, sl st into base) to form elongated points. Repeat for all 5 petals. This produces 5 long arms for the snowflake.
Info :
Snowflakes are decorative and fragile; sew them onto ivory squares centered in alternating diamonds (opposite tree diamonds). Keep them flat by blocking lightly after finishing each motif.
Round 4 :
Decorative detail: On each arm, rejoin and work a picot cluster: *ch3, picot (sl st into first chain), sc into arm; rep twice on each arm to create decorative tiny branches (adds 2–3 small picots per arm).
Round 5 :
Fasten off leaving a 15cm tail for sewing. Center and sew onto the ivory area of the diamond motif using invisible whip stitch at 5 anchor points (center and 4 arms). Add a small gold bead to the center for sparkle. (Optional glue bead with fabric glue)
Info :
Make 5 snowflakes to alternate with the 6 trees for the pictured runner pattern (pattern repeats tree, snowflake, tree...). You may choose to make a snowflake for every other motif as shown or add more for fullness.
— Small Green Corner Fans / Leaves (Make 12 pairs) :
Round 1 :
With Forest Green, ch6, sl st into 2nd ch from hook, sc, hdc, dc, hdc, sc across chain to make a small fan (5 unique stitches) (fan width 5 sts)
Round 2 :
Ch1, sc across the fan and work 2 sc at base to flatten. Fasten off leaving 10cm tail for sewing. (small leaf finished)
Info :
Sew these small fans to the two side corners of each diamond where the burgundy frame meets adjacent diamonds; they create the leafy accents visible in the photo. Place them so the curved edge faces outward.
— Joining Diamonds into Runner (Long Join Method) :
Info :
Position your diamonds rotated as diamonds (corners up/down). Arrange the diamonds in the final order (photo shows tree, snowflake, tree, snowflake, tree, snowflake). Use blocking pins to square them and ensure edges align perfectly before joining.
Round 1 :
With Burgundy and right sides facing, lay two diamonds with edges matched. With yarn and tapestry needle or by crochet seaming: join corners first by slip stitching through both edge loops of the burgundy frame along one side. Work from one corner to the other with sc or slip stitch join. (approx number of sts equals the edge sc count ~25-30)
Round 2 :
Continue joining subsequent diamonds by matching side edges and seaming. Maintain consistent tension so the seam lays flat. After joining two motifs, check alignment and adjust before sewing more.
Info :
For a seamless look use the whip stitch with matching burgundy yarn through the back loops only of the frame scs—this produces an almost invisible join and retains the burgundy frame continuity across motifs.
Round 3 :
Once all diamonds are joined, reinforce center joins where three diamonds meet by adding a small decorative bead cluster or a small ring of embroidered gold thread to hide the junction and add strength.
Info :
Ensure the top-to-bottom alignment is straight before final sewing. Use temporary safety pins to hold the diamonds in place and check the runner length on your table to confirm placement.
— Outer Scalloped Border & Corner Points :
Round 1 :
With Burgundy, attach at one corner and work: ch1, sc around the entire outer edge of the joined runner, working 3 sc in each outer corner point and adding 2 sc in each join point to keep a flat edge. Join. (full runner sc count will vary by number of diamonds)
Round 2 :
Ch2, *5 dc in next st (shell), sl st in next st; rep across to create scalloped outer row. Work 7 shells at each diamond point to create the triangular scallops between corners. Join.
Info :
The scalloped shell clusters at the points are what the tassels attach to. Count the shells and mark every point where a tassel will be attached—spaced evenly at the 6 visible diamond points plus additional side points as in the photo.
Round 3 :
With Ivory, work a small reverse single crochet (crab stitch) around the scallops for a polished finish: sl st into first st, working in the opposite direction sc in each st (reverse sc) to create a rope-like edge. Fasten off and weave in ends.
Round 4 :
Decorative point caps: With Gold or small yellow motifs, attach tiny star-shaped clusters at each diamond corner by working 5 dc in a magic ring, ch1, sl st to close and sewing into the corner. Add a single gold bead centered on each star.
Info :
These small gold star clusters give the visual gold connectors seen between diamonds in the photo. They also act as anchor points for the tassels so sew them firmly through multiple layers of through the corner.
— Tassels & Finishing Tassel Loops (Make 6–8 tassels) :
Step 1 :
Cut multiple strands of Ivory yarn to desired tassel length (photo tassels measure approx 6–7 cm finished). Fold bundle in half to form loop at top.
Step 2 :
Wrap a small contrast thread (Burgundy) around the top 1 cm of the folded strands several times to form the tassel head. Tie securely. Trim ends evenly.
Step 3 :
Attach tassel to the prefabricated gold corner star by slipping the folded loop under the star and sewing loop closed through the corner with a few secure stitches. Add a dab of fabric glue inside the head for extra hold if desired.
Info :
Make tassels last so lengths can be trimmed evenly by holding the finished runner against a ruler. Use a pair of sharp scissors and fold the tassels closed for a neat cut.
— Bead Embellishment :
Step 1 :
Thread a beading needle with fine thread or matching yarn. Sew small gold seed beads onto the tree tiers using evenly spaced placement to mimic ornaments (photo shows approx 5 beads per tree placed staggered across tiers).
Step 2 :
Sew one bead at the center of each snowflake and small beads along the outer burgundy frame at symmetric intervals for vintage sparkle. Knot thread securely and hide ends on back of runner.
Info :
Sew beads from the back through the motif and back again to lock them. Use small secure knots and a dab of clear fabric glue on the thread knot for pieces that will be handled often.
— Final Blocking, Pressing & Care :
Info :
Lightly steam-block the entire runner on blocking mats, pinning each diamond edge straight and pinning tassels to hang freely while drying. Use low steam and never press beads directly.
Info :
Care: Hand wash gently in cool water with mild detergent if necessary. Reshape and dry flat. Avoid tumble drying. Remove beads or secure them before laundry to prevent loss.
Final :
Weave in all ends, trim stray fibers, and lay out on table to enjoy. Adjust tassel lengths and even out any scallops for a professional presentation.
This Forest Green Ivory Burgundy Christmas table runner brings vintage holiday charm to your tabletop with textured trees, snowflakes and gold accents. Each diamond motif is carefully crafted and joined to create a gorgeous, cohesive centerpiece you will be proud to place at your holiday table. The tassels and beadwork add a touch of festive sparkle and handmade warmth. Enjoy the slow, satisfying process of making this heirloom-style runner and sharing it with family this season. 🎄🧶