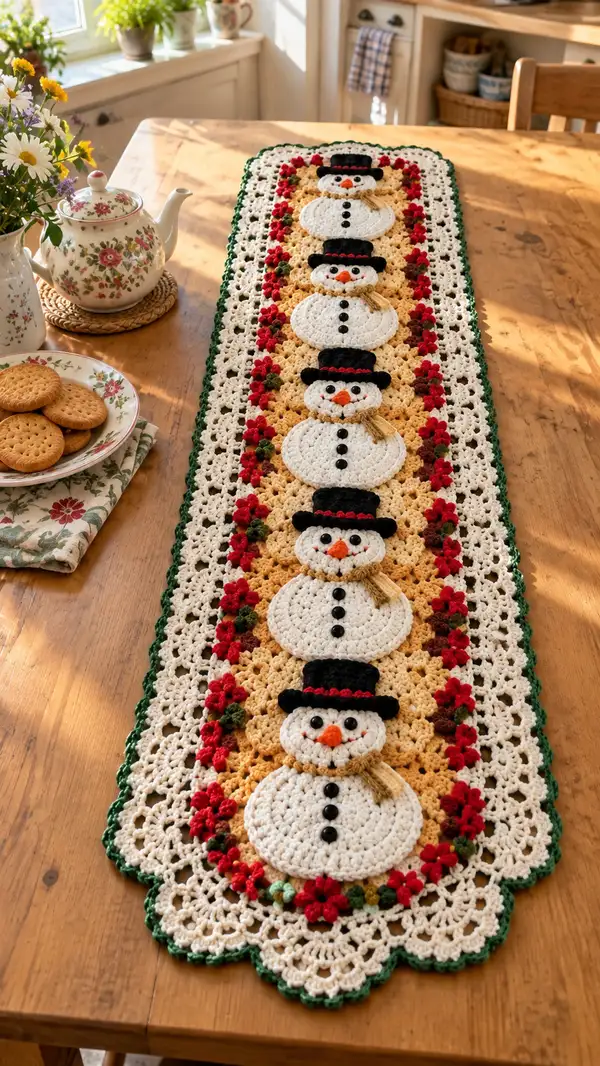
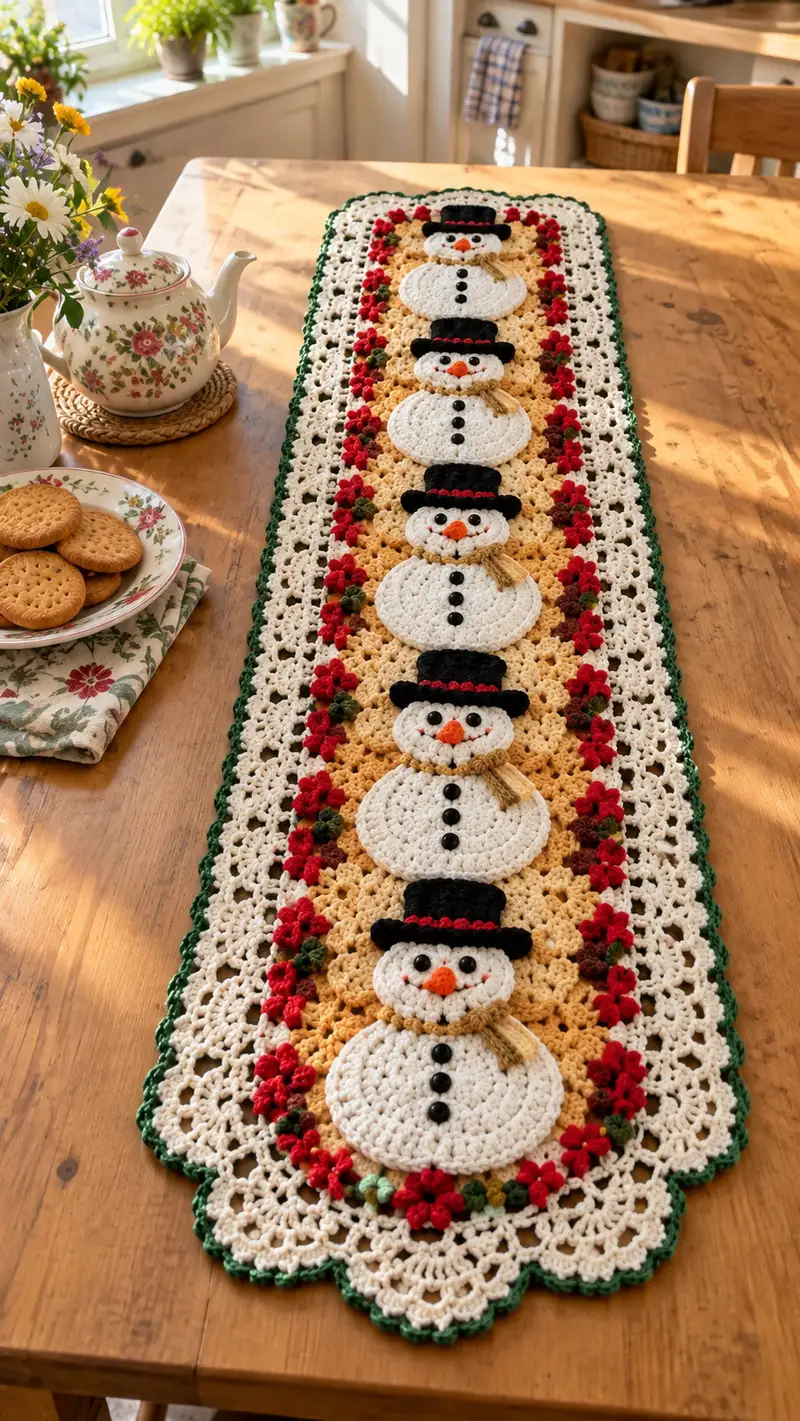
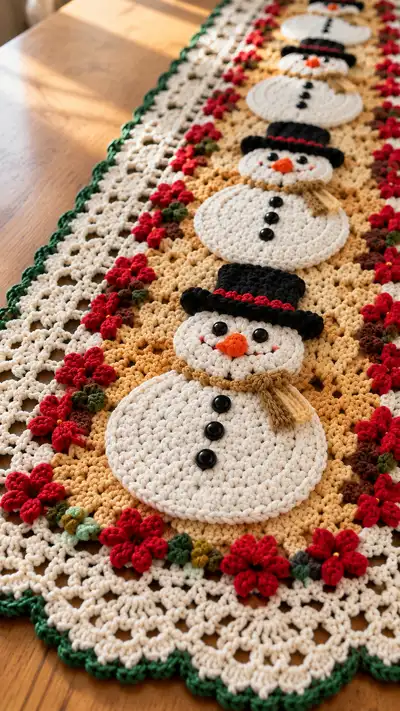
Create a charming holiday table runner featuring a row of five cheerful snowman appliques, a warm golden background, bright red poinsettia accents, and a scalloped evergreen border. This pattern uses simple circular appliques, cluster stitches, and decorative embroidery to build a festive runner that lays beautifully on a dining table or sideboard. Clear round-by-round instructions and assembly tips make it approachable for crocheters with some experience in joining and color changes. Make this runner for seasonal decor or to gift to someone who loves handmade holiday touches.
Progress Tracker
0% Complete
— Snowman Head (Make 5 Appliques):
Round 1 :
6 sc in magic ring (6)
Round 3 :
(1 sc, 1 inc) x 6 (18)
Round 4 :
(2 sc, 1 inc) x 6 (24)
Round 5 :
(3 sc, 1 inc) x 6 (30)
Info :
Work the head in continuous rounds (spiral) for a seamless look. Use a stitch marker to note the first stitch if you prefer joined rounds. Use white worsted yarn and a 3.25–3.5 mm hook for a slightly dense fabric
Round 6 :
(4 sc, 1 inc) x 6 (36)
Round 7 :
(5 sc, 1 inc) x 6 (42)
Round 8 :
(6 sc, 1 inc) x 6 (48)
Round 9-18 :
1 sc in each st (48)
Info :
Rounds 9-18 build the flat disc size for the head. Check diameter: this should produce a modest 2.25–2.75 inch disk depending on yarn and tension. Place safety eyes or mark eye placement between rounds 12-13 and about 6-8 sts apart, or plan for black button eyes sewn later
Round 19 :
(6 sc, 1 dec) x 6 (42)
Round 20 :
(5 sc, 1 dec) x 6 (36)
Info :
Begin a gentle cup-shape so hat and neck seam sits neatly on the body. No stuffing is required for the flat head disk—keep it flat but with a slight curve so it overlies the body circle well
Round 21 :
(4 sc, 1 dec) x 6 (30)
Round 22 :
(3 sc, 1 dec) x 6 (24)
Round 23 :
(2 sc, 1 dec) x 6 (18)
Round 24 :
(1 sc, 1 dec) x 6 (12)
Info :
Fasten off leaving a long tail for sewing the head to the body or for attaching the hat. For a completely flat applique, after round 18 you may fasten off; rounds 19-25 are optional to shape the underside for neat sewing.
— Snowman Body Disk (Make 5 Appliques):
Round 1 :
6 sc in magic ring (6)
Round 3 :
(1 sc, 1 inc) x 6 (18)
Round 4 :
(2 sc, 1 inc) x 6 (24)
Round 5 :
(3 sc, 1 inc) x 6 (30)
Info :
The body disk is larger than the head and should be a flat round with a slightly raised rim to help the head rest against it. Use the same white yarn and hook as the head for consistent gauge.
Round 6 :
(4 sc, 1 inc) x 6 (36)
Round 7 :
(5 sc, 1 inc) x 6 (42)
Round 8 :
(6 sc, 1 inc) x 6 (48)
Round 9 :
(7 sc, 1 inc) x 6 (54)
Round 10 :
(8 sc, 1 inc) x 6 (60)
Round 11-20 :
1 sc in each st (60)
Info :
Rounds 11-20 maintain the diameter and form a solid flat disk roughly 4.5–5 inches across depending on yarn. This will make the lower snowball of each snowman. Add more even rounds if you want a slightly larger body.
Round 21 :
(8 sc, 1 dec) x 6 (54)
Round 22 :
(7 sc, 1 dec) x 6 (48)
Round 23 :
(6 sc, 1 dec) x 6 (42)
Round 24 :
(5 sc, 1 dec) x 6 (36)
Round 25 :
(4 sc, 1 dec) x 6 (30)
Round 26 :
(3 sc, 1 dec) x 6 (24)
Round 27 :
(2 sc, 1 dec) x 6 (18)
Round 28 :
(1 sc, 1 dec) x 6 (12)
Info :
Fasten off leaving long tail for sewing to center lattice. If you prefer sewn buttons for the snowman's body, mark the vertical centerline from the top of this disk toward the bottom and plan for 3 button placements on the visible surface.
— Snowman Hat (Make 5):
Round 1 :
6 sc in magic ring with black yarn (6)
Round 3 :
(1 sc, 1 inc) x 6 (18)
Round 4 :
(2 sc, 1 inc) x 6 (24)
Round 5 :
1 sc in each st (24)
Info :
These rounds create the tapered crown. Use a slightly smaller hook (3.25 mm) for a firmer hat shape. The top hat has a short brim that is worked separately in rounds below.
Round 6 :
1 sc in each st (24)
Round 7 :
BLO: 1 sc in each st (24) (this creates a neat edge for the brim)
Round 8 :
Change to red yarn (Info: Change to red yarn for hat band by joining color with sl st). Working with black carried or rejoined, ch1 then sc around brim placement: (2 sc in next st, 1 sc in next 2 sts) x 6 (30)
Round 9 :
1 sc in each st (30)
Round 10 :
Turn brim out: Working in FLO of previous round, sc around (30). Fasten off and leave long tail for sewing on top of head.
Info :
Sew hat to the top of the head disk so it slightly overlaps the uppermost rounds, leaving a small gap for the scarf to tuck under. If desired, add a red contrasting band by embroidering a thin line of red across the hat crown.
— Carrot Nose (Make 5):
Round 1 :
4 sc in magic ring with orange yarn (4)
Round 2 :
1 sc in each st (4)
Round 3 :
(1 sc, inc) x 2 (6)
Round 4 :
1 sc in each st (6)
Round 5 :
(1 sc, dec) x 2 (4)
Round 6 :
2 sc (4) - do not stuff firmly; leave very slightly padded if you want slight 3D effect
Info :
Stuff carrot nose minimally, shaping into a tapered form. Leave a long tail to sew onto the head. If you prefer a purely flat applique, create a small triangle by sc rows and sew flat instead.
— Scarf & Tassel (Make 5):
Round 1 :
Using tan/golden yarn ch 18 (or to desired width), sc in 2nd ch from hook and across (17)
Round 2 :
Ch1 turn, sc across (17)
Round 3-6 :
Repeat Round 2 for a total of 5-6 rows to make a narrow scarf strip
Info :
Fold scarf into place and fray or add twisted tassels by cutting small lengths of yarn and knotting them at one end. For the tasseled look in the image, make 6–8 short tassels and bring them through the scarf end, trim evenly.
Round 7 :
Fasten off leaving long tail to sew the scarf around the neck seam between head and body. Attach tassel ends on one side for dangling effect.
— Buttons & Eyes (Make 5 sets):
Round 1 :
Use small black buttons or beads. If crocheting button disks: 6 sc in magic ring (6)
Round 3 :
Fasten off leaving tail for sewing to disk. For beads, sew directly to head disk between rounds 12-14.
Info :
Position two eyes roughly 3-4 sts apart within the head disk. Sew buttons or beads through slightly overlapping stitches to secure them for display use. For child-safe items, substitute embroidered eyes for buttons.
— Poinsettia Flower (Make multiple for inner border):
Round 1 :
Using red yarn, ch 4 join to form ring, ch2 (counts as hdc), work 11 hdc into ring, join (12 hdc)
Round 2 :
Ch1, sc in same st, *ch4, sl st in next st, sc in next st; rep from * around to create 6 loops, join
Round 3 :
Working into each ch4 loop: (sc, hdc, 3 dc, hdc, sc) in each loop (creates 6 pointed petals)
Round 4 :
Fasten off and leave tail for sewing to lattice. Optional: add a small French knot with yellow yarn in the center for a pollen dot
Info :
Make enough poinsettias to space evenly along both inner edges of the golden center strip. In the photographed runner there are repeating groups of single flowers with tiny green leaf clusters between them.
— Small Leaf Cluster (Make many):
Round 1 :
Using dark green yarn ch 6, sl st to form ring, ch1, make 5 sc in ring, join (5)
Round 2 :
In each sc around: *(ch3, sl st in 2nd ch from hook) to create a small point, sl st into next sc; rep from * to make 5 tiny leaves, join
Info :
These tiny leaf clusters are used as spacers between flowers and as accents along the inner red garland. Make many and arrange them in alternating colors (olive and moss) for visual interest.
— Center Golden Panel (Granny-Cluster Strip):
Round 1 :
With gold/tan yarn ch 80 (or desired runner length multiple), turn to work rows across as a strip. Row 1: sc in 2nd ch from hook and across (79)
Row 2 :
Ch2, turn, hdc in each st across (79)
Row 3 :
Ch3 (counts as dc), turn, dc in next st, *sk 1 st, (dc, ch2, dc) in next st (cluster shell), sk 1 st, dc in next 2 sts; rep from * across to create a row of shells. End with dc, ch1, turn
Info :
The center strip is constructed as a long repeating row of shell clusters which will be the base behind the snowman appliques. Ch 80 here is an example; adjust chain length in multiples of the shell repeat to match the desired runner length. This strip will be joined on both sides to the cream lattice panels with slip stitches.
Row 4-22 :
Repeat Row 3 for a total of 20 shell rows (or until the narrow golden panel is the correct width to accept the snowmen). Maintain consistent tension so the edges remain straight.
Info :
Place the snowman body disks centered on this strip as you work: the top of the lower snowman body starts approximately on shell row 3; mark positions with yarn markers or safety pins. The photographed runner has five snowmen equally spaced along the length—space them at equal shell-row intervals for symmetry.
— Outer Cream Lattice Panels (Make 2 long strips):
Round 1 :
With cream yarn ch 40 (or matching width of center panel, plus two shell edges), Row 1: sc in 2nd ch and across (39)
Row 2 :
Ch3 (counts as dc), turn, *sk 1, (dc, ch2, dc) in next st, sk1, dc in next st; rep across to create an open lattice row. End with dc in last st.
Row 3 :
Ch1, turn, sc in each dc and ch-space across, placing sc in ch2 spaces as well to create small mesh. This creates a delicate lacy band that mirrors classic granny lattice.
Row 4-22 :
Repeat Rows 2-3 alternating shell and sc rows until the length matches the center golden strip. Make two identical strips (one for each side of the golden center).
Info :
Blocking these panels lightly before assembly makes it easier to achieve consistent straight edges and to join motifs later. Use pins and a spray of water if needed to even out the mesh.
— Joining Center & Lattice Strips:
Info :
Lay the center golden panel flat. Align the cream lattice panels on each side so that shell rows align with shell rows. Use a row of slip stitches in cream along the side of the golden strip to join, or mattress stitch for invisible joins. Keep edges flat—pin in place before joining.
Round 1 :
With cream yarn, join at one corner, ch1, sc evenly through edge loops of both panels to join them together (work 1 sc in each row edge for consistent spacing). Continue along both sides to create a single long runner base.
Info :
Work carefully at corners to preserve the scalloped look; if the panels are slightly larger than the center, ease the fullness in with occasional decreases (skip 1 sc) in joining rows to avoid puckering.
— Snowman Placement & Sewing:
Info :
Before sewing appliques, lay out the joined runner and mark five evenly spaced vertical positions along the golden center using removable pins. Each snowman uses one body disk (larger) and one head disk (smaller). The center of each body disk should align with a shell cluster so the body sits centered on the golden back panel.
Round 1 :
Pin each body disk into place, then pin the head disk slightly overlapping the top edge of its body disk by 2–3 rounds so the neck seam is hidden.
Round 2 :
Sew each disk onto the runner using a tapestry needle and the long tails from each applique. Use a mattress or whip stitch around the edge, tacking every 6–8 stitches to keep the disk flat and secure.
Info :
Place the buttons vertically on the body disks before sewing them on, so you can stitch through both the button and the disk and secure the button to the underlying runner for extra stability. Sew hats slightly overlapping the top of the head so they sit snugly.
— Flower Garland Attachment:
Round 1 :
Arrange red poinsettia flowers in a single-file line inside the inner edge of the cream lattice, leaving small spaces for green leaf clusters between each flower.
Round 2 :
Sew flower centers down with small stitches and tack the green leaf clusters between them. Alternate moss/olive leaves for a natural look. Secure each element through the runner base to avoid shifting.
Info :
For the photographed runner, the flowers are placed immediately adjacent to the golden center on both sides, mirroring each other. Use the same spacing for symmetry and pin before sewing for accuracy.
— Outer Scalloped Border (Cream & Green):
Round 1 :
With cream yarn and starting at one short end of the runner, join with sl st into edge loops, ch1, sc evenly around the entire runner edge to create a clean foundation round (work more sc where there is fullness and less sc where edges are taut).
Round 2 :
Ch3 (counts as dc), *(skip 1 sc, 5 dc in next sc) skip1, dc in next sc; rep around to form shell clusters creating a scalloped look. Join with sl st to top of beginning ch3.
Round 3 :
Switch to green yarn (Info: change to dark green to create contrast along the edge). Join green with sl st into the base of each shell and work sc around, then work a 5-sc shell into each previous shell point to create double scallops. Fasten off and weave in ends.
Info :
The two-tone scallop echoes the image: delicate cream scallops backed by a subtle green rim. Adjust depth of scallop by working 5–7 dc in each shell if you want a deeper curve.
— Finishing Touches & Embroidery:
Round 1 :
Sew hats in place using the long tails. Attach the carrot noses centered between the eyes with the tapered tip pointing slightly downward.
Round 2 :
Sew small black buttons vertically down the body (3 buttons per body). For the photographed look, use glossy black round buttons roughly 6–8 mm diameter, spaced evenly on the centerline.
Round 3 :
Embroider small rosy cheeks with a couple of short pink embroidery stitches on either side of the nose and very short curved lines for smiling mouths. Add a small French knot or yellow dot center to each poinsettia if desired.
Info :
Weave all loose ends under sewn seams, and hide them within the runner when possible. Lightly block the runner flat once all sewing is complete so the edges and appliques sit tidy and uniform on the table.
— Tips for Making a Longer or Shorter Runner:
Info :
To lengthen, increase the chain foundation for the center golden panel by multiples of the shell repeat until you reach the desired length — add more snowmen by repeating the applique placements. To shorten, remove shell repeats and use fewer snowmen. Adjust cream lattice strips to match the golden panel length, and recompute scallop rounds accordingly.
Info :
Keep tension consistent across all motifs by always working the same number of even rounds for each applique and using the same hook. If you change hooks between motifs, gauge swatch one motif first to match size.
— Care & Display:
Info :
Hand-wash cold and lay flat to dry. Remove buttons before washing if worried about snagging. Store flat or rolled to avoid creases in the scalloped edging.
The Festive Snowman Table Runner brings a joyful, handcrafted focal point to any holiday table. Each carefully crafted applique and floral accent adds depth and warmth, creating a runner that feels both nostalgic and fresh. Working through the individual motifs feels wonderfully addictive — you watch the piece come together row by row until a delightful winter scene appears. 🧶🎁 Display it proudly through the season or wrap it up as a heartfelt handmade gift — either way, every stitch celebrates cozy, creative tradition.