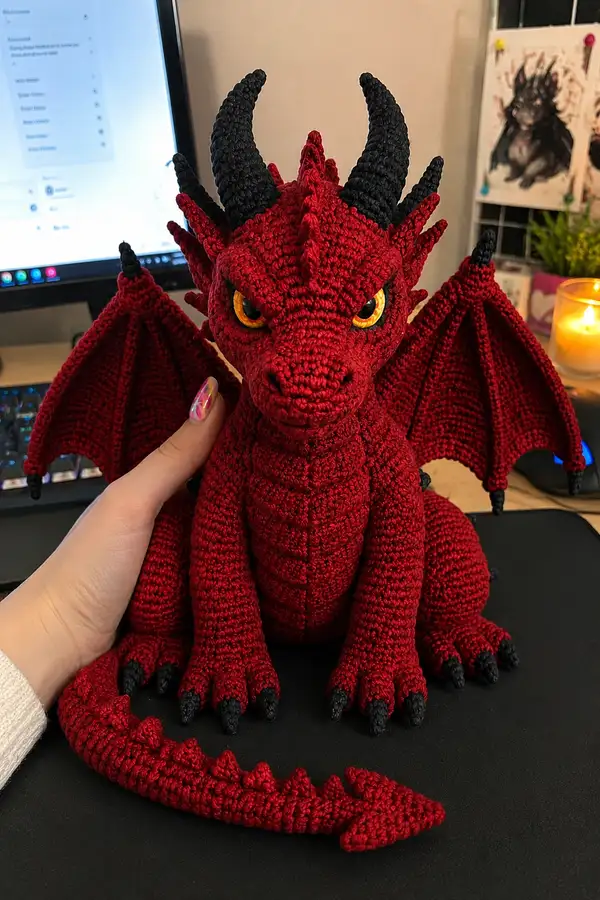
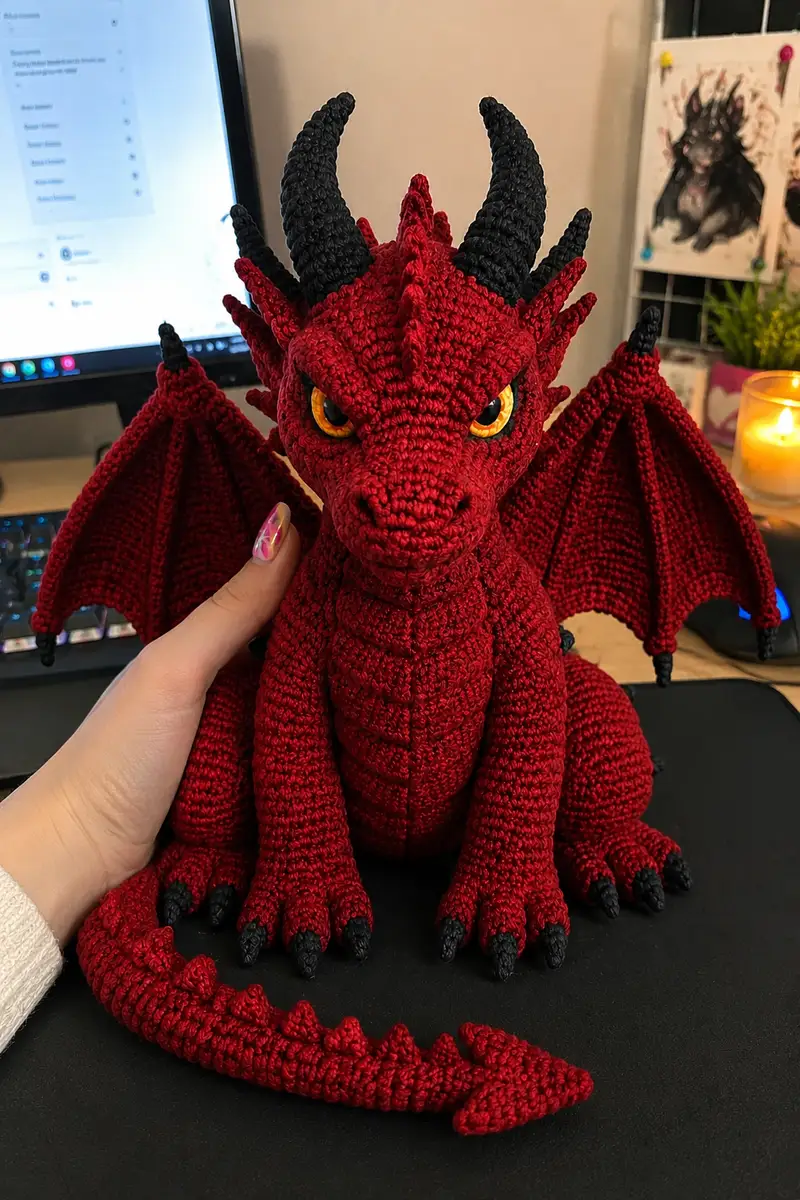
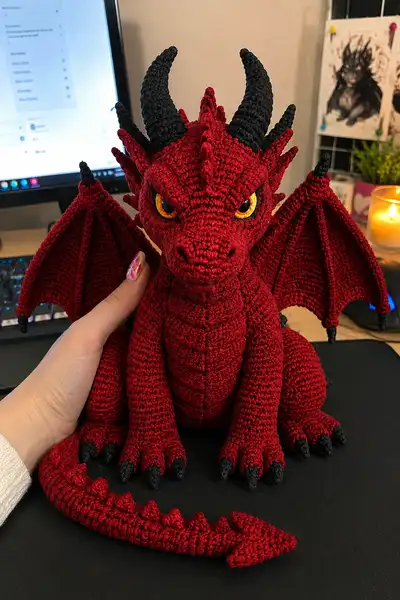
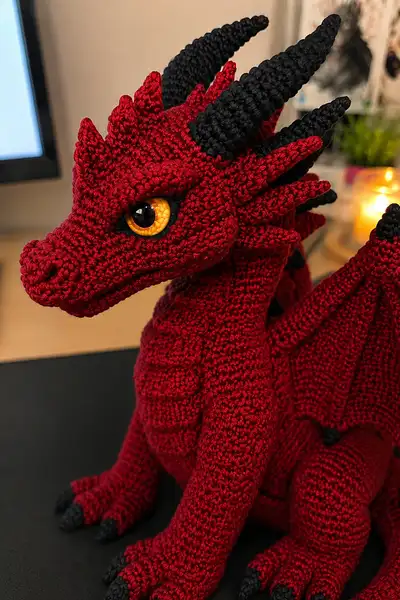
Create a dramatic, fierce yet cuddly giant blood-red dragon amigurumi with striking amber eyes, articulated wings, a long spiked tail, and sculpted horns. This pattern captures the detailed scale ridges along the belly and head frill, black claws and horns, and full poseable body. Detailed shaping and lots of small parts make this a showpiece perfect for display or a special handmade gift.
Progress Tracker
0% Complete
— Head :
Round 1 :
6 sc in magic ring (6)
Round 3 :
(1 sc, inc) x 6 (18)
Round 4 :
(2 sc, inc) x 6 (24)
Round 5 :
(3 sc, inc) x 6 (30)
Round 6 :
(4 sc, inc) x 6 (36)
Round 7 :
(5 sc, inc) x 6 (42)
Round 8 :
(6 sc, inc) x 6 (48)
Round 9-12 :
1 sc in each st (48)
Info :
Place safety eyes between rounds 13-14 later; mark round starts with stitch marker. Keep tension tight so bodywork remains sculpted
Round 13-16 :
1 sc in each st (48)
Info :
Check symmetry by folding head in half and matching points where the eyes should sit. For this dragon place eyes at the outer third of the head; usually 14-16 stitches between eyes on a 48-st head depending on expression
Round 17 :
(6 sc, dec) x 6 (42)
Round 18 :
(5 sc, dec) x 6 (36)
Round 19 :
(4 sc, dec) x 6 (30)
Info :
Begin light stuffing in the back/top of the head now; leave front and neck area less stuffed to allow snout and neck attachment shaping
Round 20 :
(3 sc, dec) x 6 (24)
Round 21 :
(2 sc, dec) x 6 (18)
Round 22 :
(1 sc, dec) x 6 (12)
Info :
Fasten off leaving a long tail for attaching to the neck later if you choose to sew head into body opening. Do NOT close head completely; this head will receive the snout piece sewn to the front to create the extended muzzle
— Snout (Make 1) :
Round 1 :
6 sc in magic ring (6)
Round 3 :
(1 sc, inc) x 6 (18)
Round 4 :
(2 sc, inc) x 6 (24)
Round 5 :
1 sc in each st (24)
Round 6 :
(3 sc, inc) x 6 (30)
Round 7-10 :
1 sc in each st (30)
Info :
This is the broadest portion of the snout base that will blend into the head. Keep the top rows a touch tighter to keep the muzzle sculpted.
Round 11 :
(3 sc, dec) x 6 (24)
Round 12 :
(2 sc, dec) x 6 (18)
Round 13 :
(1 sc, dec) x 6 (12)
Round 15 :
(1 sc, inc) x 6 (18)
Round 16 :
1 sc in each st (18)
Round 17 :
(2 sc, dec) x 4 + (1 sc) x 2 to shape forward tip (14)
Round 18 :
(1 sc, dec) x 4 + (1 sc) x 2 (10)
Round 19 :
1 sc in each st (10)
Round 20 :
2 dec, 6 sc (8)
Info :
Stuff snout firmly at the wider portions and less so near the very tip for a tapered muzzle. Adjust stuffing between rounds 10 and 17 to create a gradual taper. Do not close completely; leave tail for sewing to head front.
— Eye Socket Detail & Eyebrow Spikes (Make 2 mirrored sets) :
Round 1 :
4 sc in magic ring (4)
Round 3 :
(1 sc, inc) x 4 (12)
Round 4 :
1 sc in each st (12)
Round 5 :
BLO 1 sc in each st (12)
Round 6 :
1 sc in each st (12)
Info :
Sew these pieces around the eye holes on rounds aligned between head rounds 13-16. They create the raised socket and eyebrow ridge; place them slightly angled to give the fierce look.
— Horns (Make 2 large + 2 small rear horns) :
Large Horn Round 1 :
6 sc in magic ring (6)
Round 3 :
(1 sc, inc) x 6 (18)
Round 4-6 :
1 sc in each st (18)
Round 7 :
(2 sc, dec) x 6 (12)
Round 8-12 :
1 sc in each st (12) - continue tapering by inserting tighter tension and use 3.0mm hook if needed
Round 13 :
(1 sc, dec) x 4 (8)
Info :
Stuff lightly, mostly at base; keep tip unstuffed to allow a smooth, slightly curved horn. Make the horns in black. For a ridged look insert a strand of yarn or wire inside before finishing if you want poseable horns.
Small Rear Horns Round 1 :
6 sc in magic ring (6)
Round 2-6 :
1 sc in each st (6)
Info :
Make two smaller horns for the rear head frill. These are shorter and slightly thicker. Sew in staggered positions behind the large horns for layered effect.
— Head Frill Spikes (Make 12-14 small scales) :
Round 1 :
3 ch, 3 sc in 2nd ch from hook, sl st back to base to make a triangular spike; repeat to create small scale pieces (approx 1-3 stitches each)
Info :
Make 12-14 small spikes; sew them along the centerline of the head from forehead back to the nape, spacing them evenly. Alternate slightly larger and smaller spikes to create natural variation.
— Neck (Make 1) :
Round 1 :
6 sc in magic ring (6)
Round 3 :
(1 sc, inc) x 6 (18)
Round 4 :
(2 sc, inc) x 6 (24)
Round 5-8 :
1 sc in each st (24)
Info :
Work the neck slightly longer (about 12-16 rounds total) to get the upright pose seen. Create belly ridge rows in front (see belly section) and keep back slightly narrower to attach head with a secure seam.
Round 9 :
(3 sc, inc) x 6 (30)
Round 10-16 :
1 sc in each st (30)
Info :
Stuff neck moderately—firmer at the base for stability, softer toward head so head seam sits nicely. When joining head, make sure it aligns with the snout installer point and sew through both head and neck stitches evenly.
— Body :
Round 1 :
6 sc in magic ring (6)
Round 3 :
(1 sc, inc) x 6 (18)
Round 4 :
(2 sc, inc) x 6 (24)
Round 5 :
(3 sc, inc) x 6 (30)
Round 6 :
(4 sc, inc) x 6 (36)
Round 7 :
(5 sc, inc) x 6 (42)
Round 8 :
(6 sc, inc) x 6 (48)
Round 9 :
(7 sc, inc) x 6 (54)
Round 10 :
(8 sc, inc) x 6 (60)
Round 11-16 :
1 sc in each st (60)
Info :
If you want the ribbed belly effect work rounds 12-16 in BLO; these create a subtle ridge where later you will sew belly plates. Also, leave a large opening at the top for inserting the neck and for stuffing later.
Round 17 :
(8 sc, dec) x 6 (54)
Round 18 :
(7 sc, dec) x 6 (48)
Round 19 :
(6 sc, dec) x 6 (42)
Info :
Begin stuffing the lower body firmly for stability; the dragon sits upright so a firm base helps. Use small amounts of stuffing at a time to avoid lumps.
Round 20 :
(5 sc, dec) x 6 (36)
Round 21 :
(4 sc, dec) x 6 (30)
Round 22 :
(3 sc, dec) x 6 (24)
Round 23 :
(2 sc, dec) x 6 (18)
Round 24 :
(1 sc, dec) x 6 (12)
Info :
Fasten off leaving long tail to sew the neck into the body opening securely. When attaching neck, use mattress stitch to hide seams and ensure head sits upright.
— Belly Plates (Make 6) :
Round 1 :
6 sc in magic ring (6)
Round 3 :
(1 sc, inc) x 6 (18)
Round 4 :
1 sc in each st (18)
Round 5 :
BLO 1 sc in each st (18) - this creates a ridge
Info :
Sew belly plates vertically down the center front of the body, overlapping slightly to create segmented belly armor. Anchor at rounds of body specified in assembly notes.
— Forearms (Make 2) :
Round 1 :
6 sc in magic ring (6)
Round 3 :
(1 sc, inc) x 6 (18)
Round 4-6 :
1 sc in each st (18)
Round 7 :
(2 sc, inc) x 6 (24)
Round 8-12 :
1 sc in each st (24)
Info :
For the lower paw area maintain a slightly tighter tension for sculpted digits. These forearms will be sewn to the sides of the body with the paws resting on the ground.
Round 13 :
(2 sc, dec) x 6 (18)
Round 14 :
(1 sc, dec) x 6 (12)
Round 15 :
1 sc in each st (12)
Round 16 :
Fasten off leaving long tail for sewing; do NOT stuff fully yet
Info :
Leave toe separations for claws; you will sew small claw cones onto the paw tips, dividing the front by sewing a channel or adding stitch markers to mark toe positions.
— Hind Legs (Make 2) :
Round 1 :
6 sc in magic ring (6)
Round 3 :
(1 sc, inc) x 6 (18)
Round 4 :
(2 sc, inc) x 6 (24)
Round 5 :
(3 sc, inc) x 6 (30)
Round 6-10 :
1 sc in each st (30)
Round 11 :
(3 sc, dec) x 6 (24)
Round 12-16 :
1 sc in each st (24)
Round 17 :
(2 sc, dec) x 6 (18)
Round 18 :
(1 sc, dec) x 6 (12)
Round 19 :
1 sc in each st (12)
Round 20 :
Fasten off leaving long tail for sewing; stuff feet firmly and legs moderately to allow sitting posture
Info :
Sew hind legs to body bottom; the feet should protrude forward with toes facing slightly outward for stability. Reinforce with extra stitches if the piece will be handled.
— Claws (Make 10) :
Round 1 :
6 sc in magic ring (6) using black contrast (6)
Round 2 :
1 sc in each st (6)
Round 5 :
1 sc in each st (4)
Info :
Sew claws onto the front of each paw. For front paws sew three claws, for hind paws sew three claws each (or four depending on your preference). Position claws slightly curved and pointy.
— Wings (Make 2) - Finger Struts and Membrane :
Wing Finger (Make 4 per wing) Round 1 :
6 sc in magic ring (6)
Round 2-8 :
1 sc in each st (6) - elongate to create pointed finger bones (use black contrast on tips if desired)
Info :
Make 4 thin tubes to act as wing struts; the longest will be the leading edge and the shorter fingertips will taper. Optionally insert floral wire inside each finger for poseability.
Wing Membrane - Base Round 1 :
Ch 30, turn; from 2nd ch from hook sc across (29)
Round 2 :
Ch1, turn, 1 sc in each ch across (29)
Round 3 :
Ch1, turn, 1 sc in first 3 sts, (hdc, 2 dc, hdc) in next st to create gentle scallop, 1 sc each remaining until last 3 sts repeat scallop, end with 1 sc (29)
Round 4-8 :
1 sc in each st across (29) - repeat and shape edge by decreasing 1-2 stitches per side to create tapered triangle
Round 9 :
Attach wing finger struts by sewing 4 tubes along the membrane, spaced evenly with largest at leading edge. Reinforce with whip stitch across the base.
Round 10-16 :
Work additional rows of single crochet around wing perimeter to build thickness: 1 sc in each st (29) per round (29)
Info :
Work membrane in red with black tips on finger struts. Use BLO on the edge rounds for a crisp ridge. Sew wing bases to back on the appropriate body rounds (see assembly).
— Tail :
Round 1 :
6 sc in magic ring (6)
Round 3 :
(1 sc, inc) x 6 (18)
Round 4-6 :
1 sc in each st (18)
Round 7 :
(2 sc, inc) x 6 (24)
Round 8-18 :
1 sc in each st (24) working length until tail measures desired length (approx 18-22 rounds total)
Round 19 :
(2 sc, dec) x 6 (18)
Round 20 :
(1 sc, dec) x 6 (12)
Round 21 :
1 sc in each st (12)
Round 22 :
Fasten off leaving long tail for sewing
Info :
Create triangular spikes along the top of the tail by making small scale pieces (see Head Frill Spikes) and sewing them in a staggered pattern down the center top. Add final arrowhead tip made as flat triangular piece and sew to tail end.
— Tail Arrow Tip :
Round 1 :
Ch6, sc across (5)
Round 2 :
Ch1, turn, dec, 1 sc, dec (3)
Round 3 :
Ch1, turn, dec, 1 sc (2)
Round 4 :
Fasten off leaving tail for sewing; sew into tail end and shape
— Small Decorative Spikes (Make 10-14) :
Round 1 :
3 ch, 3 sc in 2nd ch from hook, sl st to base to make triangular spike; repeat for 10-14 pieces varying size with 3-6 ch as desired
Info :
These small spikes are sewn along the spine: across head, neck, back and tail. Mix sizes and angle them slightly outward for a dynamic profile.
— Assembly Instructions :
Info :
Stuff all parts appropriately before final assembly: head (firm at back), snout (firm at base), neck (moderate), body (firm), legs/arms (feet firm, legs moderate), tail (firm near body). Use pins to align parts before sewing.
Step 1 :
Attach the snout to the head front by aligning the snout opening with the head front. Insert snout tail into the head opening and sew with long tail using whip stitch through matching rounds to create smooth muzzle join. Weave the yarn through several times and knot securely.
Step 2 :
Sew neck into body opening: align the last round of neck with the top opening of body. Pin in several places front to back. Use mattress stitch to create an invisible seam and stuff as you go to maintain shape.
Step 3 :
Attach head to neck if not already joined through snout: sew remaining head base to the top neck round ensuring correct tilt. Reinforce by sewing from inside head into neck stitches several times.
Step 4 :
Pin forearms to the sides of the body at approximate body rounds 18-22 to make the dragon sit with paws on the ground. Sew through body and arm rounds multiple times for stability, then stuff forearms fully and seam closed.
Step 5 :
Attach hind legs to underside of the body at the base. Position them slightly to the sides so the body can sit upright with the knees forward. Whip stitch through multiple rounds for strong join.
Step 6 :
Sew claws to toes at marked positions. For front paws place 3 claws; for hind paws place 3 claws each. Use black contrast yarn and secure claws with 3-4 stitches through base to hold them tight.
Step 7 :
Sew wing bases to the back near body rounds 10-14 (approx). Pin wings and adjust angle until you get desired forward sweep. Ensure finger struts line up from shoulder outward and sew at least 6-8 passes for strength.
Step 8 :
Sew horns to top of skull. Place larger horns centrally and smaller horns slightly behind. Add head frill spikes between horns. Use a yarn needle to create a smooth, even attachment and hide ends internally.
Step 9 :
Sew small decorative spikes along back and tail. Use staggered spacing and vary sizes; secure by threading tail ends through base of body to anchor spikes so they won’t pull off easily.
Step 10 :
Embroider nostrils and mouth details using a strand of darker red or black. Add subtle highlights around eyes using small stitches of auburn yarn if desired. Weave in all ends carefully into adjacent stitches and trim close.
— Eye Installation & Finishing Touches :
Info :
Install safety eyes between head rounds 13-14 before stuffing head fully and closing. Measure distance between eyes on either side to ensure evenness (approx 12-16 sts apart on 48-st head). Secure safety washers tightly.
Step :
Use small seed stitches of black around the eye socket to create a slight eyebrow shadow; use the eyebrow socket pieces made earlier and sew them at a slight angle to maximize fierceness.
Info :
Use optional floral wire inside wing fingers or tail for poseability—insulate wire ends and avoid sharp points. Add a few stitches to hold wire in place and conceal wires under stuffing.
Final :
Weave in all tails. Mist with water and steam lightly from a distance to even stitches if your yarn tolerates steam. Display proudly.
Completing this fierce blood-red dragon is a joyful balance of sculptural shaping and detailed finishing — every stitch builds toward a dramatic, character-rich final piece! Sewing the horns, spikes and wings into place is immensely satisfying, and the amber eyes really make the dragon come alive. 🐲🧶 I hope this pattern becomes a treasured centerpiece in your collection or an unforgettable handmade gift. Happy stitching and share your finished dragon for others to admire! ✨