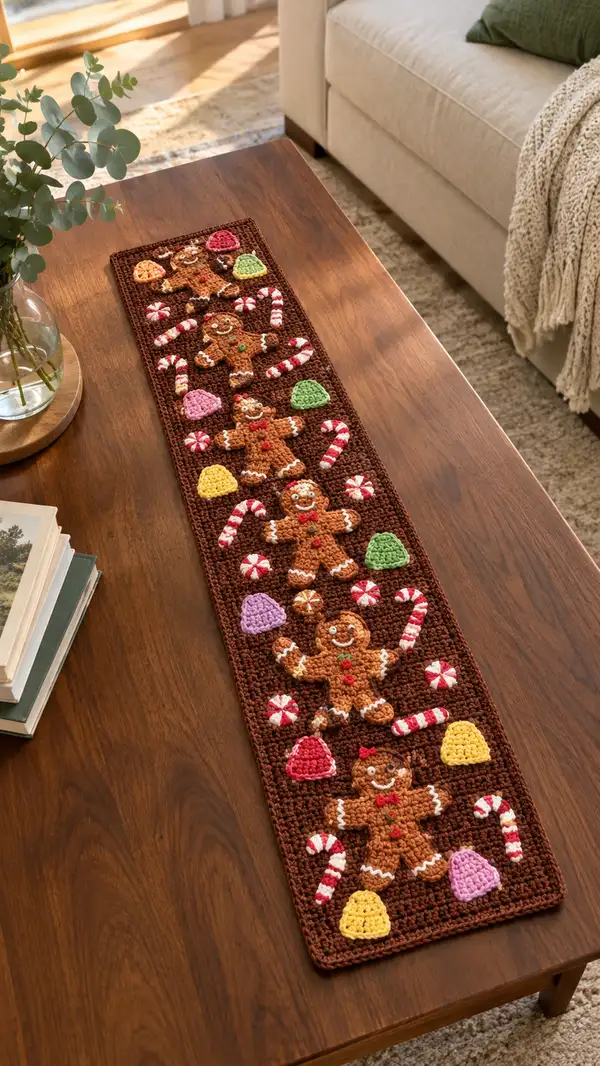
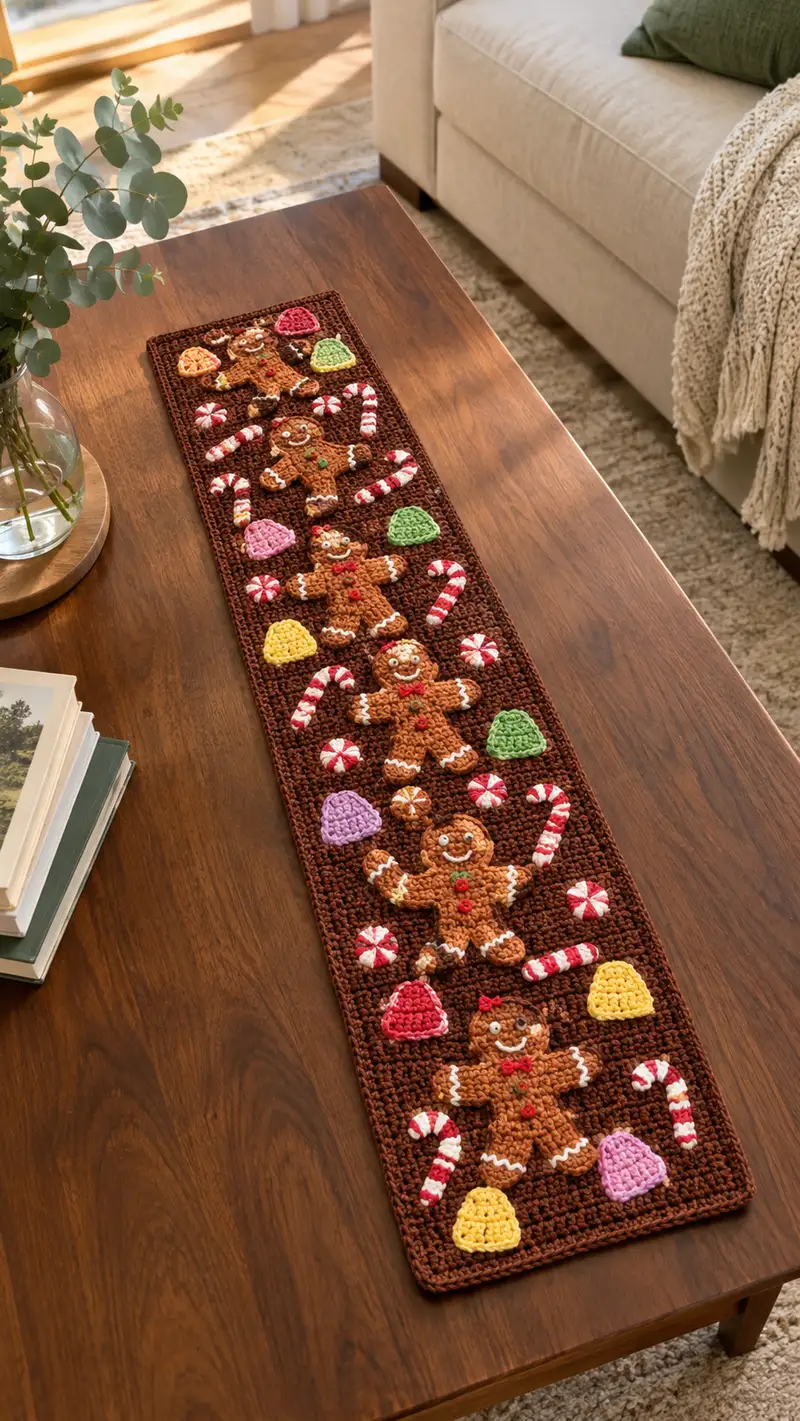
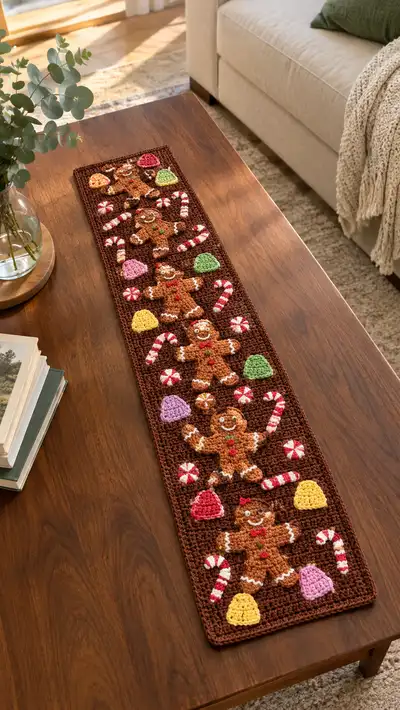
A festive, whimsical table runner featuring a parade of smiling gingerbread men surrounded by candy canes, peppermint swirls and colorful gumdrops. Worked in warm chocolate brown for the background with textured appliques sewn on top, this runner makes a charming holiday centerpiece. The pattern uses simple stitches and applique techniques for a cozy handmade accent that brightens any table.
Progress Tracker
0% Complete
— Runner Base (work one panel) :
Info :
The runner base is worked flat in rows using single crochet in chocolate brown to create a dense background. The sample panel measures approximately 11.5" wide by 48" long with a foundation chain of 90. You may adjust chain length for different widths; count and adapt motif spacing proportionally.
Round 1 :
Ch 90, turn. Starting in 2nd ch from hook, 1 sc in each ch across (89 sc). Ch 1, turn.
Round 2 :
1 sc in each st across (89 sc). Ch 1, turn.
Round 3 :
1 sc in each st across (89 sc). Ch 1, turn.
Info :
Use a stitch marker to mark the last stitch of the row and track ends of rows; keeping consistent edge tension will create a neat rectangle. Keep your tension firm for a dense background so appliques sit nicely on top.
Round 4-12 :
1 sc in each st across (89 sc). Ch 1, turn. Repeat for a total of 12 rows so far to form a sturdy lower border before the first gingerbread placement.
Info :
Measure along the panel as you work. The sample places six gingerbread appliques evenly spaced from top to bottom. Mark placement lines with removable pins or safety pins at the following row centers: Rows 18, 30, 42, 54, 66, 78 (adjust if you change total row count).
Round 13-20 :
1 sc in each st across (89 sc). Ch 1, turn. Work 8 rows to reach first motif area; adjust if your spacing markers differ.
Info :
If you prefer the background to have a textured field, substitute every 4th row with a hdc row across to create subtle ridging. For a perfectly flat look match all rows as sc.
Round 21-28 :
1 sc in each st across (89 sc). Ch 1, turn. Continue working straight rows. These rows form the area between first and second motifs. Keep track of your placement markers.
Round 29-36 :
1 sc in each st across (89 sc). Ch 1, turn. This middle section of runner contains several candy motifs in the photo; you will position them between gingerbread men after all appliques are completed.
Info :
Work steadily up the panel until you have completed rows to match the number of motifs and spacing desired. The example panel continues with repeat sets of 12 rows between motif centers; follow placement markers for precise spacing.
Round 37-84 :
1 sc in each st across (89 sc). Ch 1, turn. Continue working even rows until the panel reaches desired length. In the sample, the panel reaches 84 rows total before adding a top border. This creates a long runner that comfortably fits six gingerbread appliques with between-motif rows.
Info :
Once the base panel reaches the desired length, block it flat. Pin the edges straight and steam-block or wet-block gently to square the piece. Blocking ensures the appliques will align neatly when sewn on.
Round 85 :
Working around the entire panel to create a single-round border: With right side facing, join brown yarn at any corner. Ch 1, 1 sc in same st, continue with 1 sc evenly along the long edge ends, place 3 sc in each corner (to lie flat), continue evenly along the opposite long side and other short side; sl st to first sc to join. Maintain 3 sc in each corner for neat rounded corners.
Info :
Add a second round of border if you prefer a thicker frame: Work 1 sc in each st around, placing 3 sc in corner sc from previous round. Fasten off and weave in ends after border is complete.
— Gingerbread Applique (Make 6 identical flat gingerbread men) :
Info :
Each gingerbread man is worked flat in joined rounds to create a solid applique with slight 3D texture. Use light brown/tan yarn and a 3.5mm hook for a slightly firmer stitch definition. Embellish with small buttons, icing and facial embroidery once assembled.
Round 1 :
With light brown, mr, 6 sc into ring (6).
Round 2 :
6 inc around (12).
Round 3 :
(1 sc, inc) x 6 (18).
Round 4 :
(2 sc, inc) x 6 (24).
Round 5 :
(3 sc, inc) x 6 (30).
Round 6 :
1 sc in each st around (30).
Info :
Rounds 1–6 form the head. Place safety eyes between rounds 4 and 5 with approximately 6 stitches between centers for a friendly expression. If you prefer embroidered eyes, embroider a small straight stitch or French knots after topping with icing detail.
Round 7 :
(3 sc, dec) x 6 (24).
Round 8 :
1 sc in each st around (24).
Info :
Begin shaping the neckline and upper torso. If you want the head to appear slightly raised from the body, place a tiny amount of fiberfill under the head area before continuing; keep filling minimal to remain mostly flat.
Round 9 :
Join new round without closing: ch 1, 1 sc in next 6 sts (these will form upper torso connection), now work 2 sc in next 6 sts, 1 sc in remaining 12 sts (total 30). Adjust tension so the neckline sits smooth.
Round 10 :
1 sc in each st around (30).
Round 11 :
(4 sc, inc) x 6 (36).
Round 12 :
1 sc in each st around (36).
Info :
Rounds 9–12 build the chest area where button details will sit. Leave a small tail to embroider buttons later or use tiny sewn-on buttons for a three-dimensional look.
Round 13 :
(5 sc, inc) x 6 (42).
Round 14 :
1 sc in each st around (42).
Info :
At this stage you will create arm shaping by working flat lengthwise across the body. We will form arms as short wings by working a partial round that extends outward, then rejoining to build the lower body.
Round 15 :
Ch 1, sc in next 9 sts (this forms first shoulder), then ch 8, turn and work 7 sc back into the chain (forming arm extension), sl st to the next body st to join, continue 1 sc in next 18 sts along front, repeat arm on opposite side: ch 8, 7 sc back, sl st to next body st, 1 sc in remaining sts to complete round (42).
Round 16 :
1 sc in each st around including scalloped arm chains (count will be 42 + 14 extra chain sc = 56 sc). Adjust counts if necessary to maintain even fabric; the round should lie flat.
Info :
Arms at this stage are built as little flaps. You can leave them flat or stuff slightly before closing to create a plush, slightly raised arm. If stuffing, add a tiny bit now and secure.
Round 17 :
(6 sc, inc) x 8 (64).
Round 18 :
1 sc in each st around (64).
Round 19 :
(7 sc, inc) x 8 (72).
Round 20 :
1 sc in each st around (72).
Info :
Rounds 17–20 expand the lower torso to form hip area. Count stitches carefully after forming arm chains as these increase the round count. The sample gingerbread is a flat applique; avoid heavy stuffing to keep it appliquable.
Round 21 :
(7 sc, dec) x 8 (64).
Round 22 :
(6 sc, dec) x 8 (56).
Info :
Begin to define legs by shaping the bottom portion. We will divide the lower edge into two leg flaps by working linked chains for each leg region, similar to the arms technique used earlier.
Round 23 :
1 sc in next 14 sts, ch 6, turn and 5 sc back into chain (leg flap), sl st to next body st, 1 sc in next 16 sts, ch 6, 5 sc back, sl st to next body st, 1 sc in remaining sts (56). Total stitch count becomes 56 + 10 chain sc = 66 sc for this round.
Round 24 :
1 sc in each st around including leg chains (66).
Info :
For a very flat applique that looks like the photograph, avoid stuffing legs; only add a touch of fiberfill inside leg chains if you want a slightly raised look. Secure chain loops with single crochet to produce a rounded foot edge.
Round 25 :
(5 sc, dec) x 11 + 1 sc (55). Work decreases evenly around to narrow for the bottom of the figure and prepare for finishing edge.
Round 26 :
1 sc in each st around (55).
Round 27 :
(4 sc, dec) x 9 + 1 sc (46). Check that the shape resembles a gingerbread man with two leg flaps and two arm flaps; adjust slightly if needed.
Round 28 :
1 sc in each st around (46).
Info :
Fasten off leaving a long tail for sewing. Weave in the small number of interior ends but leave ends for sewing to the panel accessible. Repeat to make six identical gingerbread appliques for the full runner.
— Gingerbread Icing, Buttons and Face Details :
Info :
Use white scrap yarn and surface crochet/embroidery to add icing lines on arms, legs and around the head, small buttons with red and green yarn, and embroidered smile and eyes. Work details after all appliques are blocked flat.
Round 1 :
For icing, use white yarn and a yarn needle to couch a chain of slip stitches along the outer edge of arms and legs: Whip-stitch small scallops (approx 6 small loops on each arm) to mimic piped icing.
Round 2 :
Buttons: Using small stitches, sew tiny French-knots or small 2-stitch crosses with red and green yarn centered on torso where you want buttons (typically 2 or 3). Secure tightly and weave ends to back.
Round 3 :
Face: Using white for eyes, make small stitches or attach 6mm safety eyes between head rounds 4–5 before adding the icing eyebrows. Use dark yarn to embroider small smile with backstitch. Add a small red bow or candy accent on top of the head if desired.
Info :
Keep facial embroidery minimal, as details shown in the photo are small and dainty. A white highlight dot on each eye gives a cheerful expression. Use contrasting yarn colors for visibility on the tan background.
— Arms (If you prefer separate small arm pieces rather than chained flaps) (Make 12 for pair assembly) :
Round 1 :
With light brown, mr, 6 sc into ring (6).
Round 3-6 :
1 sc in each st around (12). Flatten slightly and fasten off leaving a tail for sewing. Embroider a tiny white icing cuff at the outer edge using white yarn.
Info :
Alternatively work arms as single chain loops as shown in main gingerbread instructions for perfectly flat profile. Use these separate arms only if you desire a slightly raised arm sewn to the body.
— Legs (Make 12 small foot flaps if building separately) :
Round 1 :
With light brown, mr, 6 sc into ring (6).
Round 3-8 :
1 sc in each st around (12). Shape a small oval by working (2 sc, dec) around once if you want a tapered foot and fasten off leaving a tail for sewing.
Info :
Sew leg flaps or foot pieces to bottom of gingerbread torso aligning with initial chain flaps; use whip stitch and anchor firmly. Weave ends to back to avoid visibility on front.
— Candy Cane (Make 10 to scatter between figures) :
Info :
Candy canes are small curved stripes worked in short rows with alternating red and white yarn. Work on 3.5mm hook for crisp edges. They are crocheted flat and sewn with a slight curve to sit on the runner.
Round 1 :
Ch 1, 6 sc in mr (6).
Round 2 :
1 sc in each st around (6). Fasten off and change to red.
Round 3 :
Join red to one stitch at edge, ch 3, turn and 3 sc back into chain (3 sc), sl st to next body edge st. Continue alternating 2–3 rows of white and red, creating a short striped tube. For curve, make the upper arch longer by adding chains at one end when shaping the curve.
Round 4 :
Work strips until cane length is approximately 7–8 sts long in flat chain terms (about 1.5"). End with white and fasten off, leaving tail for sewing. Lay the piece into a gentle J-shape and baste stitch to secure the curve before final sewing.
Info :
To create the candy cane look, use surface slip-stitching in contrasting color to define stripes rather than changing yarn for each short row; this method looks neater for tiny pieces.
— Peppermint Swirl (Make 12) :
Round 1 :
Mr, 6 sc in ring (6).
Round 3 :
(1 sc, inc) x 6 (18).
Round 4 :
Change to white: surface crochet or embroider radial stripes by dividing circle into 6 equal pie wedges and couch white yarn along wedge lines to create a peppermint look. Fasten off and weave ends to back.
Info :
Alternatively, work the spiral effect directly by crocheting a short spiral: start with white and switch to red at specific stitches to create tiny wedge stripes. Use embroidery for most control on such a small piece.
— Gumdrops (Make 18 in assorted colors) :
Info :
Gumdrops are small domes worked in half-sphere motifs. Use bright colors like pink, yellow, green, purple to mimic the pictured candies. Work with 3.5mm hook for crisp shaping.
Round 1 :
Mr, 6 sc into ring (6).
Round 3 :
(1 sc, inc) x 6 (18).
Round 4 :
(2 sc, inc) x 6 (24).
Round 5 :
1 sc in each st around (24).
Round 6 :
(2 sc, dec) x 6 (18). Fasten off and leave tail. Stiffen slightly if you need them to sit upright using a touch of clear-drying glue on the interior or a tiny bit of stuffing to keep a rounded dome.
Info :
For a more realistic gumdrop look, use a tiny bit of starch or craft stiffener and allow to dry while pinned into shape. Test on a scrap first to avoid discoloration of yarn.
— Assembly and Placement :
Info :
After all appliques are completed and blocked flat, position them on the runner according to your visual preference or follow the sample layout: six gingerbread men evenly spaced along the center line, candy canes flanking each figure, peppermints in the gaps and gumdrops scattered around edges for pops of color.
Round 1 :
Pin the first gingerbread applique so that its center aligns with the marked placement row (for sample runner, center on rows 18, 30, 42, 54, 66, 78). Place the top of the gingerbread head approx 6–8 rows down from the top border so it reads visually centered.
Round 2 :
Use a tapestry needle and matching brown yarn to whip or mattress stitch the applique down. Sew through the body edge only, taking small even stitches approximately 2–3 mm apart to keep the seam invisible from the front. Fasten off and weave ends to the back.
Round 3 :
Sew candy canes, peppermints and gumdrops in the spaces between and around gingerbread men. Use a sketch or measured template for spacing: candy canes angled alternating left/right next to each gingerbread, peppermints centered in smaller gaps, gumdrops near corners of the motif block.
Info :
Stitch each applique with a thread color that matches its edge for invisibility. For very small pieces (peppermints), use a few secure running stitches rather than a continuous whip stitch to avoid bunching the background fabric.
Round 4 :
After all appliques are sewn, give the entire runner a gentle steam from the front using a pressing cloth. This evens stitches and flattens any small puckers from sewing. Do not press directly on any glued or stiffened appliques.
Round 5 :
Check the underside and trim or tuck any long yarn tails. If you plan to gift or launder the runner, reinforce applique stitches with an extra pass of stitching around stress points like the corners of gumdrops and ends of candy canes.
Info :
For durability, consider sewing a lightweight fabric backing (cotton) to the underside of the runner. This hides sewn ends and gives a neater finished edge. Baste the backing with large running stitches and then topstitch along the border or slip stitch the edges together for a professional finish.
— Alternative: Raised Gingerbread (Optional small padding) :
Info :
If you want your gingerbread to have slight puffiness similar to the photograph, make two identical gingerbread shapes, sandwich a thin layer of polyester fiberfill between them and whip them together around the edges with a running stitch. Then sew the padded applique onto the panel as described above. Keep padding minimal to maintain flatness on the table.
Round 1 :
Make two gingerbread shapes as above. Put wrong sides together and baste around with evenly spaced large stitches, insert thin fiberfill, adjust to even distribution, then close with smaller stitches to hide the seam.
Info :
Use this technique sparingly — too much padding can make the runner unstable on a table and create lumps under objects. The visual impact of gentle raised appliques is lovely and subtle when done with restraint.
This gingerbread table runner brings home a whimsical holiday feel with charming appliques and candy accents. Creating each gingerbread man and candy piece is a delightful, meditative process, and assembling them into a parade across the runner is incredibly rewarding. The finished runner is sure to be the centerpiece of your seasonal decor, and makes a heartfelt handmade gift for hosts and family. Enjoy the stitching, the delicious color palette, and the smiles this runner will bring! 🎄🍬🧶