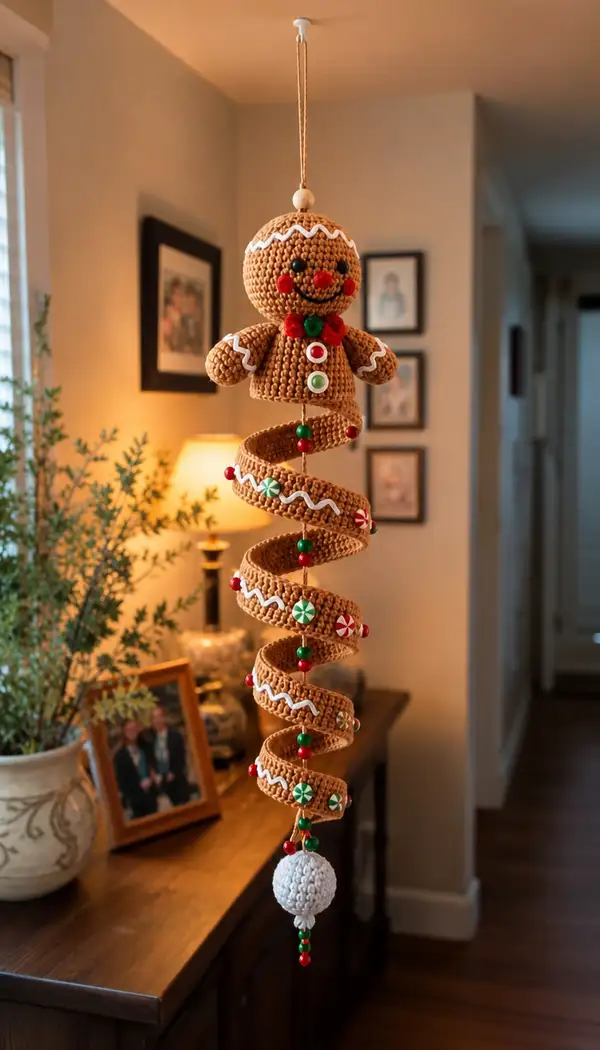
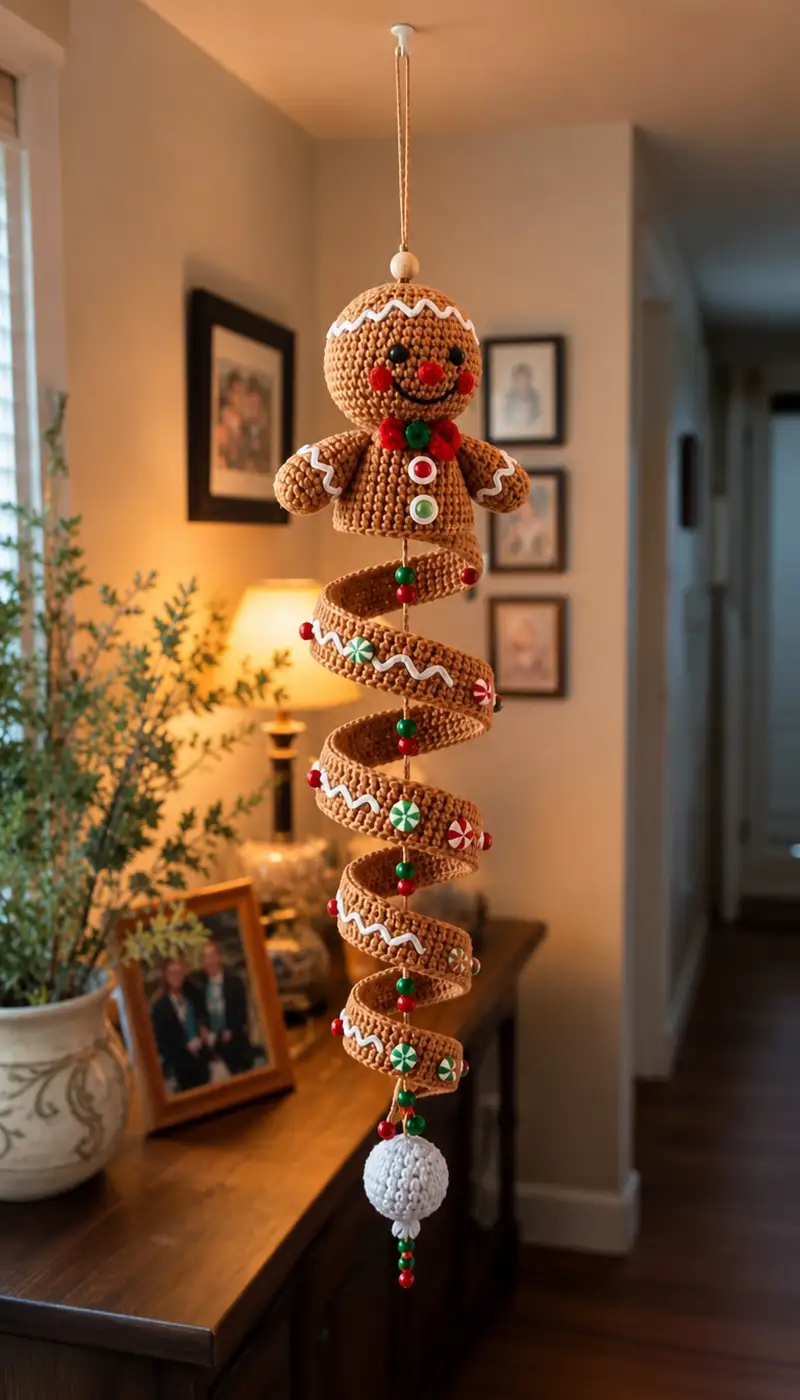
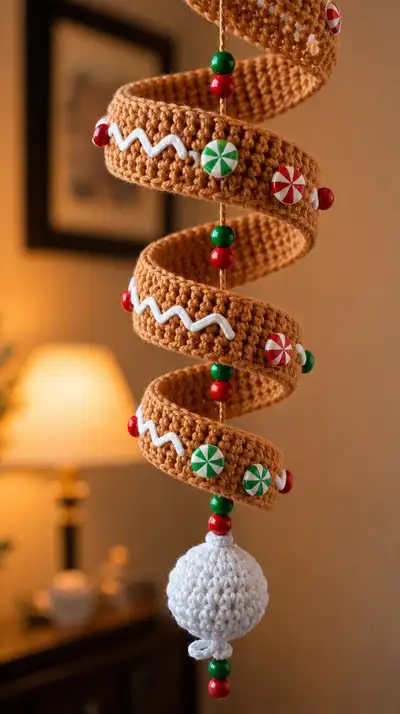
Create a whimsical gingerbread spiral hanging ornament that combines classic amigurumi shaping with a coiling spiral body, festive beads and candy buttons. This warm brown gingerbread character features a smiling face, piped white icing details, bright red/green bead accents and a textured white tassel ball at the bottom — perfect for holiday decor or gifts. The pattern covers crochet construction, assembly and decorative finishing so you can recreate the charming hanging spiral shown.
Progress Tracker
0% Complete
— Notes :
Info :
This pattern is worked mostly in continuous rounds (spiral) for the amigurumi pieces to avoid a visible seam. Use stitch markers to mark the first stitch of each round. All increases and decreases are written for single crochet unless otherwise stated. Adjust tension/hook if your fabric is too loose. Lengths, stitch counts and round numbers are tested for a finished ornament approximately 30-35 cm / 12-14 in from top bead to bottom bead using worsted yarn and 3.5mm hook. If you want a larger or smaller finished hanging, change yarn weight and hook accordingly and keep stitch math consistent.
— Head :
Round 1 :
6 sc in magic ring (6)
Round 3 :
(1 sc, inc) x 6 (18)
Round 4 :
(2 sc, inc) x 6 (24)
Round 5 :
(3 sc, inc) x 6 (30)
Round 6 :
(4 sc, inc) x 6 (36)
Round 7 :
(5 sc, inc) x 6 (42)
Round 8 :
(6 sc, inc) x 6 (48)
Round 9-20 :
1 sc in each st (48)
Info :
Eye placement: place safety eyes between rounds 12 and 13, spaced about 8-10 stitches apart for the sweet expression in the sample. If using embroidered eyes, mark the centers at the same height. Use stitch marker at round start so placement is symmetrical left/right.
Round 21 :
(6 sc, dec) x 6 (42)
Round 22 :
(5 sc, dec) x 6 (36)
Info :
Begin stuffing head firmly from this round onward. Add small amounts of fiberfill at a time and shape the cheeks and forehead as you go to mimic the rounded gingerbread head in the photo.
Round 23 :
(4 sc, dec) x 6 (30)
Round 24 :
(3 sc, dec) x 6 (24)
Round 25 :
(2 sc, dec) x 6 (18)
Round 26 :
(1 sc, dec) x 6 (12)
Round 27 :
(1 sc, dec) x 6 (6)
Round 28 :
1 sc in each st (6)
Round 29 :
1 sc in each st (6)
Info :
Finish stuffing firmly if needed to set shape. The last small tube is the neck stub which will be sewn into the torso opening. Fasten off leaving a long tail for sewing. Weave the tail through the front loops around the neck and draw closed slightly so head sits flush on the torso.
— Facial Features (Head finishing) :
Info :
Embellish face now while head is easy to manipulate: sew on black safety eyes (8-10 mm) or embroider eye dots using black yarn. Attach two small red pom-poms or sew tiny red yarn circles for rosy cheeks at rounds 13-14, three stitches apart from each eye. Embroider a curved smile in black or dark brown yarn between rounds 14-16. Attach a small white yarn zig-zag 'icing' on the forehead: use a tapestry needle to stitch a chain-like zig-zag at round 9-10 that wraps 8-10 stitches across the top.
— Body / Torso :
Round 1 :
6 sc in magic ring (6)
Round 3 :
(1 sc, inc) x 6 (18)
Round 4 :
(2 sc, inc) x 6 (24)
Round 5 :
(3 sc, inc) x 6 (30)
Round 6-10 :
1 sc in each st (30)
Info :
If you want a shallow chest ridge to carry 'clothing', work rounds 9-10 in BLO to create a subtle ridge where the head attaches. This also gives a neat edge for sewing the head down.
Round 11-15 :
1 sc in each st (30)
Info :
Button placement: mark three button locations centered along the middle front of the torso. Mark approx. rounds 12, 13 and 14 vertically and 14-16 stitches vertically down the center depending on your preference. Buttons will be sewn on later after assembly or before stacking the spiral rings.
Round 16 :
(3 sc, dec) x 6 (24)
Round 17 :
(2 sc, dec) x 6 (18)
Info :
Stuff the torso moderately — not as firm as the head. You want the torso to remain soft so it sits atop the spiral and allows the neck seam to be sewn flat. Leave the bottom opening large enough to insert the top of the central cord (we will not fully close the bottom so the cord can pass through).
Round 18 :
(1 sc, dec) x 6 (12)
Round 19 :
1 sc in each st (12)
Round 20 :
1 sc in each st (12)
Info :
Do not fasten off yet. Keep a long tail and leave an opening large enough to thread the central hanging cord or twine through the torso. Alternatively, sew the head first to the body and then thread the cord through the head/neck before fully closing the base of the torso.
Round 21 :
1 sc in each st (12)
Info :
Optional collar detail: using small red/green yarn scraps, create a little bow or a small pom-pom cluster and sew at front center between rounds 12-13 where the buttons will be placed. This adds the festive touch seen in the photo.
— Arms (Make 2) :
Round 1 :
6 sc in magic ring (6)
Round 3 :
(1 sc, inc) x 4, 2 sc (16)
Round 4 :
1 sc in each st (16)
Info :
The hands are short and rounded. Work tight to maintain a neat paw shape. You can insert a small bit of stuffing into the hand portion now; keep stuffing firmer in the palm and lighter up the arm.
Round 5-7 :
1 sc in each st (16)
Round 8 :
(3 sc, dec) x 3 (12)
Round 9-12 :
1 sc in each st (12)
Info :
Optional wrist icing: with white yarn, embroider a small zig-zag at the outermost round (round 10) using whip stitch to mimic the white piping that decorates the gingerbread arms. If you want poseable arms, insert a short length of floral wire now and wrap with yarn before continuing stuffing.
Round 13 :
(2 sc, dec) x 3 (9)
Round 14 :
1 sc in each st (9)
Round 15 :
Fasten off leaving long tail for sewing. Stuff head of arm more firmly and taper stuffing as you approach the shoulder. (9)
Info :
Sew each arm to the sides of the torso around round 6-8 of the body (counting from the top of the torso) so they sit at a natural arm height. Use mattress stitch to make an invisible seam, and anchor each arm with small back-and-forth stitches to secure.
— Spiral Ring Template (Make 7 identical rings) :
Info :
Each spiral ring is crocheted as a small tube with identical stitch count and height so they stack into a consistent spiral when threaded on the central cord. Make 7 rings to match the sample. Keep tension even between rings.
Ring Round 1 :
6 sc in magic ring (6)
Ring Round 3 :
(1 sc, inc) x 6 (18)
Ring Round 4 :
(2 sc, inc) x 6 (24)
Ring Round 5 :
(3 sc, inc) x 6 (30)
Ring Round 6 :
(4 sc, inc) x 6 (36)
Ring Round 7 :
(5 sc, inc) x 6 (42)
Ring Round 8 :
(6 sc, inc) x 6 (48)
Ring Round 9-12 :
1 sc in each st (48)
Info :
Fasten off leaving a long tail for sewing. Each completed ring should measure approximately 4-5 cm (1.5-2 in) across and be about 1.5-2 cm tall depending on your gauge. Make 7 identical rings. If your gauge differs, adjust rounds 9-12 to make tube height consistent between rings.
— Repeat Spiral Rings :
Info :
Make 7 copies of the above ring template. Keep each ring consistent: 48 sts around, 4 rounds even (or adjust to match your preferred height). Block rings flat by pinning to a circular form if you want perfectly round rings; not necessary if you will force them into a spiral shape on the cord.
— Decorative Icing Piping for Rings :
Info :
Use white yarn and a yarn needle to surface-stitch a zig-zag 'icing' motif on the outside of each ring. Work a chain of small whip stitches in a wavy line around the ring, spacing peaks approximately every 6-8 stitches. You can also use a thin rope of white cotton or puffy fabric paint for a raised effect. Attach before final assembly so the icing sits flat and uninterrupted.
— Candy Buttons & Beads :
Info :
Prepare roughly 12 candy buttons (flat peppermint-style buttons about 15-18mm across) or use polymer clay candies glued or sewn in place. Also string enough red and green round wooden beads to sit between each ring on the central cord — you will need approximately 14-18 beads depending on spacing. Pre-string these beads onto the central cord before assembling the top head and stringing rings; it is far easier than trying to add them after.
— Bottom White Ball :
Round 1 :
6 sc in magic ring (6)
Round 3 :
(1 sc, inc) x 6 (18)
Round 4 :
(2 sc, inc) x 6 (24)
Round 5 :
(3 sc, inc) x 6 (30)
Round 6 :
1 sc in each st (30)
Round 7 :
(3 sc, dec) x 6 (24)
Round 8 :
(2 sc, dec) x 6 (18)
Round 9 :
(1 sc, dec) x 6 (12)
Info :
Stuff the ball firmly before completing. Fasten off leaving long tail for securing onto the central cord. You can add a small decorative knot at the bottom, or attach a tiny looped bow of white yarn as shown in the image.
— Assembly & Threading :
Info :
Cut a length of strong twine or waxed cord approximately 45-60 cm long depending on desired drop. Thread this cord through a large wooden bead (this bead will sit at the very top). Tie a secure knot below the bead or glue to prevent slipping. If you prefer a loop for hanging, form a loop at the top before threading the bead and knotting.
Info :
Pre-string on the central cord: from top downward string beads in the following rough order so they are ready for assembly — small red bead, small green bead, then the first candy button (if your candy buttons are flat with a hole). Continue, spacing beads as seen in the photo so that between each spiral ring there are two small beads (green then red) to create vertical separators.
Info :
Sew the head first: insert the cord through the neck cavity of the torso from top or bottom depending on your preferred assembly order. If you threaded beads at top, pass the cord down through the head's neck stub before sewing the head to the body so the cord sits centered. Position the head and securely sew with the long tails, using the tail from head and torso to hide the stitch inside the work.
Info :
For each ring position: slide one ring down the cord until it rests on top of the spacer bead below. Alternate rings so that each ring rests on a bead pair and has slight offset rotation compared to the one above to form a gradual spiral. Secure each ring in place by sewing a couple of small stitches through the ring and the cord using a yarn needle and a short length of matching brown yarn — this prevents rings from sliding out of alignment once hung.
Info :
Add candy buttons onto visible areas of the rings: either sew flat candy buttons through the fabric of each ring using the long tails you left when fastening off, or glue polymer candy pieces into place. Aim for 2-3 candies per ring spaced evenly, with small spacer beads placed between rings along the cord to echo the photo's pattern.
Info :
Attach arms: pin both arms to the sides of the torso and sew around the opening using mattress stitch. Anchor the top of each arm with 2-3 extra stitches through the torso to secure. Make sure the arms sit slightly forward and angled down as in the photo.
Info :
Finish bottom: after all rings and beads are in position, thread the remaining beads and then the bottom white ball onto the cord, tie a secure knot beneath the ball, and hide the knot inside the ball by drawing the tail through the ball and tucking the tail ends into the ball's stitches. Add a tiny yarn bow beneath the ball if desired.
— Final Decorative Touches :
Info :
Using a small amount of white yarn and a yarn needle, surface-stitch the zig-zag icing motif across each ring following a consistent rhythm: bring the needle up at a peak point, then down one or two stitches later to create a wave. For raised icing, braid a thin cord of white yarn and sew it in place. Add tiny puffy pom-poms or felt circles for cheeks and button centers for extra dimension. Use a tiny dab of fabric glue on the backs of plastic candy buttons if sewing holes are not available.
— Finishing & Securement :
Info :
Weave in all loose ends through several rounds of stitches and trim. Optionally apply a small amount of craft glue to seam joins for extra durability. If the ornament will be handled by children, ensure all beads and buttons are sewn very securely or substituted with embroidered details for safety.
— Variation Notes :
Info :
To make a smaller version, use DK yarn and a 3.0mm hook and reduce ring count to 4-5. For a taller mobile, add more rings and beads and increase cord length. Swap colors to make a 'snowman' spiral (white main yarn) or a brownie variant using darker yarn and metallic beads.
This gingerbread spiral hanging ornament brings together cozy amigurumi skills and playful holiday details — from the smiling gingerbread face to the candy-button decorated spiral. Each matching ring and bead spacer stacks into a charming vertical mobile that brightens any doorway or corner. The pattern is rewarding: you build a character, crochet uniform rings, and then watch them spiral into place along your handcrafted cord. 🧶🎄✨ Hang it proudly or gift it to someone special — handmade holiday cheer in every stitch!