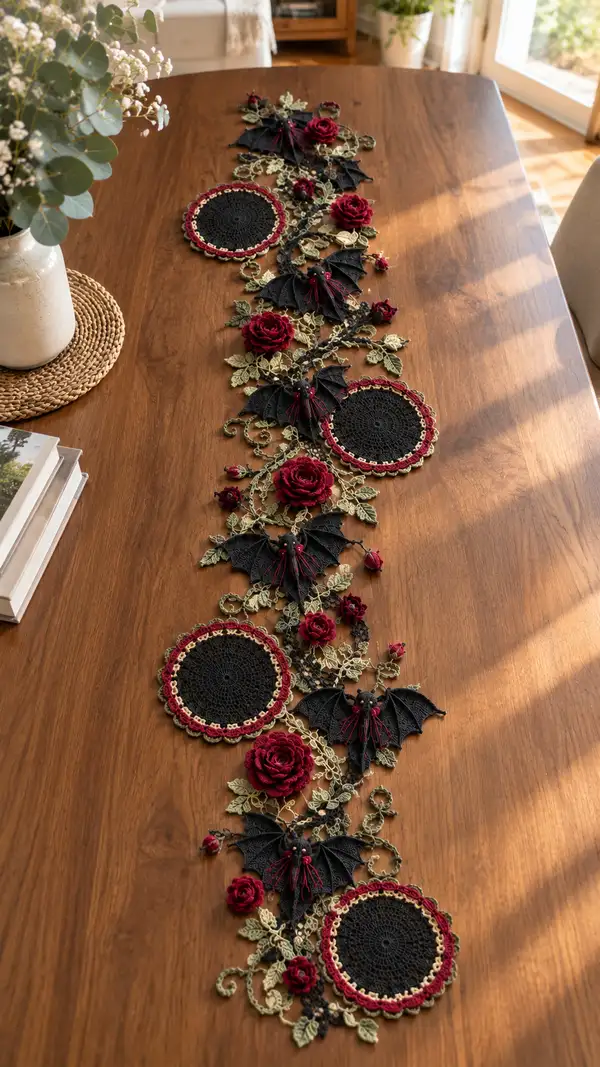
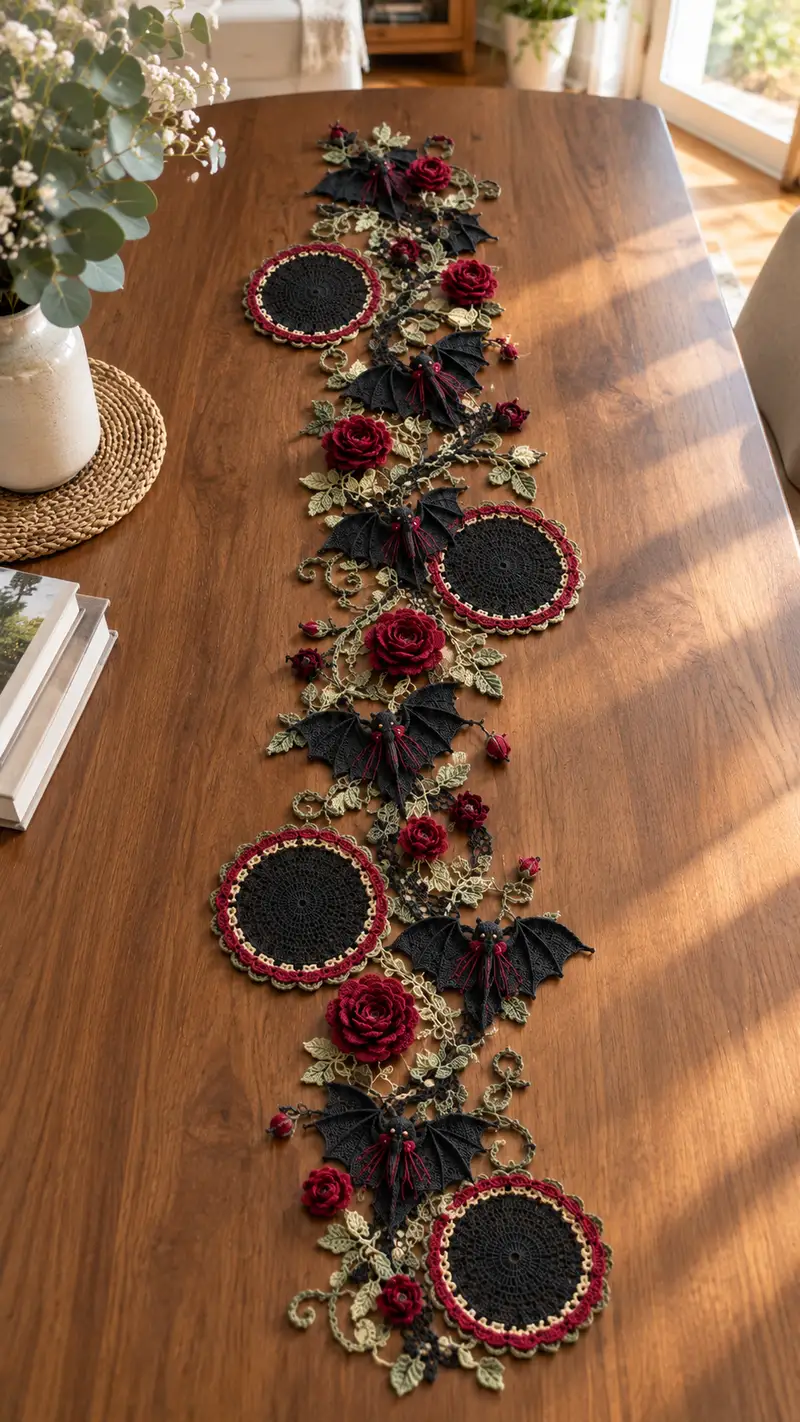
This dramatic Gothic Rose and Bat Table Runner combines elegant black doilies, deep crimson roses, olive-green leaves and whimsical black bats to create a striking centerpiece. Intricate lacework and layered 3D flowers give the runner depth and texture. Perfect for seasonal tables or a moody everyday display, this pattern includes step-by-step motif instructions and assembly guidance to recreate the full tableau.
Progress Tracker
0% Complete
— General Info :
Info :
Gauge is not critical for a runner, but for best lace definition use 2.0-2.25mm hook with fingering cotton and work tightly for amigurumi-like firmness on bats and roses. Block all flat motifs gently to measurements shown before assembly. Use reef knots and weave ends at least 2 inches into work before trimming.
Info :
Make: 4 large doilies, 6 medium sized layered roses, 8 small buds, 12 leaves, 4 bats (body+2 wings each), and multiple vine connectors. Motifs are joined by crocheted chains and whip-stitch sewing. This pattern provides counts for a single motif; repeat quantities as required for overall runner length.
— Large Circular Doily (Make 4) :
Round 3 :
(1 sc, inc) x 6 (18)
Round 4 :
(2 sc, inc) x 6 (24)
Round 5 :
(3 sc, inc) x 6 (30)
Round 6 :
(4 sc, inc) x 6 (36)
Round 7 :
1 sc in each st (36)
Info :
Keep tension even to get a flat circle. If slight ruffle appears, block gently; if cup shape appears, add 6 sc evenly around next round.
Round 8 :
(5 sc, inc) x 6 (42)
Round 9 :
1 sc in each st (42)
Round 10 :
(6 sc, inc) x 6 (48)
Round 11 :
1 sc in each st (48)
Round 12 :
*ch3, skip 2, sc in next; rep from * around to create lacy ring (48 ch-sps)
Info :
Change to deep burgundy for next decorative round. Carry black inside or fasten off and join burgundy with sl st to any ch-3 space.
Round 13 :
In each ch-3 sp: (sc, ch3, 3 dc, ch3, sc) - forming an embellished petal effect. Work 48 petals.
Round 14 :
Join gold/antique brass yarn. In each petal ch-3 loop: sl st, ch3, (5 dc) in same sp, ch3, sl st into petal center; rep around to create a gold scallop (48 scallops)
Info :
Gold accent is decorative—carry a very small tail and weave in securely. If using metallic thread, work slowly to avoid snagging.
Round 15 :
Switch back to black. Around entire edge: *sc in next 2 sts, picot (ch3 sl st into first ch)* repeat to create a tiny decorative scalloped edge. Adjust picot spacing to fit 48 repeats.
Round 16 :
1 sc in each st BLO to create a subtle ridge (48)
Round 17 :
Depth round: (4 sc, inc) x 8 (56)
Round 18 :
1 sc in each st (56)
Info :
Final reinforcing round: use a slip stitch round into back loop only to tidy the edge and create a slight raised lip for the doily so it sits well under 3D flowers.
Round 19 :
sl st in each st BLO around (56)
Round 20 :
Fasten off, weave in ends, and block flat to approximately 18-20cm diameter depending on yarn/hook. Repeat to make 4 doilies.
— Layered Rose (Make 6 medium roses, 3 small using fewer petals) :
Round 1 :
Make a foundation ch 50 (for medium rose; for small ch 28). Row 1: sc in 2nd ch from hook and in each ch across, turn (49 for medium)
Round 2 :
Work along the long strip: *sc in next 2, hdc in next, dc3 in next, tr in next, dc3 in next, hdc in next, sc in next 2* repeat across to create petal points. Turn strip so petals face up.
Round 3 :
Optionally add a second petal tier by repeating Round 2 on the opposite edge to get fuller petals (optional small rose omit this step).
Round 4 :
Roll the strip tightly starting at one end, coil so petals overlap and form a rose. Using yarn tail from starting end, sew through base of petals with running stitch to secure. Tie off and weave in tail.
Info :
Alternate method: work spiral rows of shells directly in round for a more compact rosette: in a mr ch 6 and work shell clusters increasing gradually. This written strip-and-roll method gives more sculptural open petals.
Round 5 :
For medium rose add an underside cup: Join burgundy to base and sc around base of coiled rose (approx 30-36 sc) to create a neat underside and a place to sew to doily.
Round 6 :
Attach a small dab of polyester fill into rose center before finishing base round to give a plump center but avoid overfilling which flattens petals.
Round 7 :
Edge the rose base in tiny picots: *sc, ch3, sl st into base sc* repeat around to allow decorative lacing when stitching to doily.
Round 8 :
Fasten off and leave a long tail for sewing (approx 20cm). Make 6 medium roses and optional 3 small by adjusting strip length and petal density.
— Small Bud (Make 8) :
Round 3 :
1 sc in each st (12)
Round 4 :
(2 sc, dec) x 4 (8)
Round 5 :
1 sc in each st (8)
Round 6 :
Fold bud edge inward slightly and sc around base to close slightly, leaving a small opening; stuff lightly and fasten off leaving long tail for sewing.
Info :
Buds are secure points to stitch along vines and add to rose clusters for natural looks. Make some in burgundy and some in black or mixed color to vary texture.
— Leaf Motif (Make 12-16) :
Round 1 :
ch 10; sc in 2nd ch from hook, sc next, hdc next, dc next 3, hdc next, sc next, sc next (total stitches across chain) - turn to work along opposite side: sc next, sc next, hdc next, dc3, hdc, sc, sc - join with sl st (approx 18 sts)
Round 2 :
Edge in FLO: ch1, sc in each st FLO around to create a subtle ridge for veining (18)
Round 3 :
Surface vein: With contrasting slightly darker olive, embroider a center vein by running a chain stitch down the center of the leaf and anchoring with small sl sts at intervals. Fasten off and weave ends.
Info :
For variety make 1/3 of leaves slightly larger by ch 14 foundation and scale increases proportionally to keep shape.
Round 4 :
Block leaves on foam to flatten and shape point. Make 12-16 leaves total and label as left or right facing for assembly symmetry.
— Bat Body (Make 4) :
Round 3 :
(1 sc, inc) x 6 (18)
Round 4 :
(2 sc, inc) x 6 (24)
Round 5 :
1 sc in each st (24)
Round 6 :
(3 sc, inc) x 6 (30)
Round 7 :
1 sc in each st (30)
Info :
Place bead eyes between rounds 6-7 approximately 6-8 sts apart depending on desired face width. Secure beads by threading yarn through bead and around head, then lock with a tight knot. Add a drop of glue if desired.
Round 8 :
(4 sc, inc) x 6 (36)
Round 9 :
1 sc in each st (36)
Round 10 :
(4 sc, dec) x 6 (30)
Info :
Begin stuffing head/body lightly now; bat body should be firm enough to hold wings but not overly stiff. Use small amounts of fiberfill pushed in with stuffing tool for even distribution.
Round 11 :
(3 sc, dec) x 6 (24)
Round 12 :
(2 sc, dec) x 6 (18)
Round 13 :
(1 sc, dec) x 6 (12)
Round 15 :
Fasten off leaving a long tail for attaching wings and sewing to vines. Do not overstuff; the bat should be lightweight.
— Bat Wings (Make 8 wings, pair to make 4 bats) :
Round 1 :
ch 18; Row 1: sc in 2nd ch from hook and across to last ch, work 3 sc in last ch to turn and work along opposite side of chain sc back to beginning to create a 36-st loop foundation (36)
Round 2 :
1 sc in each st (36)
Round 3 :
(3 sc, inc) x 9 (45)
Round 4 :
1 sc in each st (45)
Round 5 :
Work shaping: *sc5, (sc2tog) 1, sc5, sl st into next sp* repeat 5 times to create scalloped wing points (calculate to keep 45 total)
Round 6 :
Add decorative veins with FLO: ch1, *sc in next 7 FLO, hdc in next 2 FLO, dc in next 2 FLO, hdc in next 2 FLO, sc next 7 FLO* repeat across wing to create raised vein lines.
Round 7 :
Create wing edge picots: *sc in next 3, picot* repeat around the curved edge for a lacey finish.
Info :
Stiffen wings lightly using dilute fabric stiffener if you prefer the wings to hold spread position; lay flat to dry with pins to keep shape.
Round 8 :
Fasten off, leaving a long tail for sewing to body. When attaching, overlap center seam of wings with body and sew through 3-4 base rounds of bat body for secure anchor.
Round 9 :
Make 2 wings for each bat and pair symmetrically; add short fringe of deep red embroidery threads at wing base for chest tassels by knotting small bundles and sewing securely to underside of body base.
— Vine & Connector Motif (Make several pieces to link motifs) :
Round 1 :
ch 30 (or desired length) then secure with sl st to create a looped vine. Work along chain with sc to make a cord: sc in 2nd ch from hook and across (29 sc).
Round 2 :
At regular intervals create spiral tendrils: *sc in next 3, ch 12, sl st into second ch from hook and then sl st along chain to base to create curl; continue sc in next 6* repeat along vine.
Round 3 :
Join leaves, buds, and rose bases to vine by placing leaf base under vine and sc through both vine and leaf base to create secure join. Space elements so composition looks organic.
Info :
Vines are best worked modularly: make several 20-30ch vine pieces, block and then join to form longer continuous vines with whip stitch for flexible seams. Consider inserting thin wire into vine cord before final sewing for subtle poseability.
Round 4 :
Embellish vine with tiny gold loops: in selected spots join gold yarn and ch 6, sl st into vine base to make decorative loop, fasten off and weave tail securely.
Round 5 :
Work small black berry clusters by making 3 tiny 6-sc rounds and attaching them in clusters to vine using whip stitch (3 little spheres = 3x6 rounds each).
— Assembly Prep :
Info :
Block all flat motifs: doilies, leaves, wings—pin to measurements on foam and use a light mist of water or starch to set shape. Dry completely before joining. Arrange motifs on flat surface to plan composition: alternate doily, rose cluster, bat cluster, repeat for a balanced runner.
Info :
Have all tails available for sewing by leaving long tails when fastening off. Use contrasting tails to position features before inserting final stitches with matching yarn for invisible joins.
— Joining Motifs & Final Joins :
Round 1 :
Start with first doily. From its picot edge, join a vine by aligning vine sc stitches and working *sl st through both vine and doily picot* every 3-5 sts to create a stable sewn join. Work slowly and pin first.
Round 2 :
Attach rose bases: Position rose on doily surface or vine junction and sew through the rose base sc round and into doily doily foundation with whip stitch, using long tail and tiny stitches for invisible seam. Sew securely with 10-14 stitches around base depending on rose size.
Round 3 :
Sew bat bodies to vines: align bat underside cup to vine and sew around base with a ladder stitch, reinforcing across to wing bases using tail from body and wing tails for shared anchoring stitches. Use 8-12 anchor stitches at base and 4-6 through each wing base.
Info :
When connecting multiple doilies and motifs, stagger rose and bat placement for organic look. Leave small spaces for leaves and tendrils to weave under and over motifs.
Round 4 :
Weave in all ends, then optionally add tiny beads along vine clusters and bat chests using needle and thread to decorate stamen areas. Add a dab of glue under each bead if used for extra security.
Round 5 :
Final blocking after joining: pin runner flat on blocking board to desired final shape and lightly mist. Allow to dry 24 hours. This will settle joins and make runner lay flat on table.
— Decorative Tips & Finishing Touches :
Info :
Add subtle shading to petals with a tiny amount of water-based acrylic paint or powdered blush brushed gently on petal edges for depth (test on scrap yarn first). Use matching thread to embroider tiny veins on rose petals for extra realism.
Info :
To secure runner for use on table, stitch small clear tacking loops on underside at three points so the runner doesn't slip. These loops are unobtrusive and removable for washing if you use washable glue or slip-stitch tacks.
Info :
Care: Hand-wash gently in cool water and lay flat to dry. Reshape petals and leaves while damp if necessary. Metallic threads may tarnish with frequent washing—spot clean accents if desired.
Completing this Gothic Rose and Bat table runner is a rewarding mix of lacework, sculptural flowers and whimsical details! Each carefully crafted motif adds layered depth and mood to your tabletop decor. The contrast of black, burgundy and olive is spectacular and truly makes the runner feel like a curated antique piece. 🧶🌹 Display proudly or gift to someone who loves dramatic handmade decor. Happy stitching and enjoy creating your one-of-a-kind centerpiece! 🖤