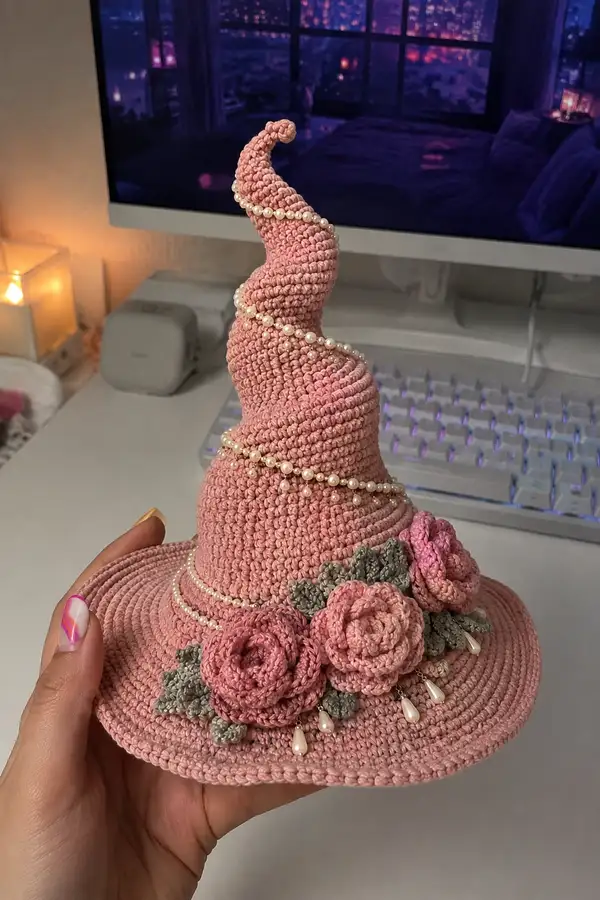
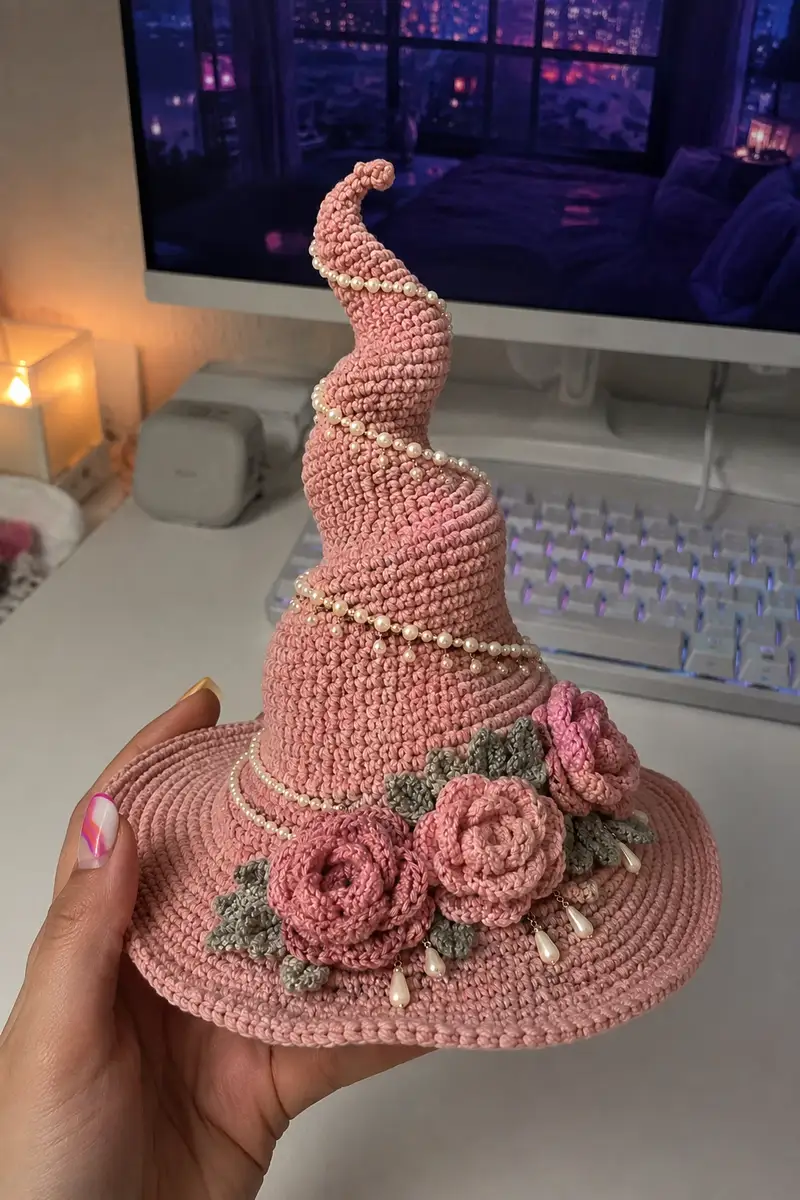
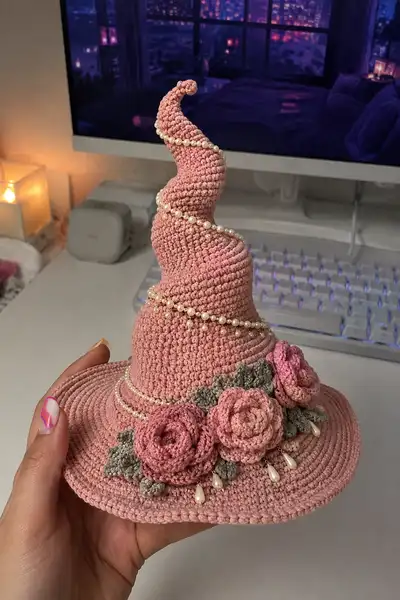
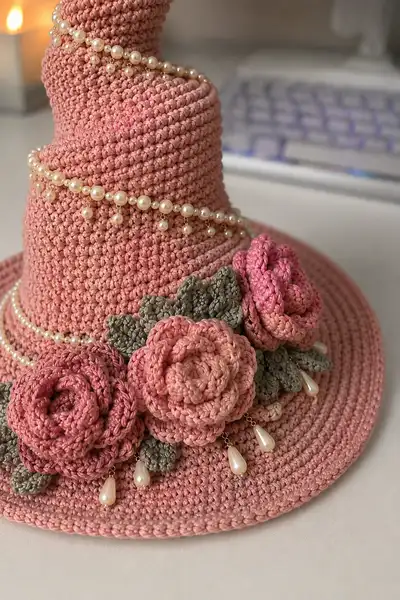
A romantic, tall spiral witch hat crocheted in blush pink cotton with a sculpted spiral tip, wide flat brim, layered crochet roses and sage leaves, and delicate pearl chains and teardrop beads. The pattern creates a structured, wearable decorative hat with a soft, feminine silhouette and elegant hardware accents. Detailed shaping and step-by-step instructions guide you through crown construction, spiral shaping, wide brim expansion, flower and leaf motifs, bead stringing, and assembly.
Progress Tracker
0% Complete
— Crown (inner head opening & lower crown) :
Round 1 :
6 sc in magic ring (6)
Round 3 :
(1 sc, inc) x 6 (18)
Round 4 :
(2 sc, inc) x 6 (24)
Round 5 :
(3 sc, inc) x 6 (30)
Round 6 :
(4 sc, inc) x 6 (36)
Round 7 :
(5 sc, inc) x 6 (42)
Round 8 :
(6 sc, inc) x 6 (48)
Info :
These first eight rounds create the base circumference of the crown. The hat in the photo fits a small to medium head; if you need a larger head opening, add one more increasing round (7 sc, inc) x 6 to reach 54 sts. Keep a stitch marker at the first stitch of each round.
Round 9 :
1 sc in each st (48)
Round 10 :
1 sc in each st (48)
Round 11 :
1 sc in each st BLO (48)
Info :
Work one round in BLO to create a subtle ridge that visually separates the crown from the base of the brim later. If you prefer a smoother look, omit BLO and work normal sc rounds.
Round 12-16 :
1 sc in each st (48) (Rounds 12,13,14,15,16)
Info :
These even rounds are the lower sides of the crown. Try the hat on (or measure against a head form) to check height. The pattern here leaves the crown open to build height for the spiral cone above. Add or remove even rounds to customize crown height, keeping stitch count constant.
Round 17 :
(6 sc, inc) x 6 (54)
Round 18 :
1 sc in each st (54)
Round 19 :
(7 sc, inc) x 6 (60)
Info :
If you prefer a less flared join between crown and cone, stop increases at 54. The photographed hat expands slightly to offer a smooth transition into the cone; increasing to 60 gives a gentle bell shape to support the base of the spiral.
Round 20-24 :
1 sc in each st (60) (Rounds 20,21,22,23,24)
Info :
Stuffing note: This hat is mostly unstuffed for a thin sculpted shape; only use minimal fiberfill inside the very top tip if you must. The crown and cone gain their shape through stitch tension and optional light blocking, so avoid overfilling.
Round 25 :
(7 sc, dec) x 6 (54)
Round 26 :
(6 sc, dec) x 6 (48)
Info :
Begin subtle tapering to encourage the cone to rise without sudden change in diameter. These decreases are gentle and primarily to prepare the upper cone shaping; keep stitches even and maintain the marker.
Round 27-32 :
1 sc in each st (48) (Rounds 27,28,29,30,31,32)
Info :
These rounds create the cylindrical base for the spiral cone. If you wish to add interior stiffener (like thin interfacing), now is the time to prepare pieces to insert before the brim is worked. Also test fit for position of embellishments—mark front center now.
— Cone / Spiral Tip :
Round 33 :
(6 sc, inc) x 6 (54)
Round 34 :
1 sc in each st (54)
Round 35 :
(6 sc, inc) x 6 (60)
Round 36-40 :
1 sc in each st (60) (Rounds 36,37,38,39,40)
Info :
Now the cone section begins. For the spiral shape you will create a gradual tilt by shifting where the increases/decreases occur across rounds. Keep the same stitch count for multiple rounds to build height before shaping. Place a second stitch marker at the spot you want the spiral to "begin" and move it 1-2 sts forward every 3-4 rounds to bias the shaping slightly.
Round 41 :
(7 sc, inc) x 6 (66)
Round 42 :
1 sc in each st (66)
Round 43 :
(8 sc, inc) x 6 (72)
Round 44-46 :
1 sc in each st (72) (Rounds 44,45,46)
Info :
To encourage a spiral, after Round 46 slip-st stitch to the next stitch and start Round 47 one stitch later than your original marker; this small offset each set of increases gives the cone a natural, slow twisting bias.
Round 47 :
(8 sc, dec) x 8 (64)
Round 48 :
1 sc in each st (64)
Round 49 :
(7 sc, dec) x 8 (56)
Round 50-52 :
1 sc in each st (56) (Rounds 50,51,52)
Info :
These decreases pull the cone toward a narrower top. Continue to slightly offset the start of each decrease set by one stitch every 2-3 sets to increase the spiral visual. If you notice ruffling, add one round of even stitches to relax shape.
Round 53 :
(6 sc, dec) x 7 (49)
Round 54 :
1 sc in each st (49)
Round 55 :
(4 sc, dec) x 7 (35)
Round 56 :
(3 sc, dec) x 7 (28)
Info :
When stitch counts become odd or non-multiples of 6/8, adjust groups so your decreases cover the whole round without leaving single-slot gaps. It's okay to distribute decreases as evenly as possible; maintain the offset trick to encourage the twist.
Round 57 :
(2 sc, dec) x 7 (21)
Round 58 :
(1 sc, dec) x 7 (14)
Info :
At this small point you may optionally place a tiny amount of stuffing (pea-size) or insert a small tightly rolled piece of interfacing to keep a slight roundness. For the pronounced curl seen in the photos, leave the tip slightly open and shape it by hand to curl—you will finish by sewing a few securing stitches into the last 6-8 rounds to lock the curl.
Round 60 :
Fasten off leaving a long tail for securing the top. Use a yarn needle to weave the tail through the remaining 7 sts and pull tight to close slightly if desired, then sew several times to hold the curl in place.
Info :
Shaping tip: To achieve the spiral curl, damp steam the cone lightly while gently twisting the tip into a spiral by hand. Use pins into a foam head form while cooling/drying to set the twist. If you want a rigid curl, add a thin wired core or interfacing prior to final shaping.
— Brim (wide, flat) :
Info :
Join yarn at the base of the crown: attach yarn with sl st to the top-most brim stitch from Round 32 (or the last even round before the cone). For a smoother join, work the first brim rounds in BLO where indicated to help hat brim sit flat. We will use 6 increase groups to maintain even expansion and keep flatness.
Round 1 :
(6 sc, inc) x 6 (54)
Round 2 :
(7 sc, inc) x 6 (60)
Round 3 :
(8 sc, inc) x 6 (66)
Round 4 :
(9 sc, inc) x 6 (72)
Round 5 :
(10 sc, inc) x 6 (78)
Info :
At each brim increase round, check flatness by letting the brim rest on a table; if it buckles, add one more even round before continuing increases. If it flares too much, reduce the intensity of increases in the next round.
Round 6 :
(11 sc, inc) x 6 (84)
Round 7 :
(12 sc, inc) x 6 (90)
Round 8 :
(13 sc, inc) x 6 (96)
Round 9 :
(14 sc, inc) x 6 (102)
Round 10 :
(15 sc, inc) x 6 (108)
Round 11 :
(16 sc, inc) x 6 (114)
Round 12 :
(17 sc, inc) x 6 (120)
Info :
After Round 12 you should have a wide, flat brim similar to the photos. If you need a smaller brim, stop earlier; for larger brim continue the pattern by adding 6 stitches per round (i.e., next: (18 sc, inc) x 6 ->126).
Round 13-16 :
1 sc in each st (120) (Rounds 13,14,15,16)
Info :
These even rounds build a firm rim. Work a few rounds in BLO to create a crisp edge if you prefer. The photo shows slightly ribbed concentric lines; to achieve that, work the final 2 rounds in BLO to let rows stack visibly.
Round 17 :
1 sc in each st BLO (120)
Round 18 :
1 sc in each st BLO (120)
Round 19 :
Fasten off and weave in ends. If you want a sturdier brim, block and lightly starch the brim or add a thin interfacing disc sandwiched between two brim layers before final joining.
Info :
Edge finishing option: Use hdc or reversed sc for a decorative skillet edge. The pictured hat has a simple sc edge to keep the look soft and vintage.
— Decorative Roses (Make 3-4, varying sizes) :
Rose A (Large) Round 1 :
With accent pink A, ch 36, sl st to first ch to form a ring (or leave as a long chain to spiral) - we will work the classic spiral rose.
Rose A Round 2 :
Row along chain: (sc in next 2 ch, hdc in next, dc in next 2, hdc in next, sc in next 2) repeat along chain forming a petal-texture strip. At the end of chain, do not join; instead roll the strip from one end into a spiral and stitch along the base with a yarn needle to secure the spiral forming the rose (approx final diameter 6-7 cm).
Info :
Work loosely for petals that open, tighter for compact rose. You may increase chain length by 4-8 chains for a larger, fuller rose. Use two shades of pink and sew the darker shade under the lighter for depth.
Rose B (Medium) Round 1 :
Ch 28. Work along chain: (sc, hdc, dc, hdc) across. Roll into spiral and secure with whip stitch (final approx 4-5 cm).
Rose C (Small) Round 1 :
Ch 20. Work along chain: (sc, hdc, dc) across. Roll and secure (final approx 3-4 cm).
Info :
Alternative: Use layered circular petals made from rounds of dc in clusters attached to a small circle base. For a stacked rose, crochet a 6-8 ch ring and then work rounds of petals (see substitution below) to create layered ruffles.
Layered Petal Alternative Round 1 :
mr, ch2 (counts as hdc), 12 hdc in ring, sl st to first hdc (12). Round 2: (ch3, sl st in next st) x6 to form loops; Round 3: work sc, hdc, dc clusters into each loop to make petals; finish and sew into rose shape.
Info :
Use two or three roses grouped close together on the brim for a natural bouquet. Vary sizes and shades to mimic the sample composition. Sew roses with strong stitches to the brim and to each other for stable arrangement.
— Leaves (Make 6-10) :
Leaf Round 1 :
With sage yarn ch 8, sc in 2nd ch from hook, hdc, dc, hdc, sc across, sl st to first sc to form the leaf base (approx 6 sts across). Fasten off leaving long tail for sewing.
Leaf Variation Round 2 :
Ch 10, sc in 2nd ch, (hdc, dc, tr, dc, hdc) across then sl st at base. Optionally add a second round of sc around the outside for a thicker leaf.
Info :
Pin each leaf around rose placements to test coverage; tuck some leaves under roses and let a few stick out for a natural look. Stiffen leaves slightly with light starch or a spray-on fabric stiffener if you want them to hold crisp shapes.
— Small Petal Clusters and Center Embellishments :
Petal Cluster :
Ch 6, sc in 2nd ch, hdc, dc, sl st to end. Make 6-8 small petals and sew into small clusters to fill spaces between roses. Use lighter blush tones for contrast.
Info :
Add a tiny bead or French knot using embroidery thread to each rose center for extra polish if desired.
— Bead and Pearl Chains :
Info :
The hat in the photo uses delicate pearl chains wrapped around the cone and another wrapped along the base of the cone/brim, plus dangling teardrop pearls attached at the rose band. Choose pre-strung pearl garlands or string small pearls onto jeweler's wire for neat, secure wraps.
Pearl Chain A :
Measure the cone circumference where you want the first wrap. String faux pearls (3-4 mm) on a fine jeweler's wire or pre-made pearl garland long enough to wrap twice. Secure ends by tying or crimping jump rings and hiding knots with a dab of fabric glue between hat stitches.
Info :
To create dangling pearls: cut short lengths of very fine chain (6-10 mm) and attach a tiny teardrop pearl at the end with a jump ring. Use a small needle and thread or a folded loop of yarn to sew the top of the chain under a rose or leaf so it hangs free as in the photo.
Pearl Chain Attachment :
Sew the pearl chain to the hat by stitching through the chain links at 6-10 points around the hat band area. For a floating look, attach only at spaced points so the chain curves naturally against the cone and brim.
— Assembly & Placement :
Info :
Before final sewing, arrange all roses, leaves and beads on the brim in the exact composition you like. The pictured hat clusters three roses slightly off-center at the front and places leaves behind them, with pendants dangling between rose petals and off the brim edge.
Sewing Roses to Brim :
Use whip stitch or ladder stitch and the long tails left from roses to stitch through the brim fabric for a secure anchor. Loop the base of each rose through several brim stitches and through the neighboring rose bases for a secure bouquet-like cluster.
Attaching Leaves :
Sew leaves under and around each rose with invisible stitches, tipping them slightly outward. Add a few stitches through the leaf midline to anchor it flat against the brim.
Securing Pearl Chains :
Using small stitches with matching thread or a needle, anchor chain links at strategic points around the cone and brim. Cover knots and crimp tubes with a tiny dab of clear craft glue and tuck under petals to hide metalwork.
Final Blocking :
Lightly steam the hat to set the spiral and brim shape. Pin the brim flat on a protected surface and use a hat block or rolled towel to hold the cone curl until dry. Avoid heavy steam directly on jewelry; remove chains before steaming if you're concerned about tarnish.
Info :
Extra stability: If you need extra structure in the brim, you can crochet a second brim layer and sew both layers together with lightweight interfacing or insert a thin flexible plastic disc between layers during assembly.
This blush spiral witch hat is a joy to bring to life — the tall cone, the soft roses, and the pearl chains come together into a piece that feels both magical and elegant. Each stitch adds character and personality, and the careful assembly makes the final piece sturdy yet delicate. Enjoy the blocking and gentle shaping; watching the cone curl and the pearls dangle is incredibly satisfying. 🧶🌸 Wear it or display it — this little treasure will brighten any day. ✨