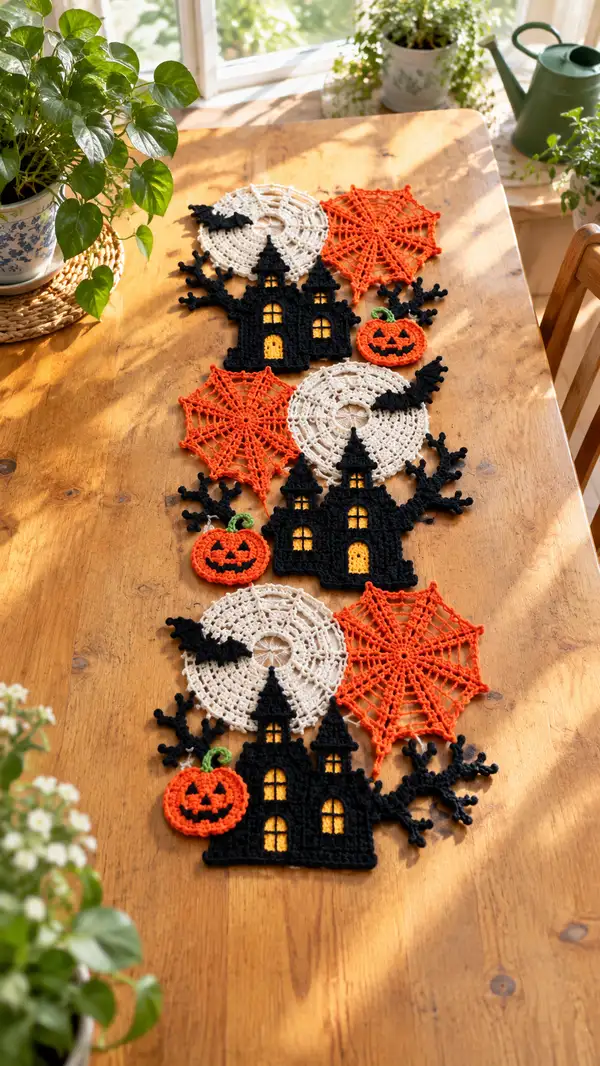
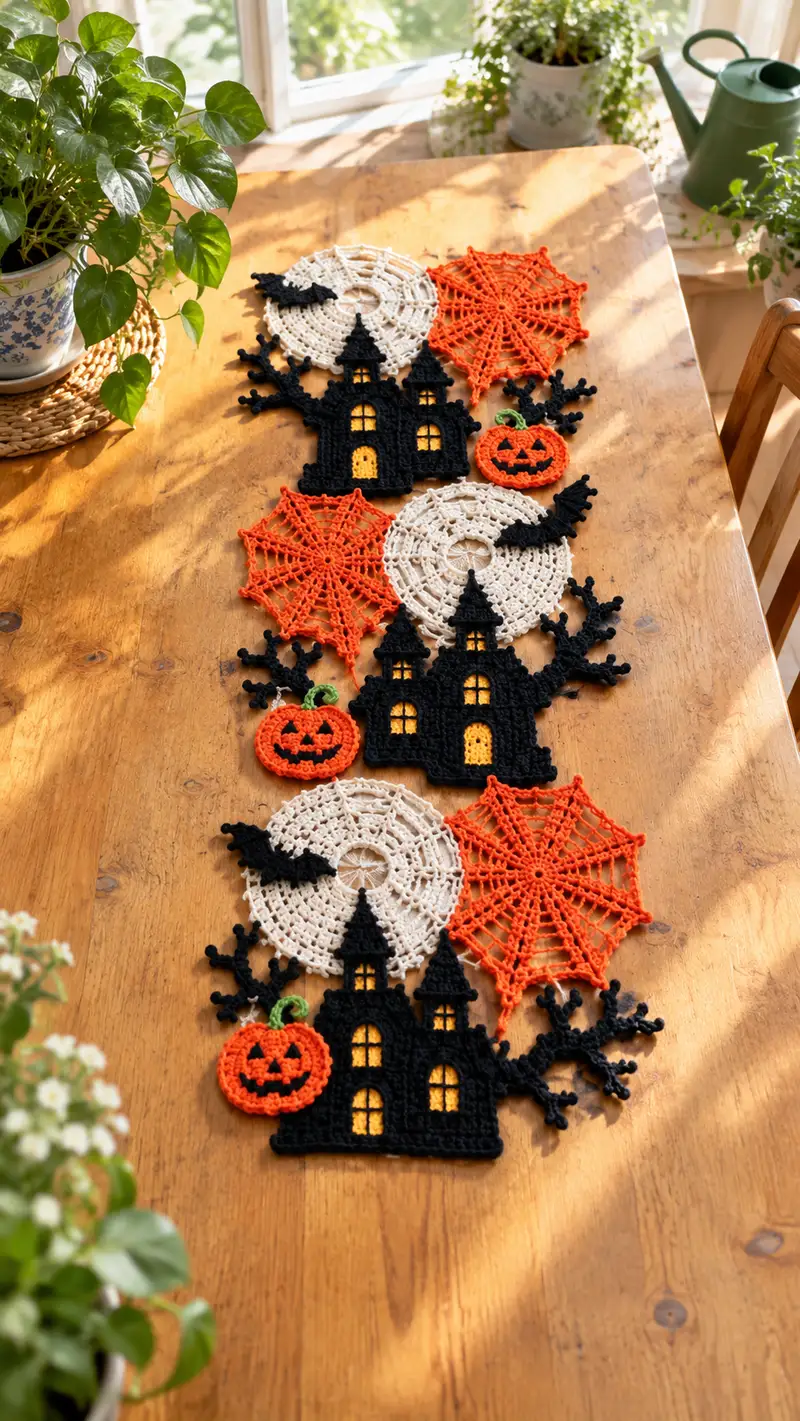
Create a charming spooky table runner featuring haunted houses, spider webs, full moon doilies, pumpkins, bats and twisted bare branches. This runner uses simple motifs joined together for a dramatic autumn centerpiece. The pattern includes detailed stitch counts, motif rounds, and joining instructions to help you recreate the layered look shown in the photo.
Progress Tracker
0% Complete
— Notes & Gauge :
Info :
This pattern is written for DK-weight mercerized cotton and a 3.5mm hook. Gauge is not critical for motif shapes but will affect overall runner length and density. Make a sample spiderweb and house to check tension; motifs should lie flat when blocked. Keep tension moderately firm for crisp motif edges.
Info :
All rounds are worked in continuous rounds unless otherwise indicated. For flat motifs worked in rounds, optionally join and turn if you prefer radial joins; instructions here assume continuous rounds for smooth lace edges. Use stitch markers to mark round starts when working continuous rounds.
— Full Moon Doily (Make 3) :
Round 1 :
Make a magic ring, ch3 (counts as dc), 11 dc into ring, join with sl st to top of ch3 (12)
Round 2 :
Ch3, dc in same st, 2 dc in each st around, join with sl st to top of ch3 (24)
Round 3 :
Ch3, (dc, ch1, dc) in next st, *skip next st, (dc, ch1, dc) in next st; rep from * around, join (12 shell spaces)
Info :
These shell clusters create the lace openings. Adjust ch1 to ch2 if you prefer larger holes for a more open lace moon.
Round 4 :
Join with sl st to center of first shell, ch1, sc in same sp, *ch5, sc into center of next shell; rep from * around, join (12 ch-5 loops)
Round 5 :
Sl st into first ch-5 loop, ch3 (counts as dc), 11 dc into same loop, sl st into next loop, rep in each loop around (12 x 12dc clusters) (144)
Info :
Work clusters evenly into each loop to keep round flat. Pull loops gently while shaping to avoid ruffling.
Round 6 :
Ch1, sc in same st, *ch3, sc in the center of next cluster (between dc groups); rep from * around, join (12 ch-3 arches)
Round 7 :
Sl st into first ch-3, ch4 (counts as tr), (tr, ch2, tr) in same arch, *sk next sc, (tr, ch2, tr) in next arch; rep from * around, join (12 pointed arches)
Round 8 :
Ch1, sc in same st, *ch5, sc in the center of next pointed arch; rep from * around, join (12 ch-5 loops)
Round 9 :
Into each ch-5 loop work: (sc, hdc, 3 dc, hdc, sc) to form a petal; rep in each loop around, join (12 petals)
Info :
Check the round for flatness. If it curls slightly, gently block with steam or wet-block and pin flat. The center should remain open and lace-like to mimic a moon texture.
Round 10 :
Ch1, sc in each st around working evenly along petal edges (approx 84 sc total depending on petal shaping), join and fasten off. Weave in ends.
Info :
Make three full moon doilies. Use cream/ivory yarn and block each to 16-18cm diameter depending on your gauge.
— Spiderweb Motif (Make 3, Orange) :
Round 1 :
Magic ring, ch4 (counts as tr), 11 tr into ring, join with sl st to top of ch4 (12)
Round 2 :
Ch1, sc in same st, *ch6, sc in next st; rep from * around (12 ch-6 spokes), join
Info :
These long ch-6 loops form the spokes of the web. Keep tension even so spokes are the same length.
Round 3 :
Sl st into first ch-6 loop center, ch3, 11 dc into same loop, *sl st into next loop center, ch3, 11 dc into that loop; rep around (12 mini-rounds attached to each spoke)
Round 4 :
Ch1, sc into each dc around first mini-round, sl st into next loop's first dc to hop over; rep around (approx 12 x 11 sc bands)
Round 5 :
Ch4, *skip 2 sc, sc in next sc, ch4; rep around to create web arches between bands, join
Round 6 :
Sl st into first ch-4 loop, ch3, 7 tr into loop, sl st into next ch-4, ch1, sc into join; rep around to build a second ring of talls (12 sets)
Info :
For a stiffer web, block the motif over a small circular template and spray with diluted fabric stiffener after blocking.
Round 7 :
Ch1, sc across the top of each tr cluster and into ch spaces to even the edge, join (edge should have small picot-like points)
Round 8 :
Optional: For a spider accent, attach a small chain loop to the center and work 6 sc to make a tiny spider body. Fasten off.
Info :
Make three orange spiderweb motifs and block them to 15-18cm diameter depending on gauge. These are deliberately open and decorative.
— Pumpkin Motif (Make 3) :
Round 1 :
Magic ring, ch1, 6 sc in ring, pull tight and leave ring open to form a slight depression (6)
Round 2 :
Inc in each st around (12)
Round 3 :
(1 sc, inc) x6 (18)
Round 4 :
(2 sc, inc) x6 (24)
Info :
Switch to orange if you began with a slightly different shade for the center. Work tightly to keep the pumpkin dense and disk-like.
Round 5 :
(3 sc, inc) x6 (30)
Round 6 :
1 sc in each st around (30)
Round 7 :
(3 sc, dec) x6 (24)
Round 8 :
(2 sc, dec) x6 (18)
Round 9 :
(1 sc, dec) x6 (12)
Info :
Stop to shape the pumpkin ribs. With a yarn needle and length of stranded orange yarn, stitch from center top through to bottom repeatedly in 6-8 evenly spaced lines to create the pumpkin ribbing. Pull gently to indent the ribs.
Round 10 :
Fasten off orange, with green yarn attach at top center, ch6, sl st back along chain to create twisted stem, sl st to pumpkin top, fasten off and weave ends.
Round 11 :
With black yarn embroider face: position two small triangles for eyes and a crescent mouth with small teeth using surface chain or small satin stitches. Secure and weave in ends.
Info :
Make three pumpkins. Keep them relatively flat (not stuffed) so they sew neatly onto the runner. If you want dimensional pumpkins, add a thin layer of batting behind the pumpkin before sewing to the runner.
— Bat Motif (Make 6 small bats) :
Round 1 :
Ch8, sc in 2nd ch from hook and across (7 sc), fasten off (7)
Round 2 :
Fold strip in half and join ends with sl st to form a small body ridge. With black yarn, sc 3 around one end for wing nub, ch6, sl st back across chain to form wing edge, sc across folded base to second wing, ch6, sl st back to base, finish (small bat silhouette)
Round 3 :
Detail wings by working 3 sc in the wing chain at points to create scalloped wing edges, join and fasten off. Make 6 bats.
Info :
Keep bats small and flat. They will be stitched to the moons and houses as flying accents. Use stronger slip stitches where wings attach to body area to prevent flapping edges.
— Bare Branch Motif (Make 3 big branches and 3 small twigs) :
Round 1 :
With black, ch30, sc in 2nd ch from hook across to end (29 sc) - this is the branch spine
Round 2 :
Turn, ch1, sc back across (29)
Round 3 :
Working along one long edge, at approximately ch5, attach a short side twig: ch6, sl st back to branch to form twig; continue sc along branch.
Round 4 :
Repeat side twig attachments at irregular intervals: ch4, ch8 twig loops and secure; these ch loops will be filled with small bobbles later (continue sc along the spine).
Round 5 :
Work a second row of sc along both long edges to create thin raised branch with slight thickness (29 sc)
Info :
Branches are intentionally organic - make small loops and Y-shaped twiglets. Use picots (ch3, sl st into base) for tiny offshoots and add bobble stitches at ends for a knobbly effect.
Round 6 :
At each twig loop, work a 5-sc bobble: into loop work (dc, dc, dc, tr) cluster then sl st to finish to create a small rounded bud. Continue along branch.
Round 7 :
Optional: Work 1 row of sc in BLO to create a ridged texture representing bark on one side of the branch.
Round 8 :
Fasten off and weave in ends. Make 3 large branches about 25-30cm in length and 3 short twigs of ch12 base with small side buds.
Info :
Branches must be flat to allow layering under houses and doilies. Block on a straight template and pin twiglets outwards to hold shape while drying.
— Haunted House Motif (Make 3) :
Info :
The haunted house is worked flat in rows using black yarn. Windows are left as open rectangles; a yellow backing is crocheted and sewn behind each window to create a glowing effect. The house is then shaped with towers and trim. These instructions create a silhouette approximately 12cm wide by 9cm high after blocking (gauge dependent).
Round 1 :
Ch36, sc in 2nd ch from hook and across (35 sc) - this is Row 1 at the base (35)
Round 2 :
Ch1, turn, sc in each st across (35)
Round 3 :
Ch1, turn, sc12, hdc5, 2dc across next 6 sts to create door arch base area, hdc5, sc rest of row (35)
Round 4 :
Ch1, turn, sc12, ch2, skip 2, work 4 dc into door area to begin arch, ch2, continue sc to end (35)
Round 5 :
Ch1, turn, sc across leaving a small central arch of 6 sts unworked to form the door opening. Sc sides to create solid base for door (based on previous shaping) (approx 29 sc)
Info :
At this point create a separate yellow window/door backing. For the door backing: ch6, join to work a small rectangle: row1 ch6, sc across 6, rep 6 rows to make rectangle approx 6x10 sts. Sew into arch opening later before finishing house front.
Round 6 :
Ch1, turn, sc across entire row increasing 1 st at both outer edges to begin slight base flare (37)
Round 7 :
Ch1, turn, sc across (37)
Round 8 :
Ch1, turn, sc8, dec, sc6, dec, sc (remaining to end) to create slight inward shaping for central tower area (35)
Round 9 :
Ch1, turn, sc across; at stitch positions for windows (approx between st10-14 and st22-26) leave small 3x4 window apertures by chaining 4 and skipping corresponding scs, then sc to continue. Count scs to keep row consistent (approx 32 sc + 2 window ch spaces)
Info :
Map where windows sit by folding the rectangle and marking window positions with pins. Window holes should be even and symmetrical. Make yellow window backing rectangles now (small crochet rectangles of hdc rows) and set aside to sew behind openings later.
Round 10 :
Ch1, turn, sc across, working sc into ch-4 window spaces at edges to create defined frames (approx 36 sc when counting frame work)
Round 11 :
Ch1, turn, sc across base row, at center column begin tower shaping: sc6, inc, sc8, inc, sc rest to edge (38)
Round 12 :
Ch1, turn, sc across but work 2 rows of sc in each tower column to raise tower height: sc across (38)
Round 13 :
Ch1, turn, sc across, at tower peaks begin roofing: skip 1 st and work (hdc, dc, hdc) into next st to make a pointed roof peak; repeat for each tower position.
Round 14 :
Ch1, turn, sc around roof peaks and create small triangular towers by decreasing across the top center of each peak: dec at both sides to taper (adjust counts to keep silhouette, approx 36)
Round 15 :
Ch1, turn, work one row of sc across, then create small spire chains for steeples: ch8, sl st into top of tower to create spire; make two spires (one taller than other) and fasten off their tips with a small single crochet to hold shape
Info :
Decorative crenellations at the roofline can be made by alternating (sc, ch2, sl st back) across the top edge to create castle-like teeth. Keep symmetry for matching look on both sides.
Round 16 :
Optional edging: with BLO, work one row of sc in BLO across the whole house to create a clean lower edge and slight raised ridge for attaching to runner (approx 36)
Round 17 :
Fasten off leaving long tail for sewing. Before final assembly, use yellow rectangles created earlier and sew them behind the window apertures and door arch. Use whip stitch around the opening perimeter to secure and create glowing windows.
Info :
Make three identical haunted house silhouettes. Block them flat. Windows should be sewn in before final assembly to prevent shifting during joining. For crisp edges, consider using slightly smaller hook (3.25mm) for the final rows to tighten perimeter.
— Window/Glow Backing (Make 6 window rectangles + 3 door panels) :
Round 1 :
With yellow yarn ch6, turn, sc across (5 sc)
Round 2 :
Ch1, turn, sc across (5)
Round 3 :
Repeat Row 2 until you have a rectangle approx 5x9 sts (5 wide x 9 rows) then fasten off. Make 6 rectangles for windows and 3 wider rectangles (7 x 12) for doors if required. Sew these pieces behind house apertures before final joining.
Info :
Sew yellow backs slightly smaller than the aperture to avoid visible yellow seams - use whip stitch and weave ends through back of house silhouette so no yellow loop shows on front.
— Edging & Decorative Trim (For motifs and runner edge) :
Round 1 :
Using black, join to outer edge of motif where you want a crisp border. Ch1, sc evenly around the perimeter of each motif, placing 2 sc into corners or curves to retain flat shape. Fasten off.
Round 2 :
For a decorative finished edge, re-attach yarn and work picot edging: *sc in next st, ch3, sl st into base of ch3, sc in next 3 sts; rep around. This creates tiny points along the lace for a spooky look.
Info :
Edging helps conceal joins and creates a uniform appearance across different motif types. Picots look particularly good on spiderwebs and moon doilies.
— Joining Motifs into Table Runner :
Info :
Layout motifs as in the photo: starting at one end, place a spiderweb and moon alternating down the center, offset with haunted houses overlapping branches and pumpkins staggered at seams. Use a blocking mat to pin layout and ensure symmetric spacing (approx 4-6 cm between motif edges depending on motif size).
Round 1 :
Whip stitch joining: With matching thread, place motifs right sides facing up and use small whip stitch to attach adjacent motif edges using stitches along the sc border or the outermost lace loops. Work slowly and test placement frequently.
Round 2 :
Slip-stitch joining for lace look: For openwork sections (spiderweb to moon), align and slip-stitch through corresponding ch loops for a nearly invisible join: join with sl st through loop A and loop B, continue around seam.
Round 3 :
Invisible mattress stitch: For flat silhouette-to-silhouette joins (house to branch), fold edges so holes align and use mattress (ladder) stitch by weaving yarn under loops on both edges to produce a flat seam.
Info :
Sew pumpkins slightly overlapping houses and branches to create a layered look. Position bats flying across moons and between spiderweb spokes for a dynamic arrangement. Secure all motifs with at least 12 evenly spaced stitches along each adjacent seam to ensure durability.
Round 4 :
For additional security, work a narrow sc border along the full outer edge of the assembled runner: with black yarn and 3.5mm hook, join at one end and sc evenly around the entire runner perimeter, placing 2 sc into concave corners to keep edge flat. This unifies motifs into one single piece.
Info :
Block the fully-joined runner gently and let dry pinned to maintain shape. If desired, lightly stiffen with diluted fabric stiffener or spray starch to keep motifs laying flat on the table surface.
— Final Detailing & Finishing Touches :
Round 1 :
Weave in all loose ends from motifs using a yarn needle. For each seam, run the tail through adjacent stitches three times for extra security before trimming close.
Round 2 :
Attach additional small decorative elements: tiny crochet spiders, mini pumpkins, or a sewn-on fabric backing if you want to convert the runner into a placemat-style piece.
Info :
If you plan to launder the runner, use colorfast yarns and hand-wash gently in cool water, pressing gently and re-blocking before laying on table to dry completely.
Round 3 :
Final blocking: pin runner flat and spray evenly with water. Ensure all motifs lie flat and edges are straight. Allow to dry fully before using.
Info :
To make the runner longer or shorter, repeat motif sequences or add additional spiderweb and moon pairs. Keep the motif balance mirrored along the runner center for best visual effect.
This spooky Halloween table runner brings playful, handmade charm to any fall gathering. Each motif is an opportunity to add tiny personality—glowing windows, cheerful pumpkins, and gossamer spiderwebs—layered to create rich visual texture. I hope this pattern inspires you to make a runner that becomes the centerpiece of seasonal memories. 🧶🎃🕸️