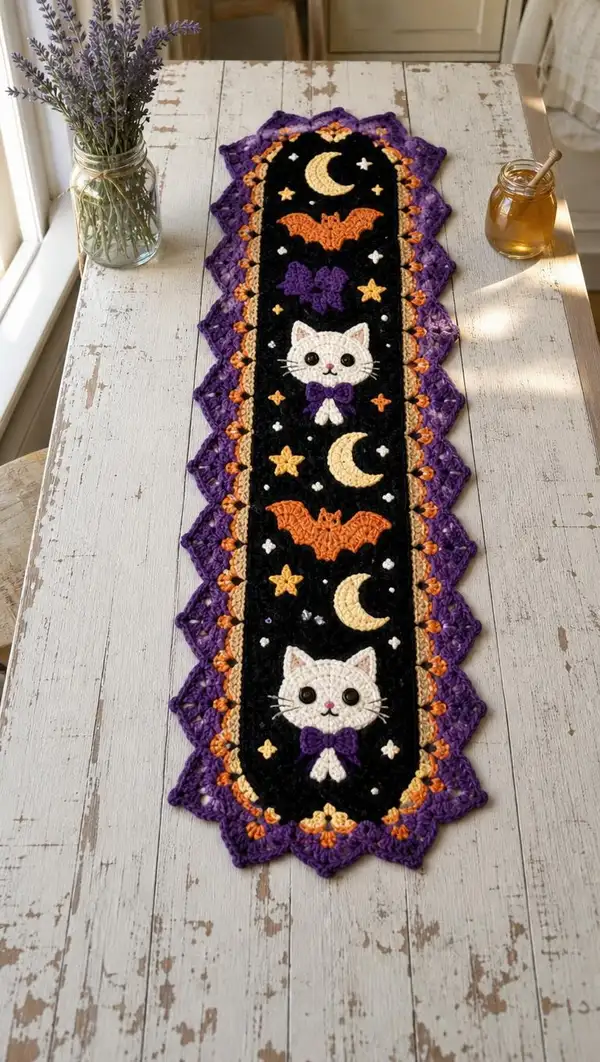
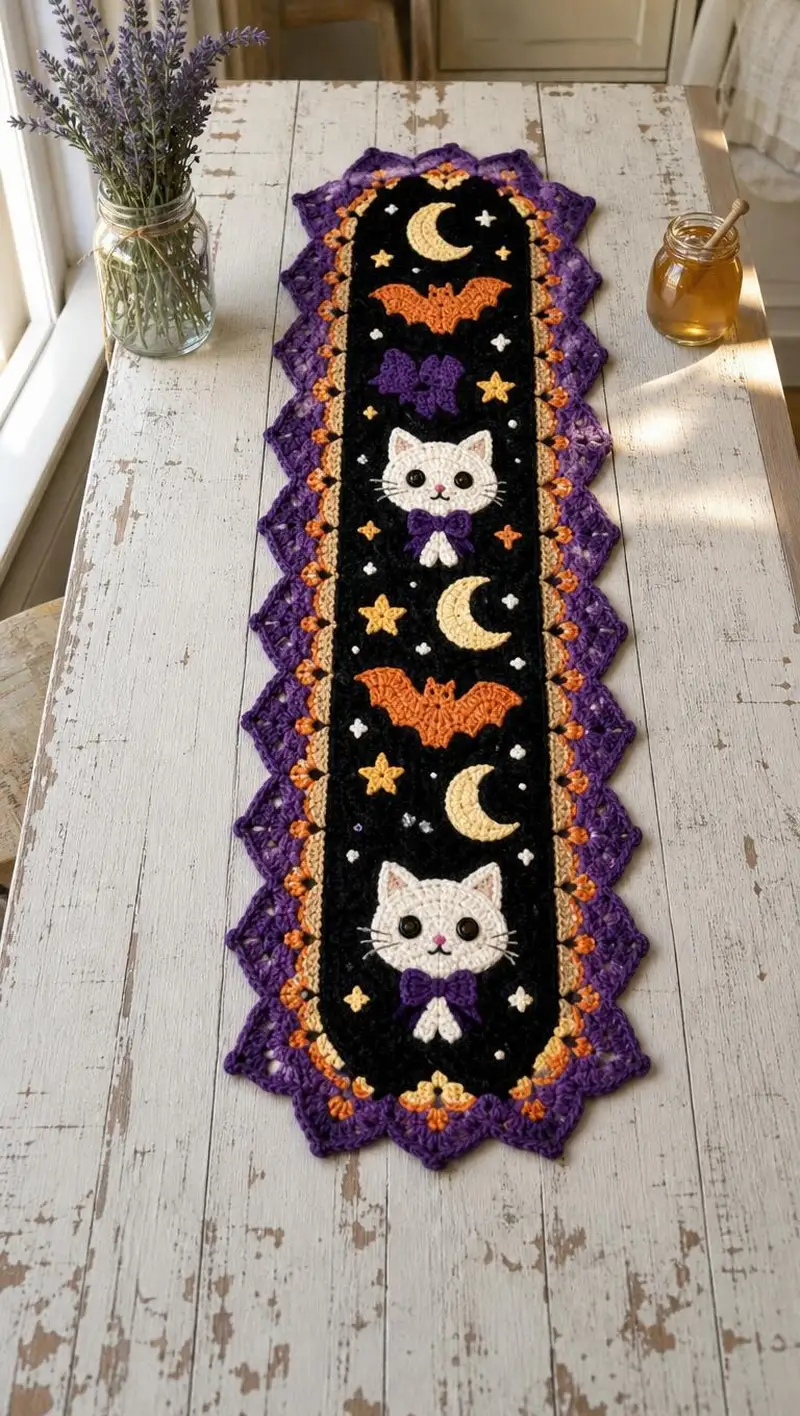
A charming Halloween table runner featuring two adorable white cat appliques, crescent moons, bats, stars and a scalloped purple and orange border. The long oval black center panel showcases colorful motifs in pumpkin orange, soft gold and lavender purple. Perfect for a spooky-but-sweet holiday display on a dining table or console.
Progress Tracker
0% Complete
— Center Panel / Base (Black Panel) :
Info :
This runner center is worked flat in joined rounds to create a long oval panel. Use 4.0 mm hook and Jet Black worsted yarn. Final dimensions with specified stitch counts: approximately 36-40 inches long and 6-7 inches wide. Adjust foundation chain to lengthen or shorten. Maintain consistent tension. We will begin with a foundation chain and join to work rounds along both sides, increasing at ends to form rounded caps.
Round 1 :
Ch 70, join with sl st to first ch to form a ring taking care not to twist (70)
Round 2 :
Ch 1, sc in each ch around, join with sl st to first sc (70)
Round 3 :
Ch 1, sc in same st, sc in next 31 sts, 2 sc in next 8 sts (increase evenly across first end to round it), sc in next 31 sts, 2 sc in next 0 sts to maintain count; join (78)
Info :
We want to build smooth rounded ends. Increases are worked across each end of the chain where ends meet in the round. On this design we add 8 increases distributed across the end arc each time we want to widen the oval ends. If your gauge differs increase counts may be adjusted to keep symmetry.
Round 4 :
Ch 1, 1 sc in each st around (78)
Round 5 :
Ch 1, sc across to first end arc, (2 sc, sc in next) x 8 across end arc (this places 8 increases on the rounded cap), continue sc across remaining rounds (86)
Round 6 :
Ch 1, sc in each st around (86)
Round 7 :
Ch 1, sc to end arc, (2 sc, 1 sc) x 8, sc rest of round (94)
Info :
Repeat the increase arc twice then maintain even rounds until the panel is long enough. This pattern uses symmetrical increase rounds to create a gentle oval slope at both short ends of the runner.
Round 8 :
Ch 1, 1 sc in each st around (94)
Round 9 :
Ch 1, sc to end arc, (2 sc in next st, 1 sc in next 1) x 8 (increase arc) sc remainder (102)
Round 10-16 :
Ch 1, 1 sc in each st around (102)
Info :
These rounds create the main straight sides of the runner. Work even until you reach the correct length where the first motif placement will begin. The sample includes 8 even rounds to reach the width and stability needed for applique placement.
Round 17 :
Ch 1, sc in each st around (102)
Round 18 :
Ch 1, sc in each st around (102)
Round 19 :
Ch 1, sc to short end arc, (sc, 2 sc) x 8 in arc, sc remainder (110)
Round 20-28 :
Ch 1, 1 sc in each st around (110)
Info :
Work even until you have ample space for the vertical arrangement of motifs (in the sample we keep 28 rounds total before first joining row). Place stitch markers at the center line of the panel for alignment when attaching motifs later.
Round 29 :
Ch 1, sc to end arc, (2 sc in next st, sc in next 2) x 8, sc remainder (118)
Round 30-44 :
Ch 1, 1 sc in each st around (118)
Info :
Continue to check width and flatness. If the panel curls, add an additional even round to relax tension. Pin flat on blocking surface to check alignment for motif placements. This central black panel will later be trimmed by a decorative inner border row before appliques are sewn.
Round 45 :
Ch 1, working in BLO for a neat ridge, 1 sc in each st BLO around (118)
Round 46 :
Ch 1, 1 sc in each st around (118)
Info :
Work a thin inner border now in Soft Gold to frame the black panel before attaching motifs. Fasten off black yarn leaving a long tail for joining if you prefer, or finish and weave ends and change color directly.
Color Change Info :
Change to Soft Gold (pale yellow). Join yarn anywhere along one long side with a sl st and continue next round in gold.
Round 47 :
With Soft Gold, ch 1, sc evenly around the panel, placing (2 sc) in each corner/arc increase area to follow curvature; maintain (118) adjusted to 120 if necessary to keep symmetrical edging (adjust to even counts) (approx 120)
Info :
Work one thin row in gold as a highlight. Carry black yarn inside if you plan to work additional black rounds; otherwise fasten off and weave ends. Allow panel to lie flat before pinning appliques.
— Cat Face Applique (Make 2) :
Info :
These are flat appliques worked in the round to form a cat head with ears. Use Cream / White worsted yarn. Work tightly so the applique lies flat. Optionally use a tiny bit of stuffing for a slight lift — no more than 2-3 grams.
Round 1 :
MR, 6 sc in MR (6)
Round 3 :
(1 sc, inc) x6 (18)
Round 4 :
(2 sc, inc) x6 (24)
Round 5 :
(3 sc, inc) x6 (30)
Info :
At this stage you have a flat circle that will be shaped into a cat head by adding ears in later rounds. Keep rounds neat; place a stitch marker at start of each round.
Round 6 :
1 sc in each st around (30)
Round 7 :
1 sc in next 6 sts, create first ear base: ch 2, turn to work ear turning row into the same round: 1 sc in chain-2, (hdc, dc, hdc) all into same chain base, sl st back into head to anchor ear, continue sc in next 6 sts, repeat ear sequence for second ear on opposite side, finish remaining sc (30 total)
Info :
Work ears by creating small crochet ear motifs attached directly to the head circle. The ear sequence of (1 sc base, ch 2, hdc, dc, hdc, sl st) forms a small pointed ear. Ensure ears are symmetrical by counting stitches from centerline (e.g., place ears 7 sts apart).
Round 8 :
1 sc around entire head and over ear attachments, taking care to pick up ear stitches to close any gaps (30)
Round 9 :
Ch 1, (1 sc, inc) x10 (40)
Round 10 :
1 sc in each st around (40)
Round 11 :
Ch 1, 1 sc in each st until you reach center bottom for chin shaping, (dec) placed twice across bottom center to create slight chin tuck: work (1 sc x4, dec) x4 across bottom area, continue sc remainder (36)
Info :
Place safety eyes between rounds 7-9 depending on desired sizing: space them about 8-10 sts apart (center-to-center) for the look in the sample. Use 10mm buttons or black yarn embroidered pupils. Sew eyes on before adding whiskers and nose.
Round 12 :
1 sc in each st around (36)
Round 13 :
Ch 1, blo 1 sc in each st around to create a subtle ridge for facial definition (36)
Info :
Embroider nose now with pink yarn: insert needle under the stitch just below eye line and make a small triangle. Use black or dark brown to stitch whisker anchors on either side of nose. Sew on small bow (see bow instructions) under chin.
Round 14 :
Sl st into back loops only to create a neat back edge; fasten off leaving long tail for sewing (36)
Assembly Info :
Weave in ends on the back of the applique. If a slightly raised face is desired, use 1-2 grams of fiberfill and place inside before final slip stitch closure on round 14. Repeat to make a second cat applique identical to the first.
— Cat Bow (Make 2) :
Round 1 :
With Violet Purple, MR, 6 sc in MR (6)
Round 3 :
Ch 1, sc in next 3 sts, ch 5, skip 2 sts, sc in next 3 sts, finish round with sc in remaining sts (12)
Round 4 :
Working into ch-5 space, 3 dc, ch 2, 3 dc to form bow loop; sc around to finish (12)
Info :
Flatten bow and cinch center tightly with yarn by wrapping long yarn end around middle 6-8 times; secure with knot on the back. Sew bow to underside of cat chin using long tail.
— Bat Applique (Make 2) :
Info :
Bats are worked flat. Use Pumpkin Orange. Work a small body and wing arcs across several rounds for sculpted wings. These are flat motifs sewn to lie across the panel width.
Round 1 :
MR, 6 sc in MR (6)
Round 3 :
(1 sc, inc) x6 (18)
Round 4 :
Sc across next 6 sts to form body, ch 8 to start wing, turn and work along chains: (sc, hdc, dc, hdc, sc) to form outer wing curve, sl st back into body; sc across body, repeat wing on opposite side, finish round (18)
Round 5 :
Ch 1, sc entire round picking up wing edges and body to smooth join, adding 3 sc in each wing tip to round the shape (24)
Round 6 :
Ch 1, sc in each st around, fasten off leaving long tail for sewing (24)
Info :
Flatten wings and use blocking to shape slight scallops if needed. Sew bats to panel with small whip stitches around body only to allow wing tips to appear lifted slightly.
— Crescent Moon Applique (Make 3) :
Round 1 :
With Soft Gold, MR, 6 sc in MR (6)
Round 3 :
(1 sc, inc) x6 (18)
Round 4 :
Ch 1, sc in next 6 sts for crescent inner curve, dec across next 6 sts to create inward curve (12)
Round 5 :
Ch 1, 1 sc in each st around to smooth edge, fasten off leaving tail for sewing (12)
Info :
Shape the crescent by pulling inner curve slightly when sewing to the black panel so the crescent reads clearly. Place moons staggered between cats and bats as seen in the sample runner.
— Small Star Motifs (Make 8-10) :
Round 1 :
With Soft Gold, ch 6, join with sl st to form a loop, (ch 3, sl st) x5 to form 5 points (work: ch3, sl st in loop, repeat 5 times)
Round 2 :
Into each ch-3 point: (sc, hdc, dc) sl st to next point; fasten off leaving tail (approx 5 points)
Info :
Make 8–10 stars of varying sizes by changing the initial chain length to 4 or 6 for smaller or larger points. Sew stars randomly across panel to mimic scattered twinkles.
— Small Dot Flowers / White Sparkles (Make many) :
Round 1 :
With White, MR, 6 sc in MR, sl st to join, fasten off (6)
Info :
Make 12–18 tiny sparkles to fill negative space on the panel. Use small yarn color contrasts to catch light and balance motif spacing.
— Edge Inner Contrast Row (Soft Gold) :
Info :
We previously worked one gold round as a thin frame. If you fastened off, rejoin Soft Gold along one long side to create a decorative chain-space row before final scallop border.
Round 1 :
Join Soft Gold, ch 2 (counts as hdc), *skip 2 sts, 5 dc cluster in next st, skip 2, hdc in next 3 sts; rep along side arcs, adjusting cluster spacing on the short ends to keep symmetry; sl st to join.* (Clusters spaced evenly around)
Info :
This creates a pumpkin-orange accent later between gold and purple. If following the pictured runner use Pumpkin Orange for the small round bobbles between scallops (instructions follow).
— Pumpkin Orange Bobble Accent Row :
Round 1 :
Join Pumpkin Orange in the spaces between gold clusters, *ch 1, bobble (dc5 cluster bobble) into space, sl st to next gold hdc* repeat around; fasten off (approx 30 bobbles)
Info :
These small bobbles sit between the inner gold row and the final purple scallops to create the orange dotted line seen in the sample. Keep them evenly spaced; mark positions before stitching if necessary.
— Scalloped Purple Border (Outer Edge) :
Info :
Work this edge in Violet Purple. The scallop is constructed as multiple rounds to build depth and texture. Join purple at any point along a long side. The scallop measures roughly 1.25-1.5 inches from inner edge to outer tip.
Round 1 :
Join Violet Purple, ch 1, sc evenly around the entire runner edge into the back loop of the gold round to anchor (approx 120-130 depending on adjustments) (approx 128)
Round 2 :
Ch 3 (counts as dc), *skip next 2 sc, 7 dc in next st (scallop shell), skip next 2 sc, dc in next sc; rep around; sl st to top of ch-3 to join* (approx 16-18 scallops)
Info :
On short ends make 5 shells across arc, and on long sides adjust shell counts to fit evenly. Use stitch markers to mark shell centers to ensure symmetry. This is the main visible purple scallop row.
Round 3 :
Ch 1, sc in each st across to work into shell centers: sc into center dc of each shell, ch 3, sl st back into center to create a small picot loop on each scallop; sc across remainder (approx 128)
Round 4 :
Ch 1, working into previous round picot centers, *(2 dc, tr, 2 dc) into each picot center to create a pointed motif on shells; sc remainder between points.* Fasten off and weave ends (approx 16-18 pointed shells)
Info :
Block scallops gently to lift points. If desired, add a second row of purple around the outer edge using (sc, picot) to give a lacy finish. The sample shows a double-depth scallop; consider repeating Round 2 and Round 4 for a fuller look.
— Assembly & Applique Placement :
Info :
Layout: From one end to the other the arrangement in the sample is: Crescent moon, bat, purple bow, cat face (top), star cluster, moon, bat, star cluster, cat face (bottom). Leave approx equal spacing between motifs—measure and mark the centerline of the panel and positions before sewing.
Assembly Round 1 :
Place and pin top crescent moon centered at round 10 of the panel (approx measured from top arc). Sew with matching gold yarn using small whip stitches along inner curve only so outer edge lifts slightly (see Info on shaping) (moon placed)
Assembly Round 2 :
Place orange bat below the moon at measured spacing of 6-8 rounds down the panel. Pin wings symmetrically and sew body only so wings retain a slight 3-D lift (bat placed)
Assembly Round 3 :
Attach purple bow motif beneath bat as decoration, centered on the runner width; sew through back of bow center only (bow placed)
Assembly Round 4 :
Position cat face applique approx 6-8 rounds below bow (cat placed). Sew around the perimeter using long tail and mattress stitch to create an invisible seam. If you lightly stuffed the face, tuck stuffing before final closure.
Info :
Repeat the sequence for the bottom half mirror image. Use measuring tape to ensure equal top and bottom spacing. Pin all motifs before sewing to verify balance. Secure each applique with at least 12-20 small stitches around the perimeter for durability.
Assembly Round 5 :
Sew stars and white sparkles evenly filling negative space. Use long tails and invisible whip stitch; for slightly raised stars add a single loop of fiberfill and gather at back to hold shape if desired.
Info :
After all appliques are sewn, lightly steam-block the runner again to ensure the motifs lie flat and the border retains crisp scallops. Secure all tails and weave them into the wrong side for a clean finish.
— Finishing Touches :
Info :
Optionally sew a small felt piece to the back of each applique to further stabilize and prevent stretching over time. For extra sparkle add a few small sequins or beads in the star centers, sewn on carefully by hand.
Round 1 :
Final inspection: Check all seams, trim any long tails close to work after weaving, and gently press scalloped edge with a low heat iron (use pressing cloth).
Info :
Allow the runner to dry completely if blocked wet. When storing, roll loosely rather than folding to preserve scallops.
You did it — a whimsical Halloween table runner full of personality and charm! This layered design combines playful cat faces, bats, moons and stars with a bold purple scalloped border for an eye-catching centerpiece. Each applique and accent adds handcrafted detail that will delight guests and match seasonal decor. Enjoy the satisfaction of finishing a long, thoughtful project and the compliments that will follow! 🧶✨