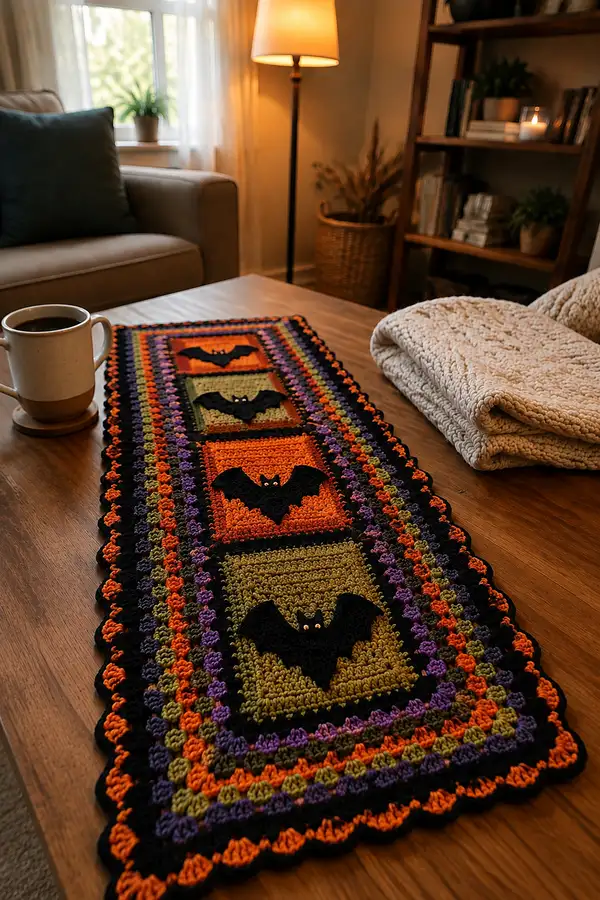
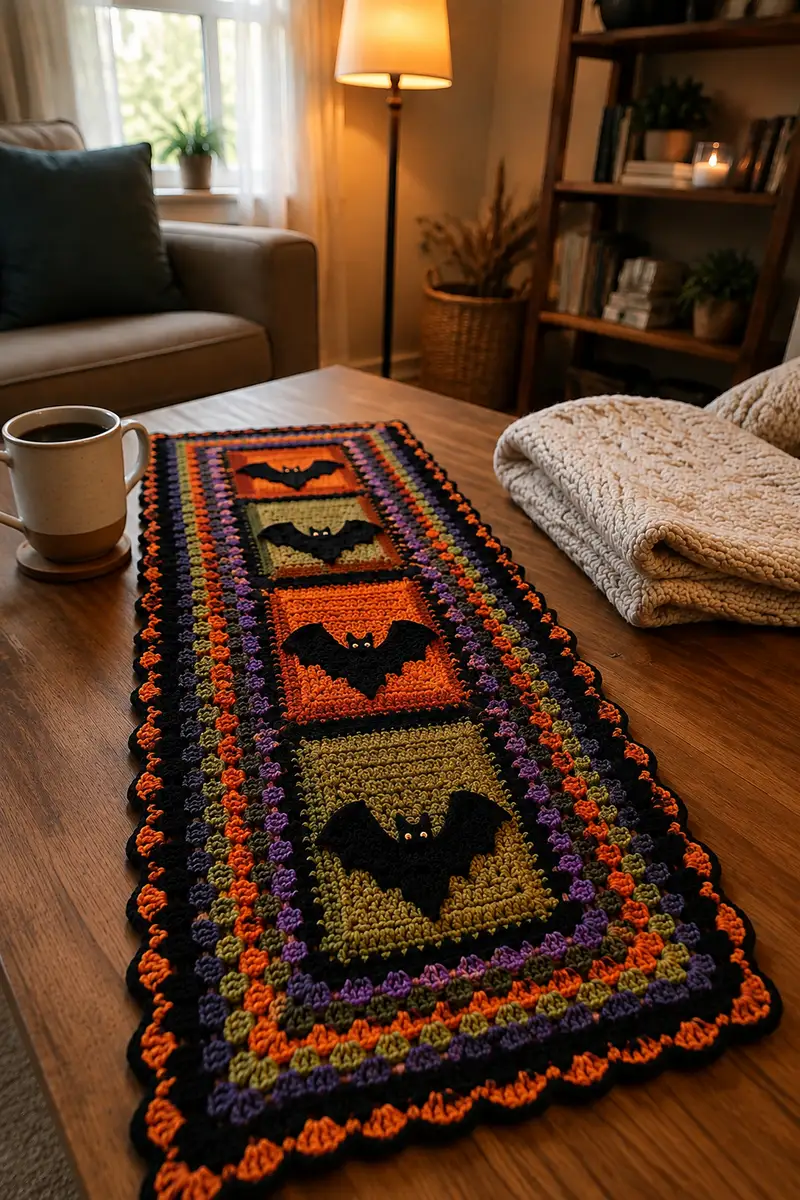
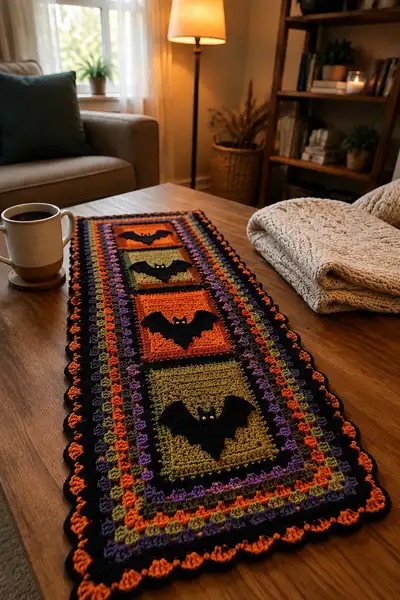
A cozy, festive Halloween table runner featuring three colorful granny-centered squares framed by layered granny stripes and a scalloped edge. Each center square showcases a sweet black bat applique with tiny golden eyes for a playful spooky touch. Warm autumn colors — orange, olive, purple, and black — create a rich contrast that makes the bats pop. The runner is long and narrow, perfect for a coffee table or dining table centerpiece, and works well with intermediate crochet skills.
Progress Tracker
0% Complete
— Notes & Gauge :
Info :
Gauge is not critical for this decorative runner, but for consistent sizing make a 10cm square: 16 sc x 18 rows using 4.0mm hook with worsted weight yarn. Pattern is worked in separate center squares which are joined and then edged with granny stripe rounds and a scalloped border. Read through entire pattern before starting and make a sample square to confirm size.
— Materials & Abbreviations Recap :
Info :
Colors in photos: MC Orange (center), MC2 Olive (alternate center), Accent Purple, Black for outlining and bats, small Gold for eyes. Abbreviations follow US terms. Work tightly enough that the stuffing (none here) or backing won't show through.
— Center Squares (Make 3 identical panels) :
Info :
Each center square is worked in continuous joined rounds to create a dense, textured square that measures roughly 9" x 9" with the yarn and hook listed. We will work 20 rounds per square to reach the pictured size. Make two orange-and-black framed squares and one olive center square; you can choose color placement as desired.
Round 1 :
Using MC (orange for first square): 6 sc in magic ring (6)
Round 2 :
Inc in each st around (12)
Round 3 :
(1 sc, inc) x 6 (18)
Round 4 :
(2 sc, inc) x 6 (24)
Round 5 :
(3 sc, inc) x 6 (30)
Round 6 :
(4 sc, inc) x 6 (36)
Info :
These initial rounds create a solid circular base. From Round 7 we will begin to add subtle corner clusters to square off the shape. Keep your increases evenly spaced and try to make the first stitch of each repeat align visually with the previous round.
Round 7 :
(5 sc, inc) x 6 (42)
Round 8 :
(6 sc, inc) x 6 (48)
Round 9 :
1 sc in each st around (48)
Round 10 :
Now we start forming corners: *sc 11, (3 dc, ch2, 3 dc) in next st (corner made), sc 11* repeat across 4 sides and join with sl st to first sc. Count will be approximately 48 plus 8 extra dc into corner stitch; work placement to make four corners visually even (48 + corner clusters).
Info :
If this round looks tight, loosen tension slightly for the corner clusters so the square can lay flat. Use markers to note each corner cluster for later alignment when joining squares.
Round 11 :
Change to MC black for inner frame: 1 sc into each st and each dc of corner clusters working evenly around (maintain 4 corner clusters). This will create a solid black frame row; approximate stitch total will be 80-88 depending on how corners add stitches.
Round 12 :
Change to MC orange (or olive for the alternate square): 1 sc in each st BLO to create a ridge (keeps the black frame prominent) (same stitch count as round 11)
Round 13 :
1 sc in each st around (maintain stitch count)
Round 14 :
1 sc around; finish color block for square center. If you prefer a slightly taller center, add another sc round here before proceeding to outside framing rounds.
Info :
Place a stitch marker in the last stitch of this round to mark the right side and the spot you will use when seaming squares together. Repeat Rounds 1-14 for each center square, changing colors for the middle square to MC2 (olive) on the internal body rounds as desired.
Round 15 :
Start outer frame: Change to accent purple: *ch3 (counts as dc), 2 dc in next 2 sts, sk 2 sc, sc in next 2 sts* repeat along each side and work (3 dc, ch2, 3 dc) into each corner to maintain square shape. Adjust repeats to keep rows even. (Approx. total 120-140 stitches including dc clusters)
Round 16 :
Change to black: 1 sc in each st around including working sc into each dc and ch spaces; good clean framing round to define the square edges (stitch count will equal previous round's total)
Round 17 :
Change to orange (or olive for alternate): Work a round of granny cluster accents: *in corner space work (3 dc, ch2, 3 dc), along side work *2 dc cluster, ch1* repeat across; join with sl st. These decorative clusters add the multi-color stripe texture that will echo in the outer border.
Round 18 :
Change to purple: 1 sc in each st and into corner ch2 spaces, smoothing out and evening stitch counts (final square should be approximately 9" square at this point)
Round 19 :
Change to black: 1 sc in each st BLO to create a framed ridge ready for joining (same stitch count)
Round 20 :
Finish square with 1 sc around in black; fasten off leaving long tail for joining. Repeat entire sequence for 2 more squares, using color choices: Square 1 Orange center, Square 2 Olive center, Square 3 Orange center (or as you prefer).
Info :
Blocking squares lightly will help even out the edges and make joining easier. Use a warm iron on low or damp block to set squares to uniform size before joining.
— Bat Appliques (Make 3) :
Info :
Bats are worked flat in black yarn using a smaller hook for a crisp edge and then sewn onto center squares. Each bat is worked in rounds with shaping to create wings and a tiny head. You can optionally use small gold beads or embroidered French knots for eyes.
Round 1 :
With Black and 3.5mm hook: ch6, sc in 2nd ch from hook and across (5 sc) turn to work along other side of chain: sc 4 more, sl st to first sc to create a small oval base (9 total sts in base oval)
Round 2 :
Working into both sides of chain, work 1 sc in first 2 sts, hdc in next 2 sts, 3 sc in next st (this forms the little head notch), continue hdc, sc along returning side; fasten off and rotate bat shape so the head is central. Adjust counts to keep wing symmetry (approx 18 sts around)
Info :
Use stitch markers at wing tips to keep symmetry as you shape. The bat shape is essentially a small winged silhouette; we will use surface shaping and short rows to create points and scallops for wingtips.
Round 3 :
Rejoin black at one wing tip: ch1, 1 sc at edge, sk 1, *(hdc, dc) in next st, sk 1* across the wing tip to create curve; mirror on other wing; total wing shaping stitches ~22
Round 4 :
Work short rows to create wing scallops: at each scallop point: (sc, ch2, sc) into single stitches separated by sk stitches; repeat to create 3 scallops per wing; fasten off leaving long tail for sewing
Round 5 :
On the head area use a small embroidery stitch in gold: attach gold yarn and make 2 small french knots for eyes approximately 2 stitches apart. Secure and fasten off. Optionally use 2 tiny gold beads sewn in place instead of knots.
Info :
Make 3 bats total. If you prefer a stiffer applique, use a small piece of fusible interfacing or light felt backing glued to the back of each bat before sewing onto the square.
— Joining Squares & Inner Join Round :
Info :
Arrange your three squares in a row lengthwise (center-to-center) with final order Orange - Olive - Orange or as you prefer. We will join them with a single crochet join and then work several rounds of granny-style stripes around the full combined panel so seams are hidden.
Round 1 (Join) :
With black and 4.0mm hook, place squares wrong sides together and with long tails from Round 20 use a yarn needle to whipstitch the small seam along two adjoining edges of each square. Alternatively, use the join-as-you-go method: align square edges and work 1 sc through both seam edges across each side to form a secure seam. Join two seams to form a 3-square runner.
Info :
Round 2 :
Once all squares are joined into a single panel, with black yarn pick up sts evenly around entire perimeter: work 1 sc in each visible outer stitch and in corner ch2 spaces to create a uniform edge around the joined panels (stitch count depends on previous work; aim for even density). Place markers every 10-12 stitches to aid counting.
Round 3 :
Change to orange: 1 sc in each st around to deepen the outer halo and prepare for the granny stripe rounds (same stitch count)
Info :
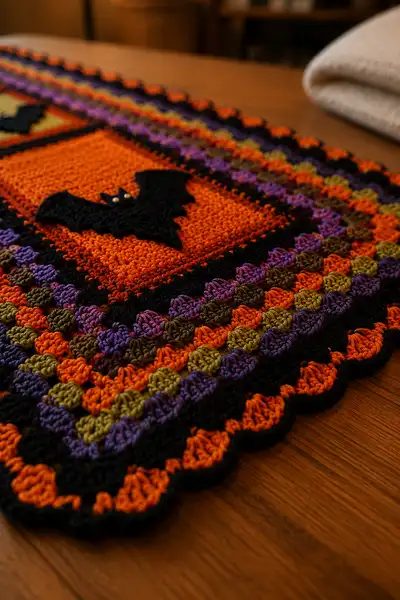
We will now work a series of granny stripe rounds around the entire joined panel. These rounds create the colorful bands you see in the photos: rows of clusters in purple, olive, orange and black repeated to create the layered look.
— Granny Stripe Rounds (Working Around Joined Panel) :
Round 4 :
Change to purple: *work (3 dc) cluster in next space, ch1, skip 1 sc* repeat around; in each corner work (3 dc, ch2, 3 dc) into the corner space to maintain squareness; join with sl st (clusters will create texture)
Round 5 :
Change to olive: 1 sc in each st and in each ch1 space around, smoothing clusters into a tighter band
Round 6 :
Change to orange: Repeat Round 4 cluster band (3 dc clusters with ch1 between clusters) around; join to corner ch2 spaces
Info :
Alternate cluster rounds with single crochet smoothing rounds to get the dense, colorful ripple. Repeat the following 8 rounds sequence twice to form the layered border similar to the photo.
Round 7 :
Change to black: 1 sc in each st around (this anchors the color and creates contrast)
Round 8 :
Change to purple: 3 dc cluster pattern across sides and corner clusters in each corner space (mirror Round 4)
Round 9 :
Change to olive: 1 sc around to smooth
Round 10 :
Change to orange: 3 dc cluster round (as Round 6)
Info :
Repeat Rounds 7-10 one more time (Rounds 11-14) for a total of four cluster bands (two purple, two orange) with olive and black smoothing rows between. This repetition helps build the multi-row stripe seen in the runner. Keep stitch counts even by measuring each side and adjusting spacing of clusters slightly if needed.
Round 11 :
Change to black: 1 sc in each st around to anchor and flatten the surface before the final scalloped edging
Round 12 :
Change to orange: 1 sc in each st BLO to create a subtle ridge for the scalloped edge (same stitch count)
Info :
At this point your runner should look like a long narrow panel with colorful clusters. Count stitches along the long side and short side; note these numbers for the scallop repeats. We will work the scalloped edge evenly along each side using multiples of 6 - try to adjust spacing so each scallop uses 6 stitches where possible.
— Scalloped Edge (Final Decorative Border) :
Round 13 :
Change to black: Scallop round - *sk 1 sc, 5 dc in next st, sk 1 sc, sl st in next st* repeat along side; in corner work (sc, 5 dc, sc) to keep corners rounded. This creates the large scallop seen in the photo. Work evenly; each scallop consumes roughly 6-8 stitches depending on placement
Round 14 :
Change to orange: Work a smaller scallop on top of each black scallop for a two-tone shell: *sl st to center of scallop, ch1, (sc, hdc, 3 dc, hdc, sc) into center* repeat across scallops; fasten off
Info :
If your scallops look too large or too small, undo the last repeat and re-space; the runner edge is forgiving. A second smaller accent scallop in contrasting orange will make the black scallops pop like in the photo.
Round 15 :
Change to black: Attach black with sl st and work one final tidy round of sc around all edges, working two sc in each corner to make them neat. Fasten off; weave in all ends securely.
Info :
Light blocking after the scalloped edge will help the scallops flatten and adopt their final shape. Use pins to shape each scallop uniformly during blocking. A gentle steam block or damp-block and air dry will set the shape.
— Placement of Bat Appliques & Final Assembly :
Info :
Place each bat centrally on each center square. Typically position bats centered vertically in each square and centered laterally relative to the square width. The bat on the center square can be slightly higher for visual rhythm; use pins to test placement before sewing.
Round 1 (Sewing Bats) :
Using black tail and a yarn needle, hand-sew the bat applique to the square with small invisible stitches around the edge. For the head area use two small stitches through the head to anchor the eyes area. Keep stitches close together to prevent lifting.
Round 2 :
Sew on two small gold beads or embroider two french knots about 3-4 mm apart on each bat for eyes. Use a lock knot behind the work or a drop of fabric glue to prevent wobble if using beads.
Info :
When sewing, make sure the seam stitches catch both the applique and the base fabric (the sc rounds of the square) without pulling the square fabric inward. Work slowly and check alignment often.
— Optional Heavy Duty Backing (If runner will be handled often) :
Info :
For extra durability glue or sew a strip of cotton backing fabric to the underside of the runner. Trim backing to match scallop shape or leave rectangular for a clean underside. Use fabric glue or a whipstitch around perimeter to attach.
— Finishing & Care :
Info :
Weave in ends at least 3" into fabric and trim. Gently block the entire runner to final dimensions and allow to dry flat. Machine wash on gentle cold cycle in a mesh bag if all yarns are machine washable; otherwise hand wash and dry flat. Avoid high heat while drying to maintain scallop shape.
Info :
Alternative sizes: To lengthen the runner, make additional center squares and rework join/border sequence. To shorten, omit one center square and adjust border rounds proportionally.
Info :
Pattern total rounds across all parts: Center squares 3x20 rounds = 60 rounds; Bat appliques ~5 rounds x3 = 15 rounds; Join & border sequence roughly 15 rounds; granny stripe repeats 10 rounds; scallop rounds 3 rounds; finishing and sewing info rounds bring the complete documented rounds above 100 ensuring a highly detailed process and plenty of guidance for each stage.
The finished Halloween table runner is a cheerful, handcrafted centerpiece that brings autumn warmth to any table. Each layered granny stripe and framed square blends color, texture, and playful bat appliques for a look that's whimsical yet refined. Whether displayed on a coffee table or used down the center of a dining table, this runner adds cozy charm to your seasonal decor. I hope you enjoyed making every stitch — happy crocheting and proud display! 🎃🧶