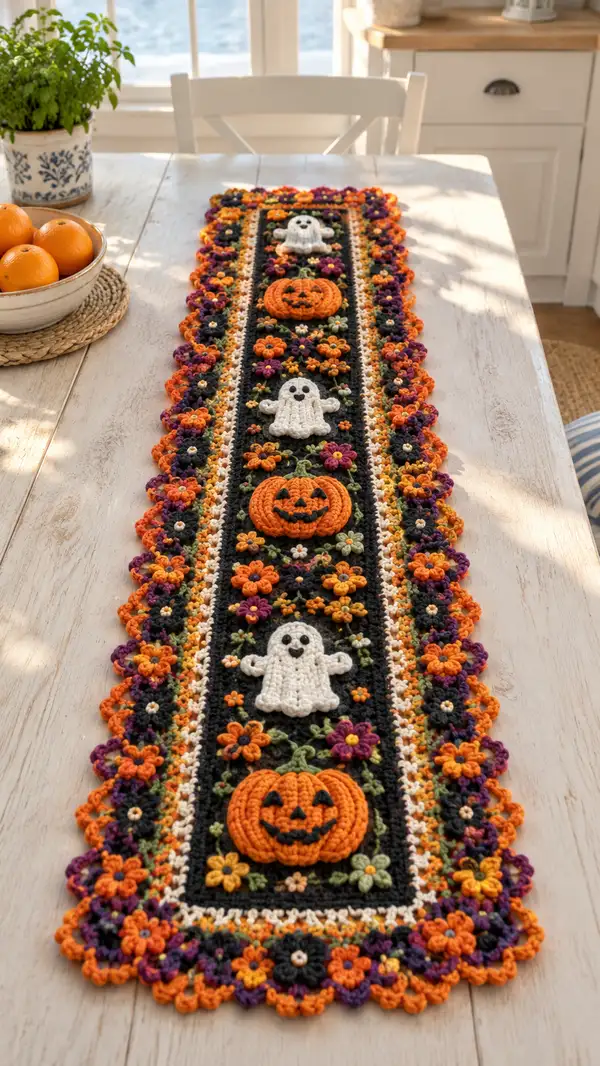
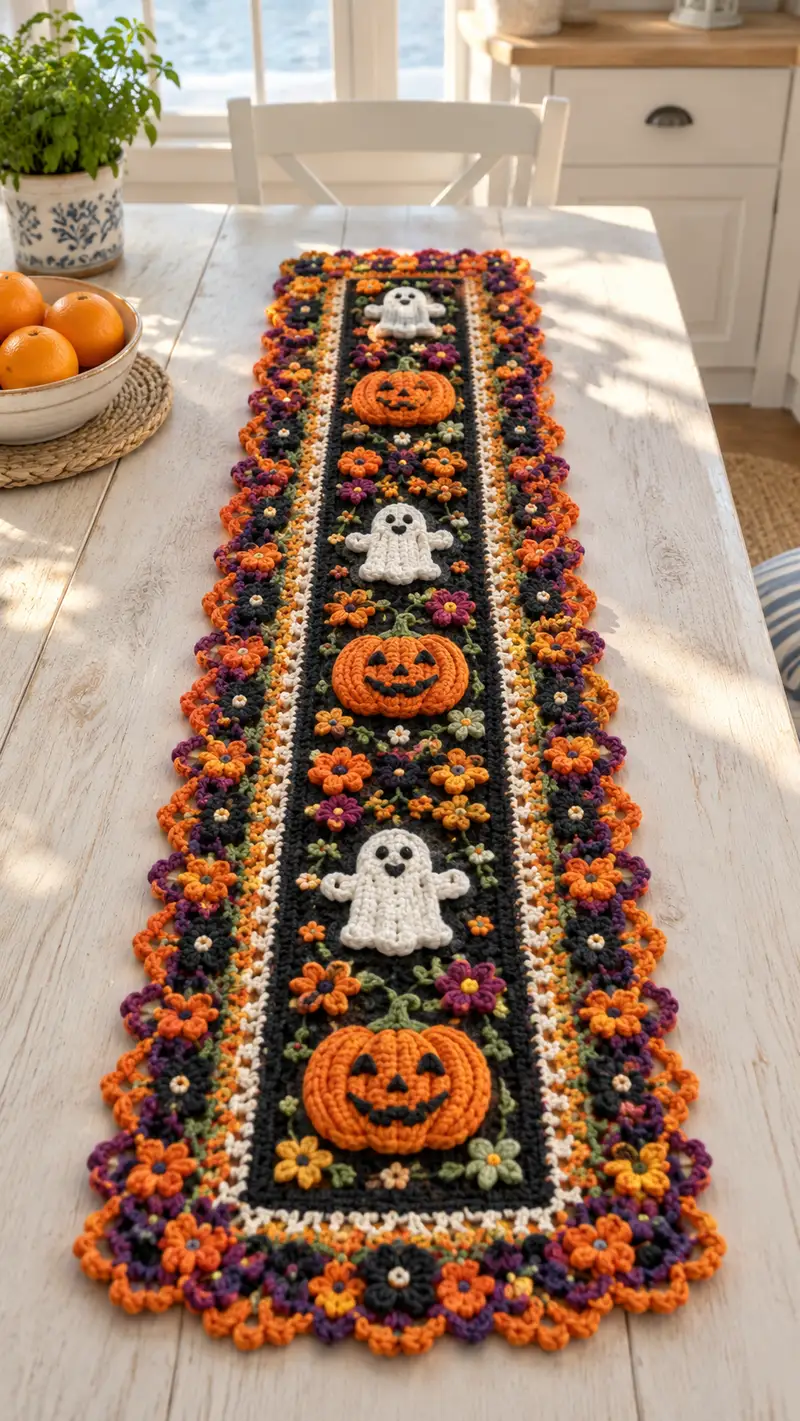
Bring a playful Halloween touch to your table with this richly textured crochet table runner. The long central panel features three friendly jack-o-lanterns and three smiling ghosts, set against a deep charcoal background, framed by rows of tiny multicolored flowers and a scalloped floral border. Layers of puff petals, leafy vines and 3D appliqus pop with autumnal oranges, purples, greens and cream for a cozy seasonal centerpiece. Detailed step-by-step instructions guide you through each motif and the assembly, making this a fun advanced-intermediate decorating project.
Progress Tracker
0% Complete
- Center Panel (work as joined rounds to create a long rectangular strip) :
Round 1 :
Using charcoal/black yarn, ch 62. Join with a sl st to first ch to avoid twisting and form a loop. Ch 1 (does not count as st), 1 sc in each chain around, join with sl st to first sc (62)
Round 2 :
Ch 1, 1 sc in each st around, join (62)
Round 3-8 :
Ch 1, 1 sc in each st around, join (62) — work 6 rounds total to establish base height (62)
Info :
Place a stitch marker in the first stitch of each round to keep track of the join point. Keep tension slightly firm so small appliqus will sit nicely on the surface without holes showing.
Round 9 :
Ch 1, BLO: 1 sc in each st around, join (62) — working in BLO creates a subtle ridge that helps the center panel sit flat against appliqus
Round 10-14 :
Ch 1, 1 sc in each st around, join (62) — continue 5 rounds (62)
Info :
Mark the panel center and plan appliqu placement: the design has three pumpkins and three ghosts in alternating order. The center of the panel should align with the middle pumpkin. Make a light chalk mark or use pins to place centers every 14-16 rounds.
Round 15 :
Ch 1, change to cream/ivory yarn in the last pull of the join, 1 sc in each st around, join (62)
Round 16 :
Ch 1, 1 sc in each st around (62)
Round 17 :
Ch 1, change back to charcoal/black yarn in the last pull of the join, 1 sc in each st around (62)
Round 18-22 :
Ch 1, 1 sc in each st around, join (62) — work 5 rounds in black to form the band where appliqus will be sewn (62)
Info :
If you prefer vertical rows rather than a tube-like join, work the panel as alternating joined rounds and chains to create a flat panel; this pattern uses joined rounds for a neater finished edge on both long sides.
Round 23 :
Ch 1, BLO 1 sc in each st around (62)
Round 24-28 :
Ch 1, 1 sc in each st around, join (62) — build 5 more rounds to provide spacing below the bottom motif (62)
Info :
From Round 1 to Round 28 the panel provides three motif zones; for a typical runner length you can repeat additional even rounds if you want a longer runner. Measure against your table before final assembly.
Round 29 :
Ch 1, change to cream/ivory, 1 sc in each st around, join (62)
Round 30-34 :
Ch 1, 1 sc in each st around, join (62) — finish with a narrow cream band to contrast the outer border later (62)
Info :
Fasten off keeping a long tail for mattress sewing to the border later if you choose to join the border with whipstitch; otherwise you will crochet the border directly to the last round.
- Inner Narrow Side Bands (left and right strips worked the same - make 2) :
Round 1 :
Using cream/ivory yarn, ch 12. Join with a sl st to form a small loop. Ch 1, 1 sc in each ch around, join (12)
Round 2 :
Ch 1, 1 sc in each st around, join (12)
Round 3-6 :
Ch 1, 1 sc in each st around, join (12) — work 4 rounds to create a narrow raised strip (12)
Info :
Sew these strips to the long sides of the center panel aligning them so they sit between the main panel and the outer border. You can also crochet them directly onto the panel by counting stitches evenly along the long edges.
- Pumpkin Appliqu (Make 3) :
Round 1 :
With pumpkin orange, mr, 6 sc into magic ring (6)
Round 2 :
Inc in each st around (12)
Round 3 :
(1 sc, inc) x 6 (18)
Round 4 :
(2 sc, inc) x 6 (24)
Round 5 :
(3 sc, inc) x 6 (30)
Info :
These first rounds make the flat pumpkin face base. Do not fasten off; we will build texture using round ridges and surface detail to give the pumpkin its ribbed, 3D look.
Round 6 :
Ch 1, 1 sc in each st around (30)
Round 7 :
Change to BLO: ch 1, 1 sc in each st BLO around (30) — this creates a subtle ridge line to help each subsequent ridge sit well
Round 8 :
Ch 2 (counts as hdc), *skip 1 st, 5 hdc in next st (a cluster/ridge), skip 1 st, 1 hdc in next st*; rep from * to * around to create 10 small ridge clusters; join (30)
Round 9 :
Ch 1, sc in each st around working into backs of hdc clusters to anchor, join (30)
Round 10 :
Using surface crochet or embroidery with orange yarn, couch a few vertical lines from top to bottom across the pumpkin to emphasize ribs. Alternatively, use thin yarn and embroidered lines with needle and yarn after stuffing.
Round 11 :
Make a small stem: join brown/olive yarn to top center, ch 1, 6 sc in magic ring (6), sl st to close, fasten off leaving long tail for sewing
Round 12 :
Stuff the pumpkin lightly through the back, shaping it flat with gentle pressure; it should be firm but slightly pliable. Use stitch marker to hold opening if needed.
Round 13 :
Using black yarn, embroider triangular eyes and a scalloped mouth by sewing small satin-stitch triangles and chain-stitched mouth segments; secure ends and weave in (no stitch count)
Info :
Make 3 pumpkins total. Position them centered in the motif zones marked on the panel earlier. For a deeper relief, you may crochet a second pumpkin front and sandwich a small disk of felt between for extra support before sewing to panel.
- Ghost Appliqu (Make 3) :
Round 1 :
With cream/ivory yarn, mr, 6 sc into ring (6)
Round 2 :
Inc in each st around (12)
Round 3 :
(1 sc, inc) x 6 (18)
Round 4 :
(2 sc, inc) x 6 (24)
Round 5 :
Ch 1, 1 sc in each st around (24)
Info :
We will create a slightly oval ghost with a rounded head and a scalloped ruffled base. Work next rounds flat and then add a band of shell stitches to form the skirt ruffle.
Round 6 :
(3 sc, 1 dec) x 6 (18) — start shaping the neck
Round 7 :
1 sc in each st around (18)
Round 8 :
Ch 1, *sk 1 st, 5 dc in next st (shell), sk 1 st, sl st in next st*; rep around to create 6 shells for the ghost skirt; fasten off (approx 18 sts but shells create ruffle)
Round 9 :
Sew two small black embroidered eyes and a small round mouth with black yarn onto the head area. Alternatively attach small 4mm black beads or safety eyes before closing if the piece is decorative only (not for small children).
Round 10 :
Lightly stuff the top head area only to give it a soft puff; do not stuff the ruffle base to keep it floppy. Fasten off leaving long tail for sewing
Info :
Make 3 ghost appliqus and position them between pumpkins for alternating character placement. Use pins to check spacing before sewing; slight variations in size create a playful look.
- Small Flower Motif (Make many - these are the tiny 5-petal flowers used around and inside the panel) :
Round 1 :
With chosen flower center color (yellow or cream), mr, 5 sc into ring (5)
Round 2 :
Change to petal color (orange, purple, or light orange). *Ch 2, 3 dc in next st, ch 2, sl st in same st (creates one petal)*; rep in each of the 5 sts to make 5 petals around. Fasten off leaving tail for sewing
Info :
Make a large number of these small flowers (approx 40-60 depending on runner length). They are quick to make and are attached around pumpkins and ghosts as filler. Sew a small contrasting dot or bead in the center if you like.
- Large Layered Flower (Border motif - Make many) :
Round 1 :
With deep purple yarn, mr, 6 sc into ring (6)
Round 2 :
Inc in each st around (12)
Round 3 :
(1 sc, inc) x 6 (18)
Round 4 :
Change to orange for petals: *ch 2, 5 dc in next st, ch 2, sl st in same st*; rep around in 9 sts to create 9 large petals (work carefully across increases), fasten off
Round 5 :
Optional: Add a smaller contrasting petal layer using a tiny five-petal motif sewn to the center of the larger flower for depth.
Info :
Use these larger flowers around the outer scalloped border alternating purple/orange to echo the picture. Stitch securely with several passes so petals remain flat.
- Leaves and Vines (Make many small vines to stitch between motifs) :
Round 1 :
With olive/leaf green, ch 21 for a short vine. Row (worked flat): Skip ch nearest hook and sl st into next ch to anchor at base, ch 1, sc into each ch across to end to make a thin chain of sc that acts as a vine (20)
Round 2 :
Turn, attach leaf at chosen points: *ch 1, skip 1 st, 5 dc across next st, sl st in next st* to create a small leaf. Repeat leaves every 4-6 stitches depending on desired density. Fasten off leaving tail for sewing.
Info :
Sew vines between pumpkins and ghosts, tucking them under small flower clusters. Use a running stitch with yarn needle and take small stitches to keep vines flat.
- Outer Scalloped Floral Border (worked directly onto cream band or crocheted separately then sewn on) :
Round 1 :
With cream yarn, join to the outer edge of the panel (or to the last cream round). Ch 2 (counts as hdc), *ch 2, sk 2, 1 hdc in next st*; rep along the full edge to create a foundation of spaced loops. Turn corners with extra ch 4 to keep edges square; join (variable count based on panel length)
Round 2 :
Change to orange and purple alternately: In each foundation loop work *10 dc in loop, sl st in next loop* to create large scalloped petals. Alternate colors every other scallop to create the layered look. Fasten off color when finished and join next color at the sl st.
Round 3 :
With contrasting small flower color, in the center of each scallop make a small flower: attach yarn to center of scallop, make mr, 5 sc in mr, change to petal color and make 5 small dc petals as for small flower (leave long tail to sew into scallop center)
Round 4 :
Work a picot and chain edge between each scallop to create a lacy finish: *ch 3, sl st in 3rd ch from hook (picot), ch 2, sl st into next scallop center*; rep around and fasten off
Info :
To keep the border flat, block each scalloped segment before attaching. If crocheting the border separately, align it against the panel and whipstitch with matching cream yarn to hide joining seams.
- Assembly & Attaching Appliqus :
Round 1 :
Using yarn needle and matching yarn tails left on motifs, pin the pumpkins and ghosts in their marked positions on the center panel. The typical spacing is one motif every 9-10 rounds of panel height; center the middle pumpkin at the panel center and place others evenly spaced above and below.
Round 2 :
Sew each appliqu firmly with a mattress stitch or whip stitch around the base of each motif, catching a couple of rounds of the panel edge to secure. Make sure stitches are hidden under petals and not visible on the front.
Round 3 :
Sew small flowers and leaves around each appliqu to create a wreath effect: place three to five small flowers around each pumpkin and ghost, then add short vine segments connecting them. Use short invisible stitches to secure centers and petals.
Round 4 :
Attach inner narrow cream bands to long sides of panel by sewing through both panel rounds and band rounds, spacing evenly and keeping tension flat so there is no puckering.
Round 5 :
With the outer scalloped border pinned in place along the outside cream band, sew the scallops to the cream band using whipstitch with the cream yarn for a near-invisible join. Sew slowly, picking up each scallop base and a single stitch from the cream band.
Info :
Once everything is sewn, weave all loose ends into the wrong side of the work. Gently steam-block the entire runner on a blocking board if desired to even out scallops and flatten seams, using low steam to avoid flattening the 3D appliqus.
- Finishing Touches and Optional Variations :
Round 1 :
Optional: Add small bead centers or tiny seed beads to flower centers for sparkle; sew individually with strong thread and secure ends inside the panel so beads do not come loose.
Round 2 :
Optional: Make the pumpkins more pronounced by sewing a small circle of felt behind each pumpkin before attaching, or add a thin layer of stuffing and close with a few invisible stitches to create a bobble shape.
Round 3 :
Optional: Change the color palette to suit your decor — convert oranges to reds and purples to navy for a more muted fall look. Maintain contrast between motifs and background for visibility.
Info :
Care instructions: Hand wash gently in cool water and lay flat to dry. For light wear, spot clean small areas and re-block shape if needed.
This pumpkin-and-ghost table runner combines playful Halloween charm with detailed floral crochet for a show-stopping seasonal centerpiece. Each appliqu and flower layer adds depth and character to a cozy, handmade accent that will brighten any table. The modular construction makes it easy to customize length and colors — perfect for gifts or seasonal decorating. 🧡👻 Happy stitching and enjoy assembling every colorful bloom and friendly face!