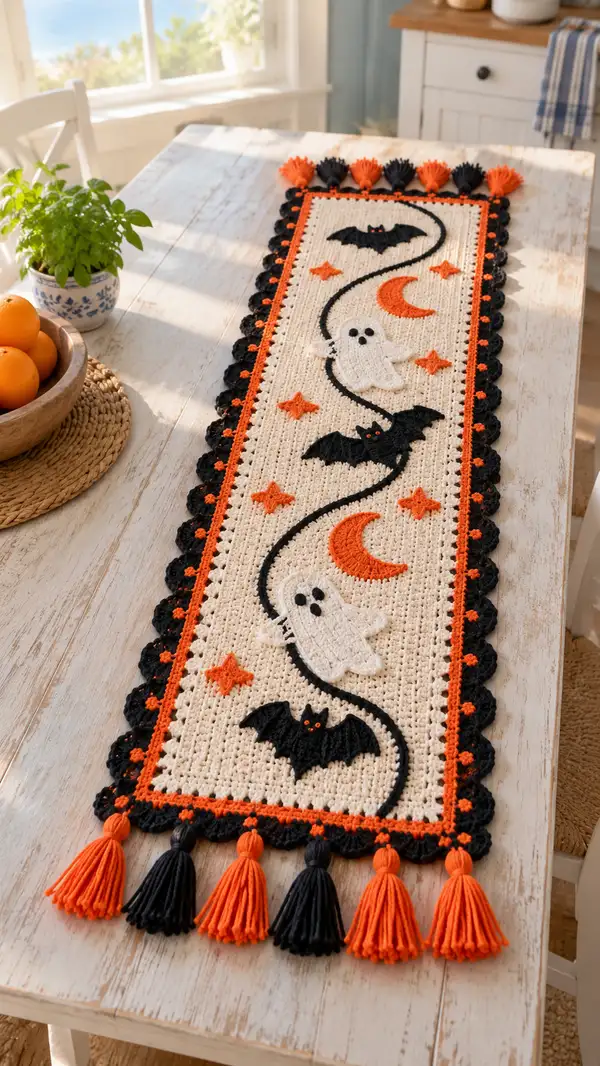
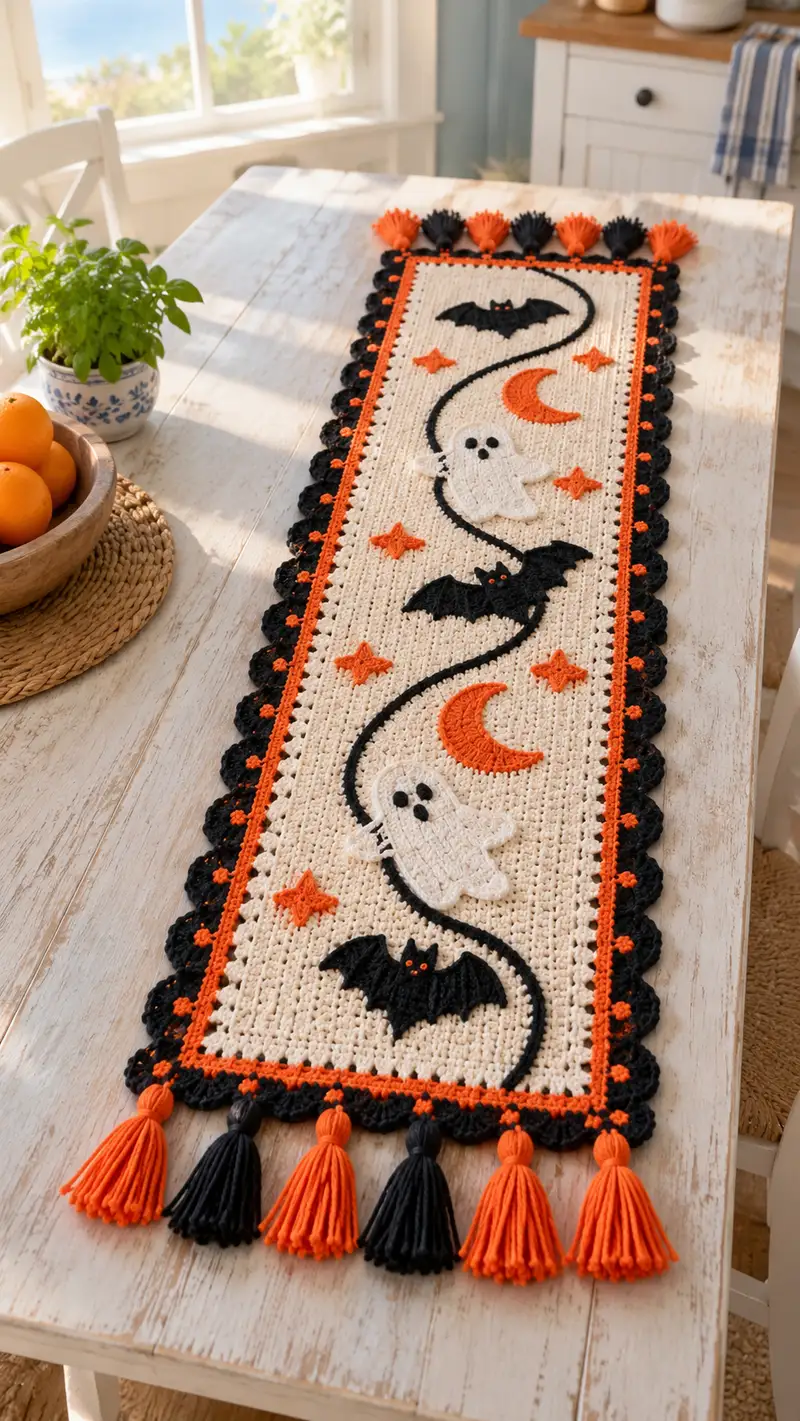
Create a festive Halloween table runner featuring playful bats, friendly ghosts, crescent moons, and stars in contrasting black, orange and cream. This rectangular runner is worked flat with appliqued motifs, a scalloped black border, an orange inner trim, and striking tassels at one end. The pattern includes full stitch-by-stitch instructions, placement guides, surface slip-stitch swirl detail, and step-by-step assembly tips to achieve a polished finished piece.
Progress Tracker
0% Complete
— Materials & Gauge :
Info :
Gauge is not critical for a decorative runner but recommended: with 4.0mm hook and worsted yarn, 10 dc x 6 rows = 2.5in (6.5cm). Adjust hook to match desired drape. Finished runner in sample: approximately 12in (30cm) wide x 42in (107cm) long (not including tassels).
— Center Panel :
Foundation Row :
Chain 81 (this yields 80 foundation stitches across for a finished width ≈12in) (80)
Row 1 :
Dc in 4th ch from hook (counts as dc + ch2 for turning optional), *dc in next st* across to last 3 ch, dc in last 3 ch. (80)
Row 2 :
Ch 2, turn, dc in each st across (80)
Row 3 :
Ch 2, turn, dc in each st across (80)
Info :
Work all rows in back loops only (BLO) for rows 4-8 if you prefer a subtle vertical ridge texture; the sample alternates plain dc rows and BLO rows every few rows to create faint ribbing. Choose consistent approach for uniform fabric.
Rows 4-8 :
Ch 2, turn, dc in each st across (80)
Info :
Mark the first stitch of every 10th row with a removable marker to help count placement rows for appliques and the surface swirl.
Rows 9-16 :
Ch 2, turn, dc in each st across (80)
Info :
At this stage the runner is building length. Keep edges straight by starting each row with chain 2 and making the last dc in the top of the turning chain of previous row (this ensures consistent edge height).
Rows 17-24 :
Ch 2, turn, dc in each st across (80)
Info :
Decide where the center line of the surface swirl will sit: count stitches from the left edge and mark the center column stitch — in a panel of 80 stitches the vertical center falls between stitch 40 and 41; the surface slip-stitch will follow coordinates based on these centers. Keep this center marked now for accuracy when you add the swirl later.
Rows 25-32 :
Ch 2, turn, dc in each st across (80)
Info :
If you prefer a tighter fabric for applique sewing, around row 30 change to 3.5mm hook for a few rows to stiffen the center slightly, then change back to 4.0mm — this is optional.
Rows 33-40 :
Ch 2, turn, dc in each st across (80)
Info :
Now is a good time to block the panel flat while it is still flexible. Pin the piece to a flat surface to check for curling. Blocking will help your border stitches read cleanly. If you choose to block, allow to dry before adding border or appliques.
Rows 41-48 :
Ch 2, turn, dc in each st across (80)
Info :
The placement of motifs in the sample is roughly as follows: bottom bat near rows 6-12, lower moon around rows 10-18, lower ghost around rows 18-26, middle bat around rows 26-34, middle ghost around rows 34-42, upper moon around rows 38-46, top bat around rows 46-54. These are flexible; pin each applique before sewing to confirm look.
Rows 49-56 :
Ch 2, turn, dc in each st across (80)
Info :
To keep the runner looking symmetric, periodically lay a tape measure along the length and ensure rows are even. If you notice drift in width, adjust tension or switch to BLO patterning for a few rows to stabilize.
Rows 57-64 :
Ch 2, turn, dc in each st across (80)
Rows 65-72 :
Ch 2, turn, dc in each st across (80)
Info :
Work the last rows (73-80) a little more slowly to ensure final edge is neat; count stitches at row ends to verify 80 sts. The sample uses 80 rows after foundation for a finished length of about 40-42 inches. Adjust rows to reach your desired length — add or subtract rows in multiples of 2 to keep motif spacing even.
Rows 73-80 :
Ch 2, turn, dc in each st across (80)
Info :
Fasten off cream yarn leaving a 12in tail for later weaving into the wrong side when attaching border. Smooth and block if desired before beginning applique and border steps.
— Surface Swirl (Black) :
Info :
The continuous sinuous line seen on the runner is worked using surface slip stitch (or you can chain and sew it on as an applique cord). We recommend surface slip-stitch with black yarn for a flat, integrated look. Place your starting point near the bottom center (between rows 8-10) and work upward in a loose S-curve to the top edge across multiple rows.
Step 1 :
With wrong side facing up, attach black yarn with a sl st at the chosen starting stitch in the center column (between st 40-41) at row 9. Carry yarn along the surface and work surface slip stitches by inserting hook from front to back through the horizontal bar at the base of the dc of the next stitch, yarn over and pull through to trap the stitch; continue to create a continuous line. Work approximately 110-130 surface slip stitches total following this S shape (this is an approximate count; follow the photo or pinned layout for the exact curve).
Info :
When you need to change direction for the curve, make slightly closer surface slip-stitches spaced 1-2 stitches apart vertically to create a smooth turn. Keep tension slightly looser than your dc tension to avoid puckering of the body panel.
Step 2 :
When you reach the top position (around row 54), fasten off, weave in ends on wrong side. If the line seems too thin, you can repeat a row of surface slip-stitches parallel to the first to widen the line; in the sample single line is used and appliques overlap it so it reads bold.
— Ghost Applique (Make 2) :
Round 1 :
With white/ivory, mr, 6 sc in magic ring (6)
Round 3 :
(1 sc, inc) x 6 (18)
Round 4 :
(2 sc, inc) x 6 (24)
Round 5 :
(3 sc, inc) x 6 (30)
Info :
We will begin shaping the ghost body which is a slightly flattened teardrop rather than a perfect circle. The following rounds shape a flat bottom with small scalloped hem; keep stitches loose enough to later flatten and sew onto runner.
Round 6 :
1 sc in each st (30)
Round 7 :
(4 sc, inc) x 6 (36)
Round 8 :
1 sc in each st (36)
Round 9 :
(5 sc, inc) x 6 (42)
Round 10 :
1 sc in each st (42)
Info :
To create the flattened ghost hem (wavy bottom) work a decorative scallop at one end: after Round 10, work a partial round of scallop stitches across approximately 12-14 sts to form the feet area. Keep the opposite side round for the head region.
Round 11 :
Ch 1, fold ghost so Row 11 aligns to create a flatter bottom; in the next 14 sts work (sc, hdc, dc, hdc, sc) across to make small scallops, then sc across remaining sts to complete the round (42)
Round 12 :
1 sc in each st around (42)
Round 13 :
1 sc in BLO around (42)
Round 14 :
Fasten off leaving long tail for sewing. Embroider two small black eyes using black yarn or attach small safety eyes (6mm) placed about 6 sts apart in the head rounded area. Sew ghost onto panel so the scalloped hem overlaps and sits slightly to the side of the surface swirl.
Info :
When placing eyes, pin the ghost on the panel and align with center of swirl to ensure balanced composition. For child-safe version, embroider eyes instead of using safety eyes.
— Bat Applique (Make 3) :
Round 1 :
With black yarn, mr, 6 sc in magic ring (6)
Round 3 :
(1 sc, inc) x 6 (18)
Round 4 :
(2 sc, inc) x 6 (24)
Round 5 :
1 sc in each st (24)
Info :
We are forming a compact round body for the bat; wings will be formed by working flat rows out of the same body in the next steps to create wing points.
Round 6 :
1 sc in each st (24)
Round 7 :
Change to 3.5mm hook; fold the circle across two sides to work wings: join with sl st at side, ch 1, sc in 6 sts to form one wing base, then work: (sc, hdc, dc, hdc, sc) in successive stitches to create scalloped wing edge (work across 12 sts), sc remaining base stitches to close (24)
Round 8 :
1 sc around to tidy shape (24)
Round 9 :
Fasten off leaving tail for sewing. Add two tiny French knot-style eyes with orange yarn by threading through and forming two small knots, or use orange seed beads sewn on. Sew bat body onto panel with head slightly overlapping the black swirl.
Info :
For more dramatic wing shapes, work small increasing rows along the wing outer edge: after wing shaping add a row of (sc, inc) across the wing scallops to widen wings if desired. Ensure symmetry by mirroring shaping for left and right wings.
— Crescent Moon Applique (Make 2) :
Round 1 :
With orange, mr, 6 sc in magic ring (6)
Round 3 :
(1 sc, inc) x 6 (18)
Round 4 :
1 sc in each st (18)
Round 5 :
(2 sc, inc) x 6 (24)
Round 6 :
1 sc in each st (24)
Round 7 :
Fasten off leaving long tail. To create the crescent shape, fold circle so the inner curve is compressed and use running stitch to remove 6-8 sts from the inner side forming the crescent gap; secure with yarn and weave ends. Shape until crescent resembles sample (approx 3.5in diameter before folding).
Info :
Work a small decorative surface dc row along the outer edge with orange to emphasize the crescent if desired. Glue small embroidery detail or chain-dense border to make it sit raised on the cream panel.
— 5-Point Star Applique (Make 6) :
Round 1 :
With orange, ch 2, 5 sc in 2nd ch from hook (5) — forms the star center
Round 2 :
*(Ch 3, sl st in next st) x 5 to create five points* Fasten off leaving tail for sewing (5 petals)
Info :
Small, dense stars can be worked with tight tension; block each star flat under a book and pin until the center sets for neatness. These are sewn on top of cream panel with a few invisible stitches through the center.
— Border & Trim :
Info :
Border in sample is worked in 3 major steps: 1) tidy round of sc around entire panel in cream to create base, 2) single-row orange decorative picot/cluster row, 3) black scallop shell round. Work borders with panel lying flat and RS facing up.
Round 1 (Base Clean Edge) :
With cream yarn and 3.5mm hook, join at any corner, ch 1, work sc evenly along the long edge placing approximately 1 sc per row-end (approx 80 sc along long edges) and 1 sc per stitch along short ends (approx 40 sc per short end). Maintain total count by working extra sc in corner to keep panel flat. Fasten off. (approx edge st counts will equal panel perimeter ≈ 240 sc)
Info :
Work this round tightly to create a clear base for decorative trims. When you reach corners, work (sc, ch2, sc) in corner stitch to allow flexibility for later scallops.
Round 2 (Orange Decorative Row) :
Join orange yarn in any sc. *Ch 3, sk next sc, sl st in next sc* repeat across the long edge and around short ends. This forms small open clusters for visual interest. Fasten off. (approx 80 chain3 loops across long edges)
Info :
Alternatively, work picot clusters by replacing each ch3 with (ch2, picot) if you prefer small closed picots. Do a practice strip to test look before applying to the whole runner.
Round 3 (Black Scallop Shell Round) :
Join black yarn at a corner with RS facing. Ch 1, sc in same corner, *sk next ch3 loop and work in the next 3 sc: (5 dc in next st, sk 2 sc, sl st in next sc)* Repeat across long edge. On short ends space scallops evenly, using (sc, ch2, sc) at corners as anchor. Work scallops around entire perimeter to create a shelled edging. Fasten off and weave ends. (approx 30-34 scallops per long edge depending on spacing)
Info :
For uniform scallops, mark every 8th sc on raw edge before you start the shell round; this helps you maintain even spacing on long edges. If scallops pull in corners, add an extra ch2 in corner anchors to ease tension.
— Tassels (Make 9 alternating orange/black) :
Step 1 :
Cut 9 equal tassel bundles each 4.5in long (finished length ≈3.5in after knotting). Use 6-8 strands of worsted for a full tassel. For uniformity wind yarn around a 4.5in cardboard template 20 times, tie at top tightly with an 8in length of yarn, slide off template, fold to create tassel.
Step 2 :
Trim bottom edge evenly. Attach tassels to one end of runner: evenly space 9 tassels along end across the short edge (about every 1.25in center-to-center) and tie securely through the base row of scallops and weave ends to wrong side for security. Alternate colors orange/black starting with orange at the corner. Fasten all knots and optionally secure with a dab of fabric glue before trimming ends flush.
Info :
Tassels can be made fuller by doubling the number of strands. For a neater look, wrap a piece of yarn around the neck of each tassel several times and secure with a knot, then hide ends inside the neck before trimming.
— Assembly & Applique Placement :
Info :
Before sewing motifs, pin the surface swirl into place and tack with a few surface sl sts to hold it steady at major curve points. Arrange appliques so they overlap the swirl slightly and sit balanced across the runner: bottom bat near rows 6-12 centered horizontally, lower moon just above to the left, lower ghost centered under the first curve, middle bat centered at mid-panel, upper ghost above the second curve, upper moon near the top third, and top bat near rows 46-54 towards the top edge. Use the center column marking to center motifs horizontally.
Step 1 :
Pin each applique flat on the right side. Using tail left on the applique, sew around the edge with invisible whip stitch or small sl st if you prefer a decorative edge. Secure each applique with at least 6-8 anchoring stitches around the perimeter, and a few stitches across the center area where motif meets swirl to prevent shifting.
Info :
To make the appliques sturdier where they overlap the surface swirl, pass the yarn through the swirl stitches and applique base and knot inside to create a strong sandwich that will not shift. Extra stitching here creates a permanent, stable finish.
Step 2 :
Attach star motifs at evenly spaced positions between main motifs, tucking them slightly under tails of swirl or between scallop edges. Use orange yarn to make them pop against the cream background. Weave in all ends to the wrong side and trim flush.
— Finishing Touches :
Info :
Give the entire runner a final gentle blocking to flatten any minor waves, reshape scallops and center motifs. Use steam blocking if yarn allows, or a damp spray and pin flat. After drying, check all motifs and tassels for secure attachment and reinforce any loose stitches.
Final :
Trim stray fibers, weave in all remaining tails at least 3in into the fabric, and your Halloween table runner is complete — ready to display!
Info :
Keep the pattern sheet and layout photo handy as you assemble to keep motif spacing faithful to design. Small adjustments and creative license are encouraged; this structure is a template that yields similar visual results when followed carefully.
This Halloween table runner brings handcrafted charm to your seasonal decor with playful motifs and a flattering scalloped edge. The contrast of cream, black and orange makes each ghost, bat, moon and star pop, while the tassels add a cheerful finish. Follow the clear assembly steps and placement notes to achieve a polished, meaningful piece perfect for a festive table. Happy crocheting — enjoy showing off your spooky-chic centerpiece! 🎃🧶