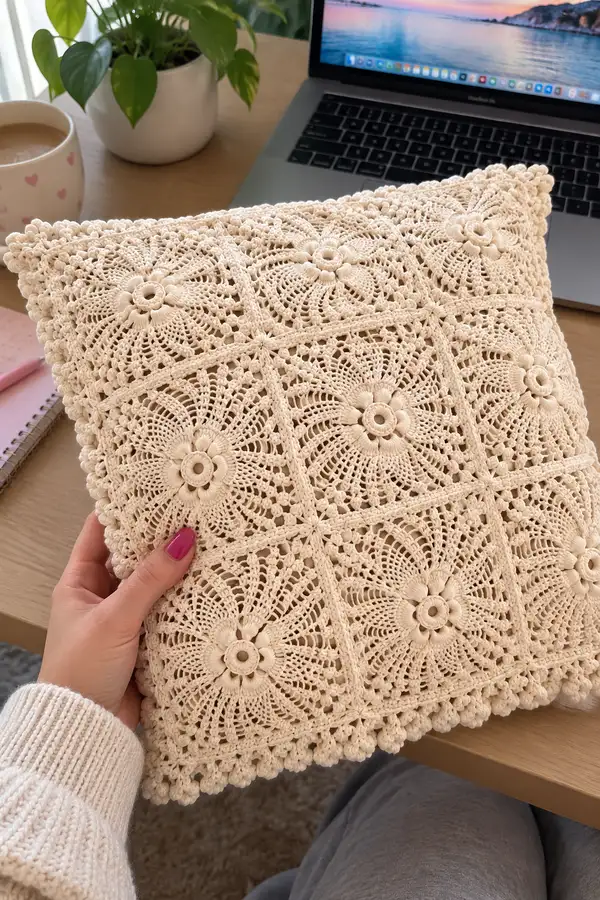
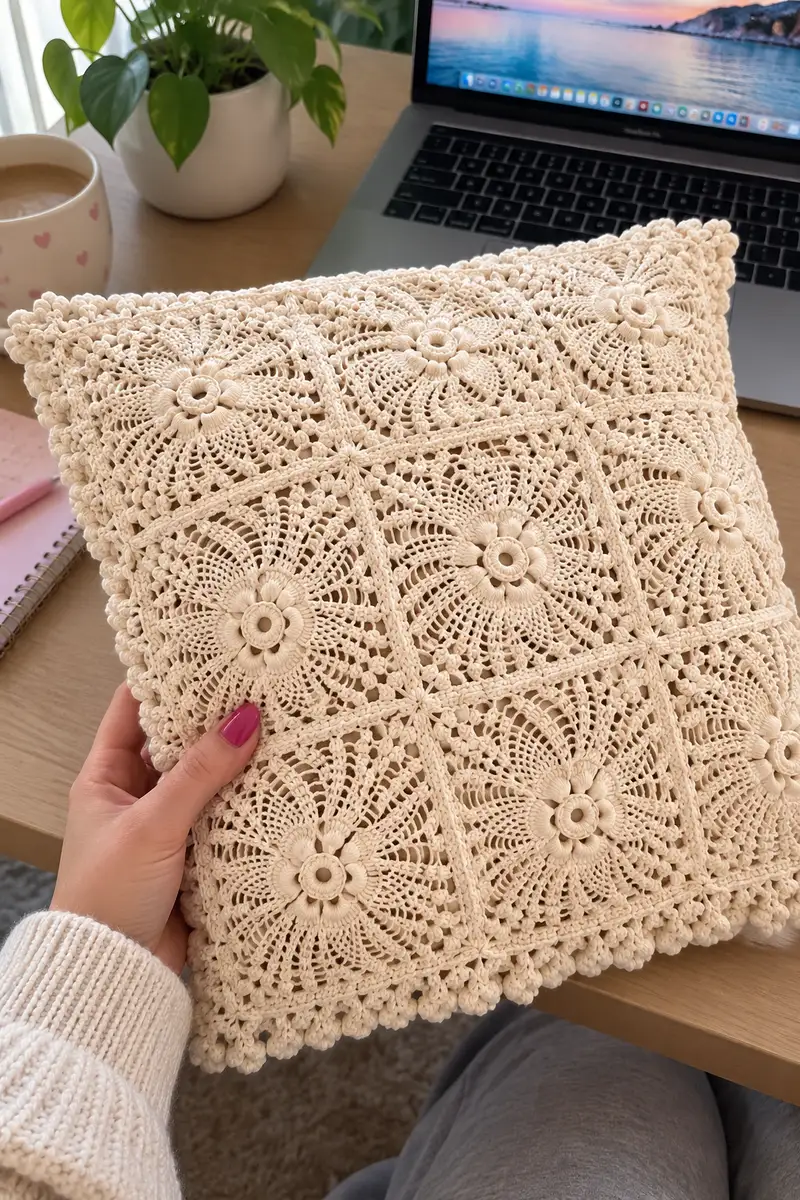
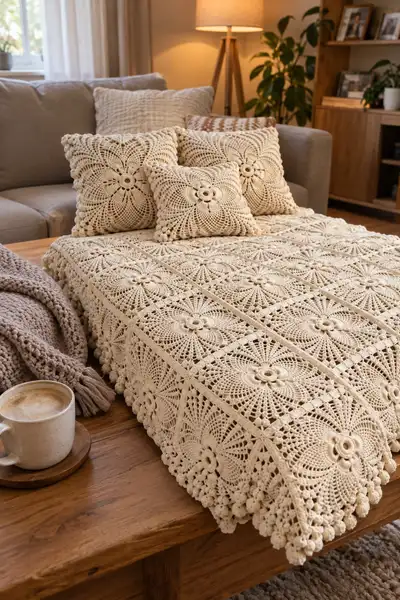
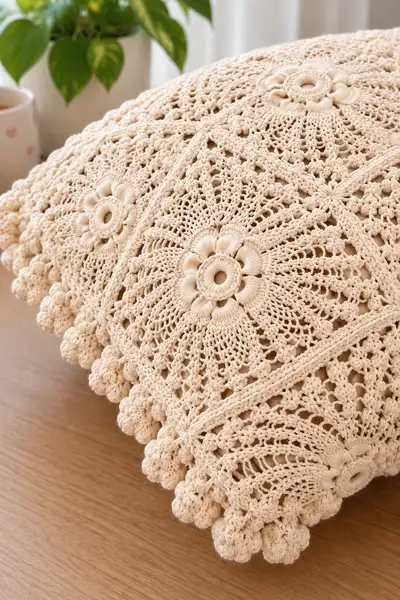
A beautifully detailed cream bedspread and matching cushion set worked from elegant floral square motifs joined together and finished with a textured bobble fringe. This pattern recreates the delicate petals, lace mesh and raised flower center seen in the photos, with step-by-step motif, joining and border instructions. Perfect for a cozy living room throw, bedspread or decorative cushions — all in a warm, vintage-inspired cream.
Progress Tracker
0% Complete
— Motif (Floral Square) :
Round 1 :
Work a magic ring, ch1, 8 sc into ring, pull tight (8)
Round 2 :
Inc in each st around (8 inc) (16)
Round 3 :
(1 sc, inc) x 8 (24)
Round 4 :
(2 sc, inc) x 8 (32)
Round 5 :
(3 sc, inc) x 8 (40)
Round 6 :
(4 sc, inc) x 8 (48)
Info :
At this stage you have the small circular base. Keep tension even. Place a removable marker at the start of each round to keep track as you switch to taller stitches next
Round 7 :
1 sc in each st around (48)
Round 8 :
Change to dc rounds to start forming petals: ch3 (counts as dc), *skip 5 sts, 7 dc in next st (petal base), skip 5 sts, 1 sc in next st* rep 8 times completing the round (This establishes petal spacing) (48 + clusters)
Info :
When making the 7-dc petal base, work dc clusters neatly into the designated single stitch from Round 7. These clusters will be worked over in following rounds to shape the petal.
Round 9 :
Working around petals: *Into the center of the 7-dc cluster: (ch2, 2 tr, dtr, 2 tr, ch2) to create a raised petal arch. Then sc into the single sc between clusters; rep around* (8 petal arches formed)
Round 10 :
1 sc in each stitch and chain space around to even out the round and secure petals (maintain approx 64 points around depending on spacing)
Info :
Use this round to tidy petal edges and flatten any tall stitches into the next. Count and aim for a stable edge — your final count must be a multiple of 8 for later mesh sections
Round 11 :
Mesh base: *ch5, skip 3, sc in next 3 stitches (or sc in next st), ch5, sc in top of next petal arch* rep 8 times to form 8 lace panels. Maintain the same number of chain spaces around (counts will vary slightly by tension)
Round 12 :
1 sc in each sc and 5 sc in each ch5 space to begin building the lace shell (this is a shaping round — total approx 64-80 depending on exact distribution)
Info :
Work evenly and count each section: if a section requires adjustment, add or remove a sc in the area nearest the petal to keep petals aligned. This motif must remain symmetrical for a neat join later
Round 13 :
BLO round for definition: 1 sc in each st BLO around to create a defined ridge at the petal base (same stitch count as previous round)
Round 14 :
*In each panel between petals: (ch3, 4 dc, ch3) anchored by sc at both ends* rep 8 times to form tall fan-lace sections (evening stitch counts about 8 fans)
Round 15 :
Secure fans: sc in each stitch and sc3 in each ch3 apex to broaden the fan (this will increase stitch count moderately — expected range 96-112 depending on fan spacing)
Info :
Check motif diameter now — a finished square block should measure approximately 15-18 cm (6-7 in) depending on yarn/hook. Adjust by working one additional even round if necessary to reach desired size.
Round 16 :
Begin squaring: working in the established spaces, *(3 sc, ch3, 3 sc) in corner point (every 2 panels) to approximate corners; sc evenly along sides* repeat to create soft square outline. Aim for four corner chain spaces spaced evenly (counts approx 112)
Round 17 :
1 sc around and in corner ch3 spaces work (3 sc, ch3, 3 sc) to define square corners (stitch count maintained)
Round 18 :
Lace infill: *Between corner shells work: ch4, skip 2, sc in next st, ch4* across each side to create open mesh strips; sc in corner spaces to maintain squareness
Round 19 :
Reinforce mesh: sc in each sc and 4 sc in each ch4 space to create small picot-like clusters across the square (increases distributed evenly)
Info :
This series of mesh rounds produces the delicate netting that frames each petal cluster. Keep tension slightly looser in chain spaces to preserve lacy look without sagging.
Round 20 :
Decorative puff round: Into each of the eight petal apexes make a 5-loop puff (yarn over insert pull up loop 5 times, yarn over and pull through all 5 loops, ch1 to close) then sc between puff groups around (expected count ~128 including puffs)
Round 21 :
1 sc around working around puff bases and mesh spaces to even round (stitch count steady after this stabilization)
Round 22 :
Raised flower center base: In the center of the motif, work across previous center area: *work 12 hdc evenly distributed around the center hole building a small raised disc* slip stitch to join (12)
Round 23 :
Edging the center: *In each of the 12 hdc work (ch1, 3 dc) around to create petaloid ring; sl st to join* (visual decorative center ready)
Round 24 :
Finish motif top: sc around outermost edge to tidy; place marker at midpoints of each side for later joining (final motif size should be square and measure approx 16-18 cm)
Info :
Fasten off leaving a 40-50 cm tail for joining if you plan to join motifs by whip stitch or mattress stitch. Block motif flat and pin to exact square measurements. Repeat motif for desired quantity.
— Motif Variation: Dense Petal Front (for alternate squares) :
Round 1 :
mr, ch1, 8 sc into mr, pull tight (8)
Round 2 :
Inc in each st around (16)
Round 3 :
(1 sc, inc) x8 (24)
Round 4 :
(2 sc, inc) x8 (32)
Round 5 :
1 sc around to stabilize (32)
Round 6 :
*Work 9 dc cluster (dc9) into 8 evenly spaced stitches to form denser petals, anchoring with sc between clusters* (clusters create 8 petals)
Round 7 :
Round of sc in each stitch and sc5 in each chain space created by petals to broaden panel (approx 64-72)
Round 8 :
Work 1 sc in each st BLO around to define base of petals (count maintained)
Round 9 :
Decorative loop round: *ch6, sl st into base between clusters* rep 8 times to create looped lacy arches
Round 10 :
In each ch6: sc5, ch2, sc5 to form a lacy fan; sc between fans to maintain shape (approx count ~120)
Info :
This variation creates a more raised petal and denser center; use it interspersed with the main motif for visual texture across the bedspread.
— Joining Panels (Seam and Joining Row) :
Info :
Make all motifs and block them flat to exact size. Join motifs while they are still pinned. Use the long tails left at motif edge for a flat whip stitch or use slip-stitch join for a textured ridge. For the sample blanket, motifs are arranged in a rectangular grid and double-joined for strength.
Round 1 :
Lay two motifs right sides up, align edges and using tail, whip stitch through outermost sc of each motif every 3-4 stitches to create an invisible seam. For a stronger join, come up through both motifs and sl st through both loops, working across the adjoining edge.
Round 2 :
Join third motif to first two using the same technique, working along rows until you have a strip of motifs the width you want (pin motifs carefully, 1 seam per side for each join)
Round 3 :
After strips are assembled, join strips together by matching corner points and seaming motif to motif in a continuous pattern; use mattress stitch technique across the seam for flat result
Info :
When joining at corners, ensure flower centers line up visually — place extra mattress stitches at midpoints every 4-6 stitches to maintain flat alignment. If using slip-stitch join, do so on the reverse side so front looks uninterrupted.
Round 4 :
Once all motifs are joined into your desired size, work one round of sc around the entire assembled piece to even the joins and tidy outer edges. Work 2 sc in each seam crossing to reinforce (count will depend on number of motifs and seam length)
Round 5 :
Work a second tidy round: 1 sc in each st around to stabilize the edge and prepare for lace border (stitch count steady)
Info :
Press the joined assembly lightly with steam (on cotton setting) through a damp cloth to help stitches settle, or re-block the large piece if possible. Keep the blanket pinned to correct shape until fully dry to maintain square corners.
— Border: Square Lace Border (Build-up rounds) :
Round 1 :
Attach yarn at center of one side; ch1, sc evenly along edge (including seams), placing 3 sc in each corner space to allow turn (stitch count depends on blanket perimeter)
Round 2 :
Work 1 sc in each sc around to create a firm anchoring round (counted perimeter stitches)
Round 3 :
Begin openwork: *ch5, skip 4, sc in next st* repeat along each side, placing ch5 loops into corner clusters so the border turns neatly (approx repeat count dependent)
Round 4 :
In each ch5 space work (sc4, ch3, sc4) to create larger arch shells; sc between shells to stabilize (this will enlarge perimeter noticeably)
Info :
At border corners, maintain symmetry by always working the same corner motif: (sc4, ch3, sc4) centered on the corner sc cluster. This preserves square shape.
Round 5 :
Work 1 sc around and in ch3 corners (stitches now forming a slightly ruffled edge to accept next rounds)
Round 6 :
*BLO fan round: in each shell work (1 sc, 1 hdc, 3 dc, 1 hdc, 1 sc) all into BLO to create a ridged fan; sc between fans* repeat around
Round 7 :
Secure fans: 1 sc around working through both loops, making sure the fans are evenly spaced (stitch count adjusted to fan sizes)
Round 8 :
Chain-lace row: *ch7, sl st into base to form looped arches* repeat to set up for bobble edging (loops should be uniform for bobble placement)
Info :
Measure border depth after Round 8 — you are building toward a multi-row bobble trim. If you prefer a smaller border, stop here and work only a single bobble row later.
Round 9 :
Work a strengthening row of sc in each loop and sc along the edge—this will be the foundation for bobbles. Place an extra sc at corner points to reinforce (count depends on loop number)
Round 10 :
1 sc in each st and begin bobble set-up: *ch3, skip 1 sc, sc in next sc* across to keep regular spacing for bobble clusters
Info :
If you want a more dramatic fringe like the sample, set the spacing between bobbles closer (ch1 or sc-skip every st). Test a short section to choose spacing before committing all around.
— Bobble Fringe (three-tier bobble cluster) :
Round 1 :
Working into each prepared bobble anchor (every 2-3 stitches depending on chosen spacing): make a 5-dc bobble cluster as follows: (yarn over, insert, pull up loop, repeat so 5 loops on hook), yarn over and pull through all loops, ch1 to close bobble; anchor with sc in next st. Work around creating bobbles approx every 2-3 stitches depending on spacing
Round 2 :
After first bobble row is complete, work a sc round in between bobbles securing each bobble base with 2 sc for extra bulk. This narrows gaps and helps bobbles sit neatly.
Round 3 :
Make second-tier bobbles: into the sc between two bobbles from Round 1 make a 4-loop bobble (similar to above but 4 loops). These secondary bobbles are nested between primary bobbles to form the dense layered trim shown (work around)
Round 4 :
Secure second-tier bobbles with sc around and add single sc between second-tier sets to even out spacing
Round 5 :
Third-tier mini bobbles: into leftover small chain spaces work 3-loop mini-bobbles finishing with sc anchoring. Now sc around and tidy ends. Fasten off and weave in ends neatly along the border to hide tails.
Info :
This multi-tiered bobble trim is what gives the Hermoso spread its signature edge. Keep bobble sizes consistent by using the same hook and tension when making each bobble. If bobbles pull the border inward, reduce bobble frequency slightly.
— Pillow Cover (Front) :
Round 1 :
Make 9 motifs arranged 3x3 for a standard 16-18 in cushion: use the motif pattern above and block each square carefully (or make motif size to suit your insert)
Round 2 :
Join motifs using the same joining method as bedspread; after joining work 1 sc around the entire pillow front to neaten edges
Round 3 :
Work a small bobble edging around pillow front: make a single row of 4-loop bobbles every 3-4 stitches and sc between to mimic bedspread edge but smaller scale
Info :
For the cushion pictured the maker used an internal insert and seamed the crocheted front to a plain crocheted back using mattress stitch. This produces a polished look without an exposed zipper.
— Pillow Cover (Back and Closure) :
Round 1 :
Back panel option A (simple panel): Work foundation chains to same width as front and work rows of sc or hdc to match thickness and finish with a sc border
Round 2 :
Back panel option B (envelope closure): Work two rectangles slightly smaller than front and attach to front edges leaving top open as envelope; sc along join and conceal edges
Round 3 :
Sew front to back using invisible ladder stitch or mattress stitch, leaving edges flush. Insert pillow and close any remaining opening with hidden stitches
Info :
Using an insert that is slightly larger than the crocheted cover will give the cushion a plumped, finished look as in the photos.
— Finishing and Weaving Ends :
Round 1 :
Weave in all long tails using a tapestry needle, working at least 6 cm/2-3 in into the fabric in a zig-zag to secure
Round 2 :
Block entire bedspread again after seaming if possible. If it is too large, block in panels or spray-steam flat and let dry under weights
Round 3 :
Trim any stray fibers and reinforce high-stress seams with an additional hidden stitch if necessary
Info :
Store the spread folded in a breathable bag so the bobble trim keeps its shape. A light starch spray can help keep lace crisp if desired.
Completing the Hermoso cream bedspread is deeply satisfying — each lace motif and bobble edge builds into a beautifully textured heirloom. The tactile raised centers and airy petals bring vintage charm while the dense trim adds modern depth. Whether you make a throw, full bedspread, or matching cushions, every stitch brings warmth and personality to your home. Happy crocheting — savor every square! 🧶✨