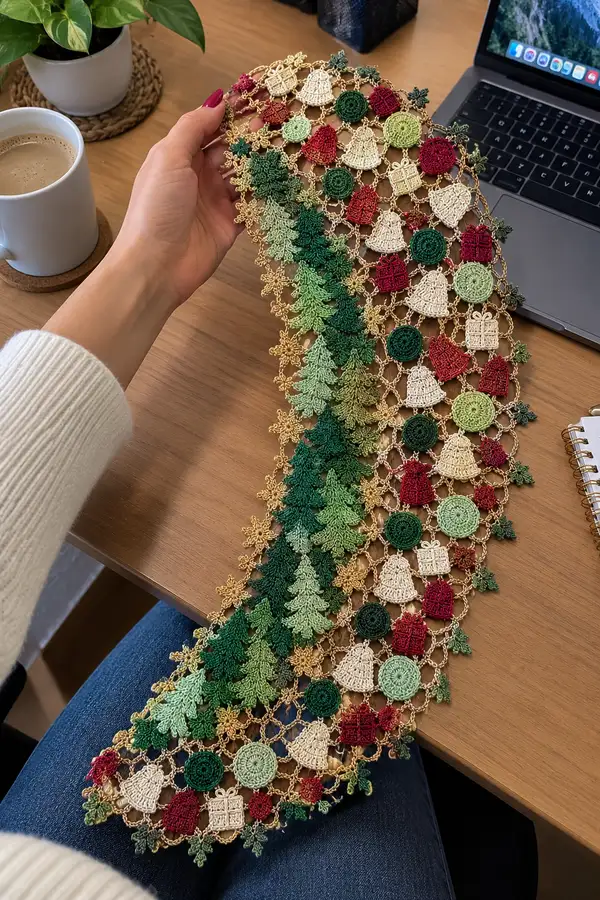
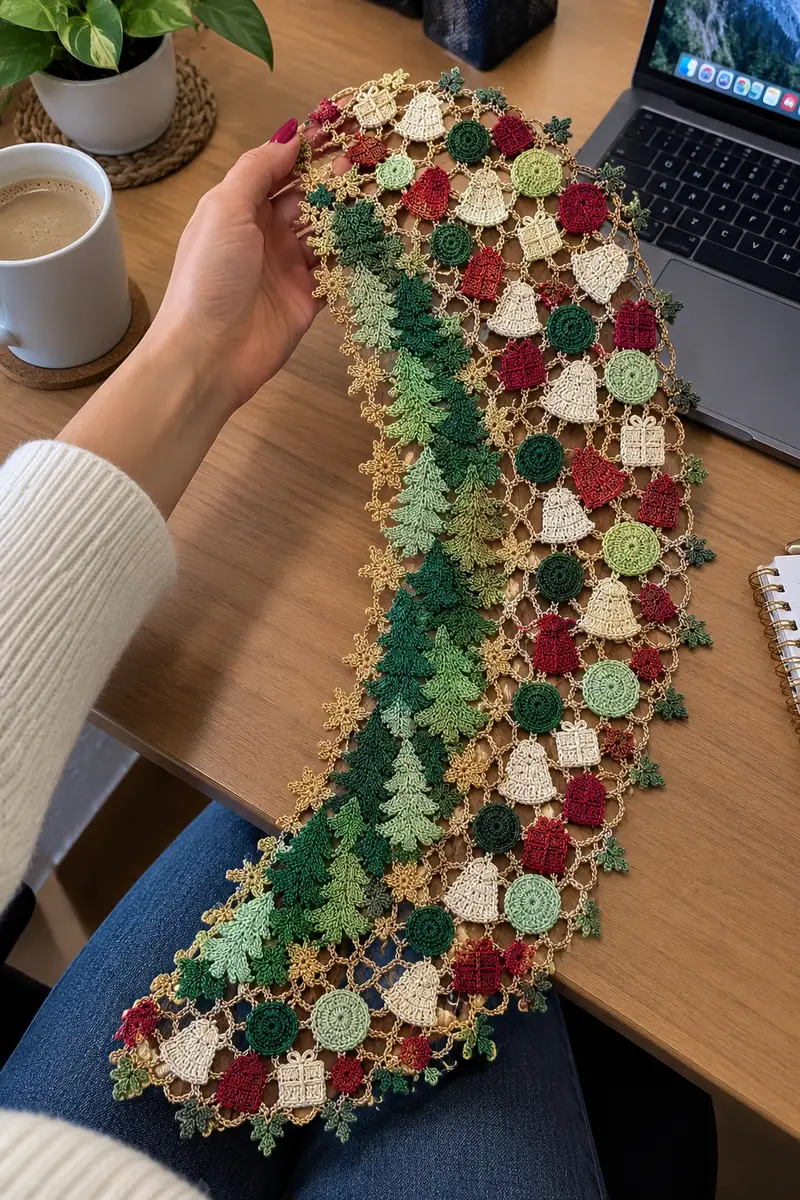
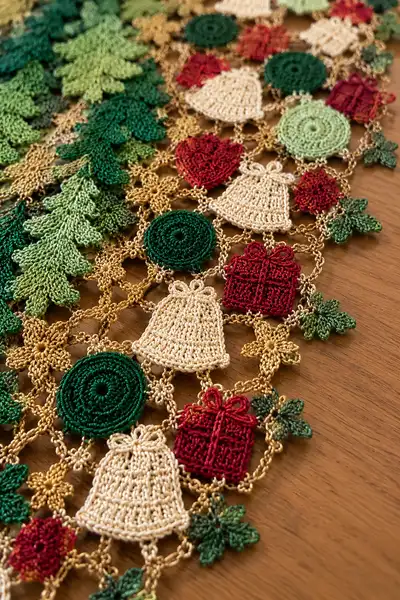
A delicate, lacy Christmas table runner made from joined motifs: tiny evergreen trees, bells, round ornaments, and gift boxes crocheted in fine thread and joined with a golden mesh. The finished runner has a column of graduated green trees down one side with rows of red, cream and green ornaments linked by a shimmering gold chain mesh. Perfect for holiday decor or as a centerpiece accent.
Progress Tracker
0% Complete
— Notes & Overview :
Info :
This runner is made of repeated small motifs joined into a mesh. Work each motif in fine thread (size 10 cotton) with a small steel hook; block motifs lightly before joining. The directions below give round-by-round instructions for each motif type and for the connecting mesh. Gauge is not critical but keeping tight stitches produces crisp motifs and a stable mesh.
Info :
Colors used in the sample: Metallic gold for mesh, deep forest green, medium leaf green, light moss green for graduated trees, cream for bells, deep red for presents and hearts, emerald green for round ornaments. You can substitute any fine thread colors to suit your decor.
— Foundation Mesh (make as many rows as needed for runner length) :
Round 1 :
With metallic gold thread,ch56 (this counts as the base chain for a 14-motif wide runner;adjust multiple of 4+8 for different widths)
Round 2 :
1 sc in 2nd ch from hook and in next 3 ch, *ch6,skip 4 ch,1 sc in next 4 ch;rep from * across to last 4 ch,1 sc in last 4 ch (creates repeating chain arches) (counts vary by width)
Round 3 :
Turn,sl st into first sc to anchor, *ch6,sc into center of next arch (3rd ch of ch6),rep across to end;end with sc into last sc. This row builds the open diamond-spaces that receive motifs
Round 4-6 :
1 sc in each sc and sc into each arch center to reinforce the mesh. At the end of row 6 the base mesh should feel even and ready for motif placement
Info :
Blocking tip: lightly mist the mesh and stretch onto blocking board so diamonds are even. Pins at each intersection help register locations for motif joining. Work a sample strip 10 cm long to test spacing before committing to full runner.
Round 7 :
Edging chainwork:ch3 (counts as sc+ch2),skip to next arch,sc in next arch center, *ch2,sc in next arch center;rep across to create small decorative chain between arches (this will later host tiny star connectors)
Info :
When joining motifs to this mesh use the arch centers created in rounds 2-3 as the primary join points. Every motif will be attached at 3 or 4 small chain loops depending on its shape (bell, circle or square).
— Small Star Connector (make many) :
Round 1 :
With metallic gold,mr, ch1, 6 sc into ring (6)
Round 2 :
(ch5,sl st into next sc) x 6 to make six tiny picot arms. Fasten off and leave tail for attaching (these little stars sit at intersections of mesh)
Info :
These star connectors form the delicate points visible between motifs. Join them to the mesh and adjacent motif edges using your tapestry needle and a few tacking stitches or by slip-stitching into adjacent chains when joining motifs as you go.
— Round Ornament Motif (make many) :
Round 1 :
With chosen ornament color,dial a mr, ch1,6 sc in mr (6)
Round 3 :
(1 sc,1 inc) x 6 (18)
Round 4 :
(2 sc,1 inc) x 6 (24)
Round 5 :
(3 sc,1 inc) x 6 (30)
Round 6-7 :
1 sc in each st (30)
Info :
For a raised spiral look work rounds 6-7 in BLO to give a rim. Keep tension tight to avoid gaps between rounds. If you want a sewn hanging loop, leave a 10 cm tail after round 7 to make a small thread loop for attachment.
Round 8 :
Dec round:(3 sc,1 dec) x 6 (24)
Round 9 :
1 sc in each st (24)
Round 10 :
Fasten off leaving tail for join. Optional: embroider concentric decorative rings with metallic thread using running stitch through rounds to mimic ornament patterns
Info :
Attach round ornaments to mesh by slip-stitching through 3 evenly-spaced chain-arch points, or join-as-you-go during final mesh row. Keep the ornament slightly domed by gentle blocking.
— Bell Motif (make many) :
Round 1 :
With cream thread,mr,ch1,6 sc into mr (6)
Round 3 :
(1 sc,1 inc) x 6 (18)
Round 4 :
(2 sc,1 inc) x 6 (24)
Round 5 :
1 sc in each st (24)
Round 6 :
ch1,turn,sc in next 24 sts working in rows now to shape bell skirt:Row 1:sc across (24)
Round 7 :
Row 2:ch1,turn*(3 sc,dec)* x6 (18)
Round 8 :
Row 3:ch1,turn*(2 sc,dec)* x6 (12)
Round 9 :
Turn,*(1 sc,dec)* x6 (6)
Round 10 :
Work a final round of sc around the outer curved edge:attach to first edge stitch then sc evenly across both sides of bell opening to make a neat tidy rim;approx 30 sc around rim. Fasten off leaving tail for joining. Do not stuff; bells are flat ornaments.
Info :
The bell's skirt is worked by flattening the circle and working short rows to form the flared bell shape. Gently block so the bell flares attractively. Add a tiny picot at the top center to indicate the hanging loop.
— Gift Box Motif (make many) :
Round 1 :
With deep red thread,mr,ch1,6 sc in mr (6)
Round 3 :
(1 sc,1 inc) x 6 (18)
Round 4 :
(2 sc,1 inc) x 6 (24)
Round 5 :
Change to box shape:fold circle flat and work across both thicknesses to create a square-like front. Ch1, turn,sc across 12 stitches on fold edge,sl st to join creating a small rectangle front (approx 12 sts wide)
Round 6 :
Round of sc around rectangle front:sc evenly around the four edges (approx 34 sc). This outlines the box face and forms a flat square ornament
Round 7 :
Bow decoration:with same color or contrast,ch6,sc in 2nd ch from hook and across to form a tiny bow strip;fasten off and stitch to top center of box. Add a vertical line of surface slip-stitch down the center to simulate ribbon.
Info :
These little boxes are intentionally flat and square; press gently and sew to mesh at three corner points to keep alignment. You can add a tiny yarn bow or a knot of metallic thread for shine.
— Tiny Heart / Star Accent (make many) :
Round 1 :
With red thread, ch4, sl st to form ring, ch1,6 sc in ring (6)
Round 2 :
*(sc,hdc,dc,hdc,sc) in same st to form a heart lobe;sl st to base to finish heart shape. Fasten off leaving tail to sew
Info :
These tiny hearts and little five-point grapes fill in lattice gaps. They are worked very small and sewn into place at intersections. For star accents use a mr, 5 ch-arms of 5 ch each and join to center with sl st to make a flat star.
— Small Leaf Motif (make many) :
Round 1 :
With light green thread,ch6,sc in 2nd ch from hook,hdc,next ch,dc next ch,tr next ch,sl st back along same side to create a pointed leaf;fasten off (leaf measures approx 1 cm)
Info :
Leaves are worked as little elongated motifs with a slip-stitch spine. Use them to fill edge gaps and under-tree accents. Work leaves in several shades for a variegated column effect.
— Evergreen Tree Motif (column of trees,make many in three shades) :
Round 1 :
With deep green thread,mr,ch1,6 sc in mr (6)
Round 3 :
(1 sc,1 inc) x 6 (18)
Round 4 :
(2 sc,1 inc) x 6 (24)
Info :
We will convert this small circle into a layered tree by working shell-shaped triangular segments from the circle edge. The circle forms the tree spine and anchor point for layered branches.
Round 5 :
Change to forming first branch tier:ch1, *skip 1 st, (sc, ch3, 3dc, ch3, sc) in next st, skip 1 st;rep around to form small shell points (approx 6 shells)
Round 6 :
Work into ch3 space of shells:sl st into ch3, ch1, *(sc,hdc,dc,hdc,sc) in same ch-space to lengthen shell;sl st to next ch3;rep around to make the tier fuller
Round 7 :
Second tier:attach next color (medium green) at base of first tier via sl st, ch1,*(skip 2 sts, (sc,ch4,4dc,ch4,sc) in next st) x6 (larger shells)
Round 8 :
Work into ch4 spaces:sl st,ch1,*(sc,hdc,dc,tr,dc,hdc,sc) in same space;rep around (6 larger layered branches)
Info :
Each tier is worked outward from the central circle to create layered triangular branch shapes. Block each tier flat to keep triangular form. Alternate shades (dark, medium, light) to create gradual color change down the column.
Round 9 :
Third tier:attach light green at base of second tier,work *(skip 2 sts,(sc,ch5,5dc,ch5,sc) in next st)x6 to form widest tier
Round 10 :
Work into ch5 spaces:sl st,ch1,*(sc,hdc,dc,tr,dtr,dc,hdc,sc) in same ch-space;rep around—final shaping for tree silhouette
Round 11 :
Optional trunk:turn motif vertical,with dark brown or deep green ch6,sc back along chain to form a small trunk of approx 6 sc;fasten off
Info :
Make trees in three sizes by adjusting number of shell tiers (2 tiers for small, 3 for medium, 4 tiers for tall). Trees in the runner are stacked in a column with sizes alternating to give a graduated forest look. Do not stuff; trees are flat motifs.
— Assembling Motifs Into Strips (join-as-you-go approach) :
Round 1 :
Arrange motifs on workspace matching pattern repeat: column of trees along one edge, then alternating bells, circles and boxes filling grid cells to the right of trees. For each motif placement, identify 3 or 4 arch centers on the gold mesh where you will join.
Round 2 :
Join-as-you-go method:work final round of a motif in gold thread at points where it meets the mesh—sl st into an adjacent mesh chain-space, ch2,sl st back into motif to lock connection. Repeat at each join point to attach motif firmly without sewing.
Round 3 :
When motifs touch each other (e.g., bell next to circle), join them together by slip-stitching through both motif edge stitches simultaneously at the point of contact. This reduces need for later sewing and gives cleaner joins.
Info :
Spacing: aim to attach each motif at three evenly spaced chain-arch points in a triangular arrangement for stability. For square motifs like gift boxes use four join points at corners. Use your blocked mesh as a template to ensure uniform spacing across the runner.
Round 4 :
Attach star connectors at every mesh intersection between four motifs using a few tiny whip-stitches or slip-stitches in gold;these stars visually tie motifs together and help keep mesh geometry stable
Round 5 :
Edge motifs:work small leaves and heart accents into edge arches:attach a leaf under each tree tip and a tiny heart between presents for decorative variety
Info :
Work row by row:complete and join motifs in each horizontal line before moving to the next row. This modular approach prevents large sections from flopping and makes checking alignment easier.
— Border and Final Scallop (work after all motifs joined) :
Round 1 :
With metallic gold,work one round of sc evenly around the entire runner edge,catching the outermost chain loops and the motif edges to create a neat unified rim (estimate 1 sc per 3 mm of edge;use approx 150-200 sc depending on runner length)
Round 2 :
Scallop round:*(ch3,5 dc in next st,ch3,sl st in next st) repeat around to create shell scallops at frequent intervals. Adjust spacing so scallops land centered over tree tips and bell edges
Round 3 :
Final picots and leaf-edge:in the spaces between scallops work little picot chains (ch5,picot,sl st) and sew small leaves into alternating spaces to mirror interior leaf clusters
Info :
Blocking: after finishing edging, thoroughly block the entire runner. Pin each scallop into a soft foam board so the edge shapes set. Use steam or spray mist lightly to fix shape. Allow to dry completely before removing pins.
Round 4 :
Secure all joins:with a yarn needle, reinforce any join points that feel loose by stitching through adjacent stitches on motif and mesh using matching gold thread. Fasten off and weave in ends deep into work.
— Optional Embellishments and Finishing Touches :
Round 1 :
Add metallic embroidery:use fine metallic thread to couch tiny horizontal lines across gift boxes and a halo stitch around ornaments for sparkle
Round 2 :
Attach tiny beads or sequins at bell centers or on ornament faces by sewing through motifs carefully with matching thread;avoid heavy beads that pull the lace out of shape
Info :
Storage note:store flat or gently rolled with tissue to avoid creasing or crushing scallops. If you make multiple runners, stack with acid-free tissue between layers to preserve thread colors and sheen.
Completing this runner feels like bringing a little holiday forest to your table — each tiny tree and ornament stitched and joined into a shimmering gold lattice. The repetitive rhythm of making many small motifs is meditative, and the final blocking reveals the full delicate beauty. This heirloom-style piece is perfect for gifting or adding seasonal charm to your home. 🧶🎄✨