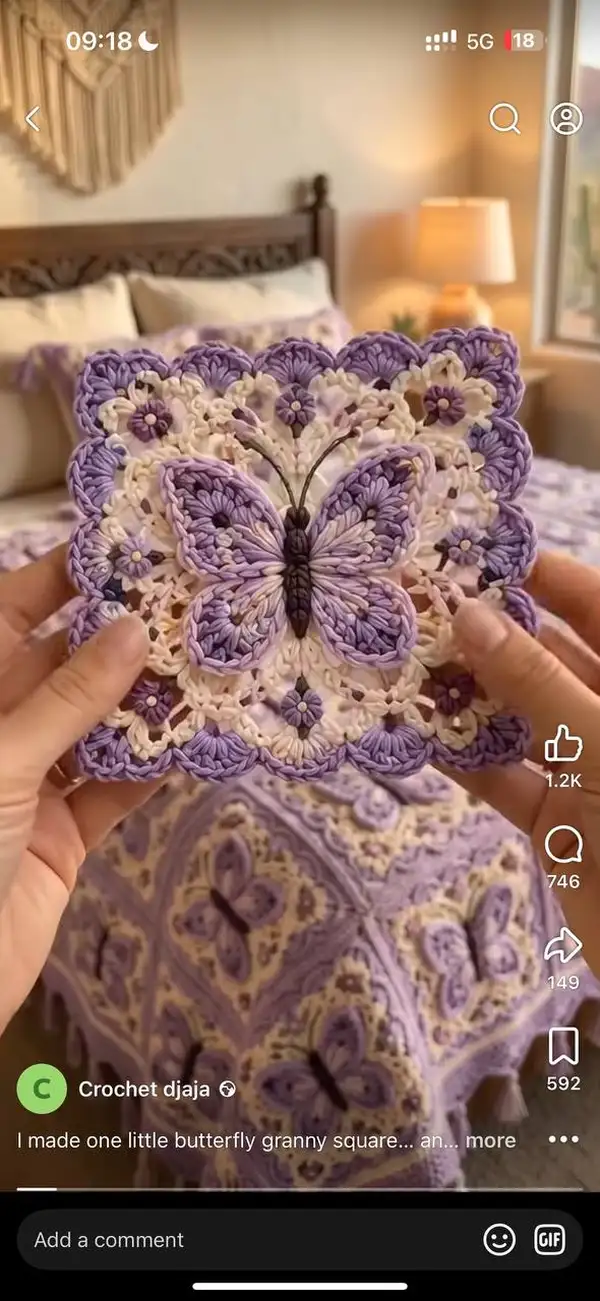
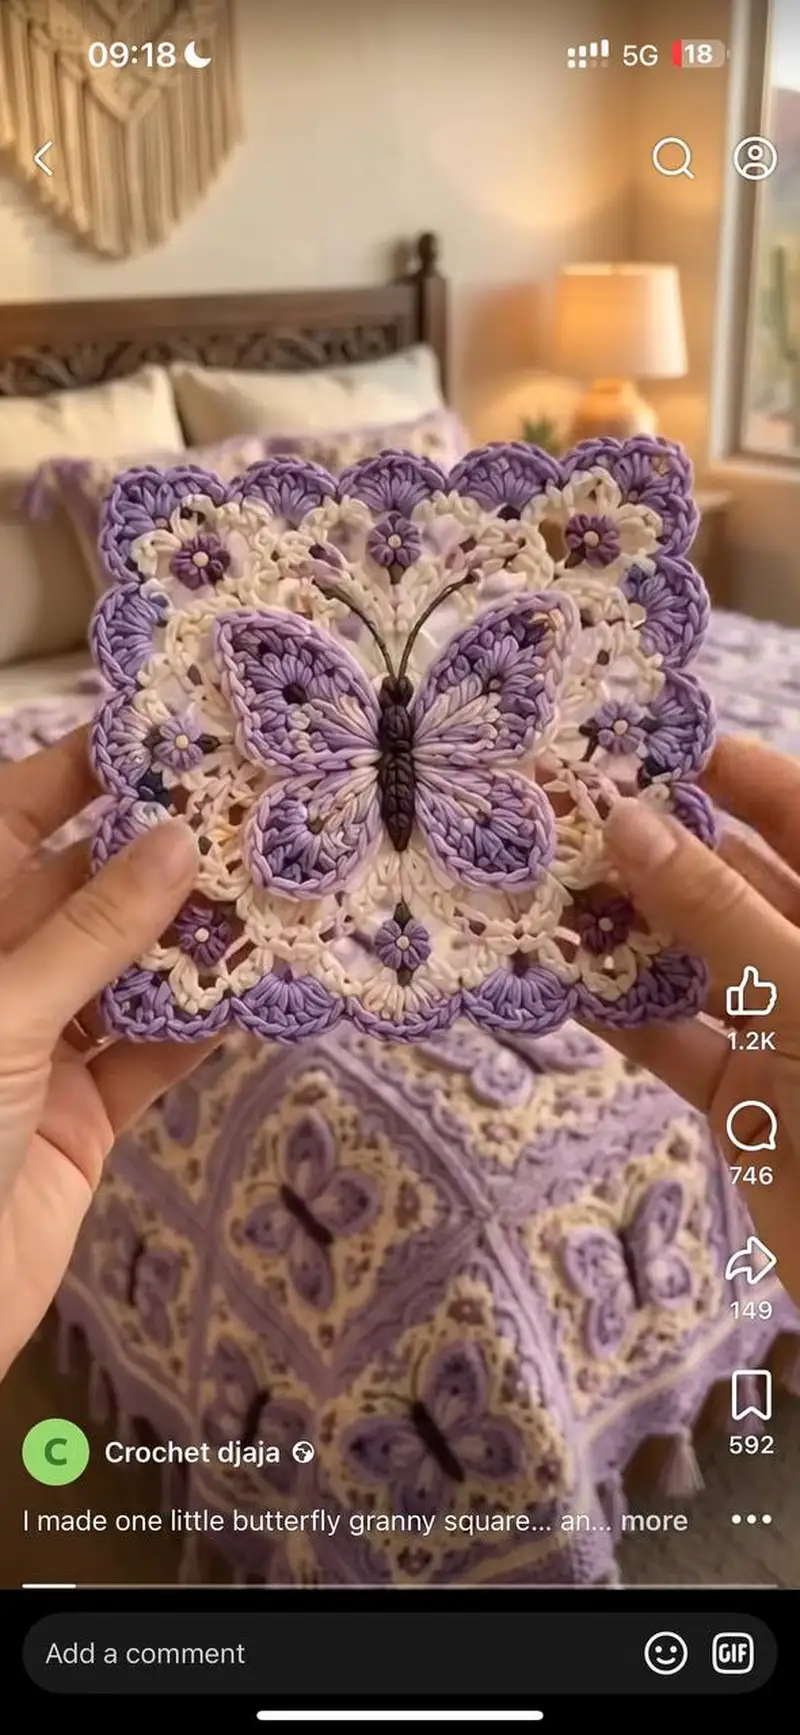
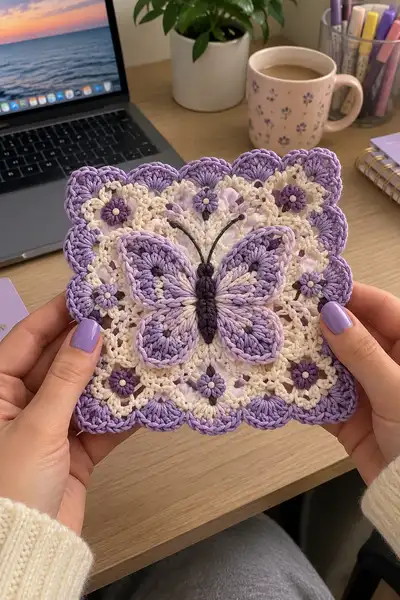
Create a delicate lavender-and-cream granny square featuring a raised 3D butterfly applique and scalloped border. This square combines textured puff clusters, small floral motifs and a layered butterfly to produce a romantic, vintage-inspired motif. Perfect as a single coaster, a set for a blanket, or joined into a thoughtful home decor project. The pattern shows step-by-step rounds for the motif, butterfly wings, body and finishing touches.
Progress Tracker
0% Complete
— Center Flower Medallion :
Round 1 :
Make a magic ring. Ch3 (counts as dc), work 11 dc into ring. Join with sl st to top of ch3 to close. (12)
Round 2 :
Ch3, dc in same st, *ch2, 2 dc in next st; rep from * around to create 6 petal-like clusters separated by ch2. Join with sl st to top of ch3. (6 clusters + 6 ch2 sps)
Info :
Keep your tension relaxed on this round: it forms the flower base. If you prefer a firmer center, use a slightly smaller hook for this round only.
Round 3 :
Sl st into first ch2 sp, ch3 (counts as dc), work 3 dc in same ch2 sp, *ch1, (3 dc in next ch2 sp); rep from * around. Join with sl st to top of ch3. (6 clusters of 3 dc, 6 ch1 sps)
Round 4 :
Change to pale lilac (Info: carry previous color behind or fasten off). Sl st into center of first 3-dc cluster, ch1, sc into same st, *ch3, sc into center of next 3-dc cluster; rep from * around to make 6 ch3 loops. Join with sl st. (6 sc, 6 ch3 sps)
Round 5 :
Into each ch3 loop: work (ch2, puff, ch1, puff, ch2). Puff = yarn over, insert hook, yarn over, pull up loop 3 times (4 tall loops), yarn over and pull through all loops, ch1 to secure. Repeat in every ch3 sp. Join with sl st to base. (6 puff-pairs creating petal clusters)
Info :
Puff stitch technique: keep the same number of loops for every puff (I use 4 wraps for a medium puff). After making each puff, tug gently to even height and keep a consistent stitch gauge.
Round 6 :
Change to cream. Working around puff petals, ch1, sc in top of base between petals, *ch4, sc between next two petals; rep from * around to create airy lacy spaces. Join with sl st. (6 sc + 6 ch4 sps)
Round 7 :
Into each ch4 space: (sc, ch3, sc) to form small picot arches; into each sc between petals: 1 sc. Join with sl st. This creates a small floral medallion foundation. (12 small arches)
Round 8 :
Change to light lavender. Work (ch3, 4 dc, ch3, sl st) around each small arch to form a slightly larger petal shell. Between shells work sl st into next base sc. Join. (6 larger shells)
Info :
After Round 8, place a stitch marker at the junction that will become the top edge of the butterfly center; this will help with later centering of the wings.
— Small Floral Motifs & Lace Connectors :
Round 1 :
From the outside of the center medallion, ch1, sc around the base to even out the circumference for joining. Work evenly until you reach a total of 36 sc around the medallion base. Join with sl st. (36)
Round 2 :
Ch3 (counts as dc), *sk 1 st, (dc, ch2, dc) in next st (creates small cluster arch), sk 1, dc in next; rep around. Join to top of ch3. This creates 12 ch2 arches. (36 dc total including ch3)
Round 3 :
Change to cream. Into each ch2 arch: (sc, ch4, sc) to make open lace loops. Between arches sc in the single dc from previous round. Join. (12 ch4 sps, 24 sc)
Info :
These lace loops will later host small daisy clusters and corner transition points. Keep each ch4 loop consistent in height for an even square shaping later.
Round 4 :
Working in FLO of the previous round (Info: working in FLO makes a subtle ridge), sc around with *ch2, sc in center of next ch4 loop; rep around so you have 12 ch2 sps interspersed with sc. Join. (24 sc, 12 ch2 sps)
Round 5 :
Change to medium lavender. Into each ch2 sp: make a small daisy cluster — (yarn over twice, insert in ch2 sp, yarn over, pull up loop 4 times, yarn over and pull through all loops) forming a tiny puff; ch1, sl st into same sp, then ch2 and sl st into the adjacent sc to secure. Repeat around to form 12 raised daisies. Join. (12 small puffs)
Info :
Sew small 2mm bead or a tiny contrasting center with cream yarn into each daisy center now if you prefer an embellished look. Secure beads before joining with more rounds.
Round 6 :
Ch1, sc around entire motif working (2 sc) at points where you want to stabilize the circle into a soft hexagon; aim for 48 sc total. Join with sl st. (48)
— First Square Shaping & Corner Preparation :
Round 1 :
Change to cream. Ch3, (2 dc) into same st, *skip 6 sts, in next st make (2 dc, ch2, 2 dc) to create a corner; repeat across creating four corner shells. Between corners work groups of 6 dc or dc clusters to make sides. Join to top of ch3. (Count: 4 corner shells (4*(4 dc + ch2)) + side clusters totalling approximate 68 dc)
Info :
This is the pivotal round that begins turning your circular medallion into a square. Mark each corner shell with a removable stitch marker so you can reference it in future rounds.
Round 2 :
Ch1, sc in each st and into ch2 spaces work (sc, ch3, sc) to enlarge corner arches. Work around with even sc on sides aiming for a count of 80 sc. Join. (80)
Round 3 :
Change to light lavender. In each side between corners: (ch3, shell of 5 dc in same sp, ch3) to create side scallops; in corners work (shell of 7 dc, ch4, 7 dc) to make pronounced corners. Join. (shell counts vary per side; rough outer count 110 dc equivalent)
Info :
If your square looks more round than square, increase corner chain spaces (ch4→ch5) to pull out the corners more aggressively. Conversely reduce corner chains if corners are pointy.
— Butterfly Body (Applique) :
Round 1 :
Using deep plum yarn. Ch6, sc in 2nd ch from hook and across (5 sc). Turn—this forms the butterfly body foundation. (5)
Round 2 :
Ch1, sc across in BLO for a defined ridge (5). Fold the strip in half lengthwise and sew a running stitch down the center to create a tuck; this forms a slightly rounded thorax. Do not fasten off. (5)
Round 3 :
Ch1, sc around the narrow tube evenly working 2 sc in end stitches to round the top and bottom caps. Work 3 rounds of sc around the tube to create a stout segmented look—approx 18 sc per round. Fasten off, leaving long tail for sewing to square. (approx 18 per round)
Info :
Optional: lightly stuff the body with a tiny bit of fiberfill for a plump appearance before final stitching. Keep stuffing minimal so the applique sits flat on the square.
— Butterfly Wings (Make 2 mirrored pairs: Upper Wings & Lower Wings) :
Upper Wing - Round 1 :
Using light lavender. Make a magic ring. Ch3 (counts as dc), work 11 dc into ring. Join with sl st. (12)
Upper Wing - Round 2 :
Ch3, dc in same st, *ch2, 2 dc in next st; rep around to make 6 clusters (6 ch2 sps). Join. (6 clusters)
Upper Wing - Round 3 :
Sl st into first ch2 sp, ch1, sc, ch3, (puff, ch1, puff) into same ch2 sp to start a raised petal, *skip to next ch2 sp and repeat (sc, ch3, puff-pair). Join. (6 puff-pairs)
Upper Wing - Round 4 :
Change to medium lavender. Working into puff loops, ch2, (3 dc, ch2, 3 dc) in each puff cluster to form a fan; between fans, sl st into the base sc. Join. (6 fans)
Upper Wing - Round 5 :
Ch1, sc around entire wing working 2 sc in each fan peak and 1 sc in valley; aim for 48 sc total. Join. (48)
Upper Wing - Round 6 :
Ch2 (counts as hdc), *hdc in next 7 sts, (hdc, ch3, hdc) in wing tip to shape curve; rep across. Join. (approx 56 hdc)
Upper Wing - Round 7 :
Change to light lavender. Work rippled picot edging: *(3 dc, picot, 3 dc) in tip arches, sc along inner edge to create a neat border. Join. (edge formed)
Info :
Make two identical upper wings then mirror one when attaching. Block wings flat over a rounded template to shape the curve before sewing.
Lower Wing - Round 1 :
Using light lavender. Make a magic ring, ch3, 9 dc into ring. Join. (10)
Lower Wing - Round 2 :
Ch3, (2 dc) same st, *ch2, 2 dc in next st; rep around to form 5 clusters separated by ch2. Join. (5 clusters)
Lower Wing - Round 3 :
Sl st into ch2 sp, ch1, sc, ch3, (puff, ch1, puff) into ch2 sp; repeat to make 5 puff-pair lobes. Join. (5 puff-pairs)
Lower Wing - Round 4 :
Change to medium lavender. Into each puff cluster work (2 dc, ch2, 2 dc) to form a robust lower fan. Join. (5 fans)
Lower Wing - Round 5 :
Ch1, sc around wing, working 2 sc in fan peaks for pronounced curvature. Aim for 36 sc. Join. (36)
Lower Wing - Round 6 :
Finish with hdc and small scallop: *(3 hdc, picot) across edge, sc along inner edge. Join. (edge complete)
Info :
For shading effect, on the last round slip-stitch with contrasting light lavender in select loops to mimic the layered two-tone seen in the sample. Pick 6-8 evenly spaced points along the wing.
Upper Wing - Rounds 8-20 (Refinement) :
Work 12 more shaping rounds across the upper wing to enlarge and sculpt the shape: alternate 2 rounds of even hdc (maintain counts 56-60), 1 round of (hdc, inc, hdc, inc) to lengthen tips, and 1 decorative round of surface slip-stitch shading. After Round 20 block and shape. (final upper wing counts approx 64-72 st circumference)
Lower Wing - Rounds 7-18 (Refinement) :
Work 12 more shaping rounds across lower wing: alternate sc and hdc rounds to firm the edge, add an increase row at the outer curve (inc every 8 sts) to create the rounded lower profile. Finish with a gentle scalloped edge round. (final lower wing counts approx 44-50)
Info :
These prolonged shaping rounds let you build the layered look of the butterfly wings. Use pins to hold each wing to a shaping board while damp-stretching to open petals slightly.
— Attaching Butterfly to Square :
Round 1 :
Position the deeply colored body along the center vertical axis of the square on top of the medallion. Pin body centered between the top and bottom corner markers. Sew body in place using long tail with mattress stitch through center of body and through the square base, ensuring it is firmly anchored. (Body attached)
Round 2 :
Arrange the upper wings above the middle of the body overlapping slightly; place lower wings below the upper wings. Pin each wing, checking symmetry. Sew wings along the inner edge onto the square and secure to the body tail as well. Use small ladder stitches spaced 3-4 mm apart. (Wings attached)
Info :
When sewing wings, try to catch only the inner edge loops on the wing and the decorative lace loops on the square to avoid showing stitches on the right side. Use matching yarn for invisible joins.
Round 3 :
With deep plum, embroider a segmented center on the butterfly body by working horizontal sl st bands across the body every 2-3 rows to mimic the compressed thorax/ridge effect. Knot and weave ends neatly at the back. (Embroidered ridges complete)
Round 4 :
Create antennae: using a 3.0mm hook and deep plum yarn, ch20, fold in half and single crochet back to create a cord, leaving a 5 cm tail for insertion. Insert antenna ends through the head of body, secure with a knot and a dab of glue if desired. Curve them gently. (2 antennae)
Info :
Optional: insert a short piece of florist wire inside the antenna cord before final stuffing/closing to make antennae poseable. Fold wire ends so they are not sharp before securing.
— Corner Motifs & Small Round Flowers :
Round 1 :
Between the major corners, there are four small floral motifs placed at center of each side. To make one small flower: using deep plum, make mr, ch2, 8 dc in ring. (8)
Round 2 :
Change to cream. Sl st into top of first dc, ch1, sc in same st, *ch3, sc in next dc; rep around to create 8 ch3 loops. Join. (8)
Round 3 :
Change to medium lavender. Into each ch3 loop work (puff, ch1, sl st) to form raised petals. Join. Fasten off leaving tail for sewing onto square in designated side centers. (8 small puffs)
Info :
Sew these small flowers into the ch4 lace spaces created earlier; place one flower centered along each side between corner shells so they sit within the lace framework.
— Outer Scallop Border (Rounds 1-12) :
Round 1 :
Change to light lavender. Sc evenly around square working (3 sc) in corner points to maintain shape; aim for 120 sc. Join. (120)
Round 2 :
Ch3, *sk 2, (5 dc in next st) to create shell, sk 2, sc in next; rep around to create scallop clusters. At corners work a larger shell of 7 dc. Join. (approx 24 shells)
Round 3 :
Ch1, sc in each st and work (sc, ch3, sc) into each shell center to make rounded loops. Join. (stabilizes shells)
Info :
If your scallops look uneven, block now: wet-block and pin each scallop to the same radius so the border looks symmetrical after finishing.
Round 4 :
Switch to medium lavender for a decorative band: work 1 sc in each st BLO for a neat ridge around the square. Join. (120)
Round 5 :
Ch2, (hdc, hdc, ch1) into each scallop valley, and (3 hdc) into each scallop peak; this gives a soft raised edge. Join. (approx 160 hdc)
Round 6 :
Change to light lavender. Work final scalloped picot round: *5 dc in shell peak, sl st into base, picot into top of shell (ch3 sl st into first ch), repeat for each shell. Join. (decorative edge complete)
Round 7 :
Finish by weaving in all ends from back; use tapestry needle to hide tails inside nearest shells and secure with a few whip stitches. Block square to final measurements—target approx 17-19 cm (6.5-7.5 in) square depending on yarn and tension. (Complete)
Info :
Final blocking: dampen lightly and pin to square template, allow to dry overnight. This opens lacy connectors and sets the scalloped edges for clean joins if making a blanket.
This lavender butterfly granny square is a joy to finish—every scallop, puff and embroidered ridge comes together into a tiny work of art. The raised butterfly adds personality while the soft lavender palette keeps it elegant and warm. Whether you make one as a keepsake or dozens for a blanket, each square invites slow, happy stitching. 🧶🦋 Enjoy the blocking, the joining, and the wonderful satisfaction of creating something beautiful by hand!