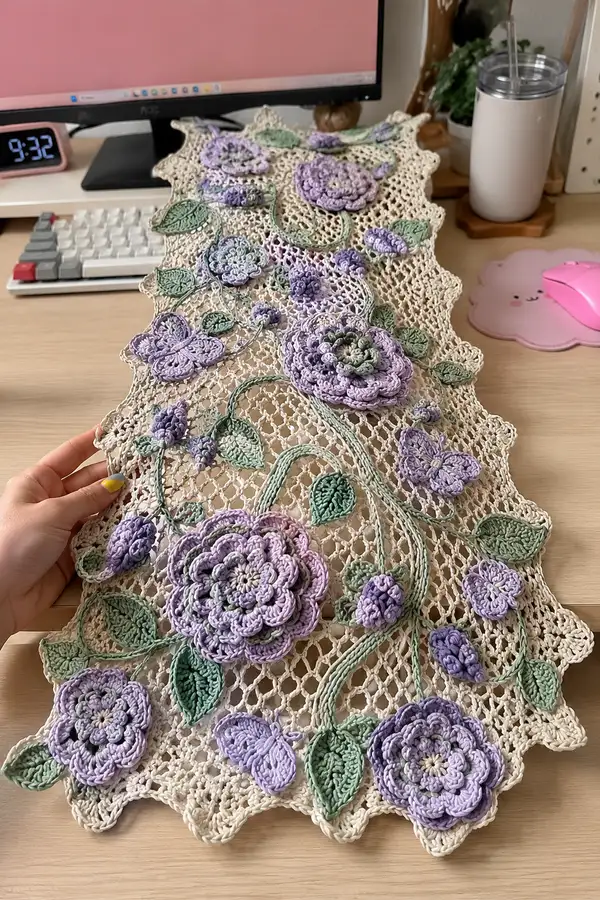
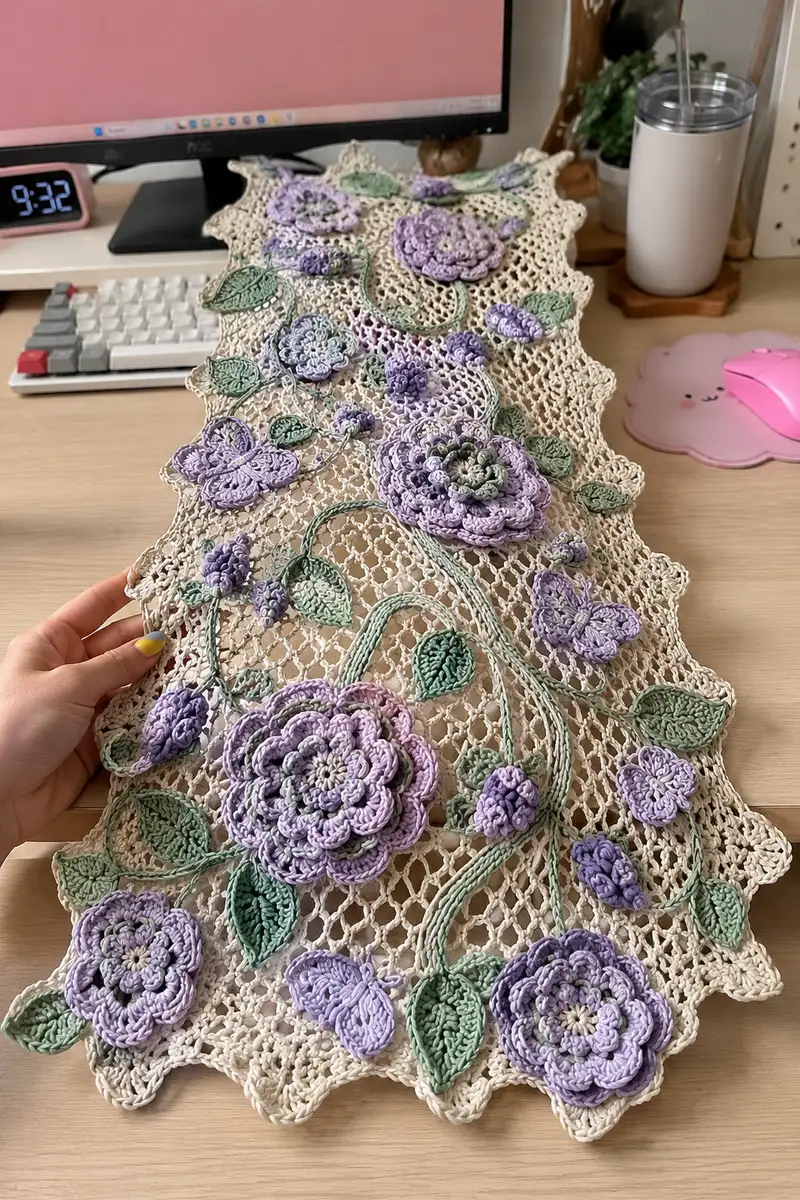
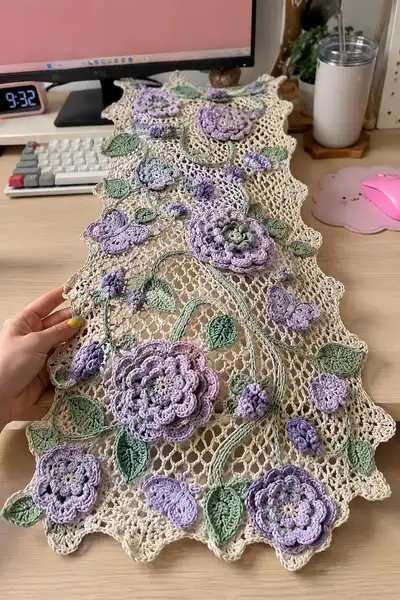
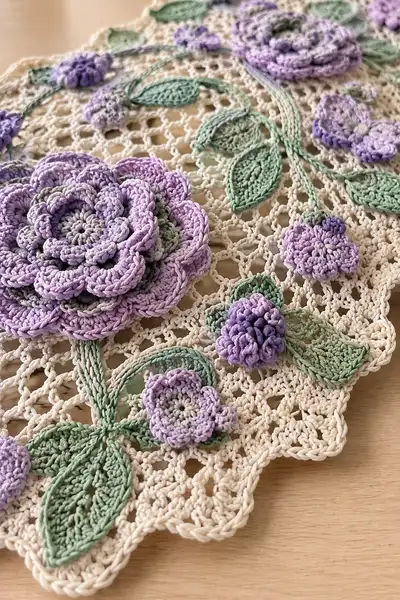
A delicate crochet lace table runner adorned with layered lavender flowers, leafy vines and tiny buds on a soft cream open-mesh ground. This pattern recreates the look of hand-appliqued 3D blossoms and embroidered corded vines for an elegant centerpiece. Finished piece features scalloped edges, raised layered rosettes in variegated lavender and soft sage leaves for a vintage, romantic feel. Ideal for special occasions, a desk accent, or a thoughtful handmade gift.
Progress Tracker
0% Complete
— Overview :
Info :
This pattern is presented as sections: Base Mesh, Scalloped Border, Large Layered Rosette (Make 3), Medium Flower Motif (Make 4), Small Five-Petal Flower (Make 6), Bud Cluster (Make 8), Leaf (Make 12), Corded Vine (Make 6), Assembly and Finishing. Work each motif separately then block and arrange. Use stitch markers to keep turn rows consistent. The runner pictured measures approximately 28-30" long by 10-12" wide depending on spacing and yarn tension.
— Base Mesh (work flat in rows) :
Round 1 :
Foundation ch 121 (multiple of 6 + 1 for edge symmetry). Turn. (121 ch)
Round 2 :
Row 1: Dc in 4th ch from hook (counts as dc), *ch2, sk 2 ch, dc in next ch; rep from * across until last 2 ch, dc in last ch. This creates 20 mesh repeats across the width. (60 dc, 20 ch-2 sps equivalent)
Round 3 :
Row 2: Ch3 (counts as dc), turn. Dc in same st as join, *ch2, dc in next dc (over the previous dc); rep across to last st, dc in top of turning ch. Maintain 20 open ch-2 spaces across. (60 dc, 20 ch-2 sps equivalent)
Info :
Keep stitches even and use a stitch marker at the start of each right-side row to track counts. The ch-2 spaces are where many applique stems and buds will be sewn through for secure attachment.
Round 4-7 :
Repeat Row 2 (4 rows total). Keep the mesh even. (Each row: 60 dc, 20 ch-2 sps)
Round 8 :
Row 8: Begin a slight shaping by working at each end: ch3, turn, dc in same st, ch1, sk next st, *dc, ch2, sk next dc; rep across until 2 sts remain, ch1, dc in last st. This pulls the edges in slightly to aid scallop placement later. (Approx 60 dc, with additional ch-1 edge spaces)
Round 9-14 :
Repeat Row 2 (six more rows) to build height for the runner base. Keep consistent tension. (Each row: 60 dc, 20 ch-2 sps)
Info :
Work base length until you have a panel approximately 28-30" long or your desired runner length. For the photographed runner a total of 30 rows (including shaping rows) results in the desired proportion. If you lengthen, keep the repeat multiple consistent (20 mesh repeats) to allow motifs to align.
Round 15-22 :
Continue even mesh rows (Row 2 pattern) for an additional 8 rows. Width remains the same. (Each row: 60 dc, 20 ch-2 sps)
Round 23-28 :
Work 6 more mesh rows maintaining ch-2 open spaces. At row 26, block the panel lightly to check for square corners and even tension. (Each row: 60 dc, 20 ch-2 sps)
Round 29 :
Final mesh row: ch3, dc across maintaining ch-2 spaces; fasten off leaving long tail for joining border. (60 dc, 20 ch-2 sps)
Info :
Weave in the main yarn tail but do not fasten completely: leave enough tail to attach scalloped border seamlessly. Block the mesh flat using pins to open the ch-2 spaces if needed. Blocking is crucial for an even applique base.
— Scalloped Shell Border (work around entire rectangle) :
Round 1 :
With right side facing, join cream yarn to a corner stitch with a sl st and ch1. Work 3 sc evenly along the short edge to build corner density (3 sc).
Round 2 :
*Skip 3 mesh loops, work 5 dc in next ch-2 opening (shell made across a mesh opening), sk 3 loops, sc in next dc; rep from * across edge until you reach next corner. At corner work (5 dc, ch2, 5 dc) in the corner ch-1 created at the end of the mesh row for a symmetrical scallop corner. Repeat on all four sides. (Shells per long edge: 18 shells approx; short edges: 4 shells)
Info :
Maintain consistent shell placement: each shell is worked into a ch-2 space or into a corner chain to create neat scallops. Use pins to hold shells in shape while you continue the next round.
Round 3 :
Round 2 repeat with picot finishing: Into each 5-dc shell, sl st into first dc, ch3, sl st into 3rd ch (picot), then sl st to shell center, sc between shells; this creates a delicate picot edge on each scallop. Fasten off and weave ends. (Scallops total around = 2 long edges x 18 + 2 short edges x 4 = 44 scallops)
Info :
Block scalloped border again to shape points. This border gives the runner its finished, frilly edge and frames the appliques beautifully.
— Large Layered Rosette (Make 3) :
Round 1 :
Make a magic ring. Ch2 (counts as hdc), work 10 hdc into ring, pull tight and join with sl st to first hdc. (11 hdc)
Round 2 :
Ch1, 2 sc in same st, *sc in next st, 2 sc in next st; rep around; join. (Total: 16 sc) [Pattern: (1 sc, inc) x 8 = 16]
Round 3 :
Ch2, *hdc in next st, ch1; rep around inserting a small open chain between petals; join. (16 hdc separated by 16 ch-1 sps)
Info :
Round 3 sets initial petal separation; keep picot spacing even. This small open row will allow the next rounds to sit raised.
Round 4 :
Working into each hdc and ch-1 space: *(sc, hdc, 3 dc, hdc, sc) into each repeat space; rep around; join with sl st. This creates the first larger petal round. (16 petals)
Round 5 :
Ch2, turn to work a second layered round: Into the back of each petal work (sc, 2hdc, 3dc, 2hdc, sc) for more lift (16 larger petals). Join. (Petal count maintained = 16)
Round 6 :
Change to variegated lavender if not already used. Ch1, join at petal base and work *sl st to center of next petal, ch5, sl st back into the base to create small looped petals; rep around to create a frilled intermediate layer. (16 looped petals)
Info :
Use a slightly smaller hook (2.75-3.0mm) for the tighter inner rounds to increase petal definition. Steam-block each rosette flat but allow center to remain slightly domed for 3D effect.
Round 7 :
In a contrasting pale lilac, work a final top layer of tiny petals: join at center between two petals, *(ch2, puff in same base, ch1) repeat 3 times to create cluster, sl st to next base; rep around to make a textured top. Total clusters = 16 clusters. Fasten off leaving long tail for sewing. (16 clusters)
Round 8 :
Assembly Info: Layer rounds 4 & 5 then place round 7 on top; use long tail to mattress stitch through central hole and shank layers together with a small neat gather so the rosette retains a slightly raised center. Sew securely with matching yarn. Block gently into a rounded rosette shape.
Info :
Make 3 rosettes total. Vary color intensity slightly across the three for visual depth — one slightly darker variegated lavender, one medium, one paler — for the same large layered look as pictured.
— Medium Floral Motif (Make 4) :
Round 1 :
Magic ring, ch1, work 8 sc into ring, pull tight, join (8 sc).
Round 2 :
Ch1, (inc) in each st around — 2 sc in each st — join. (16 sc)
Round 3 :
Ch2, *dc in next st, ch1; rep around to create spaces for petals. (16 dc with 16 ch-1 sps)
Round 4 :
Into each dc work (sc, 3 dc, sc) to form rounded petals — 16 petals. Join. (16 petals)
Info :
Work final petal edges with a slip stitch edge around each petal to firm up the shape. Block flat but allow slight cupping in the center for lifting when sewn to the mesh.
Round 5 :
Ch1, join pale lavender to the center and work a finishing picot round: *ch3, sl st into base to create tiny decorative points around center; rep 16 times. Fasten off leaving tail for sewing. (16 picots)
Info :
Make 4 of these medium motifs. They are sized to sit beside large rosettes and help fill the composition without overpowering the focal flowers.
— Small Five-Petal Flower (Make 6) :
Round 1 :
Make a magic ring, ch1, 5 sc into ring, pull tight, join with sl st. (5 sc)
Round 2 :
*Ch4, sl st into next sc to form a looped petal; rep from * around to create 5 looped petals. Finish with sl st and fasten off leaving tail for sewing. (5 petals)
Info :
These tiny flowers are purely decorative. Work in a slightly lighter hand (looser tension) so they lay flat on the mesh. Make 6 of them in mixed lilac and variegated lavender shades.
— Bud Cluster (Make 8) :
Round 1 :
Ch6, join into ring with sl st. Ch1, 8 sc into ring, join. (8 sc)
Round 2 :
Ch1, *puff stitch (yo, insert, yo, pull loop x4, yo and draw through all loops), picot (ch2 sl st) into next st; rep 8 times to create tight clustered puff buds. Fasten off leaving long tail for attaching three or more puffs into compact clusters. (8 puffs)
Info :
Use deeper lavender for inner buds and paler for outer buds to simulate depth. Sew clusters so they wobble slightly for a natural look.
— Leaf (Make 12) :
Round 1 :
Ch9, sc in 2nd ch from hook, hdc in next, dc in next 3 chs (center increase), hdc in next, sc in next, sl st in last ch to form one side. Turn and work along opposite side into remaining foundation ch: sc, hdc, dc3, hdc, sc, join at base. This creates an elongated leaf. (Total: 10-12 sts per side depending on dc cluster)
Round 2 :
Ch1, turn leaf to work decorative veins: *sl st into each central dc to draw vein, then work two rows of FPdc down center (three FPdc rows total) to raise the midrib; rep. Fasten off leaving long tail for sewing. (Leaf width: 7-9 dc equivalents)
Info :
Leaves are worked in sage green. Use BLO on one side for a slightly raised rim if desired. Make 12 leaves in mixed sizes: 8 standard and 4 small (reduce foundation chain to ch7 for small leaves).
— Corded Vine (Make 6) :
Round 1 :
Make foundation chain to desired vine length, for photographed runner each vine is worked to approx 22-30" equivalent: ch between 70–100 chains depending on spacing. Optional: make vine in separate segments of 30–40 ch and join with sl st to achieve the full length.
Round 2 :
Row: Into 2nd ch from hook work sc across to form a thin cord; for a firmer rope, use two rounds of sc: round 1 sc across, round 2 sc in BLO to tighten. Fasten off leaving long tail. (Cord width: 1–2 sc)
Round 3 :
Info: For a braided vine appearance, work three thinner cords and braid them loosely then tack-baste with matching yarn to maintain placement. Alternatively, use single cord with occasional sc loops to mimic tendrils.
Round 4 :
Optional: Add small leaf sprigs to the vine by crocheting small ch5 loops and anchoring them at intervals with sc and a small leaf motif. Fasten off.
Info :
Make 6 vines in various lengths. Blending full-length vines and shorter sprouts will create a natural composition when arranging motifs on the mesh base.
— Small Half-Rounded Petal (Accent pieces - Make 10) :
Round 1 :
Ch6, sl st in 2nd ch from hook and across 4 chs to create small bar, ch2 then work 5 sc across bar to make small padded petal; fasten off leaving tail for tacking onto mesh. (Small padded petal = 5 sc)
Info :
These are used between larger motifs to add texture. Work in pale lilac and sew directly to mesh through back loops only so they lift slightly from the base.
— Assembly Prep and Pinning :
Info :
Before sewing any motif, block each piece flat. Lay out the base mesh and pin the scalloped border into final shape. Place large rosettes first: two near either end and one central offset as in the photo. Arrange medium flowers, small flowers, bud clusters, leaves and vines between large motifs with natural spacing. Allow for negative space: do not overcrowd. Use pins to hold everything in place for at least 30 minutes to preview composition.
Info :
Note the photo shows vine paths crossing lightly over mesh and some leaves tucked partially under petals. Arrange so the dimensional elements cast small shadows for depth.
— Sewing Motifs to Mesh :
Round 1 :
Sew large rosettes using long tail and mattress stitch through the dense center round and the underlying mesh ch-2 spaces. Use 10–12 secure whip stitches around each rosette base. Hide tail ends by weaving 2" through the underside of the mesh. Repeat for 3 rosettes.
Round 2 :
Sew medium motifs with 6–8 small whip stitches through the outermost sc round into adjacent ch-2 mesh openings. Ensure petals are not constrained by stitches — anchor at petal bases only to preserve 3D effect.
Info :
Sew small five-petal flowers and bud clusters last, using a few secure stitches at the center and one or two at petal edges to keep them from spinning. Sew leaves with stitches along the central vein to create stable attachment.
Round 3 :
Attach cord vines by sewing at three points along each vine: at both ends and one mid-point. Gently curve vines and tack small leaves and buds to them as you go. If braiding cords, secure the braid ends to the mesh with a few hidden stitches so they do not unravel.
Info :
When sewing through mesh, catch only a few threads of the mesh to avoid distorting pattern. Use short, even stitches and avoid pulling yarn tight — maintain slight lifting of motifs to keep a lace-like dimensional look.
— Final Touches and Blocking :
Round 1 :
Once all motifs are sewn, place the entire runner on a flat blocking board or towel. Pin each scallop and floral edge to shape, ensuring the scalloped border points are even and the overall runner is symmetrical. Spray lightly with water and allow to dry completely. Steam-block very gently if needed but avoid flattening petals.
Round 2 :
Weave in all remaining tails, trimming close. Use a fabric-safe adhesive sparingly on particularly loose attachment points if desired, then hide adhesive with a few extra stitches. Inspect front and back for loose ends and tidy seams.
Info :
Optionally add a few hand-stitched French knots with embroidery thread in the center of medium flowers to add more focal interest. Use a matching color so the effect is subtle and textured rather than contrasting.
— Blocking & Care :
Info :
Hand wash gently in lukewarm water with mild detergent; reshape and pin flat to dry. Avoid tumble drying. For long-term storage, lay flat with acid-free tissue to protect raised petals. Re-block before display if storage causes slight distortion.
Info :
If you wish to reduce curling of petals over time, add a small dab of diluted fabric stiffener inside the base layer before final attachment — test on a scrap first.
Finishing this runner is incredibly satisfying — each layered rosette and carefully placed leaf contributes to a garden-like tapestry that will brighten any table. The airy open mesh gives the piece elegance while the raised flowers provide delightful texture. This project is perfect for creating a memorable gift or a cherished heirloom for your home. 🧶🌸 Let each petal tell a story and enjoy the meditative rhythm of stitch, block, and arrange. Happy crocheting! ✨